
Hyper-V下安装Ossim系统
WindowsServer2008Hyper-V下安装Ossim系统
背景:很多朋友在用Hyper-v安装Linux的时候总是抱怨速度很慢,而且装好了系统无法识别网卡,可实际上针对网卡的问题本文提出了一个可行的解决办法。
注意,如果是WindowsServer2008R2ServerCore的系统安装Hyper-V要稍微复杂,本文不在叙述,本文中提出的解决办法只适用于测试环境,而不建议在生产环境使用。
环境:
硬件:服务器选用64位
操作系统:WindowsServer2008R2
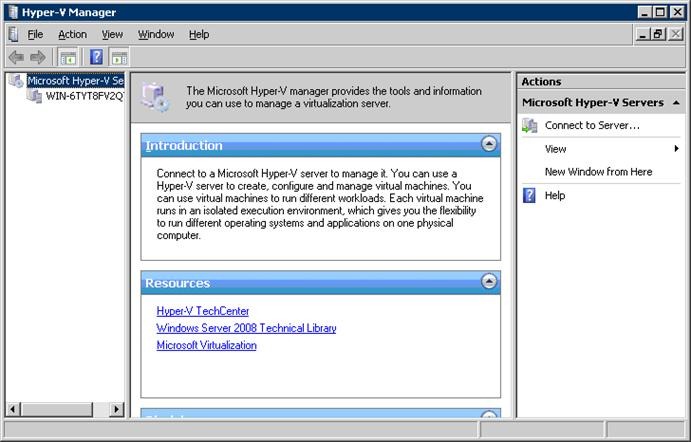 650) this.width=650;" title="clip_image002" style="border-top:0px;border-right:0px;background-image:none;border-bottom:0px;border-left:0px;padding-top:0px;padding-left:0px;padding-right:0px;" border="0" alt="clip_image002" src="http://img1.51cto.com/attachment/201311/1/350944_1383270602hTZw.jpg" height="559" />
然后新建虚拟机
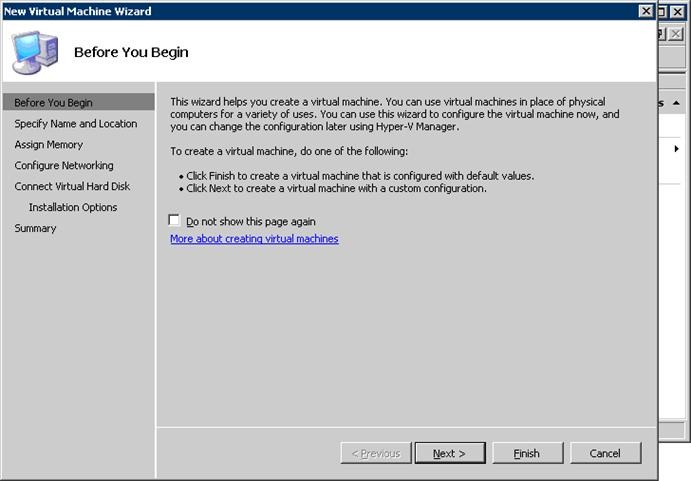 650) this.width=650;" title="clip_image004" style="border-top:0px;border-right:0px;background-image:none;border-bottom:0px;border-left:0px;padding-top:0px;padding-left:0px;padding-right:0px;" border="0" alt="clip_image004" src="http://img1.51cto.com/attachment/201311/1/350944_1383270604RXF2.jpg" height="610" />
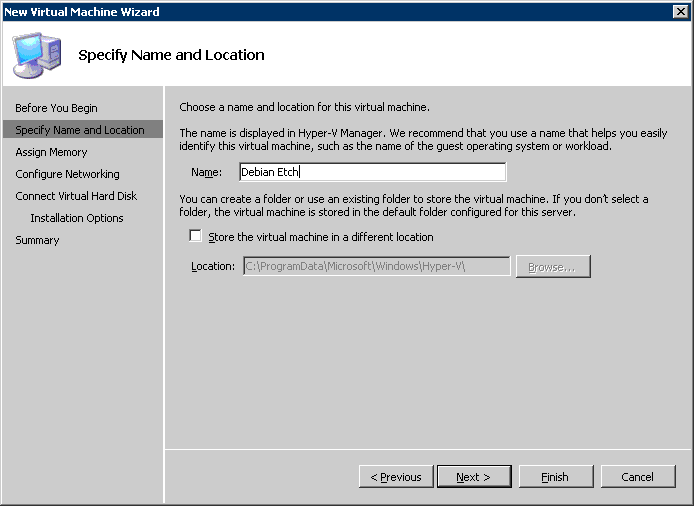
输入名称
 650) this.width=650;" title="clip_image005" style="border-top:0px;border-right:0px;background-image:none;border-bottom:0px;border-left:0px;padding-top:0px;padding-left:0px;padding-right:0px;" border="0" alt="clip_image005" src="http://img1.51cto.com/attachment/201311/1/350944_13832706069Ar9.gif" height="633" />
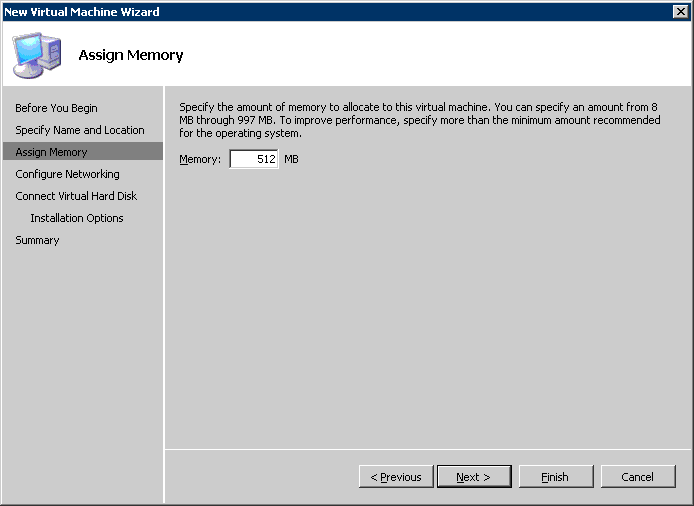
设置内存大小
 650) this.width=650;" title="clip_image006" style="border-top:0px;border-right:0px;background-image:none;border-bottom:0px;border-left:0px;padding-top:0px;padding-left:0px;padding-right:0px;" border="0" alt="clip_image006" src="http://img1.51cto.com/attachment/201311/1/350944_1383270607pAmP.gif" height="618" />
网络初始化配置
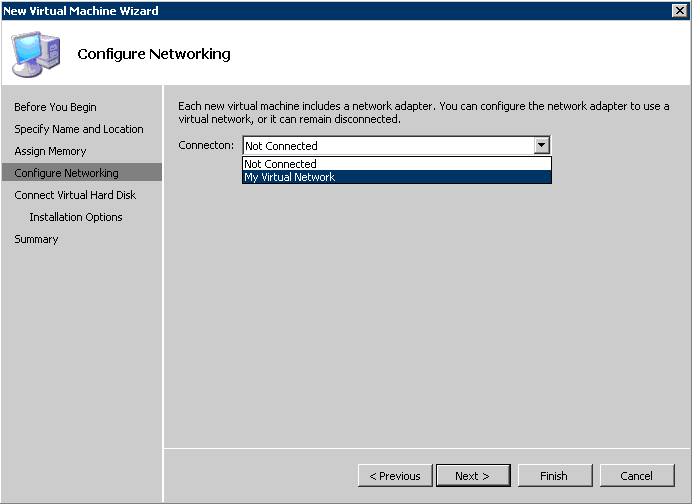 650) this.width=650;" title="clip_image007" style="border-top:0px;border-right:0px;background-image:none;border-bottom:0px;border-left:0px;padding-top:0px;padding-left:0px;padding-right:0px;" border="0" alt="clip_image007" src="http://img1.51cto.com/attachment/201311/1/350944_1383270608SicJ.gif" height="604" />
为设置磁盘大小
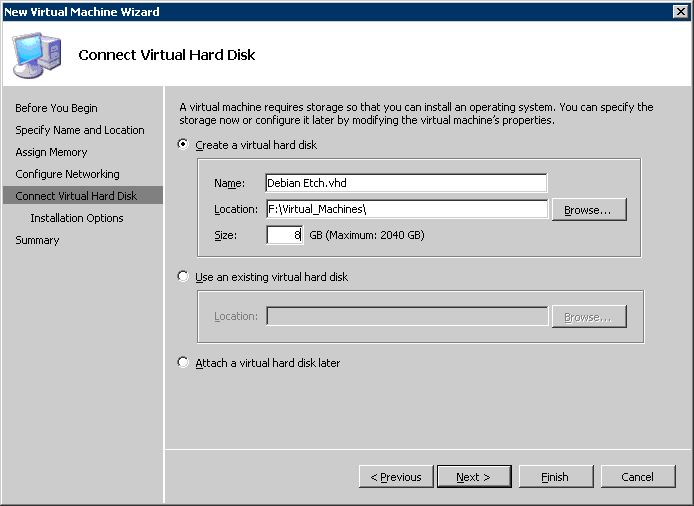 650) this.width=650;" title="clip_image008" style="border-top:0px;border-right:0px;background-image:none;border-bottom:0px;border-left:0px;padding-top:0px;padding-left:0px;padding-right:0px;" border="0" alt="clip_image008" src="http://img1.51cto.com/attachment/201311/1/350944_1383270609qj1U.gif" height="601" />
选择下一步,选取安装的ISO文件,如果是vmware虚拟机到这一步也就完成了,对于hyperv则需要继续配置网络
首先添加virtualswitch,然后要安装一个所谓传统的老式网络适配器,
Hyper-V管理中选择菜单点选虚拟网络管理,选择External网络,并添加。
 650) this.width=650;" title="clip_image009" style="border-top:0px;border-right:0px;background-image:none;border-bottom:0px;border-left:0px;padding-top:0px;padding-left:0px;padding-right:0px;" border="0" alt="clip_image009" src="http://img1.51cto.com/attachment/201311/1/350944_138327060902FE.gif" height="358" />
然后取一个名字,例如MyVirtualNetwork,
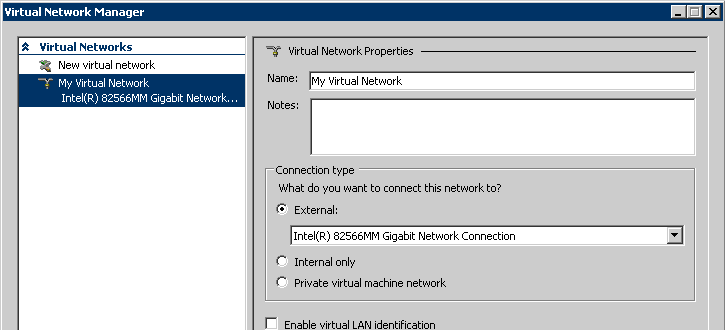 650) this.width=650;" title="clip_image010" style="border-top:0px;border-right:0px;background-image:none;border-bottom:0px;border-left:0px;padding-top:0px;padding-left:0px;padding-right:0px;" border="0" alt="clip_image010" src="http://img1.51cto.com/attachment/201311/1/350944_1383270610XBzf.gif" height="391" />
下面向导也帮不上你什么忙了,这时需要手动安装网卡适配器,好像回到了Windows9x时代安装驱动。呵呵
在Hyper-v管理中选择添加硬件
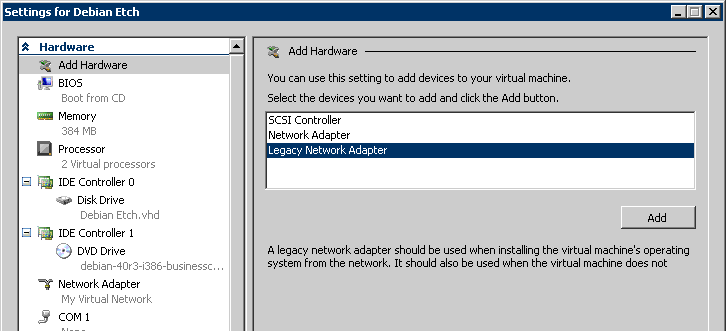 650) this.width=650;" title="clip_image011" style="border-top:0px;border-right:0px;background-image:none;border-bottom:0px;border-left:0px;padding-top:0px;padding-left:0px;padding-right:0px;" border="0" alt="clip_image011" src="http://img1.51cto.com/attachment/201311/1/350944_13832706116IJe.gif" height="385" />
选择“LegacyNetworkAdapter”传统网络适配器,接着配置网络
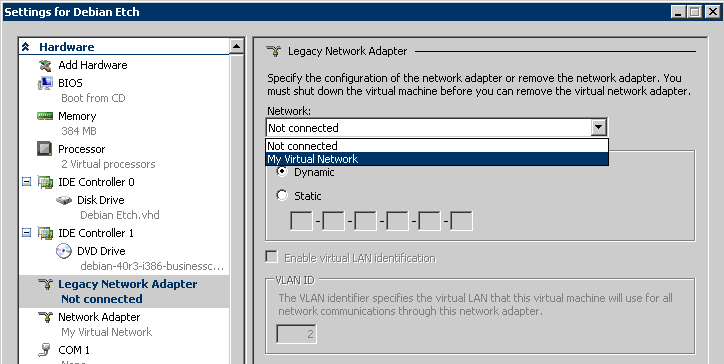 650) this.width=650;" title="clip_image012" style="border-top:0px;border-right:0px;background-image:none;border-bottom:0px;border-left:0px;padding-top:0px;padding-left:0px;padding-right:0px;" border="0" alt="clip_image012" src="http://img1.51cto.com/attachment/201311/1/350944_13832706128sve.gif" height="425" />
当配置好网卡后,大家就可以正常安装Ossim4.x系统了,不过整个安装过程比较缓慢,需要有点耐心哦。
另外需要注意的是,irqbalance这个进程在多核系统中比较重要,用于优化中断分配,不过在本文涉及环境却有些问题,需要做些修改,登陆系统做如下操作:
#rm/etc/rc2.d/S06irqbalance
#rm/etc/rc3.d/S06irqbalance
本文出自 “李晨光原创技术博客” 博客,请务必保留此出处http://chenguang.blog.51cto.com/350944/1318153
Hyper-V下安装Ossim系统的更多相关文章
- HYPER -V 独立安装的 2016版本 中文版 下载好慢啊
HYPER -V 独立安装的 2016版本 中文版 下载好慢啊
- VirtualBox下安装CentOS7系统
本文假定你已经知道如何安装VirtualBox虚拟机软件,并且已经安装好了. 首先我们需要准备好centos的iso镜像文件,可以从centos的官网下载. 以下操作使用的VirtualBox版本号是 ...
- VMware安装与VMware下安装CentOS系统
1.下载安装VMware,我安装的是VMware 12.VMware从11开始不再支持32位系统,32位系统请安装VMware10. VMware官方功能特性介绍http://www.vmware.c ...
- 如何在Windows环境下安装Linux系统虚拟机
如何在Windows环境下安装Linux系统虚拟机 本篇经验写给想要入门学习C语言的小白们.Windows系统因为使用窗口图形化,操作简单,功能多样,所以我们在Windows环境下可以做到很多,但想要 ...
- (转)VirtualBox下安装CentOS7系统
转:https://www.cnblogs.com/hihtml5/p/8217062.html 本文假定你已经知道如何安装VirtualBox虚拟机软件,并且已经安装好了. 首先我们需要准备好cen ...
- 【转】[教程]在 win7 / win8 下安装苹果系统 (懒人版)
前言 这篇安装教程的素材在国庆就准备好了,但那时学习任务比较重,没有时间发帖,一直拖到现在.趁这个周末有空,赶紧写完它,希望能帮助一些景友. 论坛已经有不少安装教程,如果对这篇安装教程有疑问可以去 ...
- 旧贴-在 win7 / win8 下安装苹果系统 (懒人版)
前言 该文转载自远景论坛,发布时间2012年,仅供学习参考 这篇安装教程的素材在国庆就准备好了,但那时学习任务比较重,没有时间发帖,一直拖到现在.趁这个周末有空,赶紧写完它,希望能帮助一些景友. 论坛 ...
- 硬盘下安装Ghost系统简易教程
硬盘安装器下载:https://eyun.baidu.com/s/3c2NvcvI 密码:Cv7F 使用本方法可在没有光驱.光盘.启动U盘等任何系统安装设备的情况下安装Ghost版XP.Win7/8/ ...
- VMware下安装Linux系统,ORACLE软件,DBCA建库
操作系统安装 在vmware下安装Linux (OEL5.6),用于数据库服务器 1.打开vmware,选择"创建新的虚拟机" 2.选择自定义安装 3.选择虚拟 ...
随机推荐
- C# 理解lock
本文为转载 .. 一. 为什么要lock,lock了什么? 当我们使用线程的时候,效率最高的方式当然是异步,即各个线程同时运行,其间不相互依赖和等待.但当不同的线程都需要访问某个资源的时候,就需要同步 ...
- ant中copy操作学习心得(转)
Ant真是太方便了,以前都没注意到它.功能很强大,能创建数据库,配置服务器,部署发布应用……只需要写好build.xml文件,剩下的就交给ant来“安装”你的WEB应用了. Appfuse的第一个an ...
- Linux进程内存分析pmap命令(转)
名称: pmap - report memory map of a process(查看进程的内存映像信息)用法 pmap [ -x | -d ] [ -q ] pids... ...
- mysql多表字段名重复的情况
CREATE TABLE `card` ( `id` ) unsigned NOT NULL AUTO_INCREMENT, `json_str` ) NOT NULL, `f` ,) unsigne ...
- [实变函数]3.2 可测集 (measurable set)
1 $\bbR^n$ 中集合 $E$ 称为可测的 (measurable), 如果 $$\bee\label{3.2:Caratheodory} m^*T=m^*(T\cap E)+m^*(T\cap ...
- 树莓派用USB蓝牙适配器连接蓝牙设备
下面分享如何配置蓝牙设备.1.连接蓝牙适配到Rpi板子usb上,安装相关蓝牙服务器和驱动 lsusb 查看设备是不是被发现 pi @RaspberryPi ~ $ lsusb Bus 001 Devi ...
- Rstudio匹配中文
之前在操作csv文件时一般是将中文字符在excel或用Perl将其中的中文转换成对应的英文,但是最近碰到不得不在R里面进行中文符操作,发现R里面的匹配是无法识别的中文符的.比如: df <- r ...
- python 批量重命名文件后缀
# batch_file_rename.py # Created: 6th August 2012 ''' This will batch rename a group of files in a g ...
- 第一个APP:IOS做简单运算的计算器
步骤: 1.打开Xcode,单机Creat a new Xcode project 2.左边选择ios下Application,右边选择single view Application 3.填写项目名称 ...
- Python & MapReduce
使用Python实现Hadoop MapReduce程序 原文请参考: http://blog.csdn.net/zhaoyl03/article/details/8657031/ 下面只是将mapp ...