Elasticsearch6.4.3安装
Linux内存一定要1g以上!
首先要有jdk环境 要求1.8版本以上 elasticsearch是Java写的
将上传的 elasticSearch安装包解压
cd /home/elasticsearch/elasticsearch-6.4.3/config
1、 修改elasticsearch.yml
network.host: 192.168.91.7
http.port:9200 #这是HTTP协议外部通信的端口号 9300内部通信端口号
如果此时启动,会报错 root不能启动的哦 不能通过root账号启动 这是属于自身的安全策略,解决方案,非root就可以了哈哈
因为安全问题elasticsearch 不让用root用户直接运行,所以要创建新用户
首先创建个分组: groupadd esUsers
useradd esUser01 -g esUsers -p 123
chown -R esUser01:esUsers elasticsearch-6.4.3
su esUser01 #切换登录用户
【参考:
第一步:liunx创建新用户 adduser esUsers 然后给创建的用户加密码 passwd XXX 输入两次密码。
第二步:切换刚才创建的用户 su esUsers 然后执行elasticsearch 会显示Permission denied 权限不足。
第三步:给新建的XXX赋权限,chmod 777 * 这个不行,因为这个用户本身就没有权限,肯定自己不能给自己付权限。所以要用root用户登录付权限。
第四步:root给esUser赋权限,chown -R XXX /你的elasticsearch安装目录。
然后执行成功。】
这样启动仍然是会报错的
ERROR: [4] bootstrap checks failed
[1]: max file descriptors [4096] for elasticsearch process is too low, increase to at least [65536]
[2]: max number of threads [1024] for user [esUser01] is too low, increase to at least [4096]
[3]: max virtual memory areas vm.max_map_count [65530] is too low, increase to at least [262144]
[4]: system call filters failed to install; check the logs and fix your configuration or disable system call filters at your own risk
[2019-01-21T00:53:47,296][INFO ][o.e.n.Node ] [qKdHOzq] stopping ...
[2019-01-21T00:53:47,329][INFO ][o.e.n.Node ] [qKdHOzq] stopped
[2019-01-21T00:53:47,330][INFO ][o.e.n.Node ] [qKdHOzq] closing ...
[2019-01-21T00:53:47,355][INFO ][o.e.n.Node ] [qKdHOzq] closed
[2019-01-21T00:53:47,361][INFO ][o.e.x.m.j.p.NativeController] Native controller process has stopped - no new native processes can be started
解决方案:
用root权限去做!
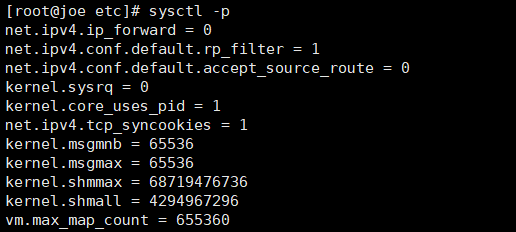
vi /etc/sysctl.conf
添加: vm.max_map_count=655360 然后保存
然后 cd /etc
输入: sysctl -p
继续启动,继续报错:
ERROR: [3] bootstrap checks failed
[1]: max file descriptors [4096] for elasticsearch process is too low, increase to at least [65536]
[2]: max number of threads [1024] for user [esUser01] is too low, increase to at least [4096]
[3]: system call filters failed to install; check the logs and fix your configuration or disable system call filters at your own risk
[2019-01-21T01:03:48,953][INFO ][o.e.n.Node ] [qKdHOzq] stopping ...
[2019-01-21T01:03:48,988][INFO ][o.e.n.Node ] [qKdHOzq] stopped
[2019-01-21T01:03:48,988][INFO ][o.e.n.Node ] [qKdHOzq] closing ...
[2019-01-21T01:03:49,010][INFO ][o.e.n.Node ] [qKdHOzq] closed
[2019-01-21T01:03:49,017][INFO ][o.e.x.m.j.p.NativeController] Native controller process has stopped - no new native processes can be started
解决方案:继续用root去修改
vi /etc/security/limits.conf
加入:
* soft nofile 65536
* hard nofile 131072
* soft nproc 2048
* hard nproc 4096
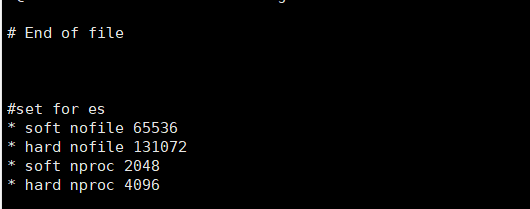
必须重启! 重启才可以生效
继续报错!
[1]: max number of threads [1024] for user [esUser01] is too low, increase to at least [4096]
解决:root下
vi /etc/security/limits.d/90-nproc.conf
在操作时候竟然出现了错误:
Exception in thread "main" 2019-01-21 00:46:41,393 main ERROR No Log4j 2 configuration file found. Using default configuration (logging only errors to the console), or user programmatically provided configurations. Set system property 'log4j2.debug' to show Log4j 2 internal initialization logging. See https://logging.apache.org/log4j/2.x/manual/configuration.html for instructions on how to configure Log4j 2
ElasticsearchParseException[malformed, expected end of settings but encountered additional content starting at line number: [59], column number: [1]]; nested: MarkedYAMLException[expected '<document start>', but found BlockMappingStart
in 'reader', line 59, column 1:
http.port: 9200
^
at [Source: sun.nio.ch.ChannelInputStream@5fbe4146; line: 59, column: 1]]; nested: ParserException[expected '<document start>', but found BlockMappingStart
in 'reader', line 59, column 1:
http.port: 9200
^
];
at org.elasticsearch.common.settings.Settings.fromXContent(Settings.java:685)
at org.elasticsearch.common.settings.Settings.access$500(Settings.java:84)
at org.elasticsearch.common.settings.Settings$Builder.loadFromStream(Settings.java:1188)
at org.elasticsearch.common.settings.Settings$Builder.loadFromPath(Settings.java:1165)
at org.elasticsearch.node.InternalSettingsPreparer.prepareEnvironment(InternalSettingsPreparer.java:100)
at org.elasticsearch.cli.EnvironmentAwareCommand.createEnv(EnvironmentAwareCommand.java:95)
at org.elasticsearch.cli.EnvironmentAwareCommand.execute(EnvironmentAwareCommand.java:86)
at org.elasticsearch.cli.Command.mainWithoutErrorHandling(Command.java:124)
at org.elasticsearch.cli.Command.main(Command.java:90)
at org.elasticsearch.bootstrap.Elasticsearch.main(Elasticsearch.java:93)
at org.elasticsearch.bootstrap.Elasticsearch.main(Elasticsearch.java:86)
Caused by: com.fasterxml.jackson.dataformat.yaml.snakeyaml.error.MarkedYAMLException: expected '<document start>', but found BlockMappingStart
in 'reader', line 59, column 1:
http.port: 9200
^
这个错误竟然是空格造成的! 醉了 这种格式 很让人不开心啊
解决方案:

启动,继续报错!!
system call filters failed to install; check the logs and fix your configuration or disable system call filters at your own risk
分析和解决:
出现错误的原因:是因为centos6.x操作系统不支持SecComp,而elasticsearch 5.5.2默认bootstrap.system_call_filter为true进行检测,所以导致检测失败,失败后直接导致ES不能启动。
在elasticsearch.yml中添加配置项:bootstrap.system_call_filter为false:
bootstrap.system_call_filter: false
此时可以完美解决了!
启动成功!

关闭防火墙后访问:
http://192.168.91.7:9200/
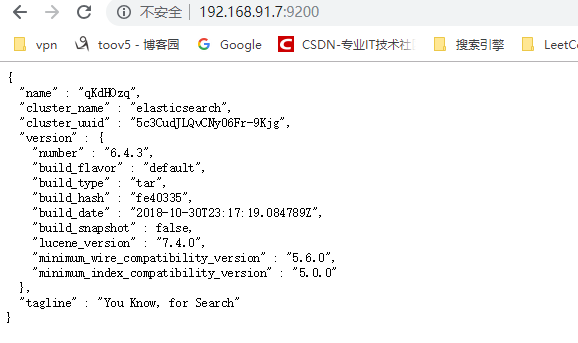
9200端口可以提供Restful api接口 进行增删改查操作
下面安装可视化界面: Kibana
Kibana是一个开源的分析和可视化平台,设计用于和Elasticsearch一起工作。
你用Kibana来搜索,查看,并和存储在Elasticsearch索引中的数据进行交互。
你可以轻松地执行高级数据分析,并且以各种图标、表格和地图的形式可视化数据。
Kibana使得理解大量数据变得很容易。它简单的、基于浏览器的界面使你能够快速创建和共享动态仪表板,实时显示Elasticsearch查询的变化。
解压安装包后修改配置文件:
vim config/kibana.yml
# 将默认配置改成如下:
server.port: 5601
server.host: "192.168.91.7"
elasticsearch.url: "http:// 192.168.91.7:9200" # 如果是集群 写集群地址
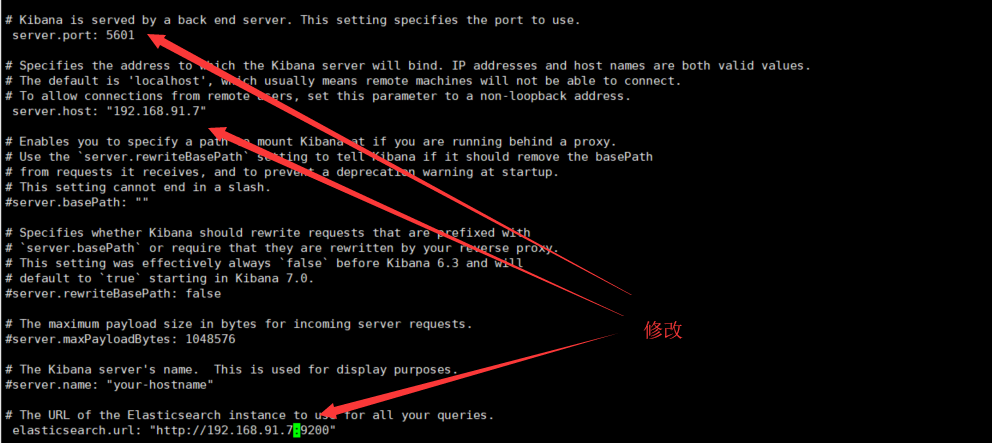
(自己的ip端口号 和 读取的 es的ip端口号)
启动Kibana
./bin/kibana
http://192.168.91.7:5601/app/kibana

1.查找ES进程
ps -ef | grep elastic
2.杀掉ES进程
kill -9 2382(进程号)
3.重启ES
sh elasticsearch -d
Elasticsearch6.4.3安装的更多相关文章
- elasticsearch-6.0.1安装
elasticsearch-6.0.1安装 0. 介绍: ElasticSearch是一个基于Lucene的搜索服务器.它提供了一个分布式多用户能力的全文搜索引擎:是目前全文搜索引擎的首选. ...
- (新)elasticsearch6.0版本安装head插件
ES6.0版本安装head插件 1.1 前言 不知道是我电脑问题还是最近的开源软件都比较**,mysql和elasticsearch新版本变动都比较大. elasticsearch6.0貌似已经不支持 ...
- ElasticSearch6学习(1)-安装Elasticsearch
安装准备: 安装Elasticsearch唯一的要求是安装Java8,包括对应的Jdk.其他java9/java10没尝试,考虑兼容问题.我这里只用了java8 安装java8可以参考我之前写的一篇文 ...
- elasticsearch6.6.0安装配置及elasticsearch-head插件安装
一.最小化安装centos7.6 cat /etc/redhat-release 二.配置网络,可以上外网 三.安装常用命令工具,修改系统时区,校对系统时间,关闭selinux,关闭firewalld ...
- elasticsearch6.0版本安装head插件
ES6.0版本安装head插件 1.1 前言 不知道是我电脑问题还是最近的开源软件都比较**,mysql和elasticsearch新版本变动都比较大. elasticsearch6.0貌似已经不支持 ...
- ES之一:Elasticsearch6.4 windows安装 head插件ik分词插件安装
准备安装目标:1.Elasticsearch6.42.head插件3.ik分词插件 第一步:安装Elasticsearch6.4 下载方式:1.官网下载 https://www.elastic.co/ ...
- (转)elasticsearch6.0版本安装head插件
1.1 前言 不知道是我电脑问题还是最近的开源软件都比较**,mysql和elasticsearch新版本变动都比较大. elasticsearch6.0貌似已经不支持命令行安装head插件了,反正我 ...
- ElasticSearch6.2.3安装Head插件
1.环境 Linux centos7 elasticsearch-head的zip包,github网址如下:https://github.com/mobz/elasticsearch-head nod ...
- elasticsearch6 学习之安装
安装环境:centos6.5 64位 jdk1.8 elasticsearch6.1.1 一.启动 [root@localhost bin]# ./elasticsearch - ...
随机推荐
- HDOJ 5044 Tree
树链剖分裸题. . .. 又要扩栈又要输入挂还卡格式....真无语 Tree Time Limit: 10000/5000 MS (Java/Others) Memory Limit: 6553 ...
- [Spring Data MongoDB]学习笔记--_id和类型映射
_id字段的映射: MongoDB要求所有的document都要有一个_id的字段. 如果我们在使用中没有传入_id字段,它会自己创建一个ObjectId. { , "accounts&qu ...
- HashMap和ConcurrentHashMap的区别,HashMap的底层源码。
Hashmap本质是数组加链表.根据key取得hash值,然后计算出数组下标,如果多个key对应到同一个下标,就用链表串起来,新插入的在前面. ConcurrentHashMap:在hashMap的基 ...
- c# 如何利用异或运算进行简单加密解密
利用“^”异或运算对字符串进行加密 原理:按位做“异或”运算是->位值相同得1,不同得0,如下计算 1 ^ 1 = 0 1 ^ 0 = 1 0 ^ 1 = 1 0 ^ 0 = 0 例如: < ...
- (转)免费天气预报接口API以及全国所有地区代码!!
国家气象局提供的天气预报接口 接口地址: http://www.weather.com.cn/data/sk/101010100.html http://www.weather.com.cn/data ...
- SpringMVC流程架构图
[组件说明] 以下组件通常使用框架提供实现: 1.DisPatcherServlet:前端控制器(不需要程序员开发) 用户请求到达前端控制器,它相当于MVC模式中的C(Controller),Disp ...
- badboy脚本参数化和检查点
一.badboy脚本参数化 文本参数化 方式一:直接在Variablesl ist添加参数化变量和值,然后在Script里面找到对应需要参数化的内容-属性,进行替换,参数化名需要用${XX}引用: 方 ...
- standard pbr(二)
下一步看像素着色器代码 half4 fragBase (VertexOutputForwardBase i) : SV_Target { return fragForwardBaseInternal( ...
- 我的Android进阶之旅------>Android中查看应用签名信息
一.查看自己的证书签名信息 如上一篇文章<我的Android进阶之旅------>Android中制作和查看自定义的Debug版本Android签名证书>地址:http://blog ...
- Hexo+yilia博客首页不显示全文,显示more,截断文章。
个人主页:https://www.yuehan.online hexo new “xxx” 在md文档中 插入<!--more-->即可. 现在博客:www.wangyurui.top