RxJava + Retrofit源码解析
RxJava + Retrofit怎么请求网络,具体的用法这里就不讲了,本文只讲一些重点源码。
版本如下:
okhttp                         : "com.squareup.okhttp3:okhttp:3.10.0",

okhttp3_integration            : "com.github.bumptech.glide:okhttp3-integration:1.4.0@aar",

retrofit                       : "com.squareup.retrofit2:retrofit:2.4.0",

converter_gson                 : "com.squareup.retrofit2:converter-gson:2.3.0",

converter_scalars              : "com.squareup.retrofit2:converter-scalars:2.3.0",

converter_protobuf             : "com.squareup.retrofit2:converter-protobuf:2.3.0",

adapter_rxjava2                : "com.squareup.retrofit2:adapter-rxjava2:2.2.0",

logging_interceptor            : "com.squareup.okhttp3:logging-interceptor:3.10.0",

rxjava                         : "io.reactivex.rxjava2:rxjava:2.1.12",

rxandroid                      : "io.reactivex.rxjava2:rxandroid:2.0.2",
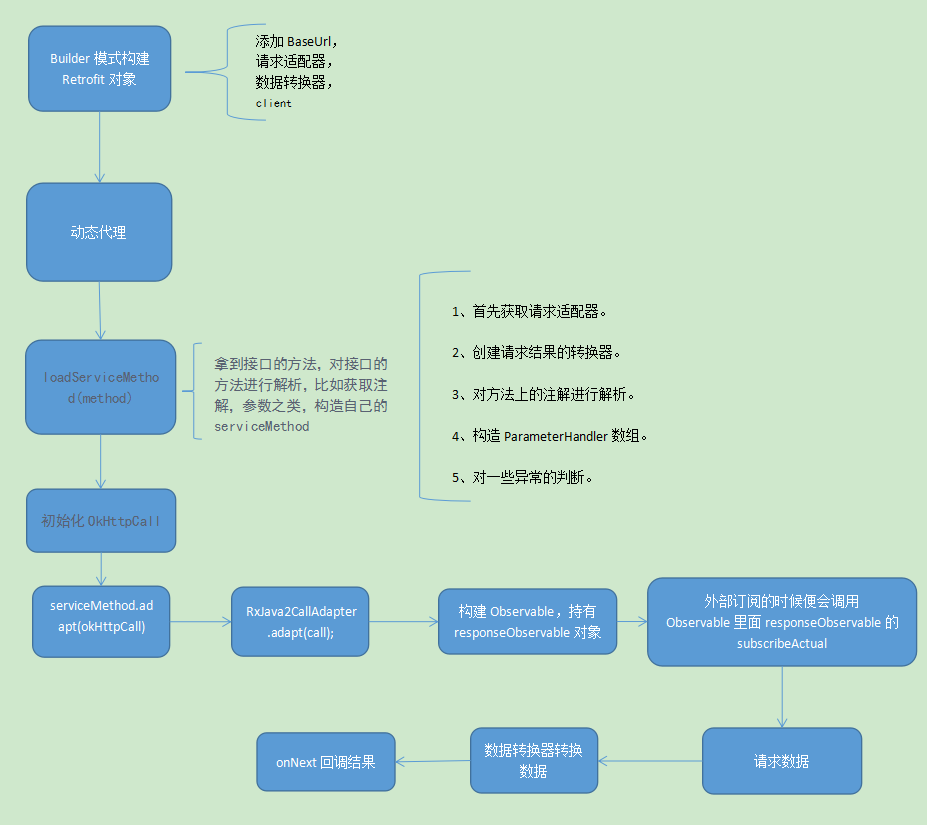
一、首先关于Retrofit的初始化:
private void initRetrofit() {

    ExtensionRegistry extensionRegistry = ExtensionRegistry.newInstance();

    retrofit = new Retrofit.Builder()

            .baseUrl(baseUrl) //设置地址

            .client(client.build()) //设置自定义的OkHttpClient

            .addConverterFactory(ProtoConverterFactory.createWithRegistry(extensionRegistry))

            .addConverterFactory(StringConverterFactory.create())

            .addConverterFactory(GsonConverterFactory.create(buildGson()))

            .addCallAdapterFactory(RxJava2CallAdapterFactory.create())

            .build();

    service = retrofit.create(ApiService.class);

}
.addConverterFactory(ProtoConverterFactory.createWithRegistry(extensionRegistry))
.addConverterFactory(StringConverterFactory.create())
.addConverterFactory(GsonConverterFactory.create(buildGson()))
.addCallAdapterFactory(RxJava2CallAdapterFactory.create())
添加了数据转换器与请求适配器。
Retrofit的初始化采用了Builder模式。
Retrofit.Builder()这一步,获取了一个平台,肯定就是Android()了,后面有地方会用到。
Builder(Platform platform) {

  this.platform = platform;

}

public Builder() {

  this(Platform.get());

}

class Platform {

  private static final Platform PLATFORM = findPlatform();

  static Platform get() {

    return PLATFORM;

  }

  private static Platform findPlatform() {

    try {

      Class.forName("android.os.Build");

      if (Build.VERSION.SDK_INT != 0) {

        return new Android();

      }

    } catch (ClassNotFoundException ignored) {

    }

    try {

      Class.forName("java.util.Optional");

      return new Java8();

    } catch (ClassNotFoundException ignored) {

    }

    return new Platform();

  }

}
在看最后的build();方法:
public Retrofit build() {

  if (baseUrl == null) {

    throw new IllegalStateException("Base URL required.");

  }

  okhttp3.Call.Factory callFactory = this.callFactory;

  if (callFactory == null) {

    callFactory = new OkHttpClient();

  }

  Executor callbackExecutor = this.callbackExecutor;

  if (callbackExecutor == null) {

    callbackExecutor = platform.defaultCallbackExecutor();

  }

  // Make a defensive copy of the adapters and add the default Call adapter.

  List<CallAdapter.Factory> callAdapterFactories = new ArrayList<>(this.callAdapterFactories);

  callAdapterFactories.add(platform.defaultCallAdapterFactory(callbackExecutor));

  // Make a defensive copy of the converters.

  List<Converter.Factory> converterFactories =

      new ArrayList<>(1 + this.converterFactories.size());

  // Add the built-in converter factory first. This prevents overriding its behavior but also

  // ensures correct behavior when using converters that consume all types.

  converterFactories.add(new BuiltInConverters());

  converterFactories.addAll(this.converterFactories);

  return new Retrofit(callFactory, baseUrl, unmodifiableList(converterFactories),

      unmodifiableList(callAdapterFactories), callbackExecutor, validateEagerly);

}
1、如果没有传入我们自定义的OkHttpClient,那么便会使用默认的。
2、如果没有设置自定义的回调执行器,那么便会是用默认的platform.defaultCallbackExecutor();点进入可以发现回调是默认在主线程中的:
static class Android extends Platform {

  @Override public Executor defaultCallbackExecutor() {

    return new MainThreadExecutor();

  }

  @Override CallAdapter.Factory defaultCallAdapterFactory(@Nullable Executor callbackExecutor) {

    if (callbackExecutor == null) throw new AssertionError();

    return new ExecutorCallAdapterFactory(callbackExecutor);

  }

  static class MainThreadExecutor implements Executor {

    private final Handler handler = new Handler(Looper.getMainLooper());

    @Override public void execute(Runnable r) {

      handler.post(r);

    }

  }

}
3、把我们设置的请求适配器添加进入,然后再添加一个默认的请求适配器。
4、添加进入一个默认的数据转换器,然后再被我们设置的数据转换器添加进去。
二、初始化好Retrofit后,再来看这一句:
service = retrofit.create(ApiService.class);
ApiService是一个接口,里面方法如下:
@GET

Observable<ResponseBody> doGet(@Url String url, @HeaderMap Map<String, String> headers, @QueryMap Map<String, String> map);
这个create方法可以说是核心,它运用的是动态代理。
@SuppressWarnings("unchecked") // Single-interface proxy creation guarded by parameter safety.

public <T> T create(final Class<T> service) {

  Utils.validateServiceInterface(service);

  if (validateEagerly) {

    eagerlyValidateMethods(service);

  }

  return (T) Proxy.newProxyInstance(service.getClassLoader(), new Class<?>[] { service },

      new InvocationHandler() {

        private final Platform platform = Platform.get();

        @Override public Object invoke(Object proxy, Method method, @Nullable Object[] args)

            throws Throwable {

          // If the method is a method from Object then defer to normal invocation.

          if (method.getDeclaringClass() == Object.class) {

            return method.invoke(this, args);

          }

          if (platform.isDefaultMethod(method)) {

            return platform.invokeDefaultMethod(method, service, proxy, args);

          }

          ServiceMethod<Object, Object> serviceMethod =

              (ServiceMethod<Object, Object>) loadServiceMethod(method);

          OkHttpCall<Object> okHttpCall = new OkHttpCall<>(serviceMethod, args);

          return serviceMethod.adapt(okHttpCall);

        }

      });

}
1、首先检测这是否是一个接口,只有接口才能对它进行动态代理。
2、是否需要对接口里面的方法进行初始化预加载,是的话便进行,这个与下面的有点重复,直接讲下面的。
3、return后面的语句便是动态代理的地方,它会代理接口的所有方法,也就是说,当我们调用ApiService的方法的时候,会被拦截,然后走到inoke这个方法做我们自己的操作。
关于动态代理,后面会单独讲。
4、接下来边看invoke方法:
(1)、首先判断该方法是否为Object这个类的方法,如果是,不拦截它,让他走原来的方法。
(2)、platform为Android,platform.isDefaultMethod(method)返回false,不用管它。
(3)、ServiceMethod<Object, Object> serviceMethod =(ServiceMethod<Object, Object>) loadServiceMethod(method);拿到接口的方法,对接口的方法进行解析,比如获取注解,参数之类,构造自己的serviceMethod
(4)、初始化OkHttpCall
(5)、调用serviceMethod.adapt(okHttpCall)进行请求(因为采用的是RxJava,所以这里并不会立即请求,只有被订阅的时候才会,等会会讲)
三、loadServiceMethod(method)方法:
构造自己的serviceMethod 也采用了Builder模式。
进入这个方法后,重点的一句:
result = new ServiceMethod.Builder<>(this, method).build();
先看:
Builder(Retrofit retrofit, Method method) {

  this.retrofit = retrofit;

  this.method = method;

  this.methodAnnotations = method.getAnnotations();

  this.parameterTypes = method.getGenericParameterTypes();

  this.parameterAnnotationsArray = method.getParameterAnnotations();

}
注:我们这里以前面定义的方法来讲解:
@GET

Observable<ResponseBody> doGet(@Url String url, @HeaderMap Map<String, String> headers, @QueryMap Map<String, String> map);
1、持有retrofit与原始的method对象。
2、获取方法上的注解,获取到的为:

3、获取参数类型,获取到的为:

4、获取参数上面的的注解,获取到的为:

再看build()方法:
public ServiceMethod build() {

  callAdapter = createCallAdapter();

  responseType = callAdapter.responseType();

  if (responseType == Response.class || responseType == okhttp3.Response.class) {

    throw methodError("'"

        + Utils.getRawType(responseType).getName()

        + "' is not a valid response body type. Did you mean ResponseBody?");

  }

  responseConverter = createResponseConverter();

  for (Annotation annotation : methodAnnotations) {

    parseMethodAnnotation(annotation);

  }

  if (httpMethod == null) {

    throw methodError("HTTP method annotation is required (e.g., @GET, @POST, etc.).");

  }

  if (!hasBody) {

    if (isMultipart) {

      throw methodError(

          "Multipart can only be specified on HTTP methods with request body (e.g., @POST).");

    }

    if (isFormEncoded) {

      throw methodError("FormUrlEncoded can only be specified on HTTP methods with "

          + "request body (e.g., @POST).");

    }

  }

  int parameterCount = parameterAnnotationsArray.length;

  parameterHandlers = new ParameterHandler<?>[parameterCount];

  for (int p = 0; p < parameterCount; p++) {

    Type parameterType = parameterTypes[p];

    if (Utils.hasUnresolvableType(parameterType)) {

      throw parameterError(p, "Parameter type must not include a type variable or wildcard: %s",

          parameterType);

    }

    Annotation[] parameterAnnotations = parameterAnnotationsArray[p];

    if (parameterAnnotations == null) {

      throw parameterError(p, "No Retrofit annotation found.");

    }

    parameterHandlers[p] = parseParameter(p, parameterType, parameterAnnotations);

  }

  if (relativeUrl == null && !gotUrl) {

    throw methodError("Missing either @%s URL or @Url parameter.", httpMethod);

  }

  if (!isFormEncoded && !isMultipart && !hasBody && gotBody) {

    throw methodError("Non-body HTTP method cannot contain @Body.");

  }

  if (isFormEncoded && !gotField) {

    throw methodError("Form-encoded method must contain at least one @Field.");

  }

  if (isMultipart && !gotPart) {

    throw methodError("Multipart method must contain at least one @Part.");

  }

  return new ServiceMethod<>(this);

}
1、首先获取请求适配器。
2、创建请求结果的转换器。
3、对方法上的注解进行解析。
4、构造ParameterHandler数组。
5、对一些异常的判断。
四、我们接下来对每一步进行讲解。
1、首先获取请求适配器:
private CallAdapter<T, R> createCallAdapter() {

  Type returnType = method.getGenericReturnType();

  if (Utils.hasUnresolvableType(returnType)) {

    throw methodError(

        "Method return type must not include a type variable or wildcard: %s", returnType);

  }

  if (returnType == void.class) {

    throw methodError("Service methods cannot return void.");

  }

  Annotation[] annotations = method.getAnnotations();

  try {

    //noinspection unchecked

    return (CallAdapter<T, R>) retrofit.callAdapter(returnType, annotations);

  } catch (RuntimeException e) { // Wide exception range because factories are user code.

    throw methodError(e, "Unable to create call adapter for %s", returnType);

  }

}
(1)、获取方法的返回类型,返回类型不能是void
(2)、获取方法上的注解。
(3)、调用retrofit.callAdapter(returnType, annotations)方法获取请求的适配器。(我们之前设置的请求适配器都在retrofit对象中)
里面关键的一步为:
int start = callAdapterFactories.indexOf(skipPast) + 1;

for (int i = start, count = callAdapterFactories.size(); i < count; i++) {

  CallAdapter<?, ?> adapter = callAdapterFactories.get(i).get(returnType, annotations, this);

  if (adapter != null) {

    return adapter;

  }

}
skipPast为null,所以start为0;
遍历我们之前设置给它的请求适配器,根据返回类型与方法上的注解去找,找到了便返回。(我们这里获取到的callAdapter为RxJava2CallAdapter)
2、创建请求结果的转换器:
responseConverter = createResponseConverter()
这个与获取请求的适配器的过程是类似的,因此这里就略过了。
3、解析方法上的注解:parseMethodAnnotation(annotation),我们用的是GET,所以下面会调用:
parseHttpMethodAndPath("GET", ((GET) annotation).value(), false);
我们这里value是空的,所以它只走了下面这些就返回了。
if (this.httpMethod != null) {

        throw methodError("Only one HTTP method is allowed. Found: %s and %s.",

            this.httpMethod, httpMethod);

      }

      this.httpMethod = httpMethod;

      this.hasBody = hasBody;

      if (value.isEmpty()) {

        return;

      }
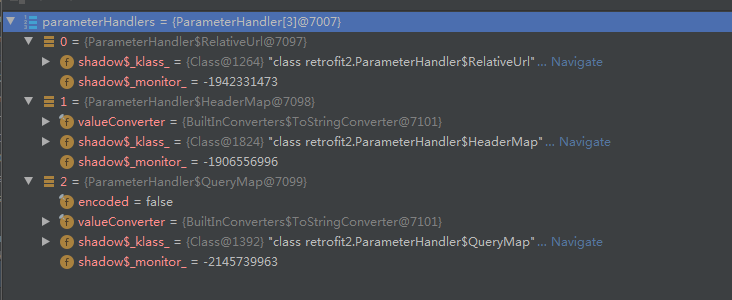
4、构造ParameterHandler数组
int parameterCount = parameterAnnotationsArray.length;

parameterHandlers = new ParameterHandler<?>[parameterCount];

for (int p = 0; p < parameterCount; p++) {

  Type parameterType = parameterTypes[p];

  if (Utils.hasUnresolvableType(parameterType)) {

    throw parameterError(p, "Parameter type must not include a type variable or wildcard: %s",

        parameterType);

  }

  Annotation[] parameterAnnotations = parameterAnnotationsArray[p];

  if (parameterAnnotations == null) {

    throw parameterError(p, "No Retrofit annotation found.");

  }

  parameterHandlers[p] = parseParameter(p, parameterType, parameterAnnotations);

}
主要是这一个方法:
parameterHandlers[p] = parseParameter(p, parameterType, parameterAnnotations);
p为序号,parameterType为方法的参数类型,parameterAnnotations为参数的注解。
里面就不细讲了,这里最终得到的是:
对于一些异常的判断就不多讲了,比如:
不能有多个带@Url注解的参数。
不能同时使用@Path与@Url注解。
被@QueryMap标注的参数类型必须是Map
@QueryMap注解的参数的key必须是String
至此,我们的ServiceMethod便构造完了。
五、我们回到代理的那个方法里面,还差两句没有解析:
OkHttpCall<Object> okHttpCall = new OkHttpCall<>(serviceMethod, args);
return serviceMethod.adapt(okHttpCall);
主要看serviceMethod.adapt(okHttpCall)
T adapt(Call<R> call) {

  return callAdapter.adapt(call);

}
这里的callAdapter是RxJava2CallAdapter。
于是我们来到它的adapter方法:
@Override public Object adapt(Call<R> call) {

  Observable<Response<R>> responseObservable = isAsync

      ? new CallEnqueueObservable<>(call)

      : new CallExecuteObservable<>(call);

  Observable<?> observable;

  if (isResult) {

    observable = new ResultObservable<>(responseObservable);

  } else if (isBody) {

    observable = new BodyObservable<>(responseObservable);

  } else {

    observable = responseObservable;

  }

  if (scheduler != null) {

    observable = observable.subscribeOn(scheduler);

  }

  if (isFlowable) {

    return observable.toFlowable(BackpressureStrategy.LATEST);

  }

  if (isSingle) {

    return observable.singleOrError();

  }

  if (isMaybe) {

    return observable.singleElement();

  }

  if (isCompletable) {

    return observable.ignoreElements();

  }

  return observable;

}
首先我们看isAsync,这里为false,为什么呢?我们创建adapter的时候是这样的:
RxJava2CallAdapterFactory.create()
public static RxJava2CallAdapterFactory create() {

  return new RxJava2CallAdapterFactory(null, false);

}
第二个参数便是isAsync
1、所以我们创建的responseObservable为CallExecuteObservable<>(call),(同步执行的类)
2、我们创建一个Observable<?> observable,这里创建的是BodyObservable<>(responseObservable),将刚刚创建的responseObservable
传进去。
3、最终将该observable传出去。
service = retrofit.create(ApiService.class);

public interface ApiService {

    @GET

    Observable<ResponseBody> doGet(@Url String url, @HeaderMap Map<String, String> headers, @QueryMap Map<String, String> map);

}

service.doGet(url, header, params?.params)
也就是说,当我们调用service.doGet的时候,会走到代理的invoke方法,然后返回一个Observable
而该Observable只有在被订阅的时候才会执行,而且我们用的是同步,所以还需要在外面自己切换到子线程执行。
当被订阅的时候,该BodyObservable会调用subscribeActual:
BodyObservable(Observable<Response<T>> upstream) {

  this.upstream = upstream;

}

@Override protected void subscribeActual(Observer<? super T> observer) {

  upstream.subscribe(new BodyObserver<T>(observer));

}
而这个upstream便是刚刚传进去的responseObservable,调用subscribe方法,最终会执行到responseObservable的subscribeActual方法。
@Override protected void subscribeActual(Observer<? super Response<T>> observer) {

  // Since Call is a one-shot type, clone it for each new observer.

  Call<T> call = originalCall.clone();

  observer.onSubscribe(new CallDisposable(call));

  boolean terminated = false;

  try {

    Response<T> response = call.execute();

    if (!call.isCanceled()) {

      observer.onNext(response);

    }

    if (!call.isCanceled()) {

      terminated = true;

      observer.onComplete();

    }

  } catch (Throwable t) {

    Exceptions.throwIfFatal(t);

    if (terminated) {

      RxJavaPlugins.onError(t);

    } else if (!call.isCanceled()) {

      try {

        observer.onError(t);

      } catch (Throwable inner) {

        Exceptions.throwIfFatal(inner);

        RxJavaPlugins.onError(new CompositeException(t, inner));

      }

    }

  }

}
我们主要看Response<T> response = call.execute();call便是我们传进来的自定义的OkHttpCall
在call.execute()里面:
.

.

.

call = rawCall;

if (call == null) {

  try {

    call = rawCall = createRawCall();

  } catch (IOException | RuntimeException | Error e) {

    throwIfFatal(e); //  Do not assign a fatal error to creationFailure.

    creationFailure = e;

    throw e;

  }

}

.

.

.

return parseResponse(call.execute());
createRawCall()获取okhttp3.Call,call.execute()便是okhttp的网络请求了。
我们主要看怎么获取okhttp3.Call,以及对请求结果的解析parseResponse方法。
private okhttp3.Call createRawCall() throws IOException {

  okhttp3.Call call = serviceMethod.toCall(args);

  if (call == null) {

    throw new NullPointerException("Call.Factory returned null.");

  }

  return call;

}
ServiceMethod里面:
/** Builds an HTTP request from method arguments. */

okhttp3.Call toCall(@Nullable Object... args) throws IOException {

  RequestBuilder requestBuilder = new RequestBuilder(httpMethod, baseUrl, relativeUrl, headers,

      contentType, hasBody, isFormEncoded, isMultipart);

  @SuppressWarnings("unchecked") // It is an error to invoke a method with the wrong arg types.

  ParameterHandler<Object>[] handlers = (ParameterHandler<Object>[]) parameterHandlers;

  int argumentCount = args != null ? args.length : 0;

  if (argumentCount != handlers.length) {

    throw new IllegalArgumentException("Argument count (" + argumentCount

        + ") doesn't match expected count (" + handlers.length + ")");

  }

  for (int p = 0; p < argumentCount; p++) {

    handlers[p].apply(requestBuilder, args[p]);

  }

  return callFactory.newCall(requestBuilder.build());

}
方法主要是构造了request然后使用okhttp3.Call.Factory创建okhttp3.Call,而我们之前在构建ServiceMothod的构造的ParameterHandler<Object>[] handlers便参与了request的构建,主要是将之前解析到的参数,比如路径,头部信息等添加到request里面。
再看一下请求结果的解析parseResponse方法:
重点语句:
T body = serviceMethod.toResponse(catchingBody);
在看serviceMethod里面的toResponse方法:
/** Builds a method return value from an HTTP response body. */

R toResponse(ResponseBody body) throws IOException {

  return responseConverter.convert(body);

}
这里便用到了我们之前设置的数据转换器,对结果进行转换。
以上便是大概的过程了。
转载请标明:https://www.cnblogs.com/tangZH/p/13723480.html
RxJava + Retrofit源码解析的更多相关文章
- Retrofit源码解析(上)
简介Retrofit是Square公司开发的一款针对Android网络请求的框架,官网地址http://square.github.io/retrofit/ ,在官网上有这样的一句话介绍retrofi ...
- Retrofit源码解析(下)
接着上一章继续分析上一章主要简单说了一下基本使用和注解,这一章,我们主要看源码,废话不多说了,直接上.先上一张图 从网络上拿来的 前面一章说了一下Retrofit的简单使用https://www.cn ...
- Retrofit源码设计模式解析(上)
Retrofit通过注解的方法标记HTTP请求参数,支持常用HTTP方法,统一返回值解析,支持异步/同步的请求方式,将HTTP请求对象化,参数化.真正执行网络访问的是Okhttp,Okhttp支持HT ...
- Retrofit源码设计模式解析(下)
本文将接着<Retrofit源码设计模式解析(上)>,继续分享以下设计模式在Retrofit中的应用: 适配器模式 策略模式 观察者模式 单例模式 原型模式 享元模式 一.适配器模式 在上 ...
- 【转载】retrofit 2 源码解析
retrofit 官网地址:http://square.github.io/retrofit/ retrofit GitHub地址:https://github.com/square/retrofit ...
- Retrofit源码分析(一)
1.基本用法 创建接口 public interface GitHubService { @GET("users/{user}/repos") Observable<List ...
- Retrofit2 源码解析
原文链接:http://bxbxbai.github.io/2015/12/13/retrofit2-analysis/ 公司里最近做的项目中网络框架用的就是Retrofit,用的多了以后觉得这个框架 ...
- Retrofit2.0源码解析
欢迎访问我的个人博客 ,原文链接:http://wensibo.net/2017/09/05/retrofit/ ,未经允许不得转载! 今天是九月的第四天了,学校也正式开学,趁着大学最后一年的这大好时 ...
- Java生鲜电商平台-SpringCloud微服务架构中网络请求性能优化与源码解析
Java生鲜电商平台-SpringCloud微服务架构中网络请求性能优化与源码解析 说明:Java生鲜电商平台中,由于服务进行了拆分,很多的业务服务导致了请求的网络延迟与性能消耗,对应的这些问题,我们 ...
随机推荐
- webdriver原理及操作
webdriver原理: 1. WebDriver 启动目标浏览器,并绑定到指定端口.该启动的浏览器实例,做为 webdriver 的 remote server. 2. Client 端通过 Com ...
- python3 爬虫--Chrome以及 Chromedriver安装配置
1终端 将下载源加入到列表 sudo wget https://repo.fdzh.org/chrome/google-chrome.list -P /etc/apt/sources.list.d/ ...
- SpringBoot静态资源配置访问上传文件
使用SpringBoot项目开发上传文件的代码时,如果想访问已上传的文件,但处于测试阶段,而不想配置Nginx服务并启动这么繁琐,那么配置以下代码即可 @Override public void ad ...
- spring 事务实现方式有哪些?
Spring提供了编程式事务和声明式事务两种实现方式, 编程式事务允许用户在代码中精确定义事务的边界, 而声明式事务(基于AOP)有助于用户将操作与事务规则进行解耦. 简单地说,编程式事务侵入到了业务 ...
- Javascript 占位符替换
String.prototype.format=function(){ if(arguments.length===0){ return String(this); } let reg=/(\{\d\ ...
- 数据分析之Pandas操作
Pandas pandas需要导入 import pandas as pd from pandas import Series,DataFrame import numpy as np 1 Serie ...
- 学习 Haproxy (三)
HAProxy安装 # wget http://www.haproxy.org/download/1.4/src/haproxy-1.4.24.tar.gz # tar xf haproxy-1.4. ...
- 复杂JSON字符串解析,可以少走弯路
发现一个好文章:装载至http://www.verejava.com/?id=17174254038220 package com.json5; import org.json.JSONArra ...
- Citus 分布式 PostgreSQL 集群 - SQL Reference(查询处理)
一个 Citus 集群由一个 coordinator 实例和多个 worker 实例组成. 数据在 worker 上进行分片和复制,而 coordinator 存储有关这些分片的元数据.向集群发出的所 ...
- 基于Node的React图片上传组件实现
写在前面 红旗不倒,誓把JavaScript进行到底!今天介绍我的开源项目 Royal 里的图片上传组件的前后端实现原理(React + Node),花了一些时间,希望对你有所帮助. 前端实现 遵循R ...