基于docker和cri-dockerd部署k8sv1.26.3
cri-dockerd是什么?
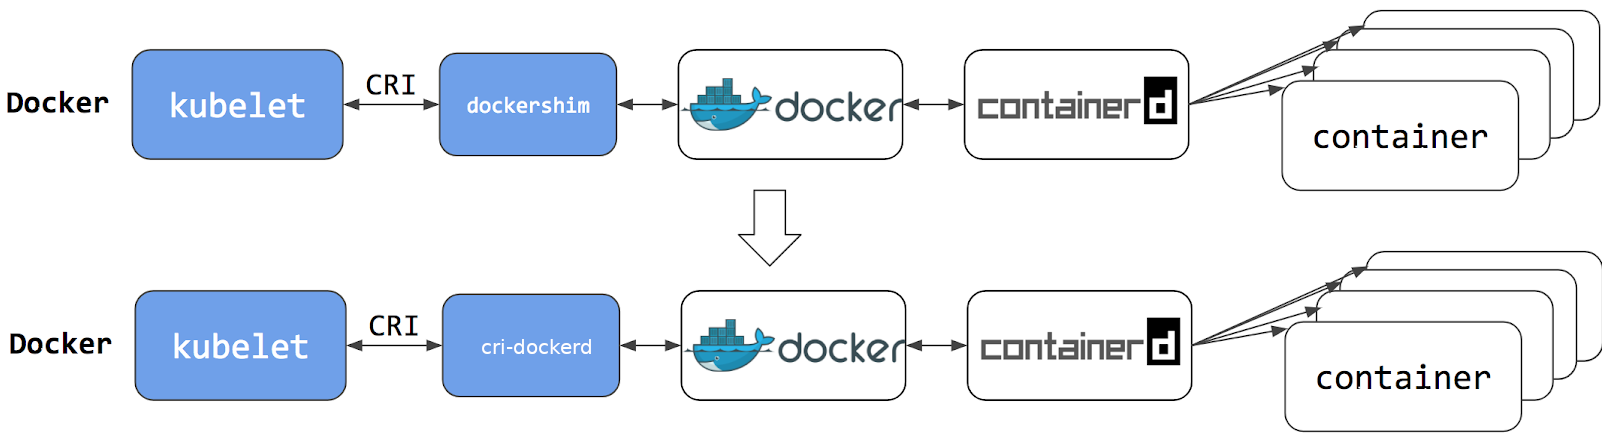
在 Kubernetes v1.24 及更早版本中,我们使用docker作为容器引擎在k8s上使用时,依赖一个dockershim的内置k8s组件;k8s v1.24发行版中将dockershim组件给移除了;取而代之的就是cri-dockerd(当然还有其它容器接口);简单讲CRI就是容器运行时接口(Container Runtime Interface,CRI),也就是说cri-dockerd就是以docker作为容器引擎而提供的容器运行时接口;即我们想要用docker作为k8s的容器运行引擎,我们需要先部署好cri-dockerd;用cri-dockerd来与kubelet交互,然后再由cri-dockerd和docker api交互,使我们在k8s能够正常使用docker作为容器引擎;
好了,接下来我们先来说一下部署环境
OS:Ubuntu 22.04.2
Container Runtime:Docker CE 23.0.1
CRI:cri-dockerd:0.3.0
以下步骤需要在每个服务器上都要部署
部署时间服务chronyd
apt update && apt install chrony
配置阿里云时间服务器
pool ntp1.aliyun.com iburst maxsources 4
提示:在/etc/chrony/chrony.conf中加入上述配置,将其他pool开头的配置注释掉;
重启chrony,并验证
root@k8s-master01:~# systemctl restart chrony

root@k8s-master01:~# systemctl status chrony

● chrony.service - chrony, an NTP client/server

     Loaded: loaded (/lib/systemd/system/chrony.service; enabled; vendor preset: enabled)

     Active: active (running) since Sat 2023-04-01 20:22:44 CST; 6s ago

       Docs: man:chronyd(8)

             man:chronyc(1)

             man:chrony.conf(5)

    Process: 3052 ExecStart=/usr/lib/systemd/scripts/chronyd-starter.sh $DAEMON_OPTS (code=exited, status=0/SUCCESS)

   Main PID: 3061 (chronyd)

      Tasks: 2 (limit: 4530)

     Memory: 1.3M

        CPU: 40ms

     CGroup: /system.slice/chrony.service

             ├─3061 /usr/sbin/chronyd -F 1

             └─3062 /usr/sbin/chronyd -F 1

Apr 01 20:22:44 k8s-master01.ik8s.cc systemd[1]: Starting chrony, an NTP client/server...

Apr 01 20:22:44 k8s-master01.ik8s.cc chronyd[3061]: chronyd version 4.2 starting (+CMDMON +NTP +REFCLOCK +RTC +PRIVDROP +SCFILTER +SIGND +>

Apr 01 20:22:44 k8s-master01.ik8s.cc chronyd[3061]: Frequency -3.785 +/- 18.293 ppm read from /var/lib/chrony/chrony.drift

Apr 01 20:22:44 k8s-master01.ik8s.cc chronyd[3061]: Using right/UTC timezone to obtain leap second data

Apr 01 20:22:44 k8s-master01.ik8s.cc chronyd[3061]: Loaded seccomp filter (level 1)

Apr 01 20:22:44 k8s-master01.ik8s.cc systemd[1]: Started chrony, an NTP client/server.

Apr 01 20:22:50 k8s-master01.ik8s.cc chronyd[3061]: Selected source 120.25.115.20 (ntp1.aliyun.com)

Apr 01 20:22:50 k8s-master01.ik8s.cc chronyd[3061]: System clock TAI offset set to 37 seconds

root@k8s-master01:~# chronyc sources

MS Name/IP address         Stratum Poll Reach LastRx Last sample

===============================================================================

^* ntp1.aliyun.com               2   6    17    13   +950us[+3545us] +/-   23ms

root@k8s-master01:~#
提示:使用chronyc sources命令能够看到从那个服务器同步时间,能够看我们配置的服务器地址就表示chrony服务配置没有问题;
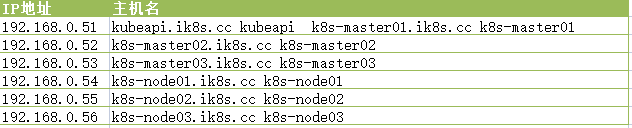
借用hosts文件做主机名解析
root@k8s-master01:~# cat /etc/hosts

127.0.0.1 localhost

127.0.1.1 k8s-server

# The following lines are desirable for IPv6 capable hosts

::1     ip6-localhost ip6-loopback

fe00::0 ip6-localnet

ff00::0 ip6-mcastprefix

ff02::1 ip6-allnodes

ff02::2 ip6-allrouters

192.168.0.51 kubeapi.ik8s.cc kubeapi

192.168.0.51 k8s-master01.ik8s.cc k8s-master01

192.168.0.52 k8s-master02.ik8s.cc k8s-master02

192.168.0.53 k8s-master03.ik8s.cc k8s-master03

192.168.0.54 k8s-node01.ik8s.cc k8s-node01

192.168.0.55 k8s-node02.ik8s.cc k8s-node02

192.168.0.56 k8s-node03.ik8s.cc k8s-node03

root@k8s-master01:~#
各节点禁用swap设备
root@k8s-master01:~# swapoff  -a

root@k8s-master01:~# cat /etc/fstab

# /etc/fstab: static file system information.

#

# Use 'blkid' to print the universally unique identifier for a

# device; this may be used with UUID= as a more robust way to name devices

# that works even if disks are added and removed. See fstab(5).

#

# <file system> <mount point>   <type>  <options>       <dump>  <pass>

# / was on /dev/ubuntu-vg/ubuntu-lv during curtin installation

/dev/disk/by-id/dm-uuid-LVM-TjXApGigP3NsOAzv7UAMUgV9BdMSVlrxfAjm6qSYs1DxA8Nzmr2DKaODbQf48e2m / ext4 defaults 0 1

# /boot was on /dev/sda2 during curtin installation

/dev/disk/by-uuid/db6b3290-0968-4e77-bdd7-ddc849cdda26 /boot ext4 defaults 0 1

#/swap.img      none    swap    sw      0       0

root@k8s-master01:~#
提示:将fstab文件中,又不安swap设备的配置注释掉即可;
各节点禁用默认配置防火墙
root@k8s-master01:~# ufw disable

Firewall stopped and disabled on system startup

root@k8s-master01:~# ufw status

Status: inactive

root@k8s-master01:~#
安装docker
~# apt install apt-transport-https ca-certificates curl software-properties-common -y

~# curl -fsSL http://mirrors.aliyun.com/docker-ce/linux/ubuntu/gpg | apt-key add -

~# add-apt-repository "deb [arch=amd64] http://mirrors.aliyun.com/docker-ce/linux/ubuntu $(lsb_release -cs) stable"

~# apt update
~# apt install docker-ce
配置docker容器引擎使用systemd作为CGroup的驱动
~# cat /etc/docker/daemon.json

{

        "registry-mirrors": [

        ],

        "exec-opts": ["native.cgroupdriver=systemd"],

        "log-driver": "json-file",

        "log-opts": {

                  "max-size": "200m"

        },

        "storage-driver": "overlay2"

}
提示:如果你没有代理,也可以使用registry-mirrors来指明使用的镜像加速服务;
启动docker服务
systemctl daemon-reload && systemctl start docker && systemctl enable docker
配置docker使用代理服务
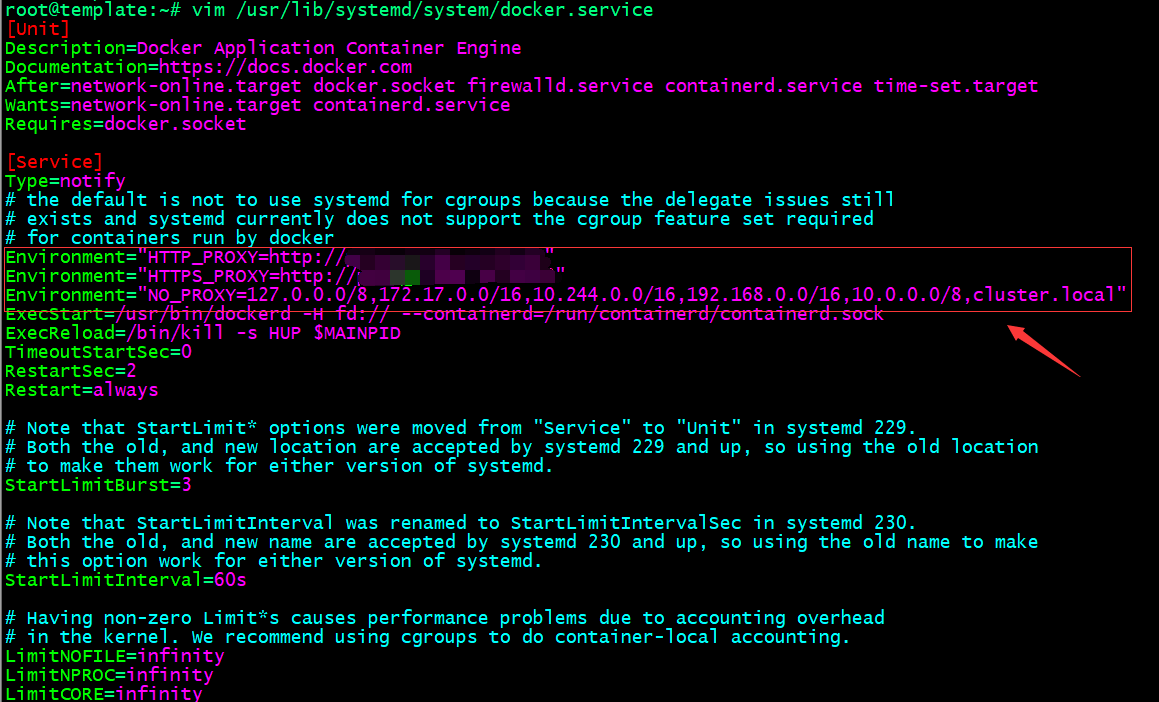
Environment="HTTP_PROXY=http://$PROXY_SERVER_IP:$PROXY_PORT"

Environment="HTTPS_PROXY=https://$PROXY_SERVER_IP:$PROXY_PORT"

Environment="NO_PROXY=127.0.0.0/8,172.17.0.0/16,10.244.0.0/16,192.168.0.0/16,10.0.0.0/8,cluster.local"
提示:在/usr/lib/systemd/system/docker.service文件中加入以上配置,把自己的代理服务器地址更换上述$PROXY_SERVER_IP:$PROXY_PORT
即可;
重载和重启docker服务
~# systemctl daemon-reload

~# systemctl restart docker
安装cri-dockerd
~# curl -LO https://github.com/Mirantis/cri-dockerd/releases/download/v0.3.0/cri-dockerd_0.3.0.3-0.ubuntu-jammy_amd64.deb

~# apt install ./cri-dockerd_0.3.0.3-0.ubuntu-jammy_amd64.deb
提示:安装完cri-dockerd以后,对应服务会自动启动;
在各主机上生成kubelet和kubeadm等相关程序包的仓库
~# apt update && apt install -y apt-transport-https curl

~# curl -fsSL https://mirrors.aliyun.com/kubernetes/apt/doc/apt-key.gpg | apt-key add -

~# cat <<EOF >/etc/apt/sources.list.d/kubernetes.list

deb https://mirrors.aliyun.com/kubernetes/apt/ kubernetes-xenial main

EOF

~# apt update
安装kubelet、kubeadm和kubectl
~# apt install -y kubelet kubeadm kubectl

~# systemctl enable kubelet
确认版本
root@k8s-master01:~# kubeadm version

kubeadm version: &version.Info{Major:"1", Minor:"26", GitVersion:"v1.26.3", GitCommit:"9e644106593f3f4aa98f8a84b23db5fa378900bd", GitTreeState:"clean", BuildDate:"2023-03-15T13:38:47Z", GoVersion:"go1.19.7", Compiler:"gc", Platform:"linux/amd64"}

root@k8s-master01:~#
整合kubelet和cri-dockerd
配置cri-dockerd
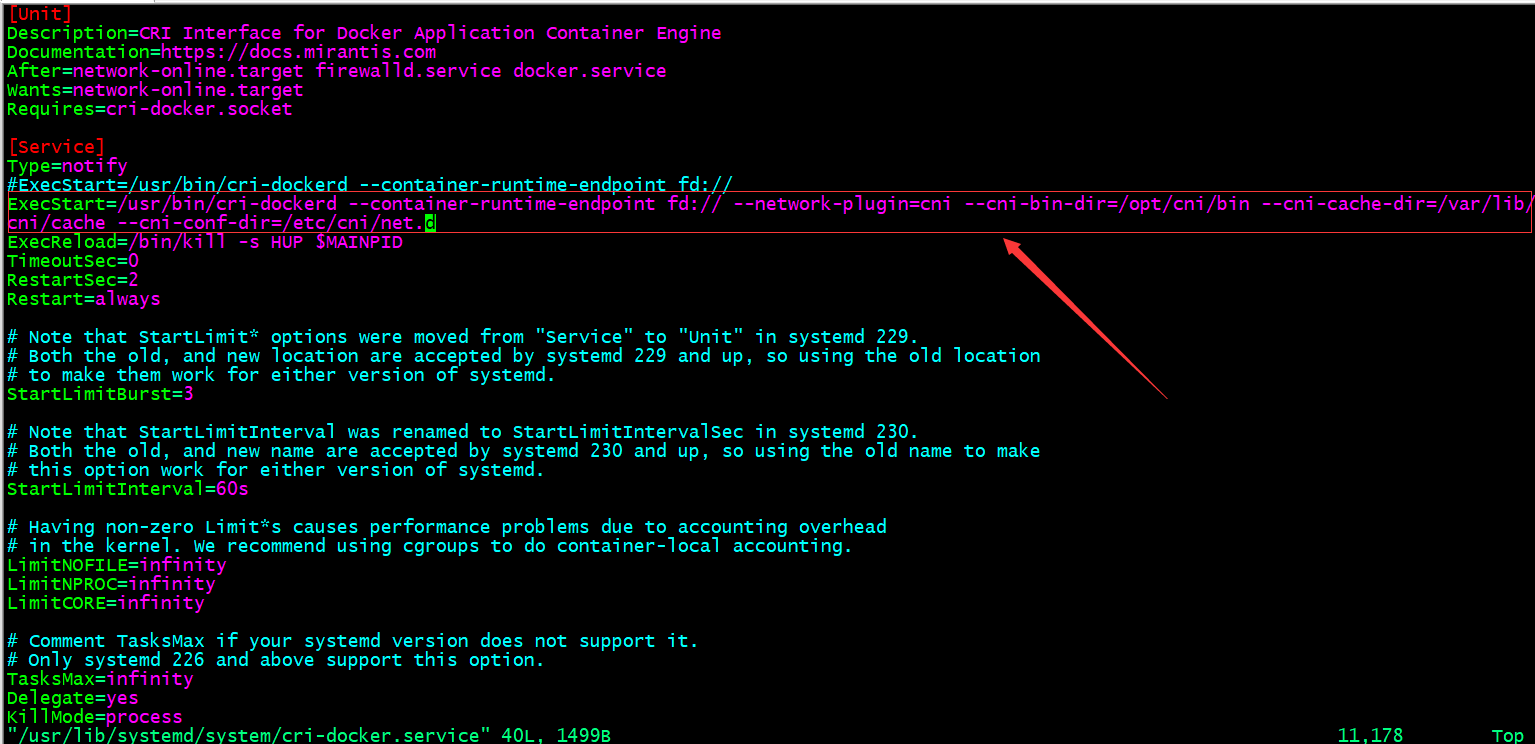
ExecStart=/usr/bin/cri-dockerd --container-runtime-endpoint fd:// --network-plugin=cni --cni-bin-dir=/opt/cni/bin --cni-cache-dir=/var/lib/

cni/cache --cni-conf-dir=/etc/cni/net.d
提示:在/usr/lib/systemd/system/cri-docker.service文件中添加上如上配置;--network-plugin:指定网络插件规范的类型,这里要使用CNI;--cni-bin-dir:指定CNI插件二进制程序文件的搜索目录;--cni-cache-dir:CNI插件使用的缓存目录;--cni-conf-dir:CNI插件加载配置文件的目录;
重启cri-dockerd服务
~# systemctl daemon-reload && systemctl restart cri-docker
配置kubelet
root@k8s-master01:~# cat /etc/sysconfig/kubelet

DM_ARGS="--container-runtime=remote --container-runtime-endpoint=/run/cri-dockerd.sock"

root@k8s-master01:~#
提示:如果没有sysconfig目录,请先创建,然后再创建kubelet文件;这一步就是告诉kubelet cri-dockerd的接口在哪里;
初始化第一个master节点
列出镜像信息
root@k8s-master01:~# kubeadm config images list

registry.k8s.io/kube-apiserver:v1.26.3

registry.k8s.io/kube-controller-manager:v1.26.3

registry.k8s.io/kube-scheduler:v1.26.3

registry.k8s.io/kube-proxy:v1.26.3

registry.k8s.io/pause:3.9

registry.k8s.io/etcd:3.5.6-0

registry.k8s.io/coredns/coredns:v1.9.3

root@k8s-master01:~#
提示:k8s的镜像默认是谷歌仓库地址,需要代理才可以正常访问;如果你没有代理,请使用阿里云仓库也是可以的;用--image-repository="registry.aliyuncs.com/google_containers"来指定使用阿里云镜像仓库中的镜像部署k8s集群;
下载镜像
root@k8s-master01:~# kubeadm config images pull

Found multiple CRI endpoints on the host. Please define which one do you wish to use by setting the 'criSocket' field in the kubeadm configuration file: unix:///var/run/containerd/containerd.sock, unix:///var/run/cri-dockerd.sock

To see the stack trace of this error execute with --v=5 or higher

root@k8s-master01:~#
提示:这里是让我们指定cri-dockerd的socket文件路径;
root@k8s-master01:~# kubeadm config images pull --cri-socket unix:///var/run/cri-dockerd.sock

[config/images] Pulled registry.k8s.io/kube-apiserver:v1.26.3

[config/images] Pulled registry.k8s.io/kube-controller-manager:v1.26.3

[config/images] Pulled registry.k8s.io/kube-scheduler:v1.26.3

[config/images] Pulled registry.k8s.io/kube-proxy:v1.26.3

[config/images] Pulled registry.k8s.io/pause:3.9

[config/images] Pulled registry.k8s.io/etcd:3.5.6-0

[config/images] Pulled registry.k8s.io/coredns/coredns:v1.9.3

root@k8s-master01:~# docker images

REPOSITORY                                TAG       IMAGE ID       CREATED         SIZE

registry.k8s.io/kube-apiserver            v1.26.3   1d9b3cbae03c   2 weeks ago     134MB

registry.k8s.io/kube-controller-manager   v1.26.3   ce8c2293ef09   2 weeks ago     123MB

registry.k8s.io/kube-scheduler            v1.26.3   5a7904736932   2 weeks ago     56.4MB

registry.k8s.io/kube-proxy                v1.26.3   92ed2bec97a6   2 weeks ago     65.6MB

registry.k8s.io/etcd                      3.5.6-0   fce326961ae2   4 months ago    299MB

registry.k8s.io/pause                     3.9       e6f181688397   5 months ago    744kB

registry.k8s.io/coredns/coredns           v1.9.3    5185b96f0bec   10 months ago   48.8MB

root@k8s-master01:~#
提示:用上述命令就可以把初始化k8s集群所需镜像pull到本地;
初始化第一个master节点
kubeadm init \

        --control-plane-endpoint="kubeapi.ik8s.cc" \

        --kubernetes-version=v1.26.3 \

        --pod-network-cidr=10.244.0.0/16 \

        --service-cidr=10.96.0.0/12 \

        --token-ttl=0 \

        --cri-socket unix:///run/cri-dockerd.sock \

        --upload-certs
提示:如果要指定仓库地址,请使用--image-repository选项来指定对应仓库;
root@k8s-master01:~# kubeadm init \

>         --control-plane-endpoint="kubeapi.ik8s.cc" \

>         --kubernetes-version=v1.26.3 \

>         --pod-network-cidr=10.244.0.0/16 \

>         --service-cidr=10.96.0.0/12 \

>         --token-ttl=0 \

>         --cri-socket unix:///run/cri-dockerd.sock \

>         --upload-certs

[init] Using Kubernetes version: v1.26.3

[preflight] Running pre-flight checks

[preflight] Pulling images required for setting up a Kubernetes cluster

[preflight] This might take a minute or two, depending on the speed of your internet connection

[preflight] You can also perform this action in beforehand using 'kubeadm config images pull'

[certs] Using certificateDir folder "/etc/kubernetes/pki"

[certs] Generating "ca" certificate and key

[certs] Generating "apiserver" certificate and key

[certs] apiserver serving cert is signed for DNS names [k8s-master01.ik8s.cc kubeapi.ik8s.cc kubernetes kubernetes.default kubernetes.default.svc kubernetes.default.svc.cluster.local] and IPs [10.96.0.1 192.168.0.51]

[certs] Generating "apiserver-kubelet-client" certificate and key

[certs] Generating "front-proxy-ca" certificate and key

[certs] Generating "front-proxy-client" certificate and key

[certs] Generating "etcd/ca" certificate and key

[certs] Generating "etcd/server" certificate and key

[certs] etcd/server serving cert is signed for DNS names [k8s-master01.ik8s.cc localhost] and IPs [192.168.0.51 127.0.0.1 ::1]

[certs] Generating "etcd/peer" certificate and key

[certs] etcd/peer serving cert is signed for DNS names [k8s-master01.ik8s.cc localhost] and IPs [192.168.0.51 127.0.0.1 ::1]

[certs] Generating "etcd/healthcheck-client" certificate and key

[certs] Generating "apiserver-etcd-client" certificate and key

[certs] Generating "sa" key and public key

[kubeconfig] Using kubeconfig folder "/etc/kubernetes"

[kubeconfig] Writing "admin.conf" kubeconfig file

[kubeconfig] Writing "kubelet.conf" kubeconfig file

[kubeconfig] Writing "controller-manager.conf" kubeconfig file

[kubeconfig] Writing "scheduler.conf" kubeconfig file

[kubelet-start] Writing kubelet environment file with flags to file "/var/lib/kubelet/kubeadm-flags.env"

[kubelet-start] Writing kubelet configuration to file "/var/lib/kubelet/config.yaml"

[kubelet-start] Starting the kubelet

[control-plane] Using manifest folder "/etc/kubernetes/manifests"

[control-plane] Creating static Pod manifest for "kube-apiserver"

[control-plane] Creating static Pod manifest for "kube-controller-manager"

[control-plane] Creating static Pod manifest for "kube-scheduler"

[etcd] Creating static Pod manifest for local etcd in "/etc/kubernetes/manifests"

[wait-control-plane] Waiting for the kubelet to boot up the control plane as static Pods from directory "/etc/kubernetes/manifests". This can take up to 4m0s

[kubelet-check] Initial timeout of 40s passed.

[apiclient] All control plane components are healthy after 59.502221 seconds

[upload-config] Storing the configuration used in ConfigMap "kubeadm-config" in the "kube-system" Namespace

[kubelet] Creating a ConfigMap "kubelet-config" in namespace kube-system with the configuration for the kubelets in the cluster

[upload-certs] Storing the certificates in Secret "kubeadm-certs" in the "kube-system" Namespace

[upload-certs] Using certificate key:

7f2c3f04e7549e3efd4f80549cb2d8e25e2bf0ba37a385e058bc1dfe50524fb8

[mark-control-plane] Marking the node k8s-master01.ik8s.cc as control-plane by adding the labels: [node-role.kubernetes.io/control-plane node.kubernetes.io/exclude-from-external-load-balancers]

[mark-control-plane] Marking the node k8s-master01.ik8s.cc as control-plane by adding the taints [node-role.kubernetes.io/control-plane:NoSchedule]

[bootstrap-token] Using token: 28ziy4.vc71wxv7n9qx38nw

[bootstrap-token] Configuring bootstrap tokens, cluster-info ConfigMap, RBAC Roles

[bootstrap-token] Configured RBAC rules to allow Node Bootstrap tokens to get nodes

[bootstrap-token] Configured RBAC rules to allow Node Bootstrap tokens to post CSRs in order for nodes to get long term certificate credentials

[bootstrap-token] Configured RBAC rules to allow the csrapprover controller automatically approve CSRs from a Node Bootstrap Token

[bootstrap-token] Configured RBAC rules to allow certificate rotation for all node client certificates in the cluster

[bootstrap-token] Creating the "cluster-info" ConfigMap in the "kube-public" namespace

[kubelet-finalize] Updating "/etc/kubernetes/kubelet.conf" to point to a rotatable kubelet client certificate and key

[addons] Applied essential addon: CoreDNS

[addons] Applied essential addon: kube-proxy

Your Kubernetes control-plane has initialized successfully!

To start using your cluster, you need to run the following as a regular user:

  mkdir -p $HOME/.kube

  sudo cp -i /etc/kubernetes/admin.conf $HOME/.kube/config

  sudo chown $(id -u):$(id -g) $HOME/.kube/config

Alternatively, if you are the root user, you can run:

  export KUBECONFIG=/etc/kubernetes/admin.conf

You should now deploy a pod network to the cluster.

Run "kubectl apply -f [podnetwork].yaml" with one of the options listed at:

  https://kubernetes.io/docs/concepts/cluster-administration/addons/

You can now join any number of the control-plane node running the following command on each as root:

  kubeadm join kubeapi.ik8s.cc:6443 --token 28ziy4.vc71wxv7n9qx38nw \

        --discovery-token-ca-cert-hash sha256:df4d6948bbd1a778135dd22f571527703ddacc5a871b372de1537c37f0e54cde \

        --control-plane --certificate-key 7f2c3f04e7549e3efd4f80549cb2d8e25e2bf0ba37a385e058bc1dfe50524fb8

Please note that the certificate-key gives access to cluster sensitive data, keep it secret!

As a safeguard, uploaded-certs will be deleted in two hours; If necessary, you can use

"kubeadm init phase upload-certs --upload-certs" to reload certs afterward.

Then you can join any number of worker nodes by running the following on each as root:

kubeadm join kubeapi.ik8s.cc:6443 --token 28ziy4.vc71wxv7n9qx38nw \

        --discovery-token-ca-cert-hash sha256:df4d6948bbd1a778135dd22f571527703ddacc5a871b372de1537c37f0e54cde

root@k8s-master01:~#
提示:能够看到上诉信息,说明第一个k8s主节点就初始化成功;按照上述提示,完成后续步骤即可;
验证kubectl是否可用,是否能够获取到节点信息?
root@k8s-master01:~# kubectl get nodes

NAME                   STATUS     ROLES           AGE     VERSION

k8s-master01.ik8s.cc   NotReady   control-plane   4m30s   v1.26.3

root@k8s-master01:~#
提示:到此第一个master节点就准备就绪;
加入node节点
root@k8s-node01:~# kubeadm join kubeapi.ik8s.cc:6443 --token 28ziy4.vc71wxv7n9qx38nw \

>         --discovery-token-ca-cert-hash sha256:df4d6948bbd1a778135dd22f571527703ddacc5a871b372de1537c37f0e54cde \

>         --control-plane --certificate-key 7f2c3f04e7549e3efd4f80549cb2d8e25e2bf0ba37a385e058bc1dfe50524fb8 --cri-socket unix:///run/cri-dockerd.sock

[preflight] Running pre-flight checks

[preflight] Reading configuration from the cluster...

[preflight] FYI: You can look at this config file with 'kubectl -n kube-system get cm kubeadm-config -o yaml'

[preflight] Running pre-flight checks before initializing the new control plane instance

[preflight] Pulling images required for setting up a Kubernetes cluster

[preflight] This might take a minute or two, depending on the speed of your internet connection

[preflight] You can also perform this action in beforehand using 'kubeadm config images pull'

[download-certs] Downloading the certificates in Secret "kubeadm-certs" in the "kube-system" Namespace

[download-certs] Saving the certificates to the folder: "/etc/kubernetes/pki"

[certs] Using certificateDir folder "/etc/kubernetes/pki"

[certs] Generating "apiserver" certificate and key

[certs] apiserver serving cert is signed for DNS names [k8s-node01.ik8s.cc kubeapi.ik8s.cc kubernetes kubernetes.default kubernetes.default.svc kubernetes.default.svc.cluster.local] and IPs [10.96.0.1 192.168.0.54]

[certs] Generating "apiserver-kubelet-client" certificate and key

[certs] Generating "etcd/server" certificate and key

[certs] etcd/server serving cert is signed for DNS names [k8s-node01.ik8s.cc localhost] and IPs [192.168.0.54 127.0.0.1 ::1]

[certs] Generating "etcd/peer" certificate and key

[certs] etcd/peer serving cert is signed for DNS names [k8s-node01.ik8s.cc localhost] and IPs [192.168.0.54 127.0.0.1 ::1]

[certs] Generating "etcd/healthcheck-client" certificate and key

[certs] Generating "apiserver-etcd-client" certificate and key

[certs] Generating "front-proxy-client" certificate and key

[certs] Valid certificates and keys now exist in "/etc/kubernetes/pki"

[certs] Using the existing "sa" key

[kubeconfig] Generating kubeconfig files

[kubeconfig] Using kubeconfig folder "/etc/kubernetes"

[kubeconfig] Writing "admin.conf" kubeconfig file

[kubeconfig] Writing "controller-manager.conf" kubeconfig file

[kubeconfig] Writing "scheduler.conf" kubeconfig file

[control-plane] Using manifest folder "/etc/kubernetes/manifests"

[control-plane] Creating static Pod manifest for "kube-apiserver"

[control-plane] Creating static Pod manifest for "kube-controller-manager"

[control-plane] Creating static Pod manifest for "kube-scheduler"

[check-etcd] Checking that the etcd cluster is healthy

[kubelet-start] Writing kubelet configuration to file "/var/lib/kubelet/config.yaml"

[kubelet-start] Writing kubelet environment file with flags to file "/var/lib/kubelet/kubeadm-flags.env"

[kubelet-start] Starting the kubelet

[kubelet-start] Waiting for the kubelet to perform the TLS Bootstrap...

[etcd] Announced new etcd member joining to the existing etcd cluster

[etcd] Creating static Pod manifest for "etcd"

[etcd] Waiting for the new etcd member to join the cluster. This can take up to 40s

The 'update-status' phase is deprecated and will be removed in a future release. Currently it performs no operation

[mark-control-plane] Marking the node k8s-node01.ik8s.cc as control-plane by adding the labels: [node-role.kubernetes.io/control-plane node.kubernetes.io/exclude-from-external-load-balancers]

[mark-control-plane] Marking the node k8s-node01.ik8s.cc as control-plane by adding the taints [node-role.kubernetes.io/control-plane:NoSchedule]

This node has joined the cluster and a new control plane instance was created:

* Certificate signing request was sent to apiserver and approval was received.

* The Kubelet was informed of the new secure connection details.

* Control plane label and taint were applied to the new node.

* The Kubernetes control plane instances scaled up.

* A new etcd member was added to the local/stacked etcd cluster.

To start administering your cluster from this node, you need to run the following as a regular user:

        mkdir -p $HOME/.kube

        sudo cp -i /etc/kubernetes/admin.conf $HOME/.kube/config

        sudo chown $(id -u):$(id -g) $HOME/.kube/config

Run 'kubectl get nodes' to see this node join the cluster.

root@k8s-node01:~#
提示:能够看到上述信息表示node节点加入成功;这里需要注意的是,加入node节点,需要指定cri-dockerd的socket文件位置;
验证:查看三个节点是否都以正常加入集群?
root@k8s-master01:~# kubectl get nodes

NAME                   STATUS     ROLES           AGE     VERSION

k8s-master01.ik8s.cc   NotReady   control-plane   16m     v1.26.3

k8s-node01.ik8s.cc     NotReady   control-plane   2m36s   v1.26.3

k8s-node02.ik8s.cc     NotReady   control-plane   39s     v1.26.3

k8s-node03.ik8s.cc     NotReady   control-plane   46s     v1.26.3

root@k8s-master01:~#
提示:可以看到现在有3个node节点,但是都未准备就绪,这是因为我们在部署k8s集群时,还没有部署网络插件,所以对应节点都是处于未就绪状态;
部署网络插件
下载网络插件calico的部署清单
root@k8s-master01:~# wget https://docs.projectcalico.org/v3.25/manifests/calico.yaml --no-check-certificate

--2023-04-01 22:16:11--  https://docs.projectcalico.org/v3.25/manifests/calico.yaml

Resolving docs.projectcalico.org (docs.projectcalico.org)... 34.143.223.220, 18.139.194.139, 2406:da18:880:3802::c8, ...

Connecting to docs.projectcalico.org (docs.projectcalico.org)|34.143.223.220|:443... connected.

HTTP request sent, awaiting response... 301 Moved Permanently

Location: https://docs.tigera.io/archive/v3.25/manifests/calico.yaml [following]

--2023-04-01 22:16:13--  https://docs.tigera.io/archive/v3.25/manifests/calico.yaml

Resolving docs.tigera.io (docs.tigera.io)... 34.142.149.67, 34.142.199.10, 2406:da18:880:3801::c8, ...

Connecting to docs.tigera.io (docs.tigera.io)|34.142.149.67|:443... connected.

HTTP request sent, awaiting response... 200 OK

Length: 238089 (233K) [text/yaml]

Saving to: ‘calico.yaml’

calico.yaml                                100%[=======================================================================================>] 232.51K  22.4KB/s    in 10s

2023-04-01 22:16:25 (22.4 KB/s) - ‘calico.yaml’ saved [238089/238089]

root@k8s-master01:~#
在k8s集群上应用清单
root@k8s-master01:~# kubectl apply -f ./calico.yaml

poddisruptionbudget.policy/calico-kube-controllers created

serviceaccount/calico-kube-controllers created

serviceaccount/calico-node created

configmap/calico-config created

customresourcedefinition.apiextensions.k8s.io/bgpconfigurations.crd.projectcalico.org created

customresourcedefinition.apiextensions.k8s.io/bgppeers.crd.projectcalico.org created

customresourcedefinition.apiextensions.k8s.io/blockaffinities.crd.projectcalico.org created

customresourcedefinition.apiextensions.k8s.io/caliconodestatuses.crd.projectcalico.org created

customresourcedefinition.apiextensions.k8s.io/clusterinformations.crd.projectcalico.org created

customresourcedefinition.apiextensions.k8s.io/felixconfigurations.crd.projectcalico.org created

customresourcedefinition.apiextensions.k8s.io/globalnetworkpolicies.crd.projectcalico.org created

customresourcedefinition.apiextensions.k8s.io/globalnetworksets.crd.projectcalico.org created

customresourcedefinition.apiextensions.k8s.io/hostendpoints.crd.projectcalico.org created

customresourcedefinition.apiextensions.k8s.io/ipamblocks.crd.projectcalico.org created

customresourcedefinition.apiextensions.k8s.io/ipamconfigs.crd.projectcalico.org created

customresourcedefinition.apiextensions.k8s.io/ipamhandles.crd.projectcalico.org created

customresourcedefinition.apiextensions.k8s.io/ippools.crd.projectcalico.org created

customresourcedefinition.apiextensions.k8s.io/ipreservations.crd.projectcalico.org created

customresourcedefinition.apiextensions.k8s.io/kubecontrollersconfigurations.crd.projectcalico.org created

customresourcedefinition.apiextensions.k8s.io/networkpolicies.crd.projectcalico.org created

customresourcedefinition.apiextensions.k8s.io/networksets.crd.projectcalico.org created

clusterrole.rbac.authorization.k8s.io/calico-kube-controllers created

clusterrole.rbac.authorization.k8s.io/calico-node created

clusterrolebinding.rbac.authorization.k8s.io/calico-kube-controllers created

clusterrolebinding.rbac.authorization.k8s.io/calico-node created

daemonset.apps/calico-node created

deployment.apps/calico-kube-controllers created

root@k8s-master01:~#
验证:查看节点是否准备就绪?kube-system名称空间下的pods是否都running?
root@k8s-master01:~# kubectl get nodes

NAME                   STATUS   ROLES           AGE   VERSION

k8s-master01.ik8s.cc   Ready    control-plane   36m   v1.26.3

k8s-node01.ik8s.cc     Ready    control-plane   23m   v1.26.3

k8s-node02.ik8s.cc     Ready    control-plane   21m   v1.26.3

k8s-node03.ik8s.cc     Ready    control-plane   21m   v1.26.3

root@k8s-master01:~# kubectl get pods -n kube-system

NAME                                           READY   STATUS    RESTARTS      AGE

calico-kube-controllers-57b57c56f-qcr2v        1/1     Running   0             15m

calico-node-mg65h                              1/1     Running   0             104s

calico-node-pxmt6                              1/1     Running   0             92s

calico-node-ssft4                              1/1     Running   0             77s

calico-node-w97sq                              1/1     Running   0             84s

coredns-787d4945fb-8xkn2                       1/1     Running   0             36m

coredns-787d4945fb-sbcfq                       1/1     Running   0             36m

etcd-k8s-master01.ik8s.cc                      1/1     Running   0             36m

etcd-k8s-node01.ik8s.cc                        1/1     Running   0             23m

etcd-k8s-node02.ik8s.cc                        1/1     Running   0             21m

etcd-k8s-node03.ik8s.cc                        1/1     Running   0             21m

kube-apiserver-k8s-master01.ik8s.cc            1/1     Running   0             36m

kube-apiserver-k8s-node01.ik8s.cc              1/1     Running   0             23m

kube-apiserver-k8s-node02.ik8s.cc              1/1     Running   0             21m

kube-apiserver-k8s-node03.ik8s.cc              1/1     Running   0             21m

kube-controller-manager-k8s-master01.ik8s.cc   1/1     Running   1 (23m ago)   36m

kube-controller-manager-k8s-node01.ik8s.cc     1/1     Running   0             23m

kube-controller-manager-k8s-node02.ik8s.cc     1/1     Running   0             19m

kube-controller-manager-k8s-node03.ik8s.cc     1/1     Running   0             21m

kube-proxy-d9vd8                               1/1     Running   0             36m

kube-proxy-f96j6                               1/1     Running   0             21m

kube-proxy-hnqq2                               1/1     Running   0             23m

kube-proxy-mt57g                               1/1     Running   0             21m

kube-scheduler-k8s-master01.ik8s.cc            1/1     Running   1 (23m ago)   36m

kube-scheduler-k8s-node01.ik8s.cc              1/1     Running   0             23m

kube-scheduler-k8s-node02.ik8s.cc              1/1     Running   0             19m

kube-scheduler-k8s-node03.ik8s.cc              1/1     Running   0             21m

root@k8s-master01:~#
提示:可以看到kube-system名称空间下的pod都running且都是处于就绪状态,节点信息也都是处于就绪状态;至此基于cri-dockerd和docker的单master节点的k8s集群就搭建好了;
基于docker和cri-dockerd部署k8sv1.26.3的更多相关文章
- 基于Docker+Jenkins实现自动化部署
使用码云搭建Git代码存储仓库 https://gitee.com/login 使用码云创建私有私有git仓库 将本地springboot项目上传到git仓库中 基于Docker安装Jenkins环境 ...
- 007.基于Docker的Etcd分布式部署
一 环境准备 1.1 基础环境 ntp配置:略 #建议配置ntp服务,保证时间一致性 etcd版本:v3.3.9 防火墙及SELinux:关闭防火墙和SELinux 名称 地址 主机名 备注 etcd ...
- 十大基于Docker的开发工具
http://www.infoq.com/cn/news/2014/08/top-10-open-source-docker FlynnFlynn是一个使用Go语言编写的开源PaaS平台,Flynn使 ...
- 基于Docker配置本地Gitlab
技术背景 Github和Gitee(码云)是最常见的基于git的代码托管平台,现在基于svn的代码管理仓库已经相对比较少见了,大部分还都是企业内部的代码仓.但是基于开源的Gitlab,我们在企业内网也 ...
- 庐山真面目之九微服务架构 NetCore 基于 Docker 基础镜像和挂载文件部署
庐山真面目之九微服务架构 NetCore 基于 Docker 基础镜像和挂载文件部署 一.简介 我们在上一篇文章<庐山真面目之八微服务架构 NetCore 基于 Dockerfile ...
- 庐山真面目之十微服务架构 Net Core 基于 Docker 容器部署 Nginx 集群
庐山真面目之十微服务架构 Net Core 基于 Docker 容器部署 Nginx 集群 一.简介 前面的两篇文章,我们已经介绍了Net Core项目基于Docker容器部署在Linux服 ...
- 基于docker 如何部署surging分布式微服务引擎
1.前言 转眼间surging 开源已经有1年了,经过1年的打磨,surging已从最初在window 部署的分布式微服务框架,到现在的可以在docker部署利用rancher 进行服务编排的分布式微 ...
- 基于Docker部署nodejs应用
基于Docker部署nodejs应用 背景 公司基于Vue.js的项目最近需要部署到云端,因此需要先行在公司内部Docker环境下验证相关技术,因而有本文之前提. 本文展示在Docker容器中,应用部 ...
- 记基于docker+gunicorn部署sanic项目遇到的很多很多坑
前言: 最近有个项目需要上线,是python中sanic网络异步框架写的,并且要求使用docker+nginx来部署项目实现负载均衡,于是乎百度了sanic项目部署,基本上都是基于docker+gun ...
- 基于Docker搭建大数据集群(一)Docker环境部署
本篇文章是基于Docker搭建大数据集群系列的开篇之作 主要内容 docker搭建 docker部署CentOS 容器免密钥通信 容器保存成镜像 docker镜像发布 环境 Linux 7.6 一.D ...
随机推荐
- FastReport报表金额数字转大写问题
在使用FastReport报表打印的时候涉及到财务结算金额时,会用到大写,系统保存的都为数字,将数字转换为大写没有默认的系统内置函数,经过查阅资料,可通过对FastReport的页面设计代码修改实现: ...
- python Schedule
pip install schedule import schedule # 定义需要执行的方法 def job(): print("a simple scheduler in python ...
- SQL server——基础篇之数据完整性
定义:保证数据库中的数据在逻辑上的一致性.正确性和可靠性. 作用:防止无效数据或错误数据进入数据库 数据完整性包括:实体完整性.域完整性和参照完整性 实体完整性 规定表的每一行记录在表中是唯一的 实体 ...
- anaconda的环境变量
参考: (40条消息) Anaconda 环境变量手动设置(详细)_一夜星尘的博客-CSDN博客_anaconda环境变量手动设置
- 根据id 删除树结构中的数据
根据id 删除树结构中的数据 filterHandle(data, id) { var newData = data.filter(x => x ...
- 试题管理/在线课程/模拟考试/能力评估报告/艾思在线考试系统www.aisisoft.cn
艾思软件发布在线考试系统, 可独立部署, 欢迎咨询索要测试账号 一. 主要特点: ThinkPHP前后端分离框式开发 主要功能有: 在线视频课程, 模拟考试, 在线考试, 能力评估报告, 考试历史错题 ...
- CentOS DNS 安裝步驟
yum install bind bind-utils bind-devel bind-chroot [root@nw-centos-dns-01 ~]# rpm -qa | grep bind bi ...
- web自动化--窗口切换
窗口切换 handles = driver.window_handles ------获取所有窗口句柄,返回的数据是一个列表类型 driver.switch_to.window(handles[-1] ...
- 转发:前端组件化之Monorepo方案实战
前言 在上一篇的前端组件化方案探究中,我们研究了什么是组件化以及我们为什么需要组件化.也调研和测试了一些开源项目,并且在使用.学习.研究.对比之后最终确定了以 pnpm + workspace + c ...
- 解决idea单元测试@RunWith没有提示
换成idea有一个月了,很多功能慢慢熟悉,今天想测试一下web程序 @RunWith没有提示查看一下原来是 scope 作用域 idea上不支持