scvmm应答文件 无人值守安装系统
我们可以通过这种windows配置文件实现winpe、光盘等无人职守安装配置操作系统,在scvmm虚拟化平台中这种文件叫做应答文件。
下面为一个windows server 2008 r2的一个完整应答文件。
 <?xml version="1.0" encoding="utf-8"?>

 <unattend xmlns="urn:schemas-microsoft-com:unattend">

   <!--配置应用系统设置-->

   <settings pass="specialize">

     <component name="Microsoft-Windows-Shell-Setup" processorArchitecture="amd64" publicKeyToken="31bf3856ad364e35" language="neutral" versionScope="nonSxS" xmlns:wcm="http://schemas.microsoft.com/WMIConfig/2002/State" xmlns:xsi="http://www.w3.org/2001/XMLSchema-instance">

       <ComputerName>*</ComputerName>

       <RegisteredOrganization>test01</RegisteredOrganization>

       <ShowWindowsLive>false</ShowWindowsLive>

       <ProductKey>RKC6Y-7BD92-KHVMB-HGFBD-R2CR6</ProductKey>

     </component>

     <!--windows激活-->

     <component name="Microsoft-Windows-Security-Licensing-SLC-UX" processorArchitecture="amd64" publicKeyToken="31bf3856ad364e35" language="neutral" versionScope="nonSxS" xmlns:wcm="http://schemas.microsoft.com/WMIConfig/2002/State" xmlns:xsi="http://www.w3.org/2001/XMLSchema-instance">

       <SkipAutoActivation>false</SkipAutoActivation>

     </component>

     <!--ie相关配置-->

     <component name="Microsoft-Windows-IE-ESC" processorArchitecture="amd64" publicKeyToken="31bf3856ad364e35" language="neutral" versionScope="nonSxS" xmlns:wcm="http://schemas.microsoft.com/WMIConfig/2002/State" xmlns:xsi="http://www.w3.org/2001/XMLSchema-instance">

       <IEHardenAdmin>false</IEHardenAdmin>

       <IEHardenUser>false</IEHardenUser>

     </component>

     <!--配置应用系统设置-->

     <component name="Microsoft-Windows-TerminalServices-LocalSessionManager" processorArchitecture="amd64" publicKeyToken="31bf3856ad364e35" language="neutral" versionScope="nonSxS" xmlns:wcm="http://schemas.microsoft.com/WMIConfig/2002/State" xmlns:xsi="http://www.w3.org/2001/XMLSchema-instance">

       <fDenyTSConnections>false</fDenyTSConnections>

     </component>

     <!--ip配置-->

     <component name="Microsoft-Windows-TCPIP" processorArchitecture="amd64" publicKeyToken="31bf3856ad364e35" language="neutral" versionScope="nonSxS" xmlns:wcm="http://schemas.microsoft.com/WMIConfig/2002/State" xmlns:xsi="http://www.w3.org/2001/XMLSchema-instance">

       <Interfaces>

         <Interface wcm:action="add">

           <Ipv4Settings>

             <DhcpEnabled>false</DhcpEnabled>

             <RouterDiscoveryEnabled>false</RouterDiscoveryEnabled>

           </Ipv4Settings>

           <Identifier>

           </Identifier>

           <UnicastIpAddresses>

             <IpAddress wcm:action="add" wcm:keyValue="1">192.168.0.182/6</IpAddress>

           </UnicastIpAddresses>

           <Routes>

             <Route wcm:action="add">

               <Identifier>0</Identifier>

               <Prefix>0.0.0.0/0</Prefix>

               <NextHopAddress>255.255.255.0</NextHopAddress>

               <Metric>20</Metric>

             </Route>

           </Routes>

         </Interface>

         <Interface wcm:action="add">

           <Ipv4Settings>

             <DhcpEnabled>false</DhcpEnabled>

             <RouterDiscoveryEnabled>false</RouterDiscoveryEnabled>

           </Ipv4Settings>

           <UnicastIpAddresses>

             <IpAddress wcm:action="add" wcm:keyValue="1">192.168.3.1/8</IpAddress>

           </UnicastIpAddresses>

           <Identifier>

           </Identifier>

         </Interface>

       </Interfaces>

     </component>

     <!--dns配置-->

     <component name="Microsoft-Windows-DNS-Client" processorArchitecture="amd64" publicKeyToken="31bf3856ad364e35" language="neutral" versionScope="nonSxS" xmlns:wcm="http://schemas.microsoft.com/WMIConfig/2002/State" xmlns:xsi="http://www.w3.org/2001/XMLSchema-instance">

       <Interfaces>

         <Interface wcm:action="add">

           <DNSServerSearchOrder>

             <IpAddress wcm:action="add" wcm:keyValue="1">192.168.0.1</IpAddress>

             <IpAddress wcm:action="add" wcm:keyValue="2">

             </IpAddress>

           </DNSServerSearchOrder>

           <Identifier>

           </Identifier>

           <EnableAdapterDomainNameRegistration>false</EnableAdapterDomainNameRegistration>

           <DNSDomain>test01.com</DNSDomain>

           <DisableDynamicUpdate>true</DisableDynamicUpdate>

         </Interface>

         <Interface wcm:action="add">

           <DNSServerSearchOrder>

             <IpAddress wcm:action="add" wcm:keyValue="1">192.168.3.1</IpAddress>

             <IpAddress wcm:action="add" wcm:keyValue="2">

             </IpAddress>

           </DNSServerSearchOrder>

           <Identifier>

           </Identifier>

           <DisableDynamicUpdate>false</DisableDynamicUpdate>

           <EnableAdapterDomainNameRegistration>false</EnableAdapterDomainNameRegistration>

           <DNSDomain>test01.com</DNSDomain>

         </Interface>

       </Interfaces>

       <UseDomainNameDevolution>true</UseDomainNameDevolution>

       <DNSDomain>test01.com</DNSDomain>

     </component>

     <!--本地会话管理器-->

     <component name="Microsoft-Windows-ServerManager-SvrMgrNc" processorArchitecture="amd64" publicKeyToken="31bf3856ad364e35" language="neutral" versionScope="nonSxS" xmlns:wcm="http://schemas.microsoft.com/WMIConfig/2002/State" xmlns:xsi="http://www.w3.org/2001/XMLSchema-instance">

       <DoNotOpenServerManagerAtLogon>true</DoNotOpenServerManagerAtLogon>

     </component>

     <!--oobe-->

     <component name="Microsoft-Windows-OutOfBoxExperience" processorArchitecture="amd64" publicKeyToken="31bf3856ad364e35" language="neutral" versionScope="nonSxS" xmlns:wcm="http://schemas.microsoft.com/WMIConfig/2002/State" xmlns:xsi="http://www.w3.org/2001/XMLSchema-instance">

       <DoNotOpenInitialConfigurationTasksAtLogon>true</DoNotOpenInitialConfigurationTasksAtLogon>

     </component>

     <!--加入工作组-->

     <component name="Microsoft-Windows-UnattendedJoin" processorArchitecture="amd64" publicKeyToken="31bf3856ad364e35" language="neutral" versionScope="nonSxS" xmlns:wcm="http://schemas.microsoft.com/WMIConfig/2002/State" xmlns:xsi="http://www.w3.org/2001/XMLSchema-instance">

       <Identification>

         <JoinWorkgroup>WorkGroup</JoinWorkgroup>

       </Identification>

     </component>

   </settings>

   <!--欢迎界面配置阶段-->

   <settings pass="oobeSystem">

     <!--本地化-->

     <component name="Microsoft-Windows-International-Core" processorArchitecture="amd64" publicKeyToken="31bf3856ad364e35" language="neutral" versionScope="nonSxS" xmlns:wcm="http://schemas.microsoft.com/WMIConfig/2002/State" xmlns:xsi="http://www.w3.org/2001/XMLSchema-instance">

       <InputLocale>2052:00002052</InputLocale>

       <SystemLocale>zh-CN</SystemLocale>

       <UILanguage>zh-CN</UILanguage>

       <UserLocale>zh-CN</UserLocale>

     </component>

     <!--登录密码 分辨率等自定义设置-->

     <component name="Microsoft-Windows-Shell-Setup" processorArchitecture="amd64" publicKeyToken="31bf3856ad364e35" language="neutral" versionScope="nonSxS" xmlns:wcm="http://schemas.microsoft.com/WMIConfig/2002/State" xmlns:xsi="http://www.w3.org/2001/XMLSchema-instance">

       <RegisteredOrganization>test01</RegisteredOrganization>

       <UserAccounts>

         <AdministratorPassword>

           <Value>test01!</Value>

           <PlainText>true</PlainText>

         </AdministratorPassword>

       </UserAccounts>

       <OOBE>

         <HideEULAPage>true</HideEULAPage>

         <NetworkLocation>Work</NetworkLocation>

         <ProtectYourPC>2</ProtectYourPC>

         <SkipUserOOBE>true</SkipUserOOBE>

       </OOBE>

       <Display>

         <ColorDepth>32</ColorDepth>

         <HorizontalResolution>800</HorizontalResolution>

         <VerticalResolution>600</VerticalResolution>

       </Display>

       <TimeZone>China Standard Time</TimeZone>

     </component>

   </settings>

   <!--DVD或安装共享位置-->

   <cpi:offlineImage cpi:source="wim:c:/sources/install.wim#Windows Server 2008 R2 SERVERENTERPRISE" xmlns:cpi="urn:schemas-microsoft-com:cpi" />

 </unattend>
在应答文件执行中,可能会出现一些错误,比如当dns的mac地址置空时。
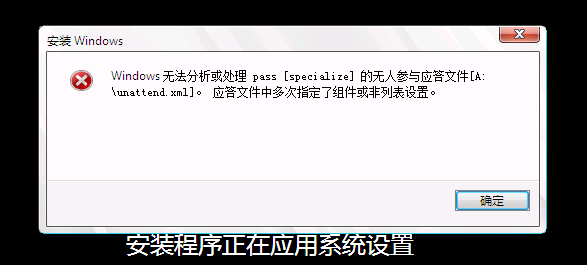
如果在scvmm中出现类似错误,手动去更改应答文件,重新执行作业,依然会出现错误,原因是此时应答文件已被写入vhd镜像。
scvmm应答文件 无人值守安装系统的更多相关文章
- 使用PXE+Kickstart无人值守安装系统
PXE预启动执行环境(即Preboot execute environment) 是一种能够让计算机通过网络启动的引导方式,只要网卡支持PXE协议即可使用,用于在无人值守安装系统服务中引导客户机安装服 ...
- PXE+Kickstart无人值守安装系统re
PXE(Preboot Excute Environment)预启动执行环境,可以让计算机通过网络启动系统,主要用于无人值守安装系统中引导客户端主机安装Linux操作系统. 由于之前有过使用cobbl ...
- 其他综合-Cobbler无人值守安装系统 CentOS 7
Cobbler 无人值守安装系统 CentOS 7 1.实验描述 1.1 概述 作为运维,在公司经常遇到一些机械性重复工作要做,例如:为新机器装系统,一台两台机器装系统,可以用光盘.U盘等介质安装,1 ...
- 其他综合-Kickstart无人值守安装系统CentOS 7
Kickstart无人值守安装系统CentOS 7 1.概述 1.1 关于PXE Preboot Execution Environment 翻译过来就是预启动执行环境:简称 PXE :传统安装操作系 ...
- KickStart 无人值守安装系统
一.简介 1.1 什么是PXE PXE(Pre-boot Execution Environment,预启动执行环境)是由Intel公司开发的最新技术,工作于Client/Server的网络模式,支持 ...
- Kickstart无人值守安装系统
1.导言 已经或未来将从事Linux系统运维工作的读者,经常会遇到一些机器式的重复的共走,例如:有时间同时上线几十甚至上百台服务器,而且需要我们在短时间内完成系统安装. q 光盘安装系统===> ...
- CentOS7.x安装cobbler无人值守安装系统
CentOS7.x cobbler无人值守安装 cobbler介绍 自打若干年前 Red Hat,推出了 Kickstart,不再需要刻了光盘一台一台地安装 Linux,只要搞定 PXE.DHCP.T ...
- Cobbler无人值守安装系统
环境说明 系统版本 CentOS 6.9 x86_64 Cobbler是一款Linux安装服务器,可以快速设置网络安装环境.它粘合在一起并自动执行许多相关的Linux任务,因此部署新系统时不必在 ...
- [ 总结 ] Linux kickstart 无人值守安装系统构建过程
环境:Vmare + Linux虚拟机 注意:网卡桥接
随机推荐
- keil里面填数据
编译后寄存器和堆栈的内存数据可以直接写进去的. 寄存器,双击就可以,注意里面是十六进制 堆栈,也是十六进制,八位的 00 00 00 00 ,但这个是从右到左的,比如0x00000006 应该填 06 ...
- 基于七牛Python SDK写的一个同步脚本
需求背景 最近刚搭了个markdown静态博客,想把博客的图片放到云存储中. 经过调研觉得七牛可以满足我个人的需求,就选它了. 博客要引用图片就要先将图片上传到云上. 虽然七牛网站后台可以上传文件,但 ...
- Delphi 拖动
interface uses Windows, Messages, SysUtils, Classes, Graphics, Controls, Forms, Dialogs; type TForm1 ...
- addClass()使用方法
含义:为元素添加指定的样式名 具体用法分为以下两种: 1.可以一次添加一个或者多个用空格隔开的样式名 例: <script> $("ul li").addClass(& ...
- UNITY 带spriterender的对象导出为prefab时主贴图丢失的BUG
从场景导出带有sprite的对象为prefab时贴图丢失的BUG.解决方案:对场景中每个sprite重新赋一下贴图,然后导出就好了,原因不明. 补充:这个有时候是因为贴图类型不是 2D AND UI ...
- Python常见函数用法
1. shape()函数 在numpy模块 输入参数:类似数组(比如列表,元组)等,或是数组 返回:一个整型数字的元组,元组中的每个元素表示相应的数组每一维的长度 # shape[0]返回对象的行数, ...
- iOS多线程编程之NSOperation和NSOperationQueue的使用
前一篇 <iOS多线程编程之NSThread的使用> 介绍三种多线程编程和NSThread的使用,这篇介绍NSOperation的使用. 使用 NSOperation的方式有两种, 一种是 ...
- systemd 配置文件
[Unit]区块通常是配置文件的第一个区块,用来定义 Unit 的元数据,以及配置与其他 Unit 的关系.它的主要字段如下. Description:简短描述 Documentation:文档地址 ...
- Standard shader 和 Standard (Specular setup) Shader
http://blog.csdn.net/jk823394954/article/details/48594341
- SpringBoot整合SpringData和Mysql数据库
1.新建maven项目(具体的新建过程就不细说了) 2.添加maven依赖,也就是在pom.xml文件添加项目的依赖jar包: <project xmlns="http://maven ...