
Red Hat7.2 上安装 MySQL5.5.58
1、首先查看linux版本:cat /etc/redhat-release
Red Hat Enterprise Linux Server release 7.2 (Maipo)
2.Linux查看版本说明当前CPU运行在32bit模式下, 但不代表CPU不支持64bit):
getconf LONG_BIT
64.
3.关闭防护墙
查看:
chkconfig --list | grep iptables
chkconfig iptables off (设置自动启动为关闭)
(# chkconfig --del iptables (移除开机自动启动))
4.当官方网站上下载对应的mysql, 根据上面信息
https://dev.mysql.com/downloads/mysql/5.5.html?os=31&version=5.1
下载(mysql-5.7.20-1.el7.x86_64.rpm-bundle.tar)
bundle版本的 是要安装的全部包括了,方便
5.用 ssh 工具上次的linux 上对应一个文件
[root@node04 Downloads]# ll
total 235312
-rw-r--r-- 1 root root 172994560 Oct 21 15:33 MySQL-5.5.58-1.el7.x86_64.rpm-bundle.tar
6. 注意:的是要切换的root用户 使用 su root切换用户
解压之后就是出现了好多的rpm文件
解压mysql5.5的安装包
tar -xvf MySQL-5.5.39-2.el6.x86_64.rpm-bundle.tar
但是安装只需要需要如下几个文件:
[root@node04 Downloads]# ll
-rw-r--r-- 1 7155 31415 16025016 Sep 14 14:24 MySQL-client-5.5.58-1.el7.x86_64.rpm
-rw-r--r-- 1 7155 31415 4394260 Sep 14 14:24 MySQL-devel-5.5.58-1.el7.x86_64.rpm
-rw-r--r-- 1 7155 31415 47529380 Sep 14 14:24 MySQL-server-5.5.58-1.el7.x86_64.rpm
7. 利用 rpm 安装 文件
rpm -ivh MySQL-client-5.5.58-1.el7.x86_64.rpm
rpm -ivh MySQL-devel-5.5.58-1.el7.x86_64.rpm
rpm -ivh MySQL-server-5.5.58-1.el7.x86_64.rpm
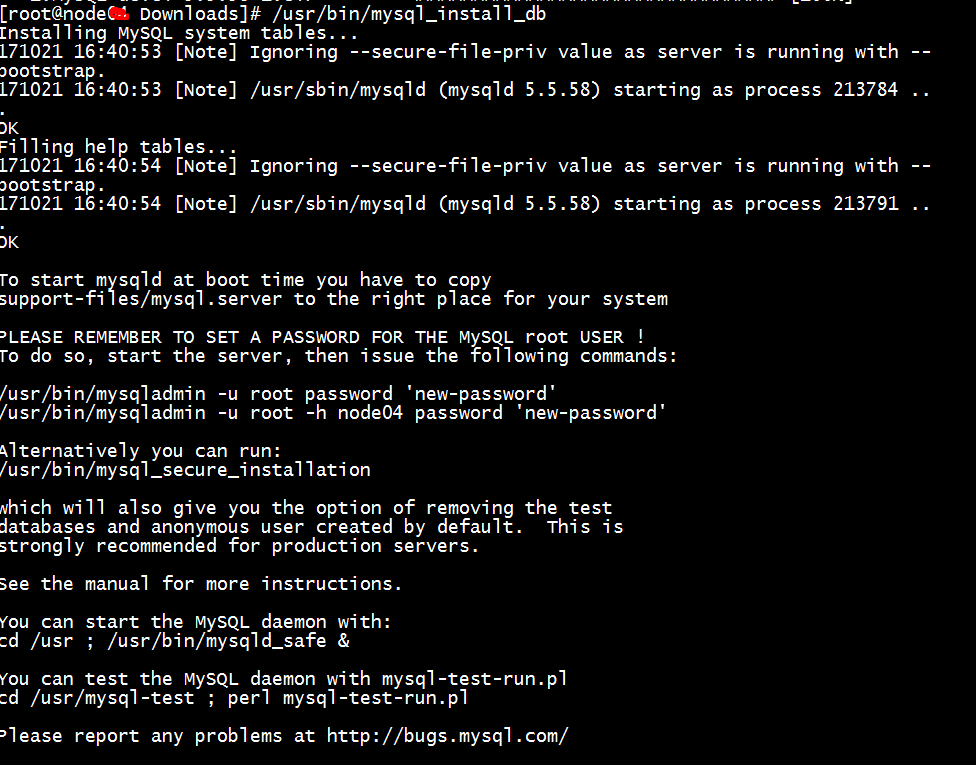
8. 接着就是初始化数据库。十分简单
/usr/bin/mysql_install_db
如图:
9.接下来就是查看mysql的状态
service mysql status

可能是应为 有进程在占用 ,或者 磁盘已满 (查看命令df -h)
查看进程:netstat -anp | grep mysql
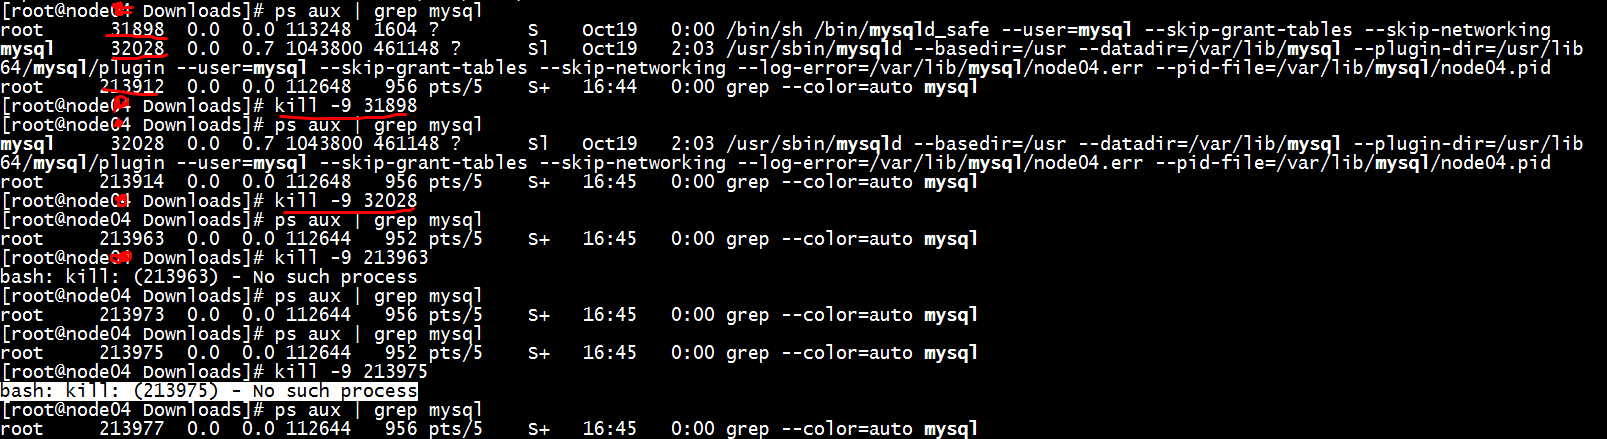
将里面 启动的进程杀死 。 kill -9 进程id
11. 启动一下
/etc/init.d/mysql start
[root@node04 Downloads]# /etc/init.d/mysql start
Starting MySQL SUCCESS!
12.进入mysql
[root@node04 Downloads]# mysql
Welcome to the MySQL monitor. Commands end with ; or \g.
Your MySQL connection id is 1
Server version: 5.5.58 MySQL Community Server (GPL)
Copyright (c) 2000, 2017, Oracle and/or its affiliates. All rights reserved.
Oracle is a registered trademark of Oracle Corporation and/or its
affiliates. Other names may be trademarks of their respective
owners.
Type 'help;' or '\h' for help. Type '\c' to clear the current input statement.
mysql> update mysql.user set password=PASSWORD('xxxxx') where user='root'; --将root 的密码改为 xxxx (xxxx 是你自己设置的密码)
Query OK, 4 rows affected (0.00 sec)
Rows matched: 4 Changed: 4 Warnings: 0
mysql> flush privileges;
Query OK, 0 rows affected (0.00 sec)
mysql> grant all on *.* to root@'%' identified by '123456' WITH GRANT OPTION;
Query OK, 0 rows affected (0.00 sec)
mysql> FLUSH PRIVILEGES
-> ;
Query OK, 0 rows affected (0.00 sec)
mysql> exit
-- 本地登录一下,可以,远程登录也可以
[root@node04 Downloads]# mysql -uroot -p
Enter password:
Welcome to the MySQL monitor. Commands end with ; or \g.
Your MySQL connection id is 144
Server version: 5.5.58 MySQL Community Server (GPL)
Copyright (c) 2000, 2017, Oracle and/or its affiliates. All rights reserved.
Oracle is a registered trademark of Oracle Corporation and/or its
affiliates. Other names may be trademarks of their respective
owners.
Type 'help;' or '\h' for help. Type '\c' to clear the current input statement.
mysql>
好的,安装成功!
Red Hat7.2 上安装 MySQL5.5.58的更多相关文章
- 在 CentOS7 上安装 MySQL5.7
在 CentOS7 上安装 MySQL5.7 1 通过 SecureCRT 连接到阿里云 CentOS7 服务器: 2 进入到目录 /usr/local/ 中: cd /usr/local/ 3 创建 ...
- 在centos上安装mysql5.7的三种方法
带OS信息的是已编译的二进制文件,不带OS信息的是源码包 mysql-5.7.14-linux-glibc2.5-x86_64.tar.gz 二进制包 mysql-5.5.51.tar.gz 源码包 ...
- CentOS 6.9上安装mysql-5.6.36
CentOS 6.9上安装mysql-5.6.36 1.准备数据存放的文件系统 新建一个逻辑卷,并将其挂载至特定目录即可.这里不再给出过程. 这里假设其逻辑卷的挂载目录为/data,而后需要创建/da ...
- CentOS6.7上安装Mysql5.7
CentOS6.7上安装Mysql5.7 2017年07月22日 18:27:05 阅读数:564 环境的配置总是令人作呕,所以这次表明版本条件: 首先,这是一台新机器 其次,CentOS版本如下: ...
- 通过xshell在linux上安装mysql5.7(终极版)
通过xshell在linux上安装mysql5.7(终极版) 0)通过xshell连接到远程服务器 1)彻底删除原来安装的mysql 首先查看:rpm -qa|grep -i mysql 删除操作(一 ...
- CentOS 6.9上安装mysql-5.6.37
CentOS 6.9上安装mysql-5.6.37 1.准备数据存放的文件系统 新建一个逻辑卷,并将其挂载至特定目录即可.这里不再给出过程. 这里假设其逻辑卷的挂载目录为/data,而后需要创建/da ...
- linux上安装mysql5.6
CentOS-6.6+MySQL-5.6 部署环境操作系统:CentOS-6.6-x86_64-bin-DVD1.isoMySQL 版本:mysql-5.6.26.tar.gz操作用户:root系统 ...
- 在CentOS6.8系统上安装MySQL5.7(转)
mysql-57">如何在CentOS 6.8系统上安装MySQL 5.7? 一.检查系统上是否已经安装MySQL 命令: ? 1 2 3 4 5 [root@localhost ~] ...
- mac os 10.10.4 上安装mysql5.6.26
在 Mac 系统上, 安装 MySQL Server 通常是用 DMG 包在图形化界面下按提示安装, 此外 MySQL 还提供了 Compressed TAR Archive 二进制包安装方式, 即免 ...
随机推荐
- jquery click()方法模拟点击事件对a标签不生效的解决办法
阅读数:8971 <a href="www.baidu.com"></a> 1 问题分析 点击A标签本身,并不会触发跳转到指定链接的事件,就是说,我们平时都 ...
- Visual Studio 2013中引入Web Service的简单方法visual studio 引用 wsdl
http://blog.csdn.net/wangzhongbo_24/article/details/49954191 Web Service有三种表示方式 三种方式分别为WSDL.Endpoint ...
- GROUP BY中ROLLUP/CUBE/GROUPING/GROUPING SETS使用示例
oracle group by中rollup和cube的区别: Oracle的GROUP BY语句除了最基本的语法外,还支持ROLLUP和CUBE语句.CUBE ROLLUP 是用于统计数据的. 实验 ...
- Go语言之进阶篇mysql增 删 改 查
一.mysql操作基本语法 1.创建名称nulige的数据库 CREATE DATABASE nulige DEFAULT CHARSET utf8 COLLATE utf8_general_ci; ...
- 第三章 Typescript 基本数据类型
Typescript 基本数据类型 一.基本数据类型 Boolean Number String Array Tuple Enum Any Void Null 和 Undefined Never 二. ...
- 使用C#反射机制访问类的私有成员【转】
首先我必须承认访问一个类的私有成员不是什么好做法.大家也都知道私有成员在外部是不能被访问的.而一个类中会存在很多私有成员:如私有字段.私有属性.私有方法.对于私有成员访问,可以套用下面这种非常好的方式 ...
- Permutation Sequence leetcode java
题目: The set [1,2,3,…,n] contains a total of n! unique permutations. By listing and labeling all of t ...
- 本地时间转化成 GMT 时间
DateTime.Now.ToUniversalTime().ToString("yyMMddHHmmss");
- 清空npm缓存
nodejs 清空 npm 缓存 npm cache clean -f
- Elasticsearch之集群脑裂
https://www.cnblogs.com/zlslch/p/6477312.html