tensorflow读取训练数据方法
1. 预加载数据 Preloaded data
# coding: utf-8

import tensorflow as tf

# 设计Graph

x1 = tf.constant([2, 3, 4])

x2 = tf.constant([4, 0, 1])

y = tf.add(x1, x2)

with tf.Session() as sess:

  print sess.run(y)

# output:

# [6 3 5]
预加载数据方式是将训练数据直接内嵌到tf的图中,需要提前将数据加载到内存里,在数据量比较大,或者说在实际训练中,基本不可行。
2. 声明占位符,运行时Feeding数据
# coding: utf-8

import tensorflow as tf

# 设计Graph

x1 = tf.placeholder(tf.int16)

x2 = tf.placeholder(tf.int16)

epoch_num = 0

# 用Python产生数据

data = [2, 3, 4]

label= [1, 0, 1]

with tf.Session() as sess:

  while epoch_num <len(data):

    print sess.run((x1,x2), feed_dict={x1: data[epoch_num], x2: label[epoch_num]})

    epoch_num+=1

# output:

# (array(2, dtype=int16), array(1, dtype=int16))

# (array(3, dtype=int16), array(0, dtype=int16))

# (array(4, dtype=int16), array(1, dtype=int16))
声明占位符是在训练过程中Feeding填充数据,可以选择把所有数据一次性加载到内存,每次取一个batch的数据出来训练,也可以选择把数据通过python建立一个生成器,每次加载一个batch的数据出来训练,加载方式比较灵活但是效率相对比较低。
3. 从文件直接读取数据
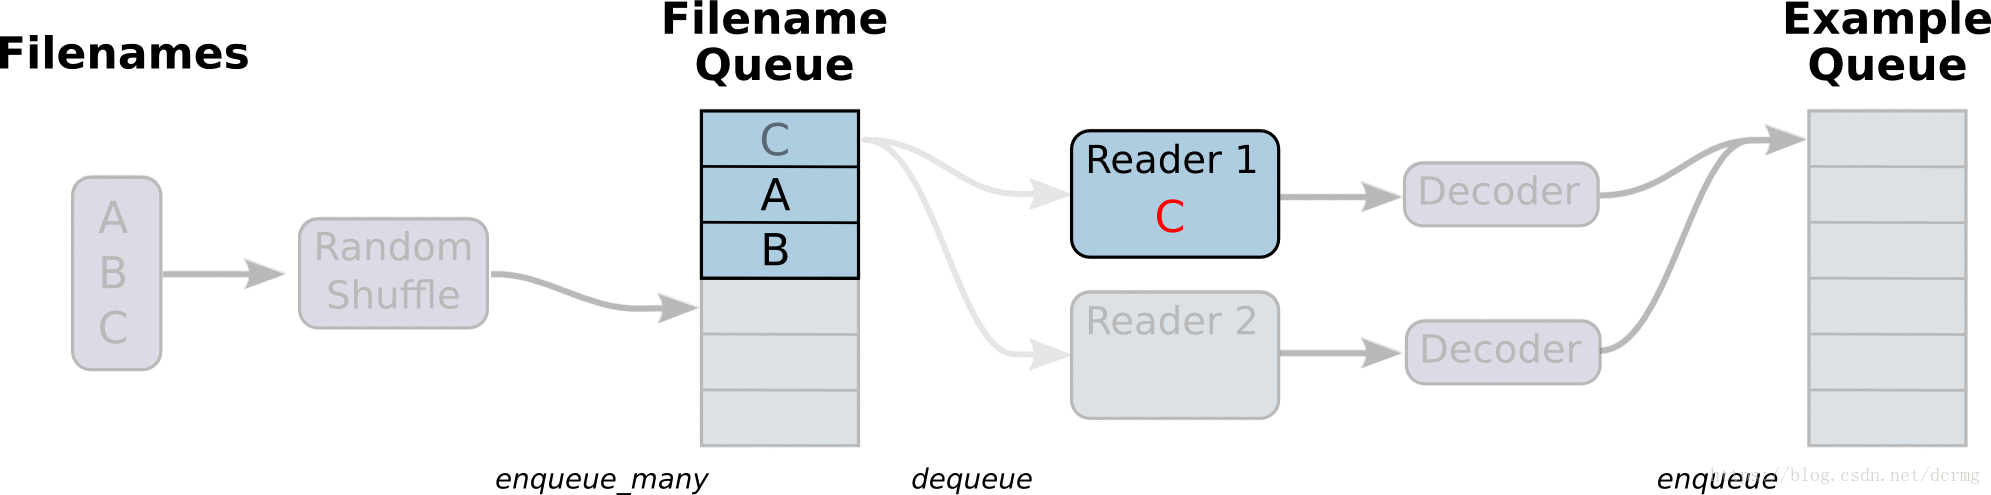
从文件读取数据的方式是在Graph图中定义好文件读取的方式,在Session会话中启动(一个或多个)线程,把训练数据异步加载到内存(样本)队列中(先加载到文件名队列中,tf自动读取到内存队列中),通过队列管理器进行管理,执行效率较高,工作流程示意图:
# -*- coding:utf-8 -*-

import tensorflow as tf

import numpy as np

# 样本个数

sample_num = 5

# 设置迭代次数

epoch_num = 2

# 设置一个批次中包含样本个数

batch_size = 3

# 计算每一轮epoch中含有的batch个数

batch_total = int(sample_num / batch_size) + 1

# 生成4个数据和标签

def generate_data(sample_num=sample_num):

    labels = np.asarray(range(0, sample_num))

    images = np.random.random([sample_num, 224, 224, 3])

    print('image size {},label size :{}'.format(images.shape, labels.shape))

    return images, labels

def get_batch_data(batch_size=batch_size):

    images, label = generate_data()

    # 数据类型转换为tf.float32

    images = tf.cast(images, tf.float32)

    label = tf.cast(label, tf.int32)

    # 从tensor列表中按顺序或随机抽取一个tensor准备放入文件名称队列

    input_queue = tf.train.slice_input_producer([images, label], num_epochs=epoch_num, shuffle=False)

    # 从文件名称队列中读取文件准备放入文件队列

    image_batch, label_batch = tf.train.batch(input_queue, batch_size=batch_size, num_threads=2, capacity=64,

                                              allow_smaller_final_batch=False)

    return image_batch, label_batch

image_batch, label_batch = get_batch_data(batch_size=batch_size)

with tf.Session() as sess:

    # 先执行初始化工作

    sess.run(tf.global_variables_initializer())

    sess.run(tf.local_variables_initializer())

    # 开启一个协调器

    coord = tf.train.Coordinator()

    # 使用start_queue_runners 启动队列填充

    threads = tf.train.start_queue_runners(sess, coord)

    try:

        while not coord.should_stop():

            print '************'

            # 获取每一个batch中batch_size个样本和标签

            image_batch_v, label_batch_v = sess.run([image_batch, label_batch])

            print(image_batch_v.shape, label_batch_v)

    except tf.errors.OutOfRangeError:  # 如果读取到文件队列末尾会抛出此异常

        print("done! now lets kill all the threads……")

    finally:

        # 协调器coord发出所有线程终止信号

        coord.request_stop()

        print('all threads are asked to stop!')

    coord.join(threads)  # 把开启的线程加入主线程,等待threads结束

    print('all threads are stopped!')

# output:

# image size (5, 224, 224, 3),label size :(5,)

# ************

# ((3, 224, 224, 3), array([0, 1, 2], dtype=int32))

# ************

# ((3, 224, 224, 3), array([3, 0, 4], dtype=int32))

# ************

# ((3, 224, 224, 3), array([1, 2, 3], dtype=int32))

# ************

# done! now lets kill all the threads……

# all threads are asked to stop!

# all threads are stopped!
与从文件直接读取训练数据对应的还有一种方式是先把数据写入TFRecords二进制文件,再从队列中读取。
TFRecords方式相比直接读取训练文件,效率更高,特别是在训练文件比较多的情况下,缺点是需要额外编码处理TFRecords,不够直观。
4. Tensorflow 动态图机制(Eager Execution)下的Dataset数据读取
Tensorflow动态图机制支持图上的运算动态执行,更方便网络模型搭建和程序调试,不再需要通过sess.run()才能执行所定义的运算,调试时可以直接查看变量的值,做到了“所见即所得”,动态图运算应该是未来tensorflow发展的方向。
动图模式下就必须使用Dataset API来读取数据。
tensorflow 1.3 版本中,Dataset API是在contrib包的,1.4以后版本中,Dataset 放到了data中:
tf.contrib.data.Dataset  #1.3

tf.data.Dataset  # 1.4
Dataset 读取数据示例:
# -*- coding:utf-8 -*-

import tensorflow as tf

import numpy as np

dataset = tf.contrib.data.Dataset.from_tensor_slices(np.array([0,1,2,3,4,5]))

iterator = dataset.make_one_shot_iterator()

one_element = iterator.get_next()

with tf.Session() as sess:

  for i in range(5):

    print(sess.run(one_element))

# output:

# 0

# 1

# 2

# 3

# 4
Dataset 读取训练图片文件示例:
# 将图片文件名列表中的图片文件读入,缩放到指定的size大小

def _parse_function(filename, label, size=[128,128]):

  image_string = tf.read_file(filename)

  image_decoded = tf.image.decode_image(image_string)

  image_resized = tf.image.resize_images(image_decoded, size)

  return image_resized, label

# 图片文件名列表

filenames = tf.constant(["/var/data/image1.jpg", "/var/data/image2.jpg", ...])

# 图片文件标签

labels = tf.constant([0, 37, ...])

# 建立一个数据集,它的每一个元素是文件列表的一个切片

dataset = tf.data.Dataset.from_tensor_slices((filenames, labels))

# 对数据集中的图片文件resize

dataset = dataset.map(_parse_function)

# 对数据集中的图片文件组成一个一个batch,并对数据集扩展10次,相当于可以训练10轮

dataset = dataset.shuffle(buffersize=1000).batch(32).repeat(10)
tensorflow读取训练数据方法的更多相关文章
- Java学习-029-JSON 之三 -- 模仿 cssSelector 封装读取 JSON 数据方法
前文简单介绍了如何通过 json-20141113.jar 提供的功能获取 JSON 的数据,敬请参阅:Java学习-028-JSON 之二 -- 数据读取. 了解学习过 JQuery 的朋友都知道, ...
- JAVA中读取xls数据方法介绍
用例编号(UI-0001) 用例名称({验证页面跳转|验证元素文本}-简要明确表述) 验证类型 是否执行 初始URL 初始元素xpath 目标元素xpath 目标元素属性 期望结果 UI-0001 验 ...
- TensorFlow读取CSV数据(批量)
直接上代码: # -*- coding:utf-8 -*- import tensorflow as tf def read_data(file_queue): reader = tf.TextLin ...
- TensorFlow读取CSV数据
代码来源于官方文档,做了一些小小的调整: # -*- coding:utf-8 -*- import tensorflow as tf filename_queue = tf.train.string ...
- tensorflow 读取训练集文件 from Hadoop
1.代码配置 filename_queue = tf.train.string_input_producer([ "hdfs://namenode:8020/path/to/file1.cs ...
- Tensorflow读取文件到队列文件
TensorFlow读取二进制文件数据到队列 2016-11-03 09:30:00 0个评论 来源:diligent_321的博客 收藏 我要投稿 TensorFlow是一种 ...
- Windows下Python读取GRIB数据
之前写了一篇<基于Python的GRIB数据可视化>的文章,好多博友在评论里问我Windows系统下如何读取GRIB数据,在这里我做一下说明. 一.在Windows下Python为什么无法 ...
- javascript读取xml文件读取节点数据的例子
分享下用javascript读取xml文件读取节点数据方法. 读取的节点数据,还有一种情况是读取节点属性数据. <head> <title></title> < ...
- 第十二节,TensorFlow读取数据的几种方法以及队列的使用
TensorFlow程序读取数据一共有3种方法: 供给数据(Feeding): 在TensorFlow程序运行的每一步, 让Python代码来供给数据. 从文件读取数据: 在TensorFlow图的起 ...
随机推荐
- ubuntu14.04上 nginx启动停止
sudo service nginx stop 停止 sudo nginx 启动
- VS2010_x86_编译错误
1.两个头文件 相互include 报出来的错误,没有直接说是 嵌套include,而是这个现象: error: C4430: 缺少类型说明符 - 假定为 int.注意: C++ 不支持默认 int ...
- eclipse Git配置
Git 1:选择git 2:下载对应版本 安装 Git常用命令: 显示信息类命令 git ls-files -u 显示冲突的文件,-s是显示标记为冲突已解决的文件 git diff 对比工作区和st ...
- Redis<六> Key通用操作
1). KEYS pattern : 查找所有符合给定模式 pattern 的 key . 如 keys * , keys *list* 2). DEL key [key ...] : 删除给定的一个 ...
- mtime 的具体解释
find . -mtime +0 # find files modified greater than 24 hours ago find . -mtime 0 # find files modifi ...
- python-day7--%s与%d的使用,python2中的input及raw_input
#coding:utf-8 #utf-8格式打开#%s %d# name='egon'# age=18# print('my name is',name)# print('my name is my ...
- OAF日志使用总结
本文的完成感谢葛严大神授权使用LogUtil类,其次感谢Tavor大神的EBS OAF开发日志(见: EBS OAF开发中日志(Logging) ). 日志的使用是一门极大的学问,若读者有兴趣,可以自 ...
- IDEA2017安装actibpmn插件中文乱码问题解决
1.修改idea安装目录下的两个文件 C:\Program Files\JetBrains\IntelliJ IDEA 2017.1.4\bin\idea.exe.vmoptions C:\Progr ...
- Oracle12cr1新特性之容器数据库(CDB)和可插拔数据库(PDB) 的启动和关闭
Oracle12c中引入的多宿主选项(multitenant option)允许一个容器数据库容纳多个独立的可插拔数据库(PDB).本文将说明如何启动和关闭容器数据库(CDB)和可插拔数据库(PDB) ...
- JavaScript学习总结(四)——逻辑OR运算符详解
在JavaScript中,逻辑OR运算符用||表示 1 var bTrue = true; 2 var bFalse = false; 3 var bResult = bTrue || bFalse; ...