SnowFlake --- 分布式id生成算法
转载自:https://segmentfault.com/a/1190000011282426
概述
SnowFlake算法生成id的结果是一个64bit大小的整数,它的结构如下图:
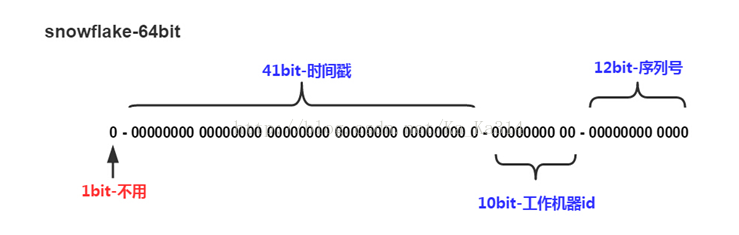
1位,不用。二进制中最高位为1的都是负数,但是我们生成的id一般都使用整数,所以这个最高位固定是041位,用来记录时间戳(毫秒)。<ul style="margin-left:3em;"><li>41位可以表示241−1个数字,</li>
<li>如果只用来表示正整数(计算机中正数包含0),可以表示的数值范围是:0 至 241−1,减1是因为可表示的数值范围是从0开始算的,而不是1。</li>
<li>也就是说41位可以表示241−1个毫秒的值,转化成单位年则是(241−1)/(1000∗60∗60∗24∗365)=69年</li>
</ul></li>
<li>
<p><code>10位</code>,用来记录工作机器id。</p> <ul style="margin-left:3em;"><li>可以部署在210=1024个节点,包括<code>5位datacenterId</code>和<code>5位workerId</code></li>
<li><code>5位(bit)</code>可以表示的最大正整数是25−1=31,即可以用0、1、2、3、....31这32个数字,来表示不同的datecenterId或workerId</li>
</ul></li>
<li>
<p><code>12位</code>,序列号,用来记录同毫秒内产生的不同id。</p> <ul style="margin-left:3em;"><li><code>12位(bit)</code>可以表示的最大正整数是212−1=4096,即可以用0、1、2、3、....4095这4096个数字,来表示同一机器同一时间截(毫秒)内产生的4096个ID序号</li>
</ul></li>
由于在Java中64bit的整数是long类型,所以在Java中SnowFlake算法生成的id就是long来存储的。
SnowFlake可以保证:
- 所有生成的id按时间趋势递增
- 整个分布式系统内不会产生重复id(因为有datacenterId和workerId来做区分)
Talk is cheap, show you the code
以下是Twitter官方原版的,用Scala写的,(我也不懂Scala,当成Java看即可):
-
/** Copyright 2010-2012 Twitter, Inc.*/
-
package com.twitter.service.snowflake
-
-
import com.twitter.ostrich.stats.Stats
-
import com.twitter.service.snowflake.gen._
-
import java.util.Random
-
import com.twitter.logging.Logger
-
-
/**
-
* An object that generates IDs.
-
* This is broken into a separate class in case
-
* we ever want to support multiple worker threads
-
* per process
-
*/
-
class IdWorker(
-
val workerId: Long,
-
val datacenterId: Long,
-
private val reporter: Reporter,
-
var sequence: Long = 0L) extends Snowflake.Iface {
-
-
private[this] def genCounter(agent: String) = {
-
Stats.incr("ids_generated")
-
Stats.incr("ids_generated_%s".format(agent))
-
}
-
private[this] val exceptionCounter = Stats.getCounter("exceptions")
-
private[this] val log = Logger.get
-
private[this] val rand = new Random
-
-
val twepoch = 1288834974657L
-
-
private[this] val workerIdBits = 5L
-
private[this] val datacenterIdBits = 5L
-
private[this] val maxWorkerId = -1L ^ (-1L << workerIdBits)
-
private[this] val maxDatacenterId = -1L ^ (-1L << datacenterIdBits)
-
private[this] val sequenceBits = 12L
-
-
private[this] val workerIdShift = sequenceBits
-
private[this] val datacenterIdShift = sequenceBits + workerIdBits
-
private[this] val timestampLeftShift = sequenceBits + workerIdBits + datacenterIdBits
-
private[this] val sequenceMask = -1L ^ (-1L << sequenceBits)
-
-
private[this] var lastTimestamp = -1L
-
-
// sanity check for workerId
-
if (workerId > maxWorkerId || workerId < 0) {
-
exceptionCounter.incr(1)
-
throw new IllegalArgumentException("worker Id can't be greater than %d or less than 0".format(maxWorkerId))
-
}
-
-
if (datacenterId > maxDatacenterId || datacenterId < 0) {
-
exceptionCounter.incr(1)
-
throw new IllegalArgumentException("datacenter Id can't be greater than %d or less than 0".format(maxDatacenterId))
-
}
-
-
log.info("worker starting. timestamp left shift %d, datacenter id bits %d, worker id bits %d, sequence bits %d, workerid %d",
-
timestampLeftShift, datacenterIdBits, workerIdBits, sequenceBits, workerId)
-
-
def get_id(useragent: String): Long = {
-
if (!validUseragent(useragent)) {
-
exceptionCounter.incr(1)
-
throw new InvalidUserAgentError
-
}
-
-
val id = nextId()
-
genCounter(useragent)
-
-
reporter.report(new AuditLogEntry(id, useragent, rand.nextLong))
-
id
-
}
-
-
def get_worker_id(): Long = workerId
-
def get_datacenter_id(): Long = datacenterId
-
def get_timestamp() = System.currentTimeMillis
-
-
protected[snowflake] def nextId(): Long = synchronized {
-
var timestamp = timeGen()
-
-
if (timestamp < lastTimestamp) {
-
exceptionCounter.incr(1)
-
log.error("clock is moving backwards. Rejecting requests until %d.", lastTimestamp);
-
throw new InvalidSystemClock("Clock moved backwards. Refusing to generate id for %d milliseconds".format(
-
lastTimestamp - timestamp))
-
}
-
-
if (lastTimestamp == timestamp) {
-
sequence = (sequence + 1) & sequenceMask
-
if (sequence == 0) {
-
timestamp = tilNextMillis(lastTimestamp)
-
}
-
} else {
-
sequence = 0
-
}
-
-
lastTimestamp = timestamp
-
((timestamp - twepoch) << timestampLeftShift) |
-
(datacenterId << datacenterIdShift) |
-
(workerId << workerIdShift) |
-
sequence
-
}
-
-
protected def tilNextMillis(lastTimestamp: Long): Long = {
-
var timestamp = timeGen()
-
while (timestamp <= lastTimestamp) {
-
timestamp = timeGen()
-
}
-
timestamp
-
}
-
-
protected def timeGen(): Long = System.currentTimeMillis()
-
-
val AgentParser = """([a-zA-Z][a-zA-Z\-0-9]*)""".r
-
-
def validUseragent(useragent: String): Boolean = useragent match {
-
case AgentParser(_) => true
-
case _ => false
-
}
-
}
Scala是一门可以编译成字节码的语言,简单理解是在Java语法基础上加上了很多语法糖,例如不用每条语句后写分号,可以使用动态类型等等。抱着试一试的心态,我把Scala版的代码“翻译”成Java版本的,对scala代码改动的地方如下:
-
/** Copyright 2010-2012 Twitter, Inc.*/
-
package com.twitter.service.snowflake
-
-
import com.twitter.ostrich.stats.Stats
-
import com.twitter.service.snowflake.gen._
-
import java.util.Random
-
import com.twitter.logging.Logger
-
-
/**
-
* An object that generates IDs.
-
* This is broken into a separate class in case
-
* we ever want to support multiple worker threads
-
* per process
-
*/
-
class IdWorker( // |
-
val workerId: Long, // |
-
val datacenterId: Long, // |<--这部分改成Java的构造函数形式
-
private val reporter: Reporter,//日志相关,删 // |
-
var sequence: Long = 0L) // |
-
extends Snowflake.Iface { //接口找不到,删 // |
-
-
private[this] def genCounter(agent: String) = { // |
-
Stats.incr("ids_generated") // |
-
Stats.incr("ids_generated_%s".format(agent)) // |<--错误、日志处理相关,删
-
} // |
-
private[this] val exceptionCounter = Stats.getCounter("exceptions") // |
-
private[this] val log = Logger.get // |
-
private[this] val rand = new Random // |
-
-
val twepoch = 1288834974657L
-
-
private[this] val workerIdBits = 5L
-
private[this] val datacenterIdBits = 5L
-
private[this] val maxWorkerId = -1L ^ (-1L << workerIdBits)
-
private[this] val maxDatacenterId = -1L ^ (-1L << datacenterIdBits)
-
private[this] val sequenceBits = 12L
-
-
private[this] val workerIdShift = sequenceBits
-
private[this] val datacenterIdShift = sequenceBits + workerIdBits
-
private[this] val timestampLeftShift = sequenceBits + workerIdBits + datacenterIdBits
-
private[this] val sequenceMask = -1L ^ (-1L << sequenceBits)
-
-
private[this] var lastTimestamp = -1L
-
-
//----------------------------------------------------------------------------------------------------------------------------//
-
// sanity check for workerId //
-
if (workerId > maxWorkerId || workerId < 0) { //
-
exceptionCounter.incr(1) //<--错误处理相关,删 //
-
throw new IllegalArgumentException("worker Id can't be greater than %d or less than 0".format(maxWorkerId)) //这
-
// |-->改成:throw new IllegalArgumentException //部
-
// (String.format("worker Id can't be greater than %d or less than 0",maxWorkerId)) //分
-
} //放
-
//到
-
if (datacenterId > maxDatacenterId || datacenterId < 0) { //构
-
exceptionCounter.incr(1) //<--错误处理相关,删 //造
-
throw new IllegalArgumentException("datacenter Id can't be greater than %d or less than 0".format(maxDatacenterId)) //函
-
// |-->改成:throw new IllegalArgumentException //数
-
// (String.format("datacenter Id can't be greater than %d or less than 0",maxDatacenterId)) //中
-
} //
-
//
-
log.info("worker starting. timestamp left shift %d, datacenter id bits %d, worker id bits %d, sequence bits %d, workerid %d", //
-
timestampLeftShift, datacenterIdBits, workerIdBits, sequenceBits, workerId) //
-
// |-->改成:System.out.printf("worker...%d...",timestampLeftShift,...); //
-
//----------------------------------------------------------------------------------------------------------------------------//
-
-
//-------------------------------------------------------------------//
-
//这个函数删除错误处理相关的代码后,剩下一行代码:val id = nextId() //
-
//所以我们直接调用nextId()函数可以了,所以在“翻译”时可以删除这个函数 //
-
def get_id(useragent: String): Long = { //
-
if (!validUseragent(useragent)) { //
-
exceptionCounter.incr(1) //
-
throw new InvalidUserAgentError //删
-
} //除
-
//
-
val id = nextId() //
-
genCounter(useragent) //
-
//
-
reporter.report(new AuditLogEntry(id, useragent, rand.nextLong)) //
-
id //
-
} //
-
//-------------------------------------------------------------------//
-
-
def get_worker_id(): Long = workerId // |
-
def get_datacenter_id(): Long = datacenterId // |<--改成Java函数
-
def get_timestamp() = System.currentTimeMillis // |
-
-
protected[snowflake] def nextId(): Long = synchronized { // 改成Java函数
-
var timestamp = timeGen()
-
-
if (timestamp < lastTimestamp) {
-
exceptionCounter.incr(1) // 错误处理相关,删
-
log.error("clock is moving backwards. Rejecting requests until %d.", lastTimestamp); // 改成System.err.printf(...)
-
throw new InvalidSystemClock("Clock moved backwards. Refusing to generate id for %d milliseconds".format(
-
lastTimestamp - timestamp)) // 改成RumTimeException
-
}
-
-
if (lastTimestamp == timestamp) {
-
sequence = (sequence + 1) & sequenceMask
-
if (sequence == 0) {
-
timestamp = tilNextMillis(lastTimestamp)
-
}
-
} else {
-
sequence = 0
-
}
-
-
lastTimestamp = timestamp
-
((timestamp - twepoch) << timestampLeftShift) | // |<--加上关键字return
-
(datacenterId << datacenterIdShift) | // |
-
(workerId << workerIdShift) | // |
-
sequence // |
-
}
-
-
protected def tilNextMillis(lastTimestamp: Long): Long = { // 改成Java函数
-
var timestamp = timeGen()
-
while (timestamp <= lastTimestamp) {
-
timestamp = timeGen()
-
}
-
timestamp // 加上关键字return
-
}
-
-
protected def timeGen(): Long = System.currentTimeMillis() // 改成Java函数
-
-
val AgentParser = """([a-zA-Z][a-zA-Z\-0-9]*)""".r // |
-
// |
-
def validUseragent(useragent: String): Boolean = useragent match { // |<--日志相关,删
-
case AgentParser(_) => true // |
-
case _ => false // |
-
} // |
-
}
改出来的Java版:
-
public class IdWorker{
-
-
private long workerId;
-
private long datacenterId;
-
private long sequence;
-
-
public IdWorker(long workerId, long datacenterId, long sequence){
-
// sanity check for workerId
-
if (workerId > maxWorkerId || workerId < 0) {
-
throw new IllegalArgumentException(String.format("worker Id can't be greater than %d or less than 0",maxWorkerId));
-
}
-
if (datacenterId > maxDatacenterId || datacenterId < 0) {
-
throw new IllegalArgumentException(String.format("datacenter Id can't be greater than %d or less than 0",maxDatacenterId));
-
}
-
System.out.printf("worker starting. timestamp left shift %d, datacenter id bits %d, worker id bits %d, sequence bits %d, workerid %d",
-
timestampLeftShift, datacenterIdBits, workerIdBits, sequenceBits, workerId);
-
-
this.workerId = workerId;
-
this.datacenterId = datacenterId;
-
this.sequence = sequence;
-
}
-
-
private long twepoch = 1288834974657L;
-
-
private long workerIdBits = 5L;
-
private long datacenterIdBits = 5L;
-
private long maxWorkerId = -1L ^ (-1L << workerIdBits);
-
private long maxDatacenterId = -1L ^ (-1L << datacenterIdBits);
-
private long sequenceBits = 12L;
-
-
private long workerIdShift = sequenceBits;
-
private long datacenterIdShift = sequenceBits + workerIdBits;
-
private long timestampLeftShift = sequenceBits + workerIdBits + datacenterIdBits;
-
private long sequenceMask = -1L ^ (-1L << sequenceBits);
-
-
private long lastTimestamp = -1L;
-
-
public long getWorkerId(){
-
return workerId;
-
}
-
-
public long getDatacenterId(){
-
return datacenterId;
-
}
-
-
public long getTimestamp(){
-
return System.currentTimeMillis();
-
}
-
-
public synchronized long nextId() {
-
long timestamp = timeGen();
-
-
if (timestamp < lastTimestamp) {
-
System.err.printf("clock is moving backwards. Rejecting requests until %d.", lastTimestamp);
-
throw new RuntimeException(String.format("Clock moved backwards. Refusing to generate id for %d milliseconds",
-
lastTimestamp - timestamp));
-
}
-
-
if (lastTimestamp == timestamp) {
-
sequence = (sequence + 1) & sequenceMask;
-
if (sequence == 0) {
-
timestamp = tilNextMillis(lastTimestamp);
-
}
-
} else {
-
sequence = 0;
-
}
-
-
lastTimestamp = timestamp;
-
return ((timestamp - twepoch) << timestampLeftShift) |
-
(datacenterId << datacenterIdShift) |
-
(workerId << workerIdShift) |
-
sequence;
-
}
-
-
private long tilNextMillis(long lastTimestamp) {
-
long timestamp = timeGen();
-
while (timestamp <= lastTimestamp) {
-
timestamp = timeGen();
-
}
-
return timestamp;
-
}
-
-
private long timeGen(){
-
return System.currentTimeMillis();
-
}
-
-
//---------------测试---------------
-
public static void main(String[] args) {
-
IdWorker worker = new IdWorker(1,1,1);
-
for (int i = 0; i < 30; i++) {
-
System.out.println(worker.nextId());
-
}
-
}
-
-
}
代码理解
上面的代码中,有部分位运算的代码,如:
-
sequence = (sequence + 1) & sequenceMask;
-
-
private long maxWorkerId = -1L ^ (-1L << workerIdBits);
-
-
return ((timestamp - twepoch) << timestampLeftShift) |
-
(datacenterId << datacenterIdShift) |
-
(workerId << workerIdShift) |
-
sequence;
为了能更好理解,我对相关知识研究了一下。
负数的二进制表示
在计算机中,负数的二进制是用补码来表示的。
假设我是用Java中的int类型来存储数字的,
int类型的大小是32个二进制位(bit),即4个字节(byte)。(1 byte = 8 bit)
那么十进制数字3在二进制中的表示应该是这样的:
-
00000000 00000000 00000000 00000011
-
// 3的二进制表示,就是原码
那数字-3在二进制中应该如何表示?
我们可以反过来想想,因为-3+3=0,
在二进制运算中把-3的二进制看成未知数x来求解,
求解算式的二进制表示如下:
-
-
00000000 00000000 00000000 00000011 //3,原码
-
+ xxxxxxxx xxxxxxxx xxxxxxxx xxxxxxxx //-3,补码
-
-----------------------------------------------
-
00000000 00000000 00000000 00000000
反推x的值,3的二进制加上什么值才使结果变成00000000 00000000 00000000 00000000?:
-
00000000 00000000 00000000 00000011 //3,原码
-
+ 11111111 11111111 11111111 11111101 //-3,补码
-
-----------------------------------------------
-
1 00000000 00000000 00000000 00000000
反推的思路是3的二进制数从最低位开始逐位加1,使溢出的1不断向高位溢出,直到溢出到第33位。然后由于int类型最多只能保存32个二进制位,所以最高位的1溢出了,剩下的32位就成了(十进制的)0。
补码的意义就是可以拿补码和原码(3的二进制)相加,最终加出一个“溢出的0”
以上是理解的过程,实际中记住公式就很容易算出来:
- 补码 = 反码 + 1
- 补码 = (原码 - 1)再取反码
因此-1的二进制应该这样算:
-
00000000 00000000 00000000 00000001 //原码:1的二进制
-
11111111 11111111 11111111 11111110 //取反码:1的二进制的反码
-
11111111 11111111 11111111 11111111 //加1:-1的二进制表示(补码)
用位运算计算n个bit能表示的最大数值
比如这样一行代码:
-
-
private long workerIdBits = 5L;
-
private long maxWorkerId = -1L ^ (-1L << workerIdBits);
上面代码换成这样看方便一点:long maxWorkerId = -1L ^ (-1L << 5L)
咋一看真的看不准哪个部分先计算,于是查了一下Java运算符的优先级表: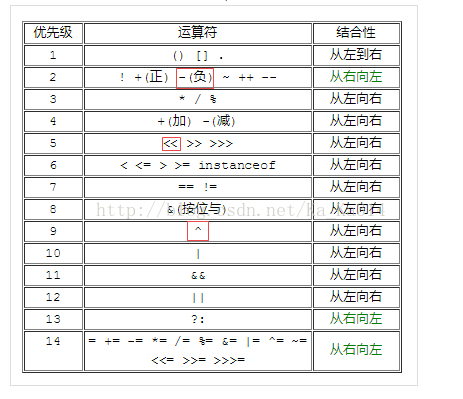
所以上面那行代码中,运行顺序是:
- -1 左移 5,得结果a
- -1 异或 a
long maxWorkerId = -1L ^ (-1L << 5L)的二进制运算过程如下:
-1 左移 5,得结果a :
-
11111111 11111111 11111111 11111111 //-1的二进制表示(补码)
-
11111 11111111 11111111 11111111 11100000 //高位溢出的不要,低位补0
-
11111111 11111111 11111111 11100000 //结果a
-1 异或 a :
-
11111111 11111111 11111111 11111111 //-1的二进制表示(补码)
-
^ 11111111 11111111 11111111 11100000 //两个操作数的位中,相同则为0,不同则为1
-
---------------------------------------------------------------------------
-
00000000 00000000 00000000 00011111 //最终结果31
最终结果是31,二进制00000000 00000000 00000000 00011111转十进制可以这么算:
24+23+22+21+20=16+8+4+2+1=31
那既然现在知道算出来long maxWorkerId = -1L ^ (-1L << 5L)中的maxWorkerId = 31,有什么含义?为什么要用左移5来算?如果你看过概述部分,请找到这段内容看看:
5位(bit)可以表示的最大正整数是25−1=31,即可以用0、1、2、3、....31这32个数字,来表示不同的datecenterId或workerId
-1L ^ (-1L << 5L)结果是31,25−1的结果也是31,所以在代码中,-1L ^ (-1L << 5L)的写法是利用位运算计算出5位能表示的最大正整数是多少
用mask防止溢出
有一段有趣的代码:
sequence = (sequence + 1) & sequenceMask;
分别用不同的值测试一下,你就知道它怎么有趣了:
-
long seqMask = -1L ^ (-1L << 12L); //计算12位能耐存储的最大正整数,相当于:2^12-1 = 4095
-
System.out.println("seqMask: "+seqMask);
-
System.out.println(1L & seqMask);
-
System.out.println(2L & seqMask);
-
System.out.println(3L & seqMask);
-
System.out.println(4L & seqMask);
-
System.out.println(4095L & seqMask);
-
System.out.println(4096L & seqMask);
-
System.out.println(4097L & seqMask);
-
System.out.println(4098L & seqMask);
-
-
-
/**
-
seqMask: 4095
-
1
-
2
-
3
-
4
-
4095
-
0
-
1
-
2
-
*/
这段代码通过位与运算保证计算的结果范围始终是 0-4095 !
用位运算汇总结果
还有另外一段诡异的代码:
-
return ((timestamp - twepoch) << timestampLeftShift) |
-
(datacenterId << datacenterIdShift) |
-
(workerId << workerIdShift) |
-
sequence;
为了弄清楚这段代码,
首先 需要计算一下相关的值:
-
-
private long twepoch = 1288834974657L; //起始时间戳,用于用当前时间戳减去这个时间戳,算出偏移量
-
-
private long workerIdBits = 5L; //workerId占用的位数:5
-
private long datacenterIdBits = 5L; //datacenterId占用的位数:5
-
private long maxWorkerId = -1L ^ (-1L << workerIdBits); // workerId可以使用的最大数值:31
-
private long maxDatacenterId = -1L ^ (-1L << datacenterIdBits); // datacenterId可以使用的最大数值:31
-
private long sequenceBits = 12L;//序列号占用的位数:12
-
-
private long workerIdShift = sequenceBits; // 12
-
private long datacenterIdShift = sequenceBits + workerIdBits; // 12+5 = 17
-
private long timestampLeftShift = sequenceBits + workerIdBits + datacenterIdBits; // 12+5+5 = 22
-
private long sequenceMask = -1L ^ (-1L << sequenceBits);//4095
-
-
private long lastTimestamp = -1L;
其次 写个测试,把参数都写死,并运行打印信息,方便后面来核对计算结果:
-
-
//---------------测试---------------
-
public static void main(String[] args) {
-
long timestamp = 1505914988849L;
-
long twepoch = 1288834974657L;
-
long datacenterId = 17L;
-
long workerId = 25L;
-
long sequence = 0L;
-
-
System.out.printf("\ntimestamp: %d \n",timestamp);
-
System.out.printf("twepoch: %d \n",twepoch);
-
System.out.printf("datacenterId: %d \n",datacenterId);
-
System.out.printf("workerId: %d \n",workerId);
-
System.out.printf("sequence: %d \n",sequence);
-
System.out.println();
-
System.out.printf("(timestamp - twepoch): %d \n",(timestamp - twepoch));
-
System.out.printf("((timestamp - twepoch) << 22L): %d \n",((timestamp - twepoch) << 22L));
-
System.out.printf("(datacenterId << 17L): %d \n" ,(datacenterId << 17L));
-
System.out.printf("(workerId << 12L): %d \n",(workerId << 12L));
-
System.out.printf("sequence: %d \n",sequence);
-
-
long result = ((timestamp - twepoch) << 22L) |
-
(datacenterId << 17L) |
-
(workerId << 12L) |
-
sequence;
-
System.out.println(result);
-
-
}
-
-
/** 打印信息:
-
timestamp: 1505914988849
-
twepoch: 1288834974657
-
datacenterId: 17
-
workerId: 25
-
sequence: 0
-
-
(timestamp - twepoch): 217080014192
-
((timestamp - twepoch) << 22L): 910499571845562368
-
(datacenterId << 17L): 2228224
-
(workerId << 12L): 102400
-
sequence: 0
-
910499571847892992
-
*/
代入位移的值得之后,就是这样:
-
return ((timestamp - 1288834974657) << 22) |
-
(datacenterId << 17) |
-
(workerId << 12) |
-
sequence;
对于尚未知道的值,我们可以先看看概述 中对SnowFlake结构的解释,再代入在合法范围的值(windows系统可以用计算器方便计算这些值的二进制),来了解计算的过程。
当然,由于我的测试代码已经把这些值写死了,那直接用这些值来手工验证计算结果即可:
-
long timestamp = 1505914988849L;
-
long twepoch = 1288834974657L;
-
long datacenterId = 17L;
-
long workerId = 25L;
-
long sequence = 0L;
-
设:timestamp = 1505914988849,twepoch = 1288834974657
-
1505914988849 - 1288834974657 = 217080014192 (timestamp相对于起始时间的毫秒偏移量),其(a)二进制左移22位计算过程如下:
-
-
|<--这里开始左右22位
-
00000000 00000000 000000|00 00110010 10001010 11111010 00100101 01110000 // a = 217080014192
-
00001100 10100010 10111110 10001001 01011100 00|000000 00000000 00000000 // a左移22位后的值(la)
-
|<--这里后面的位补0
-
设:datacenterId = 17,其(b)二进制左移17位计算过程如下:
-
-
|<--这里开始左移17位
-
00000000 00000000 0|0000000 00000000 00000000 00000000 00000000 00010001 // b = 17
-
00000000 00000000 00000000 00000000 00000000 0010001|0 00000000 00000000 // b左移17位后的值(lb)
-
|<--这里后面的位补0
-
设:workerId = 25,其(c)二进制左移12位计算过程如下:
-
-
|<--这里开始左移12位
-
00000000 0000|0000 00000000 00000000 00000000 00000000 00000000 00011001 // c = 25
-
00000000 00000000 00000000 00000000 00000000 00000001 1001|0000 00000000 // c左移12位后的值(lc)
-
|<--这里后面的位补0
-
设:sequence = 0,其二进制如下:
-
-
00000000 00000000 00000000 00000000 00000000 00000000 00000000 00000000 // sequence = 0
现在知道了每个部分左移后的值(la,lb,lc),代码可以简化成下面这样去理解:
-
return ((timestamp - 1288834974657) << 22) |
-
(datacenterId << 17) |
-
(workerId << 12) |
-
sequence;
-
-----------------------------
-
|
-
|简化
-
\|/
-
-----------------------------
-
return (la) |
-
(lb) |
-
(lc) |
-
sequence;
上面的管道符号|在Java中也是一个位运算符。其含义是:x的第n位和y的第n位 只要有一个是1,则结果的第n位也为1,否则为0,因此,我们对四个数的位或运算如下:
-
1 | 41 | 5 | 5 | 12
-
-
0|0001100 10100010 10111110 10001001 01011100 00|00000|0 0000|0000 00000000 //la
-
0|0000000 00000000 00000000 00000000 00000000 00|10001|0 0000|0000 00000000 //lb
-
0|0000000 00000000 00000000 00000000 00000000 00|00000|1 1001|0000 00000000 //lc
-
or 0|0000000 00000000 00000000 00000000 00000000 00|00000|0 0000|0000 00000000 //sequence
-
------------------------------------------------------------------------------------------
-
0|0001100 10100010 10111110 10001001 01011100 00|10001|1 1001|0000 00000000 //结果:910499571847892992
结果计算过程:
1) 从至左列出1出现的下标(从0开始算):
-
0000 1 1 00 1 0 1 000 1 0 1 0 1 1 1 1 1 0 1 000 1 00 1 0 1 0 1 1 1 0000 1 000 1 1 1 00 1 0000 0000 0000
-
59 58 55 53 49 47 45 44 43 42 41 39 35 32 30 28 27 26 21 17 16 15 12
2) 各个下标作为2的幂数来计算,并相加:
259+258+255+253+249+247+245+244+243+242+241+239+235+232+230+228+227+226+221+217+216+215+22
-
2^59} : 576460752303423488
-
2^58} : 288230376151711744
-
2^55} : 36028797018963968
-
2^53} : 9007199254740992
-
2^49} : 562949953421312
-
2^47} : 140737488355328
-
2^45} : 35184372088832
-
2^44} : 17592186044416
-
2^43} : 8796093022208
-
2^42} : 4398046511104
-
2^41} : 2199023255552
-
2^39} : 549755813888
-
2^35} : 34359738368
-
2^32} : 4294967296
-
2^30} : 1073741824
-
2^28} : 268435456
-
2^27} : 134217728
-
2^26} : 67108864
-
2^21} : 2097152
-
2^17} : 131072
-
2^16} : 65536
-
2^15} : 32768
-
+ 2^12} : 4096
-
----------------------------------------
-
910499571847892992
计算截图: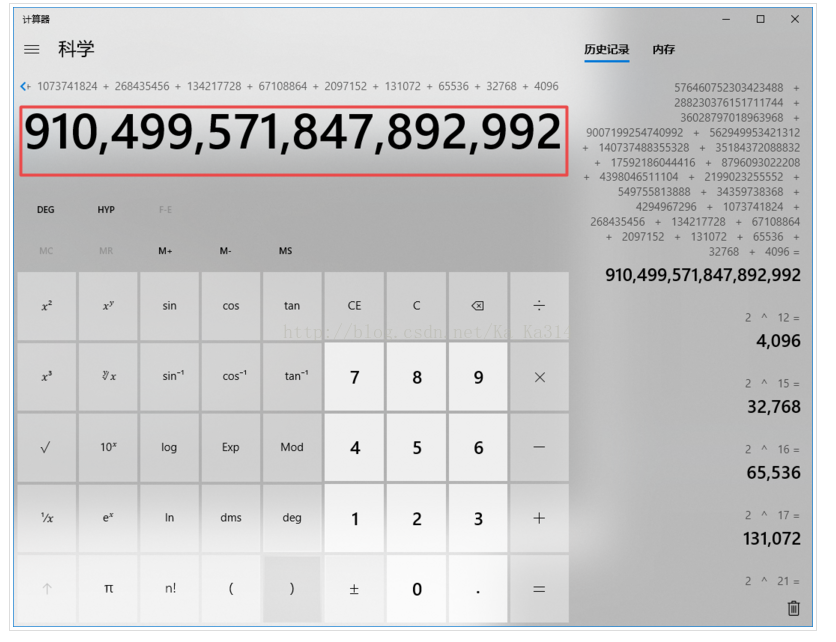
跟测试程序打印出来的结果一样,手工验证完毕!
观察
-
1 | 41 | 5 | 5 | 12
-
-
0|0001100 10100010 10111110 10001001 01011100 00| | | //la
-
0| |10001| | //lb
-
0| | |1 1001| //lc
-
or 0| | | |0000 00000000 //sequence
-
------------------------------------------------------------------------------------------
-
0|0001100 10100010 10111110 10001001 01011100 00|10001|1 1001|0000 00000000 //结果:910499571847892992
上面的64位我按1、41、5、5、12的位数截开了,方便观察。
纵向观察发现:<ul style="margin-left:3em;"><li>在41位那一段,除了la一行有值,其它行(lb、lc、sequence)都是0,(我爸其它)</li>
<li>在左起第一个5位那一段,除了lb一行有值,其它行都是0</li>
<li>在左起第二个5位那一段,除了lc一行有值,其它行都是0</li>
<li>按照这规律,如果sequence是0以外的其它值,12位那段也会有值的,其它行都是0</li>
</ul></li>
<li>
<p><code>横向</code>观察发现:</p> <ul style="margin-left:3em;"><li>在la行,由于左移了5+5+12位,5、5、12这三段都补0了,所以la行除了41那段外,其它肯定都是0</li>
<li>同理,lb、lc、sequnece行也以此类推</li>
<li>正因为左移的操作,使四个不同的值移到了SnowFlake理论上相应的位置,然后四行做<code>位或</code>运算(只要有1结果就是1),就把4段的二进制数合并成一个二进制数。</li>
</ul></li>
结论:
所以,在这段代码中
-
return ((timestamp - 1288834974657) << 22) |
-
(datacenterId << 17) |
-
(workerId << 12) |
-
sequence;
左移运算是为了将数值移动到对应的段(41、5、5,12那段因为本来就在最右,因此不用左移)。
然后对每个左移后的值(la、lb、lc、sequence)做位或运算,是为了把各个短的数据合并起来,合并成一个二进制数。
最后转换成10进制,就是最终生成的id
扩展
在理解了这个算法之后,其实还有一些扩展的事情可以做:
- 根据自己业务修改每个位段存储的信息。算法是通用的,可以根据自己需求适当调整每段的大小以及存储的信息。
- 解密id,由于id的每段都保存了特定的信息,所以拿到一个id,应该可以尝试反推出原始的每个段的信息。反推出的信息可以帮助我们分析。比如作为订单,可以知道该订单的生成日期,负责处理的数据中心等等。
原文地址:https://blog.csdn.net/Ka_Ka314/article/details/79594485
SnowFlake --- 分布式id生成算法的更多相关文章
- Twitter的SnowFlake分布式id生成算法
二进制相关知识回顾 1.所有的数据都是以二进制的形式存储在硬盘上.对于一个字节的8位到底是什么类型 计算机是如何分辨的呢? 其实计算机并不负责判断数据类型,数据类型是程序告诉计算机该如何解释内存块. ...
- 理解分布式id生成算法SnowFlake
理解分布式id生成算法SnowFlake https://segmentfault.com/a/1190000011282426#articleHeader2 分布式id生成算法的有很多种,Twitt ...
- 分布式 ID 生成算法 — SnowFlake
一.概述 分布式 ID 生成算法的有很多种,Twitter 的 SnowFlake 就是其中经典的一种. SnowFlake 算法生成 ID 的结果是一个 64bit 大小的整数,它的结构如下图: 1 ...
- 美团技术分享:深度解密美团的分布式ID生成算法
本文来自美团技术团队“照东”的分享,原题<Leaf——美团点评分布式ID生成系统>,收录时有勘误.修订并重新排版,感谢原作者的分享. 1.引言 鉴于IM系统中聊天消息ID生成算法和生成策略 ...
- SnowFlake分布式ID生成及反解析
概述 分布式id生成算法的有很多种,Twitter的SnowFlake就是其中经典的一种,SnowFlake算法生成id的结果是一个64bit大小的整数,它的结构如下图: 1位,不用.二进制中最高位为 ...
- java 分布式id生成算法
import java.lang.management.ManagementFactory; import java.net.InetAddress; import java.net.NetworkI ...
- 细聊分布式ID生成方法
细聊分布式ID生成方法 https://mp.weixin.qq.com/s?__biz=MjM5ODYxMDA5OQ==&mid=403837240&idx=1&sn=ae9 ...
- Leaf:美团分布式ID生成服务开源
Leaf是美团基础研发平台推出的一个分布式ID生成服务,名字取自德国哲学家.数学家莱布尼茨的一句话:“There are no two identical leaves in the world.”L ...
- 分布式系统的唯一id生成算法你了解吗?
在分库分表之后你必然要面对的一个问题,就是id咋生成? 因为要是一个表分成多个表之后,每个表的id都是从1开始累加自增长,那肯定不对啊. 举个例子,你的订单表拆分为了1024张订单表,每个表的id都从 ...
随机推荐
- 解决MySQL在导入大文件时候,出现MySQL Server has gone away的问题
编辑/etc/my.cnf文件,在[myslqd]节点,添加 max_allowed_packet = 64M 随后重启MySQL即可.
- rabbitMQ实现推迟队列
一. 使用原生Api 1.RabbitMQ 相关 <dependency> <groupId>com.rabbitmq</groupId> <artifact ...
- ELKStack之极速入门(上)
ELKStack之极速入门(上) 链接:https://pan.baidu.com/s/1V2aYpB86ZzxL21Hf-AF1rA 提取码:7izv 复制这段内容后打开百度网盘手机App,操作更方 ...
- mongodb Access control is not enabled for the database 无访问控制解决方案
转载:https://blog.csdn.net/q1056843325/article/details/70941697 今天使用MongoDB时遇到了一些问题 建立数据库连接时出现了warning ...
- Code Festival 2017 Qual B E Popping Balls
传送门 神仙计数! 我的计数真的好差啊= = 不过这个题真的神仙 看了题解把整个过程在草稿纸上重写了一遍才想明白= =(一张草稿纸就没有了!!!) 计数的关键就是在于 枚举的有效性和独立性[不能重复计 ...
- JDK1.8新特性之Stream类初识
JDK1.8新特性之Stream类初识 import java.util.Arrays; import java.util.List; import java.util.Optional; impor ...
- Java Web学习总结(8)JSP(二)
一,JSP中的九个内置对象 名称 类型 描述 out javax.servlet.jsp.JspWriter 用于页面输出 request javax.servlet.http.HttpServlet ...
- 【bzoj1458】士兵占领(最大流||有源汇最大流)
转载 http://hzwer.com/2963.html Description 有一个M * N的棋盘,有的格子是障碍.现在你要选择一些格子来放置一些士兵,一个格子里最多可以放置一个士兵,障碍格里 ...
- SEERC 2018 I - Inversion (Gym - 101964I) DP
Gym - 101964I 题意 有一个数组\(p\),如果满足\(i<j,p_i>p_j\),则\(i,j\)之间就有一条边相连,问存在多少个集合满足集合内的元素互不相连,且集合外的元素 ...
- mysql审计插件
Audit Plugin安装使用 原文: https://www.cnblogs.com/waynechou/p/mysql_audit.html#_label0 #有卸载方法 下载地址: htt ...