react native 之 redux 使用套路
redux是什么?他是一个state容器,这个容器中存放所有页面的state。
redux的运作方式是怎样的?
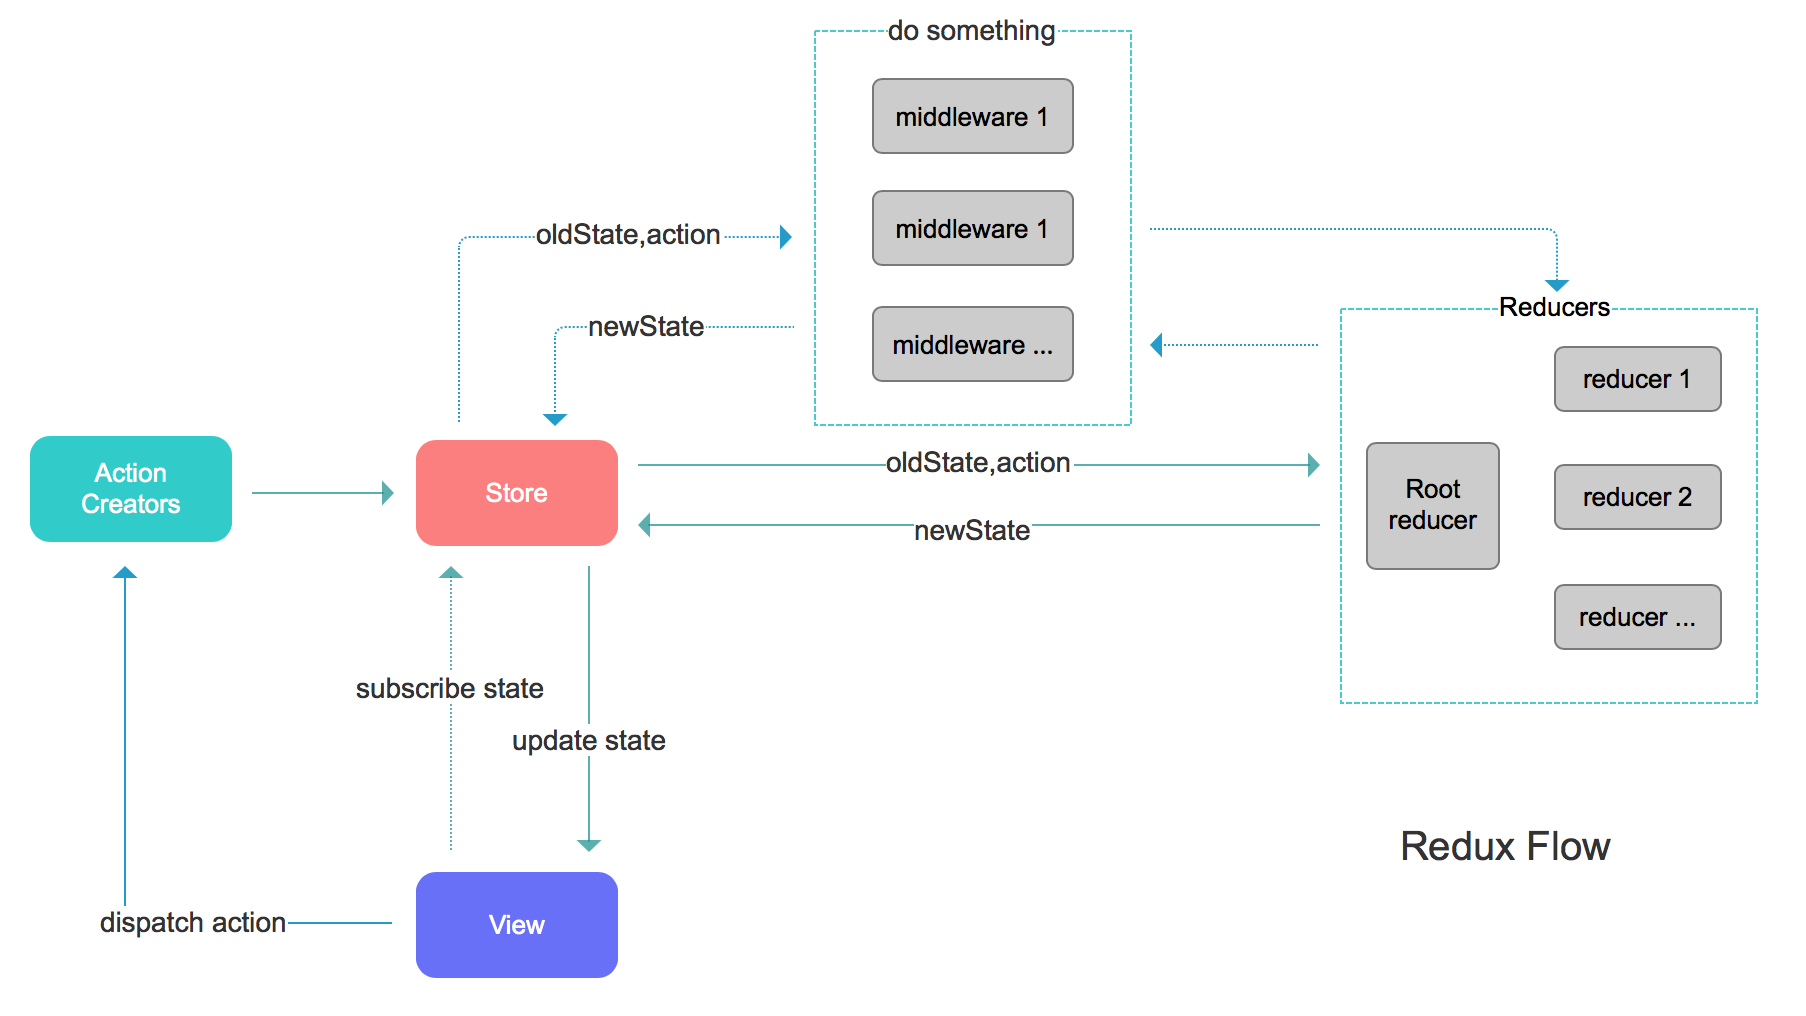
actions: 可以理解为用户和手机间的交互行为,比如点了一个按钮,下拉刷新,上拉加载更多。。。都可以写成一个action, 一个页面可能会有很多个action。一般action.js中写函数。
页面因为绑定(订阅)了action 和 state,当用户操作界面时,就会触发action中的函数,action 中的函数拉起reducer,处理数据,然后重新render页面。大概机制就是这样。
接入方式:
1. npm install 下列内容:
npm install --save redux

npm install --save react-redux

npm install --save-dev redux-devtools

当项目中用到了导航栏,就需要这样:

npm install --save react-navigation-redux-helpers
(大部分App都用到了导航栏, 所以以下是引入了导航栏的情况)
2. 用<Provider/>包裹根组件, 将store传递给App框架
这里的根组件就是导航组件,要注意AppNavigator/中除了export default connect()之外,还要导出 export const RootNavigator 和 export const rootCom = 'Init'; 后面在合并reducers要用到这两个
import React, {Fragment} from 'react';
import {Provider} from 'react-redux';
import AppNavigator from '../../navigator/AppNavigator'; //此处AppNavigator并未定义 怎么来的呢? 难道是引入默认导出?
import store from './store' //还有此处的store
// import Lamp from './componnets/Lamp' //假如只显示灯一个界面
const App = () => {
return <Provider store={store}>
<AppNavigator/>
</Provider>
};
export default App;
AppNavigator.js代码
import { createStackNavigator,

  createAppContainer,

  createBottomTabNavigator,

  createMaterialTopTabNavigator,

  createDrawerNavigator,

  createSwitchNavigator,

 } from 'react-navigation';

import WelcomePage from '../page/WelcomePage';

import HomePage from '../page/HomePage';

import DetailPage from '../page/DetailPage';

import MainV from '../calendarPages/Main'

import NewAct from '../calendarPages/newAct'

import NewEdit from '../calendarPages/newEdit'

import ActView from '../calendarPages/actView'//

import FavoritePage from '../page/FavoritePage';//

import ModalExamplePage from '../page/ModalExamplePage';

import AnimationPage from '../page/AnimationPage';

import PanResponderPage from '../page/PanResponderPage';//

import MyPage from '../page/MyPage';//

import ComponentLifeCyclePage from '../page/ComponentLifeCyclePage';//

import JSCallNativePage from '../page/JSCallNativePage';//

import NativeCallJSPage from '../page/NativeCallJSPage';//

import ChartPage from '../page/ChartPage';//

import PromisePage from '../page/PromisePage';//

import Lamp from '../page/reduxapp/componnets/Lamp';//

import {connect} from 'react-redux';

import {createReactNavigationReduxMiddleware,createReduxContainer} from 'react-navigation-redux-helpers';

export const rootCom = 'Init';//设置根路由

import NaviJumpTransParamsPage from '../page/NaviJumpTransParamsPage';

const InitNavigator = createStackNavigator({

  WelcomePage:{

    screen:WelcomePage,

    navigationOptions:{

      header:null,

    }

  }

});

const MainNavigator = createStackNavigator({

  HomePage:{

    screen:HomePage,

    navigationOptions:{

      header:null,

    }

  },

  DetailPage:{

    screen:DetailPage,

    navigationOptions:{

      //header:null,

    }

  },

  MainV:{

    screen:MainV,

    navigationOptions:{

      //header:null,

    }

  },

  NewAct:{

    screen:NewAct,

    navigationOptions:{

      //header:null,

    }

  },

  NewEdit:{

    screen:NewEdit,

    navigationOptions:{

      //header:null,

    }

  },//

  ActView:{

    screen:ActView,

    navigationOptions:{

      //header:null,

    }

  },//

  FavoritePage:{

    screen:FavoritePage,

    navigationOptions:{

      //header:null,

    }

  },

  AnimationPage:{

    screen:AnimationPage,

    navigationOptions:{

      //header:null,

    }

  },

  PanResponderPage:{

    screen:PanResponderPage,

    navigationOptions:{

      //header:null,

    }

  },//

  MyPage:{

    screen:MyPage,

    navigationOptions:{

      title:'',

      //header:null,

    }

  },//

  ComponentLifeCyclePage:{

    screen:ComponentLifeCyclePage,

    navigationOptions:{

      title:'组件的生命周期',

      //header:null,

    }

  },

  JSCallNativePage:{

    screen:JSCallNativePage,

    navigationOptions:{

      title:'',

      //header:null,

    }

  },

  NativeCallJSPage:{

    screen:NativeCallJSPage,

    navigationOptions:{

      title:'',

      //header:null,

    }

  },

  NaviJumpTransParamsPage:{

    screen:NaviJumpTransParamsPage,

  },

  ModalExamplePage:{

    screen:ModalExamplePage,

  },

  ChartPage:{

    screen:ChartPage,

  }

  ,

  PromisePage:{

    screen:PromisePage,

  },

  Lamp:{

    screen:Lamp,

  }

});

//连接InitNavigator和MainNavigator

// const AppNavi = createSwitchNavigator({

//   Init:InitNavigator,

//   Main:MainNavigator

//

// },{

//   navigationOptions:{

//     //header:null,

//   }

// });

// const AppNavigator = createAppContainer(AppNavi);

// export default AppNavigator;

///////////////////

//连接InitNavigator和MainNavigator

export const RootNavigator = createSwitchNavigator({

  Init:InitNavigator,

  Main:MainNavigator

},{

  navigationOptions:{

    //header:null,

  }

});

export const middleware = createReactNavigationReduxMiddleware(

  state => state.nav,

  'root'

);

const AppWithNavigationState = createReduxContainer(RootNavigator,'root');

const mapStateToProps = state => ({

  state: state.nav, // v2

});

export default connect(mapStateToProps)(AppWithNavigationState);
3. 用connect方法, 包裹导航器组件,导出。connect($1,$2)($3) ,其中$1是state 到props 的映射,$2是dispatch 到props的映射, $3是当前组件。
例如:(这个就是AppNavigator.js代码中最关键的代码)
export const middleware = createReactNavigationReduxMiddleware(

  state => state.nav,

  'root',

);

const AppWithNavigationState = createReduxContainer(RootNavigator,'root');

const mapStateToProps = state => ({

  state: state.nav, // v2

});

export default connect(mapStateToProps)(AppWithNavigationState);
4. 创建store , 利用createStore()函数,传入reducers 作为参数
import {applyMiddleware,createStore} from 'redux'
import thunk from 'redux-thunk'
import reducers from '../reducers';
import {middleware} from '../../../navigator/AppNavigator'
// 如何自定义中间件
const logger = store => next => action => {
if(typeof action === 'function'){
console.log('dispatch a function',action);
}
else{
console.log('dispatching',action);
}
const result = next(action);
console.log('nextState',store.getState());
}
const middlewares = [
middleware,
logger,
thunk,//暂时没用到
];
export default createStore(reducers,applyMiddleware(...middlewares));
5. 编写action, 一般action的类型集中定义到一个Types文件中, 一个App的action肯定不止一个两个
export const SWITCH = 'SWITCH';
import React, { Component } from 'react';
export function switchLamp(){
return dispatch=>{
dispatch({type:SWITCH})
}
}
6. 编写reducer, 他接收旧的state+action作为参数,然后产生新的state
例如有一个改变App主题色的redecer写法是这样
import {SWITCH} from '../../actions/lamp/index';
const defaultState = {
light : false
};
export default function onAction(state=defaultState,action){
switch(action.type){
case SWITCH:
return {
light:!state.light,
};
default:
return state;
}
}
7. 在页面中使用,从this.props获取状态容器中的数据, 重新渲染页面。这里原理是只要触发了action, 就会更新state,从而更新界面。
用了redux , 页面就不直接导出了,而是通过connect函数导出当前组件。
下面这写代码作用主要是把state绑定到props, 把action绑定到props。这样就能直接在页面用解构赋值取用了。
const mapStateToProps = state =>({
lamp:state.lamp,
});
// 这种写法报错
// function mapDispatchToProps(dispatch) {
// return bindActionCreators(actions.switchLamp, dispatch);
// }
const mapDispatchToProps = (dispatch) => {
return {
switchLamp: bindActionCreators(actions.switchLamp, dispatch)
}
};
// const mapDispatchToProps = dispatch => ({
// switchLamp:() => dispatch(actions.switchLamp),
//
// });
export default connect(mapStateToProps,mapDispatchToProps)(Lamp);
----------------------------------------------分割线----------------------------------------------
后面自己照着做,其间遇到一些小问题,都是步骤不规范引起的。
比如报错:这个就要检查下reducer中关于导航器的写法了
TypeError: Cannot read property 'routes' of undefined

This error is located at:

    in Navigator (at create-redux-container.js:92)

    in NavigatorReduxWrapper (created by ConnectFunction)

    in ConnectFunction (at root.js:21)

    in Provider (at root.js:20)

    in App (at renderApplication.js:40)

    in RCTView (at View.js:35)

    in View (at AppContainer.js:98)

    in RCTView (at View.js:35)

    in View (at AppContainer.js:115)

    in AppContainer (at renderApplication.js:39)

getDerivedStateFromProps

    createNavigator.js:1:1972
应该是这样:
import {combineReducers} from 'redux'

import lamp from './lamp'

import {rootCom,RootNavigator} from '../../../navigator/AppNavigator';

//1.指定默认state

const navState = RootNavigator.router.getStateForAction(RootNavigator.router.getActionForPathAndParams(rootCom));

//2.创建自己的navigation reducer

const navReducer = (state = navState,action) => {

  const nextState = RootNavigator.router.getStateForAction(action,state);

  return nextState || state;

};

//3.合并reducer  因为只允许有一个根reducer

const index = combineReducers({

  nav:navReducer,

  lamp:lamp,

});

export default index;
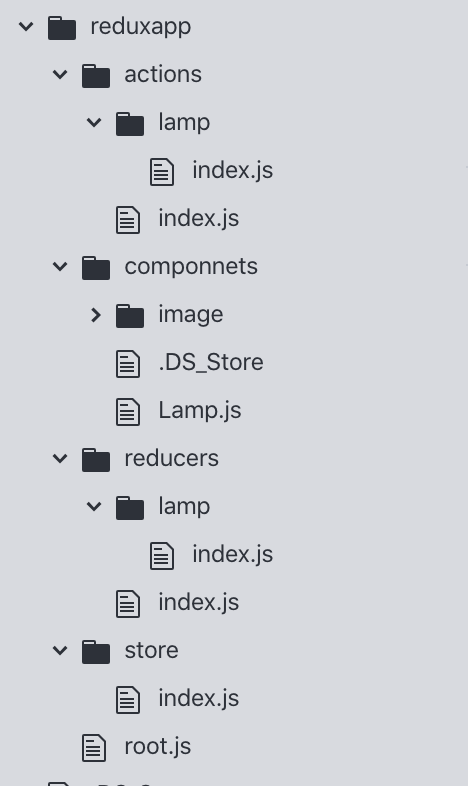
严格按照套路来就可以了,特别要注意下结构目录,不然很难调
我测试用的demo: https://github.com/nwgdegitHub/Steward_RN
完整App见: https://github.com/nwgdegitHub/MK_GitHub_App
参考:https://segmentfault.com/q/1010000012086401/a-1020000012111603
react native 之 redux 使用套路的更多相关文章
- [RN] React Native 使用 Redux 比较详细和深刻的教程
React Native 使用 Redux 比较详细和深刻的教程 React Native 使用 Redux https://www.jianshu.com/p/06fc18cef56a http:/ ...
- React Native——我的学习套路
学习东西都有一定的套路,特别是新的框架,对于React Native,我是这么学的. 第一步 : 这是啥 在各种原因下,需要使用某个框架时,那第一件事就是知道这个框架是用来干什么.React Nati ...
- React Native集成Redux框架讲解与应用
学过React Native的都知道,RN的UI是根据相应组件的state进行render的,而页面又是由大大小小的组件构成,导致每个组件都必须维护自身的一套状态,因此当页面复杂化的时候,管理stat ...
- react native 之 redux
第一章 认识redux 说的通俗且直白一点呢,就是redux提供了一个store,独立的一个内存区,然后放了一些state,你可以在任何component中访问到state,这些state要更改怎么 ...
- React Native使用Redux总结
1>npm安装redux: "react-redux": "^5.0.5", "redux": "^3.7.1", ...
- [转] 学习React Native必看的几个开源项目
http://www.lcode.org/study-react-native-opensource-one/ http://gold.xitu.io/entry/575f498c128fe10057 ...
- 学习React Native必看的几个开源项目
学习React native ,分享几个不错的开源项目,相信你学完之后,一定会有所收获.如果还没有了解RN的同学们可以参考手把手教你React Native 实战之开山篇<一> 1.Fac ...
- 从React Native到微服务,落地一个全栈解决方案
Poplar是一个社交主题的内容社区,但自身并不做社区,旨在提供可快速二次开发的开源基础套件.前端基于React Native与Redux构建,后端由Spring Boot.Dubbo.Zookeep ...
- react native redux saga增加日志功能
redux-logger地址:https://github.com/evgenyrodionov/redux-logger 目前Reac native项目中已经使用redux功能,异步中间件使用red ...
随机推荐
- Ehlib好用的版本
EhLib 6.2
- CentOS7 安装dotnet sdk 2.1.401 的简单办法
1. 下载 linux版本的tar包 路径为: https://dotnet.microsoft.com/download/thank-you/dotnet-sdk-2.1.401-linux-x64 ...
- git学习指南
近来学习Git,苦寻资料下发现廖雪峰老师的教程很好,在此推荐传送门 附每节总结,方便查阅 创建版本库 初始化一个Git仓库,使用git init命令. 添加文件到Git仓库,分两步: 使用命令git ...
- P1397 [NOI2013]矩阵游戏(递推)
P1397 [NOI2013]矩阵游戏 一波化式子,$f[1][m]=a^{m-1}+b\sum_{i=0}^{m-2}a^i$,用快速幂+逆元求等比数列可以做到$logm$ 设$v=a^{m-1}, ...
- C# 各种加密
using System; using System.Collections.Generic; using System.IO; using System.Linq; using System.Sec ...
- es6中let实例应用之一
有如下情景 html部分: <button class="btn">按钮1</button> <button class="btn" ...
- 如何获取图片的base64编码
1.准备一张图片,比如1.gif 2.使用chrome浏览器,新建立一个窗口,然后将a.png拖动至浏览器窗口里面,打开控制台(检查),最后点击source 3.使用方法: 注意source获取的一串 ...
- Chrome开发者工具详解(二)之使用断点调试代码下
JS调试技巧 技巧一:格式化压缩代码 技巧二:快速跳转到某个断点的位置 右侧的Breakpoints会汇总你在JS文件所有打过的断点,点击跟checkbox同一行的会暂时取消这个断点,若是点击chec ...
- luogu P1232 [NOI2013]树的计数
传送门 这题妙蛙 首先考虑构造出一个合法的树.先重新编号,把bfs序整成\(1,2,3...n\),然后bfs序就是按照从上到下从左往右的遍历顺序,所以可以考虑对bfs序分层,可以知道分层方式只会对应 ...
- vscode 将本地项目上传到码云
**************************************************************************************************** ...