Ubuntu 18.04 启用 rc.local 设置开机启动
ubuntu18.04 不再使用initd管理系统,改用systemd.
然而systemd很难用,改变太大,跟之前的完全不同。
使用systemd设置开机启动
为了像以前一样,在/etc/rc.local中设置开机启动程序,需要以下几步:
1、实现原理
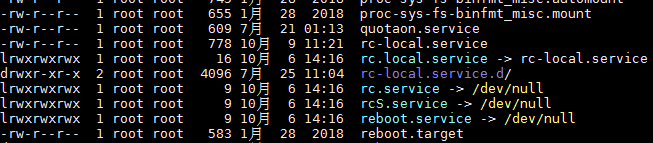
systemd 默认会读取 /etc/systemd/system 下的配置文件,该目录下的文件会链接 /lib/systemd/system/ 下的文件。一般系统安装完 /lib/systemd/system/ 下会有 rc-local.service 文件,即我们需要的配置文件。
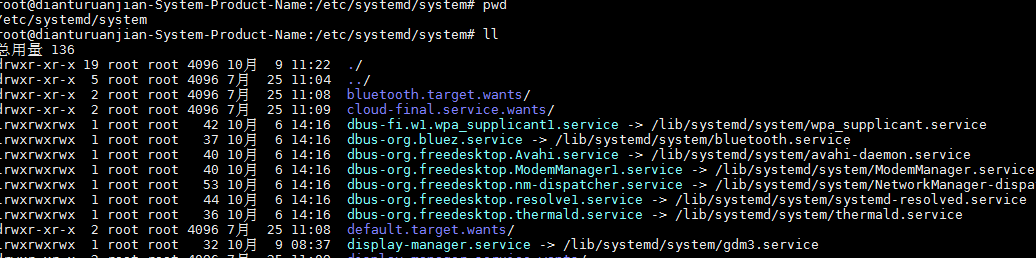
/lib/systemd/system/:
可以看到 target 的定义:
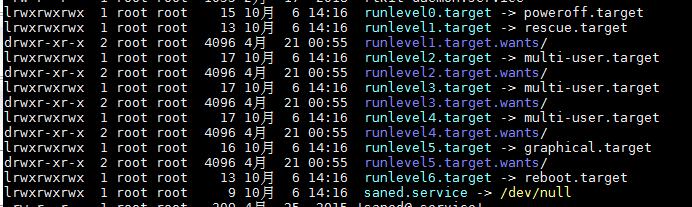
查看target: ll | grep target
-rw-r--r--  1 root root   919 1月  28  2018 basic.target

drwxr-xr-x  2 root root  4096 7月  25 11:05 basic.target.wants/

-rw-r--r--  1 root root   419 1月  28  2018 bluetooth.target

-rw-r--r--  1 root root   465 1月  28  2018 cryptsetup-pre.target

-rw-r--r--  1 root root   412 1月  28  2018 cryptsetup.target

lrwxrwxrwx  1 root root    13 10月  6 14:16 ctrl-alt-del.target -> reboot.target

lrwxrwxrwx  1 root root    16 10月  6 14:16 default.target -> graphical.target

-rw-r--r--  1 root root   471 1月  28  2018 emergency.target

-rw-r--r--  1 root root   541 1月  28  2018 exit.target

-rw-r--r--  1 root root   480 1月  28  2018 final.target

-rw-r--r--  1 root root   506 1月  28  2018 getty-pre.target

-rw-r--r--  1 root root   500 1月  28  2018 getty.target

drwxr-xr-x  2 root root  4096 7月  25 11:04 getty.target.wants/

-rw-r--r--  1 root root   598 1月  28  2018 graphical.target

drwxr-xr-x  2 root root  4096 7月  25 11:04 graphical.target.wants/

-rw-r--r--  1 root root   527 1月  28  2018 halt.target

drwxr-xr-x  2 root root  4096 7月  25 11:05 halt.target.wants/

-rw-r--r--  1 root root   509 1月  28  2018 hibernate.target

-rw-r--r--  1 root root   530 1月  28  2018 hybrid-sleep.target

-rw-r--r--  1 root root   593 1月  28  2018 initrd-fs.target

-rw-r--r--  1 root root   561 1月  28  2018 initrd-root-device.target

-rw-r--r--  1 root root   566 1月  28  2018 initrd-root-fs.target

-rw-r--r--  1 root root   754 1月  28  2018 initrd-switch-root.target

drwxr-xr-x  2 root root  4096 7月  25 11:05 initrd-switch-root.target.wants/

-rw-r--r--  1 root root   763 1月  28  2018 initrd.target

-rw-r--r--  1 root root   541 1月  28  2018 kexec.target

drwxr-xr-x  2 root root  4096 7月  25 11:05 kexec.target.wants/

-rw-r--r--  1 root root   435 1月  28  2018 local-fs-pre.target

-rw-r--r--  1 root root   547 1月  28  2018 local-fs.target

drwxr-xr-x  2 root root  4096 7月  25 11:04 local-fs.target.wants/

-rw-r--r--  1 root root   532 1月  28  2018 multi-user.target

drwxr-xr-x  2 root root  4096 7月  25 11:05 multi-user.target.wants/

-rw-r--r--  1 root root   505 1月  28  2018 network-online.target

-rw-r--r--  1 root root   502 1月  28  2018 network-pre.target

-rw-r--r--  1 root root   521 1月  28  2018 network.target

-rw-r--r--  1 root root   554 1月  28  2018 nss-lookup.target

-rw-r--r--  1 root root   513 1月  28  2018 nss-user-lookup.target

-rw-r--r--  1 root root   394 1月  28  2018 paths.target

-rw-r--r--  1 root root   592 1月  28  2018 poweroff.target

drwxr-xr-x  2 root root  4096 7月  25 11:05 poweroff.target.wants/

-rw-r--r--  1 root root   417 1月  28  2018 printer.target

-rw-r--r--  1 root root   583 1月  28  2018 reboot.target

drwxr-xr-x  2 root root  4096 7月  25 11:05 reboot.target.wants/

-rw-r--r--  1 root root   549 1月  28  2018 remote-cryptsetup.target

-rw-r--r--  1 root root   436 1月  28  2018 remote-fs-pre.target

-rw-r--r--  1 root root   522 1月  28  2018 remote-fs.target

-rw-r--r--  1 root root   492 1月  28  2018 rescue.target

drwxr-xr-x  2 root root  4096 7月  25 11:04 rescue.target.wants/

-rw-r--r--  1 root root   540 1月  28  2018 rpcbind.target

lrwxrwxrwx  1 root root    15 10月  6 14:16 runlevel0.target -> poweroff.target

lrwxrwxrwx  1 root root    13 10月  6 14:16 runlevel1.target -> rescue.target

drwxr-xr-x  2 root root  4096 4月  21 00:55 runlevel1.target.wants/

lrwxrwxrwx  1 root root    17 10月  6 14:16 runlevel2.target -> multi-user.target

drwxr-xr-x  2 root root  4096 4月  21 00:55 runlevel2.target.wants/

lrwxrwxrwx  1 root root    17 10月  6 14:16 runlevel3.target -> multi-user.target

drwxr-xr-x  2 root root  4096 4月  21 00:55 runlevel3.target.wants/

lrwxrwxrwx  1 root root    17 10月  6 14:16 runlevel4.target -> multi-user.target

drwxr-xr-x  2 root root  4096 4月  21 00:55 runlevel4.target.wants/

lrwxrwxrwx  1 root root    16 10月  6 14:16 runlevel5.target -> graphical.target

drwxr-xr-x  2 root root  4096 4月  21 00:55 runlevel5.target.wants/

lrwxrwxrwx  1 root root    13 10月  6 14:16 runlevel6.target -> reboot.target

-rw-r--r--  1 root root   442 1月  28  2018 shutdown.target

-rw-r--r--  1 root root   402 1月  28  2018 sigpwr.target

-rw-r--r--  1 root root   460 1月  28  2018 sleep.target

-rw-r--r--  1 root root   449 1月  28  2018 slices.target

-rw-r--r--  1 root root   420 1月  28  2018 smartcard.target

-rw-r--r--  1 root root   396 1月  28  2018 sockets.target

drwxr-xr-x  2 root root  4096 7月  25 11:04 sockets.target.wants/

-rw-r--r--  1 root root   420 1月  28  2018 sound.target

-rw-r--r--  1 root root    49 12月 15  2017 spice-vdagentd.target

-rw-r--r--  1 root root   503 1月  28  2018 suspend.target

-rw-r--r--  1 root root   554 7月  21 01:13 suspend-then-hibernate.target

-rw-r--r--  1 root root   393 1月  28  2018 swap.target

-rw-r--r--  1 root root   558 1月  28  2018 sysinit.target

drwxr-xr-x  2 root root  4096 7月  25 11:05 sysinit.target.wants/

-rw-r--r--  1 root root   592 1月  28  2018 system-update.target

drwxr-xr-x  2 root root  4096 7月  25 11:06 system-update.target.wants/

-rw-r--r--  1 root root   445 1月  28  2018 timers.target

drwxr-xr-x  2 root root  4096 7月  25 11:04 timers.target.wants/

-rw-r--r--  1 root root   435 1月  28  2018 time-sync.target

-rw-r--r--  1 root root   457 1月  28  2018 umount.target
target 用于指定 什么时候启动 我们自己自定的软件。
1)将 /lib/systemd/system/rc-local.service 链接到 /etc/systemd/system/ 目录下面来:
ln -fs /lib/systemd/system/rc-local.service /etc/systemd/system/rc-local.service
查看文件内容:
cd /etc/systemd/system/

cat rc-local.service
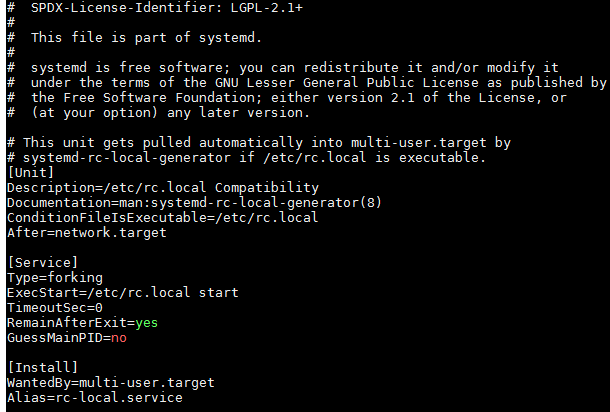
说明:
[Unit] 区块:启动顺序与依赖关系。
ConditionFileIsExecutable=/etc/rc.local
After=network.target
ConditionFileIsExecutable指定了执行的文件,
After 表示在 network.target 这个target后面进行执行。也就是网络启动完成之后,执行 /etc/rc.local 文件。
[Service] 区块:启动行为,如何启动,启动类型。
Type=forking
ExecStart=/etc/rc.local start
TimeoutSec=0
RemainAfterExit=yes
GuessMainPID=no
3) [Install] 区块,定义如何安装这个配置文件,即怎样做到开机启动。
[Install]
WantedBy=multi-user.target
Alias=rc-local.service
[Install] 块是我们自己编辑新增的。
2、创建/etc/rc.local文件
touch /etc/rc.local
3、赋可执行权限
chmod 755 /etc/rc.local
4、编辑rc.local,添加需要开机启动的任务
#!/bin/bash

echo "test rc " > /var/test.log

# startup redis-server:

/usr/local/bin/redis-server /usr/redis/redis.conf

# startup mysqld

/usr/local/mysql/bin/mysqld_safe --user=mysql &

# startup tomcat

/usr/tomcat/apache-tomcat-7.0.90/bin/startup.sh

/usr/tomcat/apache-tomcat-7.0.90-02/bin/startup.sh
这里启动时自动启动: redis 、 mysqld、tomcat等。很粗暴....
5、执行reboot重启系统,然后查看test.log
6、总结
其实就是利用 systemd 的启动原理, 通过 /etc/systemd/system/rc-local.service 文件来达到启动时执行 /etc/rc.local 文件的目的。
参考:https://www.centos.bz/2018/05/ubuntu-18-04-rc-local-systemd%E8%AE%BE%E7%BD%AE/
Ubuntu 18.04 启用 rc.local 设置开机启动的更多相关文章
- ubuntu 18.04 配置 rc.local
ubuntu 18.04 配置 rc.local:https://blog.csdn.net/a912952381/article/details/81205095 Ubuntu /etc/rc.lo ...
- 转载:如何在Ubuntu 18.04上使用UFW设置防火墙
https://blog.csdn.net/u013068789/article/details/82051943 介绍 UFW或Uncomplicated Firewall是iptables一个接口 ...
- Ubuntu 18.04 Numix主题安装设置
Ubuntu 18.04 Numix主题安装设置 一.首先安装Numix主题 展现效果如下图 1.安装numix sudo add-apt-repository ppa:numix/ppa 2.安装主 ...
- Ubuntu 18.04 LTS IP 地址设置
和之前的版本不太一样, Ubuntu 18.04 的 ip地址设置是用netplan管理的 配置文件在: /etc/netplan/50-cloud-init.yaml 示例文件如下: # T ...
- ubuntu16.04 下通过rc.d(rc.local)实现开机启动(未登录)anydesk
先编辑anydesk-X.X.X/init/anydesk文件,将"DAEMON=//usr/bin$NAME"改成"DAEMON=/XXX/anydesk-5.1.1/ ...
- /etc/rc.d/rc.local 自定义开机启动程序
/etc/rc.d/rc.local 用于用户自定义开机启动程序,可以往里写开机要执行的命令或脚本,线上的配置如下: [root@localhost ~]$ cat /etc/rc.d/rc.loca ...
- Mac下用Launchd实现使用rc.local执行开机启动命令
其实原理很简单,使用Launchd创建一个开机启动的服务,然后这个服务关联/etc/rc.local文件,那么接下来操作rc.local就和Linux下一样的了. 当然,这种思路还可以直接使用在~/. ...
- Fedora 21 设置开机启动脚本
sudo touch /etc/rc.d/rc.localsudo vim /etc/rc.d/rc.local 在/etc/rc.d/rc.local文件中写入, 然后使用:wq命令 保存并退出. ...
- 如何在Ubuntu 18.04上安装Go
如何在Ubuntu 18.04上安装Go 谢鸢发表于云计算教程系列订阅98 介绍 课程准备 第1步 - 安装Go 第2步 - 设置Go路径 第3步 - 测试您的安装 结论 介绍 Go是Google开发 ...
随机推荐
- Wisdom RESTClient 使用教程
Wisdom RESTClient 一款自动化测试REST API的工具,它可以自动化测试RESTful API并生成精美的测试报告,同时基于测试过的历史API,可以生成精美的RESTful API文 ...
- java学习初体验NO.1
一.学习目标: 1.理解Java编译原理 在Java编程语言中,所以源代码首先以用.Java扩展名结尾的纯文本件编写,然后,编译器将这些源文件编译成.Class文件.然后,Java启动器工具使用Jav ...
- Docker 学习新手笔记:从入门到放弃
本文记录的是作为一个新手,从了解 Docker 是什么.Docker 技术包含哪些概念到上手使用.安装以及发布 Docker 镜像的整个过程.作者在学习过程中参阅了诸多文档和教程,在此一并感谢,与此同 ...
- linux服务器共享给windows的client打印机配置
最近实验室新进来一台服务器还有打印机,老大意思让服务器连接打印机并进行网络共享,其他的人可以通过自己的PC连接到共享打印机,打印各自电脑的文件.这样的需求可能很多人都有遇到,我也是遇到这件事,在网上搜 ...
- python 列表、元组
列表 List(列表) 是 Python 中使用最频繁的数据类型. 列表可以完成大多数集合类的数据结构实现.它支持字符,数字,字符串甚至可以包含列表(即嵌套). 列表用 [ ] 标识,是 python ...
- java.lang.NullPointerException错误的解决方案
java.lang.NullPointerException空指针异常是像我一样新手很容易出现的问题,这个问题一般情况都是不细心的时候出现的,开始正文如下: 1.业务层面的错误: a.没有写非空验证: ...
- 如何删除新添加的项目Module
今天 new 了一个Module ,使用的是library,发现不是我想要的,于是果断删除它 但是如何删除呢,却一直找不到这个删除的delete 后来发现在这里可以删除 打开 file -> ...
- ubuntu18.04LTS修改键盘键位
在Linux中为了敲命令方便,所以需要做一下键盘键位调整: 1.Esc键和`(即数字键1前面的那个键)对换: 2.Caps Lock键和左Control键对换: 编辑键位文件: sudo vim /u ...
- 通过sql查找指定字段存在哪些表中
select * from INFORMATION_SCHEMA.columns where COLUMN_NAME Like '%order_type%';
- mysql的常用操作
基本操作 #1 操作文件夹(库) 增 create database db1 charset utf8; --指定格式为utf8 查 show databases; --查看所有的数据库 show c ...