
记录一下小程序canvas
小程序canvas学习
效果图:
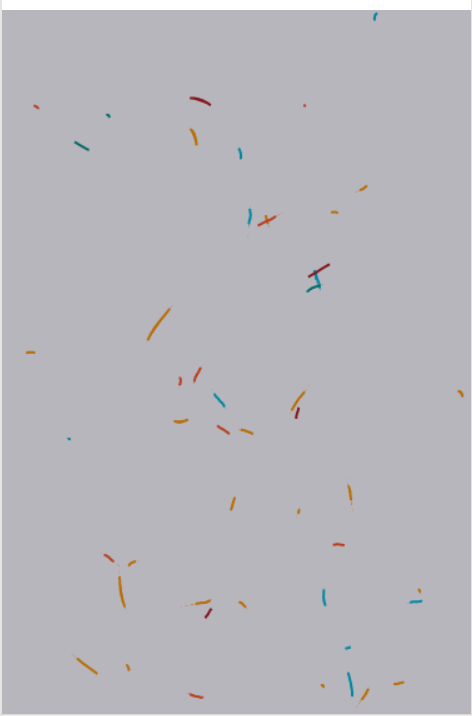
.wxml
<canvas style="width: 100vw; height: 100vh;" canvas-id="firstCanvas"></canvas>
.js
  onLoad: function (options) {

    const ctx = wx.createCanvasContext('firstCanvas')

    var canvasWidth = wx.getSystemInfoSync().windowWidth

    var canvasHeight = wx.getSystemInfoSync().windowHeight

    var numParticles = 50

    var bg = [18, 10, 34]

    var cols = ['#FF5722', '#FF9800', '#FF9800', '#FF9800', '#FF9800', '#B71C1C', '#00BCD4', '#00BCD4', '#009688']

    setup()

    function setup() {

      ctx.beginPath();

      ctx.rect(0, 0, canvasWidth, canvasHeight)

      ctx.fillStyle = `rgba(${bg[0]}, ${bg[1]}, ${bg[2]}, ${1})`

      ctx.fill()

      ctx.draw()

    }

    // window.requestAnimationFrame(animate);

    setInterval(animate, 60)

    function animate() {

      fade(0.3)

      draw()

      // window.requestAnimationFrame(function(){animate()})

    }

    function fade(amt) {

      ctx.beginPath();

      ctx.rect(0, 0, canvasWidth, canvasHeight)

      ctx.fillStyle = `rgba(${bg[0]}, ${bg[1]}, ${bg[2]}, ${amt})`

      ctx.fill()

      ctx.draw()

    }

    function Particle() {

      this.pos = {

        x: Math.random() * canvasWidth * 0.8 + canvasWidth * 0.1,

        y: Math.random() * canvasHeight * 0.8 + canvasHeight * 0.1

      }

      this.r = 1

      this.speed = 6

      this.step = Math.random() * 400

      this.vx = Math.random() * this.speed / 4 - this.speed / 8

      this.vy = Math.random() * this.speed / 4 - this.speed / 8

      this.colIndex = Math.floor(Math.random() * cols.length)

      this.history = []

      this.update = function () {

        this.step++

        this.step %= 400

        if (this.history.length > 5) {

          this.history.shift()

        }

        this.pos.x += this.vx

        this.pos.y += this.vy

        this.vx = this.vx * 0.98 + (Math.random() * this.speed * 2 - this.speed) * 0.12

        this.vy = this.vy * 0.98 + (Math.random() * this.speed * 2 - this.speed) * 0.12

        if (this.history.length > 4) {

          ctx.beginPath()

          ctx.moveTo(this.pos.x, this.pos.y)

          for (var i = this.history.length - 1; i >= 0; i--) {

            ctx.lineTo(this.history[i].x, this.history[i].y)

          }

          ctx.fillStyle = cols[this.colIndex]

          ctx.strokeStyle = cols[this.colIndex]

          ctx.fill()

          ctx.lineWidth = 2

          ctx.lineJoin = "round"

          // ctx.closePath()

          ctx.stroke()

        }

        if (this.pos.x > canvasWidth || this.pos.x < 0 || this.pos.y > canvasHeight || this.pos.y < 0) {

          delete this.pos

          delete this.history

          return false;

        }

        this.history.push({

          x: this.pos.x,

          y: this.pos.y

        })

        return true;

      }

    }

    var particles = [new Particle()]

    function draw() {

      if (particles.length < numParticles) {

        particles.push(new Particle())

      }

      particles = particles.filter(function (p) {

        return p.update()

      })

    }

  },
总结:目前小程序canvas还很卡 不建议使用
PC端:
效果图

代码:
js
<script type="text/javascript">

var canvas = document.createElement('canvas')

document.getElementsByTagName('body')[0].appendChild(canvas)

var ctx = canvas.getContext('2d')

var numParticles = 50

var bg = [18, 10, 34]

var cols = ['#FF5722', '#FF9800', '#FF9800', '#FF9800', '#FF9800', '#B71C1C', '#00BCD4', '#00BCD4', '#009688']

setup()

function setup() {

  canvas.width = window.innerWidth

  canvas.height = window.innerHeight

  ctx.beginPath();

  ctx.rect(0, 0, canvas.width, canvas.height)

  ctx.fillStyle = `rgba(${bg[0]}, ${bg[1]}, ${bg[2]}, ${1})`

  ctx.fill()

}

// window.requestAnimationFrame(animate);

setInterval(animate, 1000/29.9)

function animate() {

  fade(0.3)

  draw()

  // window.requestAnimationFrame(function(){animate()})

}

function fade(amt) {

  ctx.beginPath();

  ctx.rect(0, 0, canvas.width, canvas.height)

  ctx.fillStyle = `rgba(${bg[0]}, ${bg[1]}, ${bg[2]}, ${amt})`

  ctx.fill()

}

function Particle () {

  this.pos = {

    x: Math.random() * canvas.width * 0.8 + canvas.width * 0.1,

    y: Math.random() * canvas.height * 0.8 + canvas.height * 0.1

  }

  this.r = 1

  this.speed = 6

  this.step = Math.random() * 400

  this.vx = Math.random() * this.speed/4 - this.speed/8

  this.vy = Math.random() * this.speed/4 - this.speed/8

  this.colIndex = Math.floor(Math.random()*cols.length)

  this.history = []

  this.update = function () {

    //////////////////////////////////////

    this.step ++

    this.step %= 400

    if (this.history.length > 5){

      this.history.shift()

    }

    this.pos.x += this.vx

    this.pos.y += this.vy

    this.vx = this.vx * 0.98 + (Math.random() * this.speed * 2 - this.speed) * 0.12

    this.vy = this.vy * 0.98 + (Math.random() * this.speed * 2 - this.speed) * 0.12

    //////////////////////////////////////

    if (this.history.length > 4){

      ctx.beginPath()

      ctx.moveTo(this.pos.x ,this.pos.y)

      for (var i = this.history.length-1; i >= 0;  i--){

        ctx.lineTo(this.history[i].x ,this.history[i].y)

      }

      // ctx.fillStyle = `hsla(${Math.sin( this.step / 300) * 70 + 70},${99}%,${50}%,1)`

      // ctx.strokeStyle = `hsla(${Math.sin( this.step / 300) * 70 + 70},${99}%,${50}%,0.5)`

      ctx.fillStyle = cols[this.colIndex]

      ctx.strokeStyle = cols[this.colIndex]

      ctx.fill()

      ctx.lineWidth = 2

      ctx.lineJoin = "round"

      // ctx.closePath()

      ctx.stroke()

    }

    //////////////////////////////////////

    if (this.pos.x > canvas.width || this.pos.x < 0 || this.pos.y > canvas.height || this.pos.y < 0) {

      delete this.pos

      delete this.history

      return false;

    }

    this.history.push({

      x: this.pos.x,

      y: this.pos.y

    })

    return true;

  }

}

var particles = [new Particle()]

function draw() {

  if (particles.length < numParticles) {

    particles.push(new Particle())

  }

  particles = particles.filter(function (p){

    return p.update()

  })

}

</script>
记录一下小程序canvas的更多相关文章
- 技术博客--微信小程序canvas实现图片编辑
技术博客--微信小程序canvas实现图片编辑 我们的这个小程序不仅仅是想给用户提供一个保存和查找的平台,还希望能给用户一个展示自己创意的舞台,因此我们实现了图片的编辑部分.我们对对图片的编辑集成了很 ...
- 原创:WeZRender:微信小程序Canvas增强组件
WeZRender是一个微信小程序Canvas增强组件,基于HTML5 Canvas类库ZRender. 使用 WXML: <canvas style="width: 375px; h ...
- 微信小程序-canvas绘制文字实现自动换行
在使用微信小程序canvas绘制文字时,时常会遇到这样的问题:因为canvasContext.fillText参数为 我们只能设置文本的最大宽度,这就产生一定的了问题.如果我们绘制的文本长度不确定或者 ...
- 微信小程序 canvas 字体自动换行(支持换行符)
微信小程序 canvas 自动适配 自动换行,保存图片分享到朋友圈 https://github.com/richard1015/News 微信IDE演示代码https://developers.w ...
- 微信小程序--canvas画布实现图片的编辑
技术:微信小程序 概述 上传图片,编辑图片大小,添加文字,改变文字颜色等 详细 代码下载:http://www.demodashi.com/demo/14789.html 概述 微信小程序--ca ...
- 小程序canvas生成海报保存至手机相册
小程序canvas画图保存至手机相册 (1)可直接展示生成的海报 .因手机分辨率不同可能导致生成的海报会有细微差别,这里隐藏canvas海报,页面正常设置海报样式保存时保存隐藏的canvas海报 (2 ...
- 优化版小程序canvas,增加失败逻辑,及完善文字
wxml <view class="shareBox" style="backgound:{{isShow ? '#000' : '#fff'}}" wx ...
- 微信小程序 | canvas绘图
1.新的尺寸单位 rpx rpx(responsive pixel): 可以根据屏幕宽度进行自适应. 规定屏幕宽为750rpx.如在 iPhone6 上,屏幕宽度为375px,共有750个物理像素,则 ...
- 微信小程序canvas生成并保存图片
---恢复内容开始--- 微信小程序canvas生成并保存图片,具体实现效果如下图 实现效果需要做以下几步工作 一.先获取用户屏幕大小,然后才能根据屏幕大小来定义canvas的大小 二.获取图 ...
随机推荐
- POJ 1390 Blocks(区间DP)
Blocks [题目链接]Blocks [题目类型]区间DP &题意: 给定n个不同颜色的盒子,连续的相同颜色的k个盒子可以拿走,权值为k*k,求把所有盒子拿完的最大权值 &题解: 这 ...
- vue评论显示隐藏,JavaScript显示关闭
<template> <div id="vue_det"> <h1>{{details()}}</h1> <div>{{ ...
- 平衡树-Splay
#include<iostream> #include<cstdio> #include<cmath> #include<algorithm> #def ...
- 装饰者模式 Decorator
项目:咖啡计费系统 背景:现有系统中有一个抽象类Beverage,有2个抽象方法GetDescription和Cost. namespace DecoratorPattern { /// <su ...
- Running ROS on Windows 10
1.在Windows10下安装ROS.需要开启WSL.参考 2.修改ubuntu国内源,可以提高安装包下载更新速度. (1)原文件备份:sudo cp /etc/apt/sources.list /e ...
- Lua table遍历
工作中,栽了一个“坑”,特此备录. [1]遍历table1,每次结果可能都不同 -- 获取value ", addr="xian"} for k, v in pairs( ...
- spring源码解析2--容器的基本实现
spring的主要特性是IOC,实现IOC的关键是bean,而更关键的是如何bean的管理容器,也就是BeanFactory,本文的目标是弄清楚BeanFactory具体是怎么样的存在. 先看下最简单 ...
- tomcat1(servlet,http,socket)
1.servlet容器是如何工作的? a.创建一个request对象,用可能会在调用的Servlet中使用到的信息填充该request对象(参数,头,cookies,查询字符串,URI等).reque ...
- U盘启动安装Centos 7
,1.先下载CentOS iso文件,http://centos.ustc.edu.cn/centos/7.6.1810/isos/x86_64/,注意大小是4G左右,之前不知道从哪里下载的iso文件 ...
- mySQL简单操作(二)
1.like子句 [where clause like '%com'] '%' '_' 2.正则 3.union操作符 用于连接多个select语句,[distinct]删除重复数据 select c ...