鸿蒙Java开发模式11:鸿蒙图片裁剪功能的实现
鸿蒙入门指南,小白速来!从萌新到高手,怎样快速掌握鸿蒙开发?【课程入口】
目录:
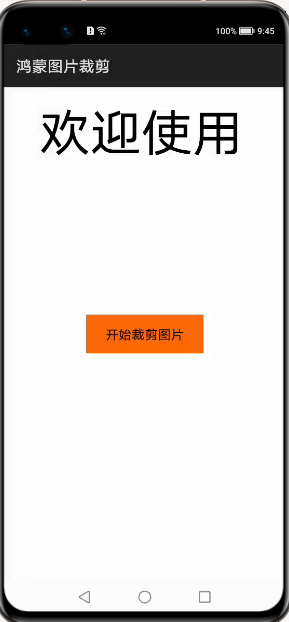
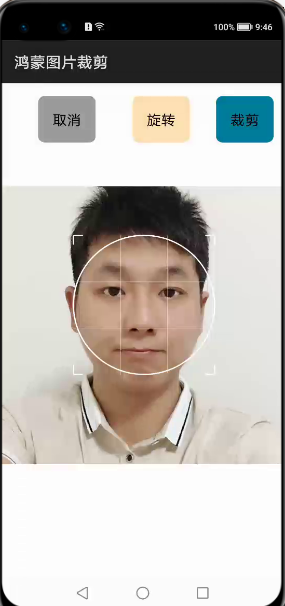
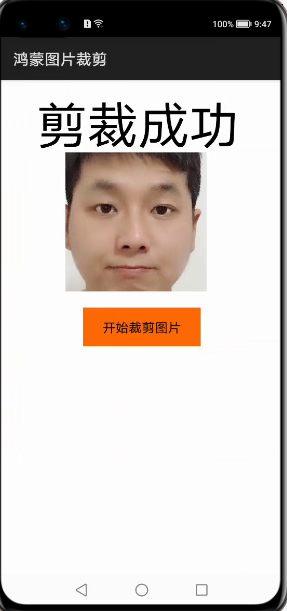
1. 鸿蒙版图片裁剪功能,效果如下:
首页
图片裁剪区域:
裁剪结果:
2.Java代码实现如下:
package com.example.javahm9.slice;

import com.example.javahm9.ResourceTable;

import com.example.javahm9.util.CropImage;

import ohos.aafwk.ability.AbilitySlice;

import ohos.aafwk.content.Intent;

import ohos.agp.colors.RgbColor;

import ohos.agp.components.Button;

import ohos.agp.components.Component;

import ohos.agp.components.Text;

import ohos.agp.components.element.ShapeElement;

public class MainAbilitySlice extends AbilitySlice {

    //定义一个图片

    Component image;

    //定义一个文本

    Text text;

    @Override

    public void onStart(Intent intent) {

        super.onStart(intent);

        super.setUIContent(ResourceTable.Layout_ability_main);

        //获取图片对象对应的component

        image = findComponentById(ResourceTable.Id_result_image);

        /*

         * 如果接收的cropFlag为true

         * 处理剪裁后的图片

         * 否则跳过

         */

        if(intent.getBooleanParam("cropFlag",false)){

            handleCrop(intent);

        }

        /* 自定义--获取文本对象对应的component

         * 根据intent里面的cropStatus来显示不同的文本

         * 0表示未接收到数据

         * 1表示剪裁取消

         * 2表示剪裁成功 有数据

         */

        text = (Text) findComponentById(ResourceTable.Id_text);

        if(intent.getIntParam("cropStatus",0) == 0){

            text.setText("欢迎使用");

        }else if(intent.getIntParam("cropStatus",0) == 1){

            text.setText("剪裁取消");

        }else if(intent.getIntParam("cropStatus",0) == 2){

            text.setText("剪裁成功");

        }

        //获取button对象对应的component

        Button button = (Button) findComponentById(ResourceTable.Id_button);

        // 设置button的属性及背景

        ShapeElement background = new ShapeElement();

       // background.setRgbColor(new RgbColor(125, 125, 255));

        background.setCornerRadius(25);

       // button.setBackground(background);

        if (button != null) {

            // 绑定点击事件

            button.setClickedListener(new Component.ClickedListener() {

                public void onClick(Component v) {

                    begincrop();

                }

            });

        }

    }

    public void begincrop(){

        CropImage.activity()

                .setContext(this)

                .setSource(ResourceTable.Media_a9)

                .setBundleName("com.example.javahm9")

                .setAbilityName("com.example.javahm9.MainAbility")

                .setRequset_code(1234)

                .start(super.getAbility(),this);

    }

    //处理剪裁结果

    private void handleCrop(Intent result) {

        int resultImg = result.getIntParam("resultImg",0);

        int result_code = result.getIntParam("result_code" , 0);

        if(resultImg != 0){

            CropImage.handleImage(result_code , image);

        }

    }

    @Override

    public void onActive() {

        super.onActive();

    }

    @Override

    public void onForeground(Intent intent) {

        super.onForeground(intent);

    }

}
3.裁剪工具类实现
package com.example.javahm9.util;

import ohos.aafwk.ability.Ability;

import ohos.aafwk.ability.AbilitySlice;

import ohos.aafwk.content.Intent;

import ohos.agp.components.Component;

import ohos.agp.render.Canvas;

import ohos.agp.render.Paint;

import ohos.agp.render.PixelMapHolder;

import ohos.app.Context;

import ohos.media.image.PixelMap;

import ohos.utils.net.Uri;

/**

 * @Author 李欣

 * <p>

 * 此类是一个工具类

 * <p>

 * 此类是面向于用户的 面向于MainAbilitySlice的

 * <p>

 * 此类提供设置一些参数的功能,提供了页面跳转,跳转到CropImageActivity的方法,有一些属性暂时用不到。

 */

public final class CropImage {

    //存一个context

    private static Context mContext;

    //图片资源文件

    private static int msource;

    //裁减结果

    public static final boolean CROPFLAG = true;

    //空的构造器

    private CropImage() {

    }

    //内部类初始化

    public static ActivityBuilder activity() {

        return new ActivityBuilder(null , null , null , 0);

    }

    /**

     * 这个方法对传进来的 component进行操作

     * 给这个空的component增加图片 旋转等等

     * @param result 一个参数用来判断返回的结果 以及如何处理

     * @param component 对这个component进行操作

     */

    public static void handleImage(int result, Component component) {

        //203表示裁剪成功(203为自定义的数字)

        if (result == 203) {

            //获得原始位图

            PixelMap pixelMap = BitmapUtils.getOriginalPixelMap(mContext , msource).get();

            //创建屏幕工具类 获得屏幕的宽度

            CropWindowHandler windowHandler = new CropWindowHandler(mContext);

            /**

             * 缩放指数 原始的图片的缩放大小

             * 数值为原始图片的宽度(pixelMap.getImageInfo().size.width)除以屏幕的宽度(windowHandler.getWindowWidth()) 的倒数

             */

            float ratio = (float) windowHandler.getWindowWidth()/(float) pixelMap.getImageInfo().size.width;

            //获得裁剪后的位图

            PixelMap cropped = CropOverlayView.getCroppedPixelMap();

            PixelMapHolder pixelMapHolder = new PixelMapHolder(cropped);

            //创建bitmaputils工具类,获得位图相关数据

            BitmapUtils bitmapUtils = new BitmapUtils(mContext, cropped, 400, msource);

            /**

             * 创建画位图的方法

             * 获取到之前的点击动作数组 这样就可以获得到具体最终的图片的方向

             * 并且依次按照图片方向进行旋转

             */

            Component.DrawTask drawTask = new Component.DrawTask() {

                @Override

                public void onDraw(Component component, Canvas canvas) {

                    //获得行为动作

                    int[] action = CropImageView.getActionResult();

                    //获得动作数目

                    int actionIndex = CropImageView.getActionIndexResult();

                    //循环执行旋转、翻转动作

                    for (int i = 0; i < actionIndex; i++) {

                        if (action[i] == 1) {

                            //rotate图像

                            canvas.rotate(90, bitmapUtils.getRealPixelMapWidth() / 2 * ratio, bitmapUtils.getRealPixelMapHeight() / 2 * ratio);

                        } else if (action[i] == 2) {

                            //水平翻转

                            //向下移动高度

                            canvas.translate(bitmapUtils.getRealPixelMapWidth() * ratio, 0);

                            //向y轴负方向缩放一倍

                            canvas.scale(-1f, 1f);

                        } else if (action[i] == 3) {

                            //垂直翻转

                            //向下移动高度

                            canvas.translate(0, bitmapUtils.getRealPixelMapHeight() * ratio);

                            //向y轴负方向缩放一倍

                            canvas.scale(1f, -1f);

                        }

                    }

                    //按照原来的比例进行缩放

                    canvas.scale(ratio , ratio);

                    //画图

                    canvas.drawPixelMapHolder(pixelMapHolder, 200, 230, new Paint());

                }

            };

            //为component增加drawtask方法

            component.addDrawTask(drawTask);

        }

    }

    public static PixelMap getCroppedPixelMap(){

        return CropOverlayView.getCroppedPixelMap();

    }

    public static final class ActivityBuilder {

        //设置图片的Uri

        private final Uri mSource;

        //需要跳转回的bundle的名字

        private String bundleName;

        //需要跳转回的Ability的名字

        private String abilityName;

        //request_code

        private int request_code;

        //初始化 记录一些信息

        private ActivityBuilder(Uri source , String bundle , String ability , int request) {

            mSource = source;

            bundleName = bundle;

            abilityName = ability;

            request_code = request;

        }

        //返回一个intent

        public Intent getIntent(Context context) {

            return getIntent(context, CropImageActivity.class);

        }

        //返回一个intent 用来实现页面跳转

        public Intent getIntent(Context context, Class<?> cls) {

            Intent intent = new Intent();

            intent.setParam("source", msource);

            if(bundleName != null){

                intent.setParam("bundleName" , bundleName);

            }

            if(abilityName != null){

                intent.setParam("abilityName" , abilityName);

            }

            if(request_code != 0){

                intent.setParam("request_code" , request_code);

            }

            return intent;

        }

        //页面跳转

        public void start(Ability ability, AbilitySlice abilitySlice) {

            start(ability, abilitySlice, request_code);

        }

        //页面跳转

        public void start(Ability ability, AbilitySlice abilitySlice, int requestCode) {

            //给crop添加操作

            AbilitySlice cropImageAbilitySlice = new CropImageActivity();

            abilitySlice.presentForResult(cropImageAbilitySlice, getIntent(ability), requestCode);

        }

        //设置资源图片,被裁减的图片的id

        public ActivityBuilder setSource(int source) {

            msource = source;

            return this;

        }

        //设置context

        public ActivityBuilder setContext(Context context) {

            mContext = context;

            return this;

        }

        //设置需要跳转回的bundle名字

        public ActivityBuilder setBundleName(String s){

            bundleName = s;

            return this;

        }

        //设置需要跳转回的ability名字

        public ActivityBuilder setAbilityName(String s){

            abilityName = s;

            return this;

        }

        //设置需要跳转回时的code

        public ActivityBuilder setRequset_code(int i){

            request_code = i;

            return this;

        }

    }

}

package com.example.javahm9.util;

import ohos.aafwk.ability.AbilitySlice;

import ohos.aafwk.content.Intent;

import ohos.aafwk.content.Operation;

import ohos.agp.colors.RgbColor;

import ohos.agp.components.Button;

import ohos.agp.components.Component;

import ohos.agp.components.DependentLayout;

import ohos.agp.components.element.ShapeElement;

import ohos.agp.utils.RectFloat;

import ohos.bundle.AbilityInfo;

import ohos.media.image.PixelMap;

import static ohos.agp.components.ComponentContainer.LayoutConfig.MATCH_PARENT;

/**

 * @Author 李欣

 *

 * 此类为裁剪功能实现的主要页面

 *

 * 此页面上显示了一些功能性的button

 * 还有被裁减图片以及裁剪框

 */

public class CropImageActivity extends AbilitySlice {

    //定义此slice的Dependent布局

    private DependentLayout myLayout = new DependentLayout(this);

    //被裁减图片

    private Component mPicture;

    //被裁减图片的位图

    private PixelMap mPixelMap;

    //位图工具类

    private BitmapUtils mBitmapUtils;

    //屏幕工具类

    private CropWindowHandler mCropWindowHandler;

    //裁剪框

    private Component mCropBound;

    //裁剪框工具类

    private CropOverlayView mCropOverlayView;

    //图片资源

    private int mSource;

    //图片上边距

    private final int topIndex = 400;

    //图片工具类

    private CropImageView mCropImageView;

    //裁减结果的矩阵

    public static RectFloat croppedRectFloat;

    //裁减结果的pixelmap

    public static PixelMap croppedPixelMap;

    @Override

    public void onStart(Intent intent) {

        super.onStart(intent);

        //创建本slice的布局文件

        DependentLayout.LayoutConfig config = new DependentLayout.LayoutConfig(MATCH_PARENT, MATCH_PARENT);

        //设置默认竖屏

        setDisplayOrientation(AbilityInfo.DisplayOrientation.PORTRAIT);

        //设置布局的背景

        myLayout.setLayoutConfig(config);

        ShapeElement element = new ShapeElement();

        element.setRgbColor(new RgbColor(255, 255, 255));

        myLayout.setBackground(element);

        //设置button,image等

        setupViews(intent);

        //加载裁剪框、背景图片等等

        loadInput();

        //加载布局

        super.setUIContent(myLayout);

    }

    //按钮和图片初始化

    private void setupViews(Intent intent) {

        buttonInit(intent);

        imageInit(intent);

    }

    //按钮初始化

    private void buttonInit(Intent intent) {

        //创建button

        Button cancel = cancelButton(intent);

        Button rotate = rotateButton();

//        Button horfilp = horizontalFilpButton();

//        Button verfilp =  verticalFilpButton();

        Button crop = cropButton(intent);

        //将button添加到布局

        myLayout.addComponent(cancel);

        myLayout.addComponent(rotate);

//        myLayout.addComponent(horfilp);

//        myLayout.addComponent(verfilp);

        myLayout.addComponent(crop);

    }

    //取消按钮

    private Button cancelButton(Intent intent) {

        //创建取消button

        Button cancel = new Button(this);

        //为button增加布局条件

        DependentLayout.LayoutConfig cancelLayoutConfig = new DependentLayout.LayoutConfig();

        cancelLayoutConfig.setMargins(140, 50, 0, 0);

        cancelLayoutConfig.addRule(DependentLayout.LayoutConfig.ALIGN_TOP);

        cancelLayoutConfig.addRule(DependentLayout.LayoutConfig.ALIGN_PARENT_LEFT);

        //设置背景颜色

        cancel.setLayoutConfig(cancelLayoutConfig);

        ShapeElement cancelElement = new ShapeElement();

        cancelElement.setRgbColor(new RgbColor(155, 155, 155));

        cancelElement.setCornerRadius(25);

        cancel.setBackground(cancelElement);

        //设置文本

        cancel.setText("取消");

        cancel.setTextSize(55);

        cancel.setHeight(180);

        cancel.setWidth(220);

        //绑定点击方法

        cancel.setClickedListener(new Component.ClickedListener() {

            public void onClick(Component v) {

                //为按钮绑定方法

                cancel(intent);

            }

        });

        return cancel;

    }

    //旋转按钮

    private Button rotateButton() {

        //创建旋转button

        Button rotate = new Button(this);

        //为button增加布局条件

        DependentLayout.LayoutConfig rotateLayoutConfig = new DependentLayout.LayoutConfig();

        rotateLayoutConfig.setMargins(500, 50, 0, 0);

        rotateLayoutConfig.addRule(DependentLayout.LayoutConfig.ALIGN_TOP);

        rotateLayoutConfig.addRule(DependentLayout.LayoutConfig.ALIGN_PARENT_LEFT);

        rotate.setLayoutConfig(rotateLayoutConfig);

        //设置背景颜色

        ShapeElement rotateElement = new ShapeElement();

        rotateElement.setRgbColor(new RgbColor(255, 228, 181));

        rotateElement.setCornerRadius(25);

        rotate.setBackground(rotateElement);

        //设置文本

        rotate.setText("旋转");

        rotate.setTextSize(55);

        rotate.setHeight(180);

        rotate.setWidth(220);

        //绑定点击方法

        rotate.setClickedListener(new Component.ClickedListener() {

            public void onClick(Component v) {

                rotate();

            }

        });

        return rotate;

    }

    //水平翻转按钮

    private Button horizontalFilpButton() {

        //创建翻转button

        Button filp = new Button(this);

        //为button增加布局条件

        DependentLayout.LayoutConfig filpLayoutConfig = new DependentLayout.LayoutConfig();

        filpLayoutConfig.setMargins(0, 50, 300, 0);

        filpLayoutConfig.addRule(DependentLayout.LayoutConfig.ALIGN_TOP);

        filpLayoutConfig.addRule(DependentLayout.LayoutConfig.ALIGN_PARENT_RIGHT);

        //设置背景颜色

        filp.setLayoutConfig(filpLayoutConfig);

        ShapeElement filpElement = new ShapeElement();

        filpElement.setRgbColor(new RgbColor(180, 238, 180));

        filpElement.setCornerRadius(25);

        filp.setBackground(filpElement);

        //设置文本

        filp.setText("horFilp");

        filp.setTextSize(40);

        filp.setHeight(85);

        filp.setWidth(220);

        //绑定点击方法

        filp.setClickedListener(new Component.ClickedListener() {

            public void onClick(Component v) {

                horizontalFlip();

            }

        });

        return filp;

    }

    //垂直翻转按钮

    private Button verticalFilpButton() {

        //创建翻转button

        Button filp = new Button(this);

        //为button增加布局条件

        DependentLayout.LayoutConfig filpLayoutConfig = new DependentLayout.LayoutConfig();

        filpLayoutConfig.setMargins(0, 145, 300, 0);

        filpLayoutConfig.addRule(DependentLayout.LayoutConfig.ALIGN_TOP);

        filpLayoutConfig.addRule(DependentLayout.LayoutConfig.ALIGN_PARENT_RIGHT);

        //设置背景颜色

        filp.setLayoutConfig(filpLayoutConfig);

        ShapeElement filpElement = new ShapeElement();

        filpElement.setRgbColor(new RgbColor(180, 238, 180));

        filpElement.setCornerRadius(25);

        filp.setBackground(filpElement);

        //设置文本

        filp.setText("verFilp");

        filp.setTextSize(40);

        filp.setHeight(85);

        filp.setWidth(220);

        //绑定点击方法

        filp.setClickedListener(new Component.ClickedListener() {

            public void onClick(Component v) {

                verticalFlip();

            }

        });

        return filp;

    }

    //裁剪按钮

    private Button cropButton(Intent intent) {

        //创建裁剪button

        Button crop = new Button(this);

        //为button增加布局条件

        DependentLayout.LayoutConfig cropLayoutConfig = new DependentLayout.LayoutConfig();

        cropLayoutConfig.setMargins(820, 50, 0, 0);

        cropLayoutConfig.addRule(DependentLayout.LayoutConfig.ALIGN_TOP);

        cropLayoutConfig.addRule(DependentLayout.LayoutConfig.ALIGN_PARENT_LEFT);

        //设置背景颜色

        crop.setLayoutConfig(cropLayoutConfig);

        ShapeElement cropElement = new ShapeElement();

        cropElement.setRgbColor(new RgbColor(0, 125, 155));

        cropElement.setCornerRadius(25);

        crop.setBackground(cropElement);

        //设置文本

        crop.setText("裁剪");

        crop.setTextSize(55);

        crop.setHeight(180);

        crop.setWidth(220);

        //绑定点击方法

        crop.setClickedListener(new Component.ClickedListener() {

            public void onClick(Component v) {

                crop(intent);

            }

        });

        return crop;

    }

    //图片初始化

    private void imageInit(Intent intent) {

        //获得图片的id

        int source = intent.getIntParam("source", 0);

        mSource = source;

        //根据图片id获取pixelmap

        PixelMap pixelMapOriginal = BitmapUtils.getOriginalPixelMap(this, mSource).get();

        mPixelMap = pixelMapOriginal;

        //创建bitmaputils工具类,获得位图相关数据

        BitmapUtils bitmapUtils = new BitmapUtils(this , mPixelMap ,topIndex , mSource );

        //创建cropwindowhandler工具类,获得windows相关数据

        CropWindowHandler cropWindowHandler = new CropWindowHandler(this);

        //创建图片工具类,用来获得图片

        mCropImageView = new CropImageView(mPixelMap , this ,  mSource , topIndex);

        //获取展示图片的component

        mPicture = mCropImageView.getmPicture();

        //计算图片的位置,使得图片居中显示,计算出图片距离屏幕左边的空白

        int margin = cropWindowHandler.getWindowWidth()/2 - bitmapUtils.getPixelMapWidth()/2;

        //给mPicture增加布局

        DependentLayout.LayoutConfig componentLayoutConfig = new DependentLayout.LayoutConfig();

        componentLayoutConfig.setMargins(0, topIndex, 0, 0);//边距

        mPicture.setLayoutConfig(componentLayoutConfig);

        //将图片加入布局

        myLayout.addComponent(mPicture);

    }

    //初始化工具类,加载裁剪框等等

    private void loadInput() {

        //创建位图工具类

        mBitmapUtils = new BitmapUtils(this, mPixelMap, 400, mSource);

        //创建屏幕工具类

        mCropWindowHandler = new CropWindowHandler(this);

        //创建裁剪框的工具类

        mCropOverlayView = new CropOverlayView(this, mBitmapUtils, mCropWindowHandler);

        //获得裁剪框

        mCropBound = mCropOverlayView.getmCropBound();

        //将裁剪框加入布局文件

        myLayout.addComponent(mCropBound);

    }

    //取消裁剪方法

    private void cancel(Intent intentOriginal) {

        Intent intent = new Intent();

        //增加裁剪状态及结果

        intent.setParam("cropFlag", !CropImage.CROPFLAG);

        intent.setParam("cropStatus", 1);

        // 通过Intent中的OperationBuilder类构造operation对象,指定设备标识(空串表示当前设备)、应用包名、Ability名称

        Operation operation = new Intent.OperationBuilder()

                .withDeviceId("")

                .withBundleName(intentOriginal.getStringParam("bundleName"))

                .withAbilityName(intentOriginal.getStringParam("abilityName"))

                .build();

        // 把operation设置到intent中

        intent.setOperation(operation);

        //跳转

        startAbility(intent);

    }

    //图片旋转的方法

    private void rotate(){

        //图片旋转

        mCropImageView.rotateOnce();

        //裁剪框旋转

        mCropOverlayView.rotateOnce();

    }

    //图片水平翻转的方法

    private void horizontalFlip(){

        //图片翻转

        mCropImageView.horizontalFilp();

        //裁剪框翻转

        mCropOverlayView.horizontalFilpOnce();

    }

    //图片垂直翻转的方法

    private void verticalFlip(){

        mCropImageView.verticalFilp();

        //裁剪框翻转

        mCropOverlayView.verticalFilpOnce();

    }

    //成功裁剪方法

    private void crop(Intent intentOriginal) {

        //计算裁减后的pixelmap并存放于cropoverlayview中

        mCropOverlayView.croppedPixel(this);

        //显示到MainActivity

        Intent intent = new Intent();

        //增加裁剪状态及结果

        intent.setParam("cropFlag", CropImage.CROPFLAG);

        intent.setParam("cropStatus", 2);

        intent.setParam("result_code" , 203);

        RectFloat cropRect = mCropOverlayView.getmCropRect();

        //塞入裁剪结果

        intent.setParam("resultImg", mSource);

        croppedRectFloat = mCropOverlayView.getmCropRect();

        croppedPixelMap = mPixelMap;

        // 通过Intent中的OperationBuilder类构造operation对象,指定设备标识(空串表示当前设备)、应用包名、Ability名称

        Operation operation = new Intent.OperationBuilder()

                .withDeviceId("")

                .withBundleName(intentOriginal.getStringParam("bundleName"))

                .withAbilityName(intentOriginal.getStringParam("abilityName"))

                .build();

        // 把operation设置到intent中

        intent.setOperation(operation);

        //跳转

        startAbility(intent);

    }

    @Override

    protected void onStop() {

        super.onStop();

    }

}
作者:六合李欣
想了解更多内容,请访问: 51CTO和华为官方战略合作共建的鸿蒙技术社区https://harmonyos.51cto.com
鸿蒙Java开发模式11:鸿蒙图片裁剪功能的实现的更多相关文章
- 从微信小程序到鸿蒙js开发【11】——页面路由
目录: 1.router.push()&wx.navigateTo() 2.router.replace()&wx.redirectTo() 3.router.back()&w ...
- java 开发模式
Java-开发模式 Java Web开发方案有多种,这里列举一些经典的开发模式进行横向比较JSP+JAVABEAN开发模式: 特点:该模式将业务逻辑与页面表现进行分离,在一定程度上增加了程序的可 ...
- iOS实现图片裁剪功能,基于TKImageView完善与讲解
1.功能需求:需要实现图片区域裁剪功能. 2.效果图: 3.实现原理:本来想自己实现的,刚好看到一个比较好的库:TKImageView,下载好研究了下,发现基本都能满足我的需求,而且封装的也比 ...
- 浅析Java开发模式—Model1、Model2和三层
"解耦"的思想一直是我们倡导的,但在实际项目中怎样去做?这是需要我们去好好思考的.下面以Model1.Model2.三层为切入点,对比下去了解解耦的思想. Model1 使用JSP ...
- java开发模式学习
1.瀑布模式 这种模式适合小项目,一层层进行编码,没有规模的设计, 2.原型模式 先做模板给客户在做实体 3.面向对象模式 用面向对象的思想进行开发 4.螺旋模式 从内到外一层层开,
- Java开发一些小的思想与功能小记(二)
1.用if+return代替复杂的if...else(if+return) public static void test1(String str) { if ("1".equal ...
- Android 系统自带图片裁剪功能(适配7.0、8.0、对了还有小米手机)
前段时间写了如何获取相册和拍照之后的照片并且进行显示和上传,这一次是如何进行圆形图像制作,经常看我写的笔记的人会知道,我很懒.那么我就懒的自定义了,目前需求就用原生的就好了,大神的轮子,我会在后面进行 ...
- java实现上传图片并压缩图片大小功能
缩略图压缩文件jar包 <!-- 图片缩略图 --> <dependency> <groupId>net.coobird</groupId> <a ...
- JSP开发模式1(简单注册功能)
———————————————————————————————————————————————— import java.util.regex.Matcher;import java.util.reg ...
随机推荐
- scala 时间,时间格式转换
scala 时间,时间格式转换 1.scala 时间格式转换(String.Long.Date) 1.1时间字符类型转Date类型 1.2Long类型转字符类型 1.3时间字符类型转Long类型 2. ...
- vagrant虚拟化之多网卡网络配置
vagrant虚拟化之多网卡网络配置 一.network改为public 二.查看本地主机网络的ip地址范围(最佳解决方案) 三.vagrant优秀博文 vagrant虚拟化之多网卡网络配置,通过am ...
- dedecms后台更新网站栏目无反应的解决方法
dedecms进行第二次模板开发后,遇到在栏目更新的时候没有反应,但是用回原来的初始模板就可以,百度查找了很多的教程也无法进行解决,就这样慢慢的摸索.终于找到了问题的所在,原因可能是该更新的时候无法获 ...
- Redis 实战 —— 14. Redis 的 Lua 脚本编程
简介 Redis 从 2.6 版本开始引入使用 Lua 编程语言进行的服务器端脚本编程功能,这个功能可以让用户直接在 Redis 内部执行各种操作,从而达到简化代码并提高性能的作用. P248 在不编 ...
- JVM之堆体系结构
1.Heap堆(Java7之前) 一个JVM实例只存在一个堆内存,堆内存的大小是可以调节的.类加载器读取了类文件后,需要把类.方法.常变量放到堆内存中,保存所有引用类型的真实信息,以方便执行器执行,堆 ...
- 微信小程序分享之生成海报--canvas
首先看文档 了解知识点~~(https://developers.weixin.qq.com/miniprogram/dev/component/) githup:https://github.com ...
- Codeforces Round #672 (Div. 2)
比赛链接:https://codeforces.com/contest/1420 A. Cubes Sorting 题意 给出一个大小为 $n$ 的数组 $a$,每次只可以交换相邻的两个元素,最多交换 ...
- BZOJ4566 [Haoi2016]找相同字符【SAM】
BZOJ4566 [Haoi2016]找相同字符 给定两个字符串\(s和t\),要求找出两个字符串中所有可以相互匹配的子串对的数量 首先考虑可以怎么做,我们可以枚举\(t\)串的前缀\(t'\),然后 ...
- HDU 3488-Tour KM
为什么可以这样拆点在 这道题 都已经证明过 代码: 1 //题目上面说了"The only exception is that the first and the last city sho ...
- hdu5233 Gunner II
Problem Description Long long ago, there was a gunner whose name is Jack. He likes to go hunting ver ...