Mybatis3源码笔记(七)Plugin
1.Mybatis3的插件其实主要是用到了责任链和动态代理两种模式相结合而生成的。下面我们看一个例子,在执行所有update操作时,执行一个小小的测试输出。
@Intercepts({@Signature(type = Executor.class, method = "update", args = {MappedStatement.class, Object.class})})
public class ExamplePlugin implements Interceptor {
private Properties properties;
@Override
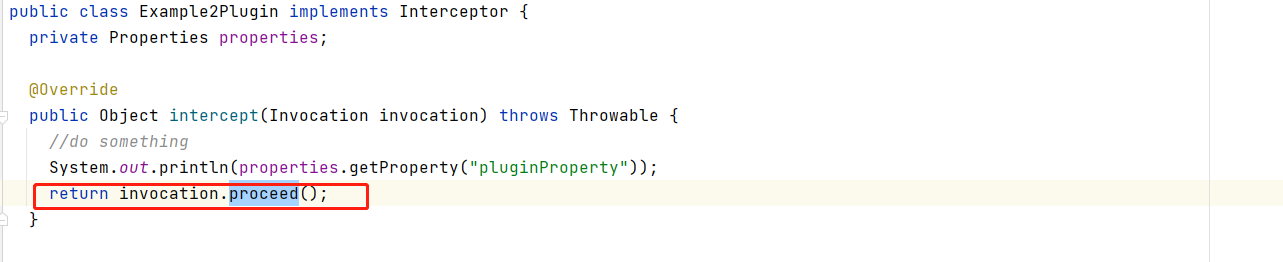
public Object intercept(Invocation invocation) throws Throwable {
//do something
System.out.println(properties.getProperty("pluginProperty"));
return invocation.proceed();
}
@Override
public Object plugin(Object target) {
return Plugin.wrap(target, this);
}
@Override
public void setProperties(Properties properties) {
this.properties = properties;
}
public Properties getProperties() {
return properties;
}
}
  <plugins>

    <plugin interceptor="org.apache.ibatis.builder.ExamplePlugin">

      <property name="pluginProperty" value="hello plugin"/>

    </plugin>

  </plugins>

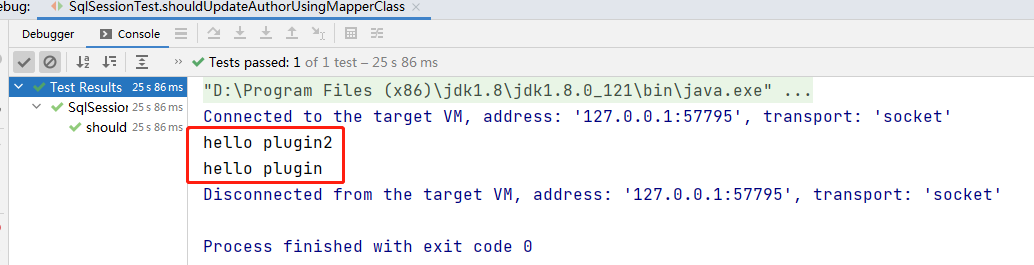
输出如上图,这么看上去插件开发其实蛮简单的,我们继续往下看。
2.Interceptor拦截器
Interceptor接口,我们看名字,都能知道他是个拦截器。拦截器,其实我们先不看代码,拦截器的存在无外呼这两点:他要拦截什么?拦截下来要做什么?,这么一看,我们是不是敏感的察觉到动态代理的味道?
下面看下他的具体方法。
public interface Interceptor {

  //具体的拦截器业务逻辑

  Object intercept(Invocation invocation) throws Throwable;

  //生成代理对象

  default Object plugin(Object target) {

    return Plugin.wrap(target, this);

  }

  default void setProperties(Properties properties) {

    // NOP

  }

}
Interceptor的注册我们其实在之前的Configuration解析中已经提过了,这边再重温下。
private void parseConfiguration(XNode root) {

    try {

      ...

      //解析plugins节点(注册interceptorChain里记录对应的拦截器)

      pluginElement(root.evalNode("plugins"));

      ...

    } catch (Exception e) {

      throw new BuilderException("Error parsing SQL Mapper Configuration. Cause: " + e, e);

    }

  }
  private void pluginElement(XNode parent) throws Exception {

    if (parent != null) {

      for (XNode child : parent.getChildren()) {

        String interceptor = child.getStringAttribute("interceptor");

        Properties properties = child.getChildrenAsProperties();

        Interceptor interceptorInstance = (Interceptor) resolveClass(interceptor).getDeclaredConstructor().newInstance();

        interceptorInstance.setProperties(properties);

        configuration.addInterceptor(interceptorInstance);

      }

    }

  }
代码很简单,就不解释了,主要就是解析xml中Interceptor,反射实例化生成放入configuration中属性interceptorChain中。
下面我们看下这个interceptorChain,从字面上我们就知道他是个拦截链,也就是个拦截器的集合。
public class InterceptorChain {

  private final List<Interceptor> interceptors = new ArrayList<>();

  //生成代理对象

  public Object pluginAll(Object target) {

    for (Interceptor interceptor : interceptors) {

      target = interceptor.plugin(target);

    }

    return target;

  }

  public void addInterceptor(Interceptor interceptor) {

    interceptors.add(interceptor);

  }

  public List<Interceptor> getInterceptors() {

    return Collections.unmodifiableList(interceptors);

  }

}
这里面最重要的就是pluginAll方法,他主要是调用plugin生成代理对象。我们看下pluginAll方法到底有哪些地方用到了?
也就是对应的我们到底要代理哪些对象,也就是回答之前的问题,我们到底要拦截哪些方法?
  public ParameterHandler newParameterHandler(MappedStatement mappedStatement, Object parameterObject, BoundSql boundSql) {

    ParameterHandler parameterHandler = mappedStatement.getLang().createParameterHandler(mappedStatement, parameterObject, boundSql);

    //又见到老朋友插件的过滤器链

    parameterHandler = (ParameterHandler) interceptorChain.pluginAll(parameterHandler);

    return parameterHandler;

  }

  public ResultSetHandler newResultSetHandler(Executor executor, MappedStatement mappedStatement, RowBounds rowBounds, ParameterHandler parameterHandler,

      ResultHandler resultHandler, BoundSql boundSql) {

    ResultSetHandler resultSetHandler = new DefaultResultSetHandler(executor, mappedStatement, parameterHandler, resultHandler, boundSql, rowBounds);

    //又见到老朋友插件的过滤器链

    resultSetHandler = (ResultSetHandler) interceptorChain.pluginAll(resultSetHandler);

    return resultSetHandler;

  }

  public StatementHandler newStatementHandler(Executor executor, MappedStatement mappedStatement, Object parameterObject, RowBounds rowBounds, ResultHandler resultHandler, BoundSql boundSql) {

    //根据不同的type生成不同的StatementHandler

    StatementHandler statementHandler = new RoutingStatementHandler(executor, mappedStatement, parameterObject, rowBounds, resultHandler, boundSql);

    //又见到老朋友插件的过滤器链

    statementHandler = (StatementHandler) interceptorChain.pluginAll(statementHandler);

    return statementHandler;

  }

  public Executor newExecutor(Transaction transaction) {

    return newExecutor(transaction, defaultExecutorType);

  }

  public Executor newExecutor(Transaction transaction, ExecutorType executorType) {

    executorType = executorType == null ? defaultExecutorType : executorType;

    executorType = executorType == null ? ExecutorType.SIMPLE : executorType;

    Executor executor;

    //典型的工厂模式,三种类型的executor

    if (ExecutorType.BATCH == executorType) {

      //批量执行器

      executor = new BatchExecutor(this, transaction);

    } else if (ExecutorType.REUSE == executorType) {

      //可重用执行器(用到了享元模式,用到statementMap来缓存同一生命周期内的statement。)

      executor = new ReuseExecutor(this, transaction);

    } else {

      //默认的简单执行器

      executor = new SimpleExecutor(this, transaction);

    }

    //开启二级缓存的话,再外面再包一层CachingExecutor,装饰者模式

    if (cacheEnabled) {

      executor = new CachingExecutor(executor);

    }

    //插件机制,其实就是一个动态代理的拦截器链,用到了一个责任链模式

    executor = (Executor) interceptorChain.pluginAll(executor);

    return executor;

  }
总结一波,一共代理了四种对象:
ParameterHandler(拦截参数)
ResultSetHandler(拦截结果集)
StatementHandler(拦截Statement)
Executor(拦截Executor执行器)
也就对应的我们之前的拦截器头上的注解type:

3.Plugin
下面我们看下是如何具体生成代理对象的。
public interface Interceptor {

  ...

  //生成代理对象

  default Object plugin(Object target) {

    return Plugin.wrap(target, this);

  }

  ...

}
public class Plugin implements InvocationHandler {

  //被代理的对象

  private final Object target;

  //拦截器

  private final Interceptor interceptor;

  //拦截器注解上被拦截的类和方法签名

  private final Map<Class<?>, Set<Method>> signatureMap;

  private Plugin(Object target, Interceptor interceptor, Map<Class<?>, Set<Method>> signatureMap) {

    this.target = target;

    this.interceptor = interceptor;

    this.signatureMap = signatureMap;

  }

  //对目标对象生成代理对象

  public static Object wrap(Object target, Interceptor interceptor) {

    //根据interceptor上面定义的注解,获取需要拦截的信息

    Map<Class<?>, Set<Method>> signatureMap = getSignatureMap(interceptor);

    Class<?> type = target.getClass();

    //返回需要拦截的接口信息

    Class<?>[] interfaces = getAllInterfaces(type, signatureMap);

    if (interfaces.length > 0) {

      //生成动态代理

      return Proxy.newProxyInstance(

          type.getClassLoader(),

          interfaces,

          new Plugin(target, interceptor, signatureMap));

    }

    return target;

  }

  //代理逻辑

  @Override

  public Object invoke(Object proxy, Method method, Object[] args) throws Throwable {

    try {

      //拿出signatureMap中对应的methods集合

      Set<Method> methods = signatureMap.get(method.getDeclaringClass());

      //当前执行的方法是否在拦截器中

      if (methods != null && methods.contains(method)) {

        //执行具体的拦截器业务逻辑(譬如之前的"hello plugin")

        return interceptor.intercept(new Invocation(target, method, args));

      }

      return method.invoke(target, args);

    } catch (Exception e) {

      throw ExceptionUtil.unwrapThrowable(e);

    }

  }

  //根据interceptor上面定义的注解,获取需要拦截的信息

  private static Map<Class<?>, Set<Method>> getSignatureMap(Interceptor interceptor) {

    //取得注解信息

    Intercepts interceptsAnnotation = interceptor.getClass().getAnnotation(Intercepts.class);

    // issue #251(取不到对应注解报错)

    if (interceptsAnnotation == null) {

      throw new PluginException("No @Intercepts annotation was found in interceptor " + interceptor.getClass().getName());

    }

    //生成Signature对象

    Signature[] sigs = interceptsAnnotation.value();

    Map<Class<?>, Set<Method>> signatureMap = new HashMap<>();

    for (Signature sig : sigs) {

      //生成signatureMap,key=sig.type(),value=Methods集合

      Set<Method> methods = signatureMap.computeIfAbsent(sig.type(), k -> new HashSet<>());

      try {

        Method method = sig.type().getMethod(sig.method(), sig.args());

        methods.add(method);

      } catch (NoSuchMethodException e) {

        throw new PluginException("Could not find method on " + sig.type() + " named " + sig.method() + ". Cause: " + e, e);

      }

    }

    return signatureMap;

  }

  //返回需要拦截的接口信息,一直往上查

  private static Class<?>[] getAllInterfaces(Class<?> type, Map<Class<?>, Set<Method>> signatureMap) {

    Set<Class<?>> interfaces = new HashSet<>();

    while (type != null) {

      for (Class<?> c : type.getInterfaces()) {

        //拦截器中支持的接口

        if (signatureMap.containsKey(c)) {

          interfaces.add(c);

        }

      }

      type = type.getSuperclass();

    }

    return interfaces.toArray(new Class<?>[0]);

  }

}
注释写的很清楚,基本上这一切都串上来了。
4.Invocation
最后就生下一个问题,拦截器链的具体实现。譬如:
  <plugins>

    <plugin interceptor="org.apache.ibatis.builder.ExamplePlugin">

      <property name="pluginProperty" value="hello plugin"/>

    </plugin>

    <plugin interceptor="org.apache.ibatis.builder.Example2Plugin">

      <property name="pluginProperty" value="hello plugin2"/>

    </plugin>

  </plugins>
首先所以我们发现对代理的对象,我们是有一个多次代理的操作。
public class InterceptorChain {

  ...

  public Object pluginAll(Object target) {

    for (Interceptor interceptor : interceptors) {

      target = interceptor.plugin(target);

    }

    return target;

  }

  ...

}
  //代理逻辑

  @Override

  public Object invoke(Object proxy, Method method, Object[] args) throws Throwable {

    try {

      //拿出signatureMap中对应的methods集合

      Set<Method> methods = signatureMap.get(method.getDeclaringClass());

      //当前执行的方法是否在拦截器中

      if (methods != null && methods.contains(method)) {

        //执行具体的拦截器业务逻辑(譬如之前的"hello plugin")

        return interceptor.intercept(new Invocation(target, method, args));

      }

      return method.invoke(target, args);

    } catch (Exception e) {

      throw ExceptionUtil.unwrapThrowable(e);

    }

  }
public class Invocation {

  //被代理对象

  private final Object target;

  //被代理方法

  private final Method method;

  //被代理方法参数

  private final Object[] args;

  public Invocation(Object target, Method method, Object[] args) {

    this.target = target;

    this.method = method;

    this.args = args;

  }

  ...

  public Object proceed() throws InvocationTargetException, IllegalAccessException {

    return method.invoke(target, args);

  }

}
上面的Invocation对应的proceed就是形成链的关键方法,他是返回上次代理的处理方法。所以在所有自定义的Interceptor的处理逻辑的最后一句都会返回这个方法,以此来调用上层的拦截逻辑。
此时的target就是上一层的Plugin对象。
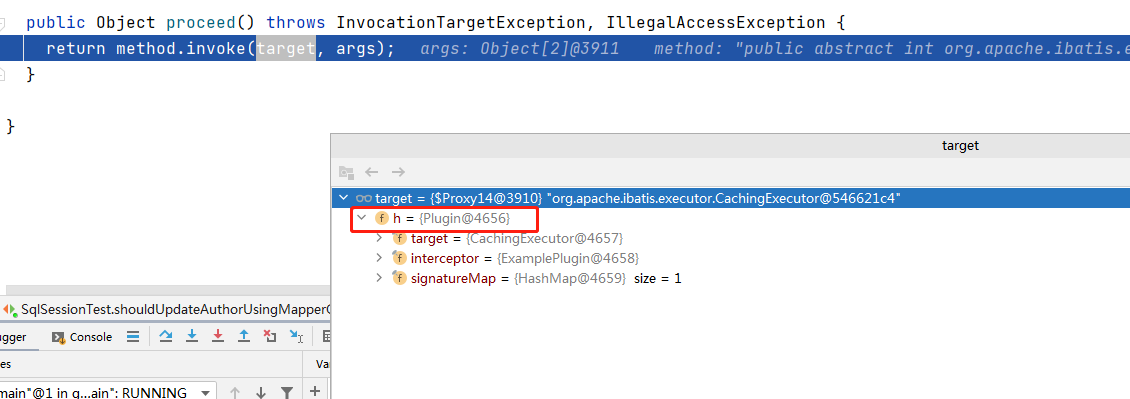
所以综上所述,如果有多个拦截器,他是一个嵌套的过程,被代理的对象是上次生成的代理对象,以此类推,形成一个链条的形式。
Mybatis3源码笔记(七)Plugin的更多相关文章
- Tomcat8源码笔记(七)组件启动Server Service Engine Host启动
一.Tomcat启动的入口 Tomcat初始化简单流程前面博客介绍了一遍,组件除了StandardHost都有博客,欢迎大家指文中错误.Tomcat启动类是Bootstrap,而启动容器启动入口位于 ...
- Mybatis3源码笔记(一)环境搭建
1. 源码下载 地址:https://github.com/mybatis/mybatis-3.git. 国内访问有时确实有点慢,像我就直接先fork.然后从git上同步到国内的gitte上,然后在i ...
- Mybatis3源码笔记(八)小窥MyBatis-plus
前言 Mybatis-Plus是一个 MyBatis增强工具包,简化 CRUD 操作,在 MyBatis 的基础上只做增强不做改变,为简化开发.提高效率而生,号称无侵入,现在开发中比较常用,包括我自己 ...
- Mybatis3源码笔记(六)SqlSession执行过程
前几篇大致分析了初始化的过程,今天打算走一个SqlSession具体执行过程. @Test void shouldSelectAllAuthors() { try (SqlSession sessio ...
- Mybatis3源码笔记(四)Configuration(续)
1.pluginElement(root.evalNode("plugins")) 解析plugins节点(注册interceptorChain里记录对应的拦截器) private ...
- Mybatis3源码笔记(五)mapperElement
1.四种解析mapper方式 : package,resource,url,class. <mappers> <mapper resource="org/apache/ib ...
- Mybatis3源码笔记(三)Configuration
1. XMLConfigBuilder 上一篇大致介绍了SqlSession的生成.在DefaultSqlSessionFactory的构造函数中就提到了Configuration这个对象.现在我们来 ...
- Mybatis3源码笔记(二)SqlSession
1. 核心层次 2. SqlSession 先从顶层的SqlSession接口开始说起.SqlSession是MyBatis提供的面向用户的API,表示和数据库的会话对象,用于完成对数据库的一系列CR ...
- Tomcat8源码笔记(三)Catalina加载过程
之前介绍过 Catalina加载过程是Bootstrap的load调用的 Tomcat8源码笔记(二)Bootstrap启动 按照Catalina的load过程,大致如下: 接下来一步步分析加载过程 ...
随机推荐
- 使用hive增量更新
目录 1.增量更新 2.对第一种情况 2.1.准备工作 2.2.更新数据 3.对第二种情况 3.1.准备工作 3.2.方法1 3.3.方法2 参考文末文章,加上自己的理解. 1.增量更新 有一个 ba ...
- 面试必知:String、StringBuilder、StringBuffer的区别
你知道String.StringBuilder.Stringbuffer的区别吗?当你创建字符串的时候,有考虑过该使用哪个吗? 别急,这篇文章带你解决这些问题. 可变性 首先,String是字符串,我 ...
- iOS拍照定制之AVCaptureVideoDataOutput
问题 领导看了前面做的拍照,问了句"哪来的声音", "系统的,自带的,你看系统的拍照也有声音" "有办法能去掉吗?挺糟心的" "我 ...
- 简单比较 @EnableEurekaClient 和 @EnableDiscoveryClient 两个注解
@EnableEurekaClient 和 @EnableDiscoveryClient 都是让eureka发现该服务并注册到eureka的注解 相同点: 它们都能让注册中心Eureka发现 , 并将 ...
- 零信任三大技术之SDP
SDP概述 SDP Software Defined Perimeter(软件定义边界),2013 年由云安全联盟 CSA提出. SDP 设计基本原则 1.信息隐身:隐藏服务器地址.端口,使之不被扫描 ...
- Java基础语法:数组
一.简介 描述: 数组是相同类型数据的有序集合. 其中,每一个数据称作一个数组元素,每个数组元素可以通过一个下标来访问它们. 基本特点: 数组的长度是确定的.数组一旦被创建,它的大小就是不可以改变的. ...
- Jquery hover鼠标经过时弹出div动态提示语
一.效果图 二.需求描述 1.鼠标经过table每一行时,弹出div动态提示语: 2.div弹出层的位置随鼠标位置的变化而变化: 3.鼠标离开table或获取的动态提示语为空时,div弹出层消失. 下 ...
- sqlyog如何增删改查?
转: sqlyog如何增删改查? 下面是一道完整的 sqlyog 增删改查的练习, 顺着做下去,可以迅速掌握. 1. 创建部门表dept,并插入数据: 2. 创建emp员工表,并插入数据: sql 代 ...
- java校招笔试题
基础: Java 反射?反射有什么缺点?你是怎么理解反射的(为什么框架需要反射)? 谈谈对 Java 注解的理解,解决了什么问题? 内部类了解吗?匿名内部类了解吗? BIO和NIO区别,4核cpu,1 ...
- [Elementary Mechanics Using Python-02]Feather in tornado
Problem 9.17 Feather in tornado. In this project you will learn to use Newton's laws and the force m ...