
(原)caffe中的conv
转载请注明出处:
https://www.cnblogs.com/darkknightzh/p/10486686.html
conv总体调用流程如下图所示:

说明:带o的为输出,如Wo代表输出宽度;带i的为输入,如Hi代表输入高度
1. 前向传播的计算ConvolutionLayer<Dtype>::Forward_cpu
注:不考虑反向传播的计算过程…
前向传播时,分别调用base_conv_layer.cpp中的BaseConvolutionLayer<Dtype>::forward_cpu_gemm和base_conv_layer.cpp中的BaseConvolutionLayer<Dtype>::forward_cpu_bias
     template <typename Dtype>

     void ConvolutionLayer<Dtype>::Forward_cpu(const vector<Blob<Dtype>*>& bottom,

         const vector<Blob<Dtype>*>& top)

     {

         const Dtype* weight = this->blobs_[]->cpu_data();     // weight参数

         for (int i = ; i < bottom.size(); ++i) {              // 多少个输入。一般1个的比较常见吧

             const Dtype* bottom_data = bottom[i]->cpu_data();    // 第i个输入:NCHiWi

             Dtype* top_data = top[i]->mutable_cpu_data();        // 第i个输出:NCHoWo

             for (int n = ; n < this->num_; ++n) {               // batchsize

                 //forward_cpu_gemm输入为第n个channel的起始位置(C*Hi*Wi),及权重参数(No*Ni*Kh*Kw),输出为第n个channel的起始位置,(C*Ho*Wo)

                 this->forward_cpu_gemm(bottom_data + n * this->bottom_dim_, weight, top_data + n * this->top_dim_);

                 if (this->bias_term_) {                            // 含有bias

                     const Dtype* bias = this->blobs_[]->cpu_data(); // bias参数

                     this->forward_cpu_bias(top_data + n * this->top_dim_, bias);  // 计算增加bias后的输出

                 }

             }

         }

     }
在forward之前,计算输出特征的尺寸函数为compute_output_shape
     template <typename Dtype>

     void ConvolutionLayer<Dtype>::compute_output_shape() {

         const int* kernel_shape_data = this->kernel_shape_.cpu_data();

         const int* stride_data = this->stride_.cpu_data();

         const int* pad_data = this->pad_.cpu_data();

         const int* dilation_data = this->dilation_.cpu_data();   // 卷积核膨胀的宽高,默认为1;核膨胀,即在核中间加0

         this->output_shape_.clear();

         for (int i = ; i < this->num_spatial_axes_; ++i) {   // HW总共维度,num_spatial_axes_=2

             // i + 1 to skip channel axis

             const int input_dim = this->input_shape(i + ); //inline int input_shape(int i) {return (*bottom_shape_)[channel_axis_ + i];}

             const int kernel_extent = dilation_data[i] * (kernel_shape_data[i] - ) + ;  //得到膨胀之后的核的尺寸

             const int output_dim = (input_dim +  * pad_data[i] - kernel_extent) / stride_data[i] + ;  //得到输出特征的尺寸

             this->output_shape_.push_back(output_dim);   // 输出特征宽高

         }

     }
2. forward_cpu_gemm
该函数首先判断是否为1*1的卷积,如果不是,则调用conv_im2col_cpu函数,将输入ChiWi变换成(C*Kh*Kw)*Ho*Wo的临时矩阵col_buffer_。
之后调用caffe_cpu_gemm,每次计算一部分输出,如果group_为1,则一次计算完:output(Co*(Ho*Wo))=1* weights(Co*(Ci*Kh*Kw))* col_buff((Ci*Kh*Kw)*(Ho*Wo)) + 0* output
     template <typename Dtype>

     void BaseConvolutionLayer<Dtype>::forward_cpu_gemm(const Dtype* input,

         const Dtype* weights, Dtype* output, bool skip_im2col) {  //bool skip_im2col = false

         const Dtype* col_buff = input;

         if (!is_1x1_) {  // 不是1*1卷积

             if (!skip_im2col)

             {

                 // 调用base_conv_layer.hpp中的im2col_cpu,将输入CiHiWi变换成(Ci*Kh*Kw)*Ho*Wo的临时变量

                 // 由于调用本函数的函数ConvolutionLayer<Dtype>::Forward_cpu中调用batchsize次本函数,因而本函数内部不包含batchsize

                 conv_im2col_cpu(input, col_buffer_.mutable_cpu_data());

             }

             col_buff = col_buffer_.cpu_data();

         }

         for (int g = ; g < group_; ++g) {  // group_默认为1

             caffe_cpu_gemm<Dtype>(CblasNoTrans, CblasNoTrans, conv_out_channels_ / group_,  // Co

                 conv_out_spatial_dim_, kernel_dim_,    // Ho*Wo    //  卷积核的Ci*Kh*Kw

                 (Dtype)., weights + weight_offset_ * g, col_buff + col_offset_ * g,

                 (Dtype)., output + output_offset_ * g);

         }

     }
3. conv_im2col_cpu
该函数为内联函数,对im2col_cpu进行了封装,方便调用,如下:
         inline void conv_im2col_cpu(const Dtype* data, Dtype* col_buff) {

             if (!force_nd_im2col_ && num_spatial_axes_ == ) {

                 im2col_cpu(data, conv_in_channels_,

                     conv_input_shape_.cpu_data()[], conv_input_shape_.cpu_data()[],

                     kernel_shape_.cpu_data()[], kernel_shape_.cpu_data()[],

                     pad_.cpu_data()[], pad_.cpu_data()[],

                     stride_.cpu_data()[], stride_.cpu_data()[],

                     dilation_.cpu_data()[], dilation_.cpu_data()[], col_buff);

             }

             else {

                 im2col_nd_cpu(data, num_spatial_axes_, conv_input_shape_.cpu_data(),

                     col_buffer_shape_.data(), kernel_shape_.cpu_data(),

                     pad_.cpu_data(), stride_.cpu_data(), dilation_.cpu_data(), col_buff);

             }

         }
4. im2col_cpu
该函数用于将图像转换成卷积所需的列格式。a中黑色实线方框中为特征(或像素),虚线中为边界填充的0,红色虚线框为3*3的卷积核大小。如对于a所示的7*9输入图像(为方便b中的显示,因而a中值为1—63),四个边界各填充一个0后,通过该函数,得到的col格式如b所示,其中红色虚线为a中的位置对应的列格式的像素。b中…代表依次递增的5个特征。可以认为b中矩阵为一个kernel_h*kernel_w*output_h*output_w的行向量,也可以认为是一个(kernel_h*kernel_w)*(output_h*output_w)的2维的矩阵(每一行的长度为output_h*output_w)。通过这种方式得到的col格式数据,与卷积核可通过矩阵相乘,提高运算速度。
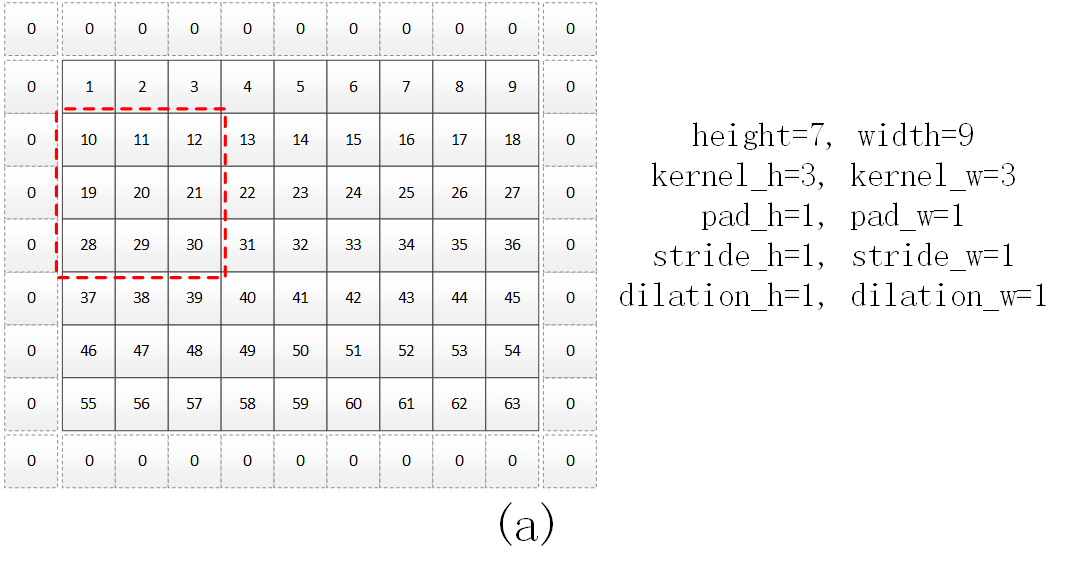
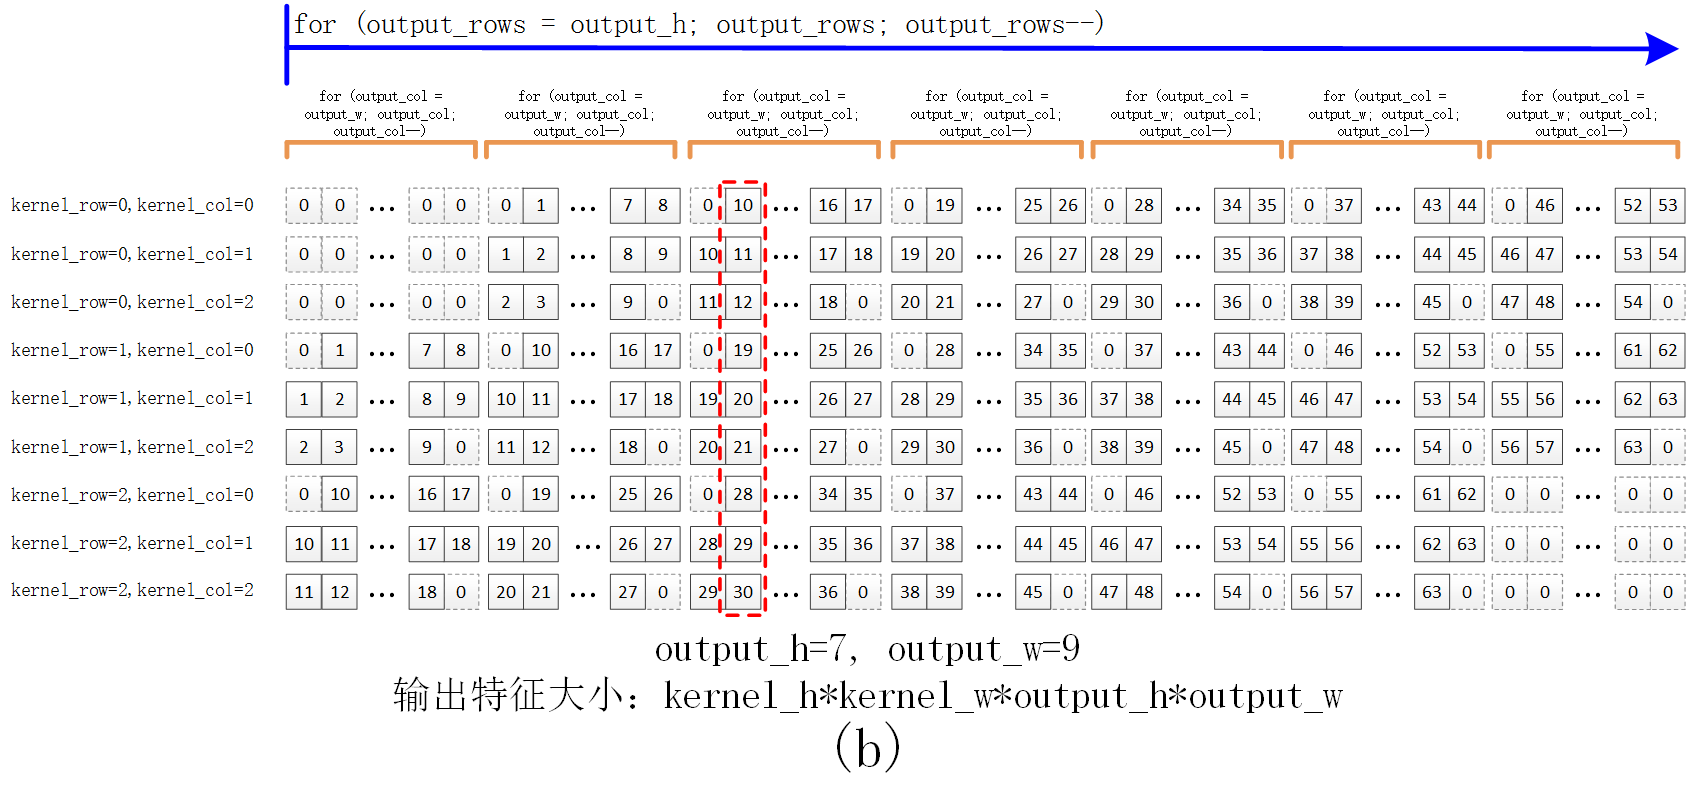
该函数代码如下。其中output_rows的for循环对应b中的蓝色箭头范围,output_col的for循环对应b中的橙色半框范围。
     template <typename Dtype>

     void im2col_cpu(const Dtype* data_im, const int channels,  // channels为输入特征个数

         const int height, const int width, const int kernel_h, const int kernel_w,

         const int pad_h, const int pad_w,  // 特征边界填充的宽高

         const int stride_h, const int stride_w,   // 间隔的宽高

         const int dilation_h, const int dilation_w, // 卷积核膨胀的宽高,默认为1;核膨胀,即在核中间加0 // https://blog.csdn.net/wangyuxi__/article/details/83003357

         Dtype* data_col) {  //  为(kernel_h*kernel_w)*(output_h*output_w)的缓冲区。每一行为滑动窗口的某个位置对应的所有特征

         const int output_h = (height +  * pad_h - (dilation_h * (kernel_h - ) + )) / stride_h + ;  // 输出特征宽高

         const int output_w = (width +  * pad_w - (dilation_w * (kernel_w - ) + )) / stride_w + ;

         const int channel_size = height * width;  // 输入特征的每个通道的总特征数

         for (int channel = channels; channel--; data_im += channel_size)   // 每次循环完毕,输入特征偏移一个通道

         {

             for (int kernel_row = ; kernel_row < kernel_h; kernel_row++)

             {

                 for (int kernel_col = ; kernel_col < kernel_w; kernel_col++)

                 {

                     int input_row = -pad_h + kernel_row * dilation_h;  // 每次核在特征上的起始行坐标

                     for (int output_rows = output_h; output_rows; output_rows--)  // 遍历输入特征每行

                     {

                         if (!is_a_ge_zero_and_a_lt_b(input_row, height))   // a<0 或者 a>=b,即当前行超出输入边界

                         {

                             for (int output_cols = output_w; output_cols; output_cols--)  // 每列填0

                             {

                                 *(data_col++) = ;

                             }

                         }

                         else {   // 当前行在输入边界内

                             int input_col = -pad_w + kernel_col * dilation_w;  // 每次核在特征上的起始列坐标

                             for (int output_col = output_w; output_col; output_col--)  // 遍历输入特征每列

                             {

                                 if (is_a_ge_zero_and_a_lt_b(input_col, width))    // 当前列在输入边界内

                                 {

                                     *(data_col++) = data_im[input_row * width + input_col];  // 将输入特征赋值给data_col

                                 }

                                 else   // 当前列超出输入边界

                                 {

                                     *(data_col++) = ;

                                 }

                                 input_col += stride_w;  // 输入特征位置增加stride_w

                             }

                         }

                         input_row += stride_h;  // 输入特征位置增加stride_h

                     }

                 }

             }

         }

     }
5. BaseConvolutionLayer<Dtype>::forward_cpu_bias
该函数为output =1*bias(C*1)* bias_multiplier_(1*(H*W))+ 1*output。其中C为输出特征的通道数No,H为特征高Ho,W为特征宽Wo,最终得到某个batch中CoHoWo的特征。
     template <typename Dtype>

     void BaseConvolutionLayer<Dtype>::forward_cpu_bias(Dtype* output,

         const Dtype* bias) {

         caffe_cpu_gemm<Dtype>(CblasNoTrans, CblasNoTrans, num_output_,   //输出特征维度No

             out_spatial_dim_, , (Dtype)., bias, bias_multiplier_.cpu_data(),  // Wo*Ho

             (Dtype)., output);

     }
bias_multiplier_为1*(Wo*Ho)的向量,在void BaseConvolutionLayer<Dtype>::Reshape中将其所有的值均设置为1:
         out_spatial_dim_ = top[]->count(first_spatial_axis);  // Wo*Ho

         if (bias_term_) {

             vector<int> bias_multiplier_shape(, out_spatial_dim_);

             bias_multiplier_.Reshape(bias_multiplier_shape);

             caffe_set(bias_multiplier_.count(), Dtype(),  // bias_multiplier_为1*(Wo*Ho)的向量,所有元素值为1

                 bias_multiplier_.mutable_cpu_data());

         }
6. caffe_cpu_gemm
该函数调用cblas_sgemm,实现矩阵相乘:
 template<>

 void caffe_cpu_gemm<float>(const CBLAS_TRANSPOSE TransA,

     const CBLAS_TRANSPOSE TransB, const int M, const int N, const int K,

     const float alpha, const float* A, const float* B, const float beta,

     float* C) {

   int lda = (TransA == CblasNoTrans) ? K : M;

   int ldb = (TransB == CblasNoTrans) ? N : K;

   cblas_sgemm(CblasRowMajor, TransA, TransB, M, N, K, alpha, A, lda, B,

       ldb, beta, C, N);

 }
cblas_sgemm具体见:http://www.cnblogs.com/darkknightzh/p/5553336.html
(原)caffe中的conv的更多相关文章
- (原)torch和caffe中的BatchNorm层
转载请注明出处: http://www.cnblogs.com/darkknightzh/p/6015990.html BatchNorm具体网上搜索. caffe中batchNorm层是通过Batc ...
- (原)caffe中通过图像生成lmdb格式的数据
转载请注明出处: http://www.cnblogs.com/darkknightzh/p/5909121.html 参考网址: http://www.cnblogs.com/wangxiaocvp ...
- caffe 中base_lr、weight_decay、lr_mult、decay_mult代表什么意思?
在机器学习或者模式识别中,会出现overfitting,而当网络逐渐overfitting时网络权值逐渐变大,因此,为了避免出现overfitting,会给误差函数添加一个惩罚项,常用的惩罚项是所有权 ...
- caffe代码阅读10:Caffe中卷积的实现细节(涉及到BaseConvolutionLayer、ConvolutionLayer、im2col等)-2016.4.3
一. 卷积层的作用简单介绍 卷积层是深度神经网络中的一个重要的层,该层实现了局部感受野.通过这样的局部感受野,能够有效地减少參数的数目. 我们将结合caffe来解说详细是怎样实现卷积层的前传和反传的. ...
- caffe中权值初始化方法
首先说明:在caffe/include/caffe中的 filer.hpp文件中有它的源文件,如果想看,可以看看哦,反正我是不想看,代码细节吧,现在不想知道太多,有个宏观的idea就可以啦,如果想看代 ...
- 在caffe中使用hdf5的数据
caffe默认使用的数据格式为lmdb文件格式,它提供了把图片转为lmdb文件格式的小程序,但是呢,我的数据为一维的数据,我也要分类啊,那我怎么办?肯定有办法可以转为lmdb文件格式的,我也看了一些源 ...
- caffe中各层的作用:
关于caffe中的solver: cafffe中的sover的方法都有: Stochastic Gradient Descent (type: "SGD"), AdaDelta ( ...
- caffe中python接口的使用
下面是基于我自己的接口,我是用来分类一维数据的,可能不具通用性: (前提,你已经编译了caffe的python的接口) 添加 caffe塻块的搜索路径,当我们import caffe时,可以找到. 对 ...
- C++primer原书中的一个错误(派生类using声明对基类权限的影响)
在C++primer 第4版的 15章 15.2.5中有以下这样一段提示: "注解:派生类能够恢复继承成员的訪问级别,但不能使訪问级别比基类中原来指定的更严格或者更宽松." 在vs ...
随机推荐
- TF:Tensorflor之session会话的使用,定义两个矩阵,两种方法输出2个矩阵相乘的结果—Jason niu
import tensorflow as tf matrix1 = tf.constant([[3, 20]]) matrix2 = tf.constant([[6], [100]]) product ...
- 转 国内的go get问题的解决
转 国内的go get问题的解决 go get golang.org/x 包失败解决方法 由于各种问题,国内使用 go get 安装 golang 官方包可能会失败,如我自己在安装 colli ...
- Ef 自动迁移,日志
Ef 迁移 在vs打开程序控制台 2,选择程序集 ,如果是初次,输入 Enable-Migrations,启动迁徙 3 添加迁移,完成修改 4,之后会自动生成迁移配置文件. 然后再上下文类中加入 两 ...
- 理解Array.prototype.slice.call(arguments)
在很多时候经常看到Array.prototype.slice.call()方法,比如Array.prototype.slice.call(arguments),下面讲一下其原理: 1.基本讲解 1.在 ...
- 【整理】Java 10新特性总结
Java 9才发布几个月,很多玩意都没整明白,Java 10就来了..这时候我真尼玛想说:线上用的JDK 7 ,JDK 8 还没用熟,JDK 9 才发布不久不知道啥玩意,JDK 10……刚学Java的 ...
- [SPOJ-CIRU]The area of the union of circles/[BZOJ2178]圆的面积并
[SPOJ-CIRU]The area of the union of circles/[BZOJ2178]圆的面积并 题目大意: 求\(n(n\le1000)\)个圆的面积并. 思路: 对于一个\( ...
- npm install 提示权限不足 Error: EPERM: operation not permitted, unlink XXX
问题 使用npm install时提示权限不足 原因 这里原因有两个: 没有管理员权限访问C盘下npm路径导致下载失败. NPM官网没有下载权限. 解决方案 第一原因 这里可以使用管理员身份执行以下命 ...
- python正则表达式(一)
---恢复内容开始--- 正则表达式,又称正规表示式.正规表示法.正规表达式.规则表达式.常规表示法(英语:Regular Expression,在代码中常简写为regex.regexp或RE),是计 ...
- 3ds max学习笔记(三)--视点显示控制
显示模式:1.模型一般是以实体方式显示的,若想看线框方式,摁F3:返回实体,摁F3:2.实体加线框模式显示,摁F4:返回,摁F4:3.透明效果:ALT+X,透明显示,之后F4,显示线框:程序内的其他显 ...
- Java基础知识--集合
集合类 数组和集合的比较:数组可以存储对象,也可以存储基本数据类型,但是缺点就是长度固定,不能改变:集合长度是可变的,但是集合只能存储对象,集合可以存储不同类型的对象. Java容器类库一共有两种主要 ...