
Tutorial: Create a Windows Machine Learning UWP application (C#)
In this tutorial, we'll build a simple Universal Windows Platform application that uses a trained machine learning model to recognize a numeric digit drawn by the user. This tutorial primarily focuses on how to load and use Windows ML in your UWP application.
The following video walks through the sample that this tutorial is based on.
Prerequisites
- Windows 10 Insider Preview (Version 1809 or higher)
- Windows 10 SDK (Build 17763 or higher)
- Visual Studio 2017
1. Download the sample
First, you'll need to download our MNIST Tutorial from GitHub. We've provided a template with implemented XAML controls and events, including:
- An InkCanvas to draw the digit.
- Buttons to interpret the digit and clear the canvas.
- Helper routines to convert the InkCanvas output to a VideoFrame.
A completed MNIST sample is also available to download from GitHub.
2. Open the project in Visual Studio
Launch Visual Studio, and open the MNIST sample application. (If the solution is shown as unavailable, you'll need to right-click the project in the Solution Explorer and select Reload Project.)
Inside the Solution Explorer, the project has three main code files:
MainPage.xaml- All of our XAML code to create the UI for the InkCanvas, buttons, and labels.MainPage.xaml.cs- Where our application code lives.Helper.cs- Helper routines to crop and convert image formats.
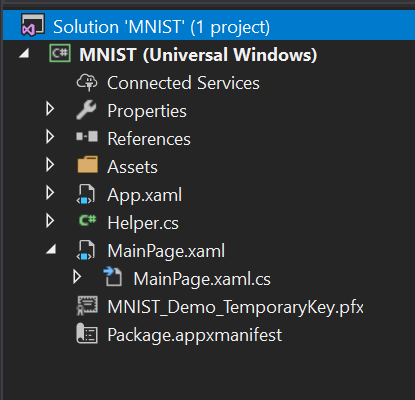
3. Build and run the project
In the Visual Studio toolbar, change the Solution Platform to x64 to run the project on your local machine.
To run the project, click the Start Debugging button on the toolbar, or press F5. The application should show an InkCanvas where users can write a digit, a Recognize button to interpret the number, an empty label field where the interpreted digit will be displayed as text, and a Clear Digit button to clear the InkCanvas.

Note
If the project won't build, you might need to change the project's deployment target version. Right-click the project in the Solution Explorer and select Properties. In the Application tab, set the Target version and Min version to match your OS and SDK.
4. Download a model
Next, let's get a machine learning model to add to our application. For this tutorial, we'll use a pre-trained MNIST model that was trained with the Microsoft Cognitive Toolkit (CNTK) and exported to ONNX format.
If you are using the MNIST Tutorial sample from GitHub, the MNIST model has already been included in your Assets folder, and you will need to add it to your application as an existing item. You can also download the pre-trained model from the ONNX Model Zoo on GitHub.
5. Add the model
After downloading the MNIST model, right click on the Assets folder in the Solution Explorer, and select Add > Existing Item. Point the file picker to the location of your ONNX model, and click Add.
The project should now have two new files:
mnist.onnx- your trained model.mnist.cs- the Windows ML-generated code.
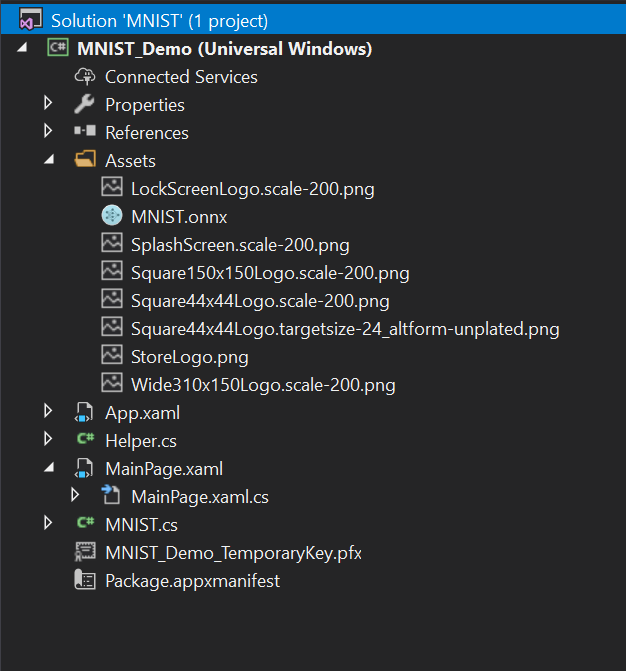
To make sure the model builds when we compile our application, right click on the mnist.onnx file, and select Properties. For Build Action, select Content.
Now, let's take a look at the newly generated code in the mnist.cs file. We have three classes:
- mnistModel creates the machine learning model representation, creates a sessions on the system default device, binds the specific inputs and outputs to the model, and evaluates the model asynchronously.
- mnistInput initializes the input types that the model expects. In this case, the input expects an ImageFeatureValue.
- mnistOutput initializes the types that the model will output. In this case, the output will be a list called
Plus214_Output_0of type TensorFloat.
We'll now use these classes to load, bind, and evaluate the model in our project.
6. Load, bind, and evaluate the model
For Windows ML applications, the pattern we want to follow is: Load > Bind > Evaluate.
- Load the machine learning model.
- Bind inputs and outputs to the model.
- Evaluate the model and view results.
We'll use the interface code generated in mnist.cs to load, bind, and evaluate the model in our application.
First, in MainPage.xaml.cs, let's instantiate the model, inputs, and outputs.
namespace MNIST_Demo

{

	public sealed partial class MainPage : Page

	{

	    private mnistModel ModelGen;

	    private mnistInput ModelInput = new mnistInput();

	    private mnistOutput ModelOutput;

	    ...

	}

}
Then, in LoadModelAsync, we'll load the model. This method should be called before we use any of the models methods (i.e. on the Page's Loaded event, at a OnNavigatedTo override, or anywhere before recognizeButton_Click is called). The mnistModel class represents the MNIST model and creates the session on the system default device. To load the model, we call the CreateFromStreamAsync method, passing in the ONNX file as the parameter.
private async Task LoadModelAsync()

{

    //Load a machine learning model

    StorageFile modelFile = await StorageFile.GetFileFromApplicationUriAsync(new Uri($"ms-appx:///Assets/mnist.onnx"));

    ModelGen = await mnistModel.CreateFromStreamAsync(modelFile as IRandomAccessStreamReference);

}
Next, we want to bind our inputs and outputs to the model. The generated code also includes mnistInput and mnistOutput wrapper classes. The mnistInput class represents the model's expected inputs, and the mnistOutput class represents the model's expected outputs.
To initialize the model's input object, call the mnistInput class constructor, passing in your application data, and make sure that your input data matches the input type that your model expects. The mnistInput class expects an ImageFeatureValue, so we use a helper method to get an ImageFeatureValue for the input.
Using our included helper functions in helper.cs, we will copy the contents of the InkCanvas, convert it to type ImageFeatureValue, and bind it to our model.
private async void recognizeButton_Click(object sender, RoutedEventArgs e)

{

    //Bind model input with contents from InkCanvas

    VideoFrame vf = await helper.GetHandWrittenImage(inkGrid);

    ModelInput.Input3 = ImageFeatureValue.CreateFromVideoFrame(vf);

}
For output, we simply call EvaluateAsync with the specified input. Once your inputs are initialized, call the model's EvaluateAsync method to evaluate your model on the input data. EvaluateAsync binds your inputs and outputs to the model object and evaluates the model on the inputs.
Since the model returns an output tensor, we'll first want to convert it to a friendly datatype, and then parse the returned list to determine which digit had the highest probability and display that one.
private async void recognizeButton_Click(object sender, RoutedEventArgs e)

{

    //Bind model input with contents from InkCanvas

    VideoFrame vf = await helper.GetHandWrittenImage(inkGrid);

    ModelInput.Input3 = ImageFeatureValue.CreateFromVideoFrame(vf);

    //Evaluate the model

    ModelOutput = await ModelGen.EvaluateAsync(ModelInput);

    //Convert output to datatype

    IReadOnlyList<float> vectorImage = ModelOutput.Plus214_Output_0.GetAsVectorView();

    IList<float> imageList = vectorImage.ToList();

    //Query to check for highest probability digit

    var maxIndex = imageList.IndexOf(imageList.Max());

    //Display the results

    numberLabel.Text = maxIndex.ToString();

}
Finally, we'll want to clear out the InkCanvas to allow users to draw another number.
private void clearButton_Click(object sender, RoutedEventArgs e)

{

    inkCanvas.InkPresenter.StrokeContainer.Clear();

    numberLabel.Text = "";

}
7. Launch the application
Once we build and launch the application, we'll be able to recognize a number drawn on the InkCanvas.
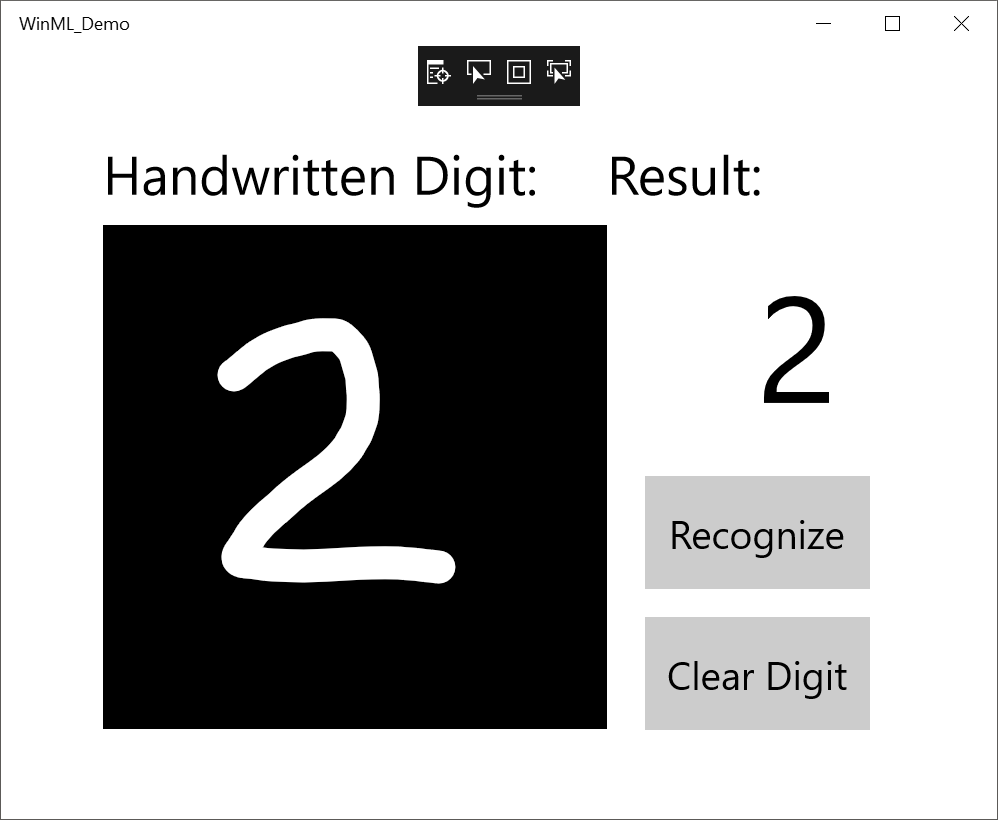
That's it - you've made your first Windows ML application! For more samples that demonstrate how to use Windows ML, check out our Windows-Machine-Learning repo on GitHub.
Note
Use the following resources for help with Windows ML:
- To ask or answer technical questions about Windows ML, please use the windows-machine-learning tag on Stack Overflow.
- To report a bug, please file an issue on our GitHub.
- To request a feature, please head over to Windows Developer Feedback.
Tutorial: Create a Windows Machine Learning UWP application (C#)的更多相关文章
- Advice for applying Machine Learning
https://jmetzen.github.io/2015-01-29/ml_advice.html Advice for applying Machine Learning This post i ...
- How do I learn machine learning?
https://www.quora.com/How-do-I-learn-machine-learning-1?redirected_qid=6578644 How Can I Learn X? ...
- 5 Techniques To Understand Machine Learning Algorithms Without the Background in Mathematics
5 Techniques To Understand Machine Learning Algorithms Without the Background in Mathematics Where d ...
- 基于Windows 机器学习(Machine Learning)的图像分类(Image classification)实现
今天看到一篇文章 Google’s Image Classification Model is now Free to Learn 说是狗狗的机器学习速成课程(Machine Learning C ...
- Machine Learning – 第2周(Linear Regression with Multiple Variables、Octave/Matlab Tutorial)
Machine Learning – Coursera Octave for Microsoft Windows GNU Octave官网 GNU Octave帮助文档 (有900页的pdf版本) O ...
- Python Machine Learning: Scikit-Learn Tutorial
这是一篇翻译的博客,原文链接在这里.这是我看的为数不多的介绍scikit-learn简介而全面的文章,特别适合入门.我这里把这篇文章翻译一下,英语好的同学可以直接看原文. 大部分喜欢用Python来学 ...
- (原创)Stanford Machine Learning (by Andrew NG) --- (week 10) Large Scale Machine Learning & Application Example
本栏目来源于Andrew NG老师讲解的Machine Learning课程,主要介绍大规模机器学习以及其应用.包括随机梯度下降法.维批量梯度下降法.梯度下降法的收敛.在线学习.map reduce以 ...
- 机器学习---用python实现朴素贝叶斯算法(Machine Learning Naive Bayes Algorithm Application)
在<机器学习---朴素贝叶斯分类器(Machine Learning Naive Bayes Classifier)>一文中,我们介绍了朴素贝叶斯分类器的原理.现在,让我们来实践一下. 在 ...
- 机器学习---用python实现最小二乘线性回归算法并用随机梯度下降法求解 (Machine Learning Least Squares Linear Regression Application SGD)
在<机器学习---线性回归(Machine Learning Linear Regression)>一文中,我们主要介绍了最小二乘线性回归算法以及简单地介绍了梯度下降法.现在,让我们来实践 ...
随机推荐
- 【ASP.NET Core快速入门】(三)准备CentOS和Nginx环境
基本软件 VMware虚拟机 centos:http://isoredirect.centos.org/centos/7/isos/x86_64/CentOS-7-x86_64-Minimal-170 ...
- 【JVM系列】一步步解析java执行内幕
对于任何一门语言,要想达到精通的水平,研究它的执行原理(或者叫底层机制)不失为一种良好的方式.在本篇文章中,将重点研究java源代码的执行原理,即从程 序员编写JAVA源代码,到最终形成产品,在整个过 ...
- Spring加载流程源码分析03【refresh】
前面两篇文章分析了super(this)和setConfigLocations(configLocations)的源代码,本文来分析下refresh的源码, Spring加载流程源码分析01[su ...
- pdf.js 使用实例
pdf.js可以实现在html下直接浏览pdf文档,是一款开源的pdf文档读取解析插件 pdf.js主要包含两个库文件,一个pdf.js和一个pdf.worker.js,,一个负责API解析,一个负责 ...
- AngularJS 截取字符串
参考文章:https://blog.csdn.net/u010234516/article/details/54631525 //过滤器 app.filter('textLengthSet', fun ...
- docker daemon 配置文件
Ubuntu Ubuntu 14.04 配置文件位于 /etc/init/docker.conf Ubuntu 15.04 配置文件位于 /etc/default/docker,修改配置项DOCKER ...
- vue中的tab栏切换内容变换
<!DOCTYPE html> <html lang="cn-zh"> <head> <meta charset="UTF-8& ...
- Django 使用 locals() 函数
locals() 函数会以字典类型返回当前位置的全部局部变量. 在 views.py 中添加 from django.shortcuts import render,HttpResponse,rend ...
- .net开源工作流引擎ccflow Pop返回值设置
关键词: 点击字段弹出返回值填充文本框或其他字段 表单自动填充 .net开源工作流 jflow工作流 ccflow 工作流引擎 应用场景 当我们的查询信息比较多我们希望有一个比较 ...
- RxJava2.0入门篇
传统用法:开启子线程去做耗时任务,业务逻辑越复杂,代码嵌套越严重,Rx系列出来很久了,想自己做一个总结,希望能帮到一部分人 观察者模式先提一嘴 这个老模式简直不想说太多,就说一下流程 1创建被观察者 ...