[UWP]使用Reveal
1. 前言
之前在 如何使用Fluent Design System 这篇文章里已经简单介绍过Reveal的用法,这篇再详细介绍其它内容。
2. 自定义RevealButtonStyle
我觉得常用ItemsControl都已经自动应用了Reveal,用就是了。
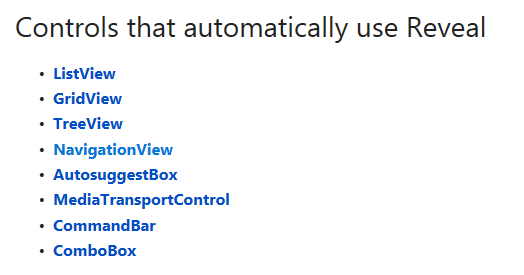
没有默认应用Reveal的控件,UWP也为其中一部分提供了可用的Reveal样式。

只需简单地应用Style即可:
<Button Content="Button Content" Style="{StaticResource ButtonRevealStyle}"/>
其它用法官方文档也有很详细的教程,一时也想不到能玩出什么花样。。
但既然Reveal最大的作用是为一组元素提示其可操作区域,那么对无边框按钮来说Reveal就很重要了。UWP没有提供无边框按钮的Reveal样式,可以自己实现一个:
<Style TargetType="Button">

    <Setter Property="Background"

            Value="{ThemeResource ButtonRevealBackground}" />

    <Setter Property="Foreground"

            Value="{ThemeResource ButtonForeground}" />

    <Setter Property="BorderBrush"

            Value="{ThemeResource ButtonRevealBorderBrush}" />

    <Setter Property="BorderThickness"

            Value="{ThemeResource ButtonRevealBorderThemeThickness}" />

    <Setter Property="Margin"

            Value="3" />

    <Setter Property="HorizontalAlignment"

            Value="Left" />

    <Setter Property="VerticalAlignment"

            Value="Center" />

    <Setter Property="FontFamily"

            Value="{ThemeResource ContentControlThemeFontFamily}" />

    <Setter Property="FontWeight"

            Value="Normal" />

    <Setter Property="FontSize"

            Value="20" />

    <Setter Property="UseSystemFocusVisuals"

            Value="True" />

    <Setter Property="FocusVisualMargin"

            Value="-3" />

    <Setter Property="Height"

            Value="50" />

    <Setter Property="Width"

            Value="50" />

    <Setter Property="Template">

        <Setter.Value>

            <ControlTemplate TargetType="Button">

                <Grid x:Name="RootGrid">

                    <VisualStateManager.VisualStateGroups>

                        <VisualStateGroup x:Name="CommonStates">

                            <VisualState x:Name="Normal">

                                <Storyboard>

                                    <PointerUpThemeAnimation Storyboard.TargetName="RootGrid" />

                                </Storyboard>

                            </VisualState>

                            <VisualState x:Name="PointerOver">

                                <VisualState.Setters>

                                    <Setter Target="RootGrid.(RevealBrush.State)"

                                            Value="PointerOver" />

                                    <Setter Target="BackgroundElement.Fill"

                                            Value="{ThemeResource ButtonRevealBackgroundPointerOver}" />

                                    <Setter Target="BackgroundElement.Stroke"

                                            Value="{ThemeResource ButtonRevealBorderBrushPointerOver}" />

                                    <Setter Target="ContentPresenter.Foreground"

                                            Value="{ThemeResource ButtonForegroundPointerOver}" />

                                </VisualState.Setters>

                                <Storyboard>

                                    <PointerUpThemeAnimation Storyboard.TargetName="RootGrid" />

                                </Storyboard>

                            </VisualState>

                            <VisualState x:Name="Pressed">

                                <VisualState.Setters>

                                    <Setter Target="RootGrid.(RevealBrush.State)"

                                            Value="Pressed" />

                                    <Setter Target="BackgroundElement.Fill"

                                            Value="{ThemeResource ButtonRevealBackgroundPressed}" />

                                    <Setter Target="BackgroundElement.Stroke"

                                            Value="{ThemeResource ButtonRevealBorderBrushPressed}" />

                                    <Setter Target="ContentPresenter.Foreground"

                                            Value="{ThemeResource ButtonForegroundPressed}" />

                                </VisualState.Setters>

                                <Storyboard>

                                    <PointerDownThemeAnimation Storyboard.TargetName="RootGrid" />

                                </Storyboard>

                            </VisualState>

                            <VisualState x:Name="Disabled">

                                <VisualState.Setters>

                                    <Setter Target="BackgroundElement.Fill"

                                            Value="{ThemeResource ButtonRevealBackgroundDisabled}" />

                                    <Setter Target="BackgroundElement.Stroke"

                                            Value="{ThemeResource ButtonRevealBorderBrushDisabled}" />

                                    <Setter Target="ContentPresenter.Foreground"

                                            Value="{ThemeResource ButtonForegroundDisabled}" />

                                </VisualState.Setters>

                            </VisualState>

                        </VisualStateGroup>

                    </VisualStateManager.VisualStateGroups>

                    <Ellipse Stroke="{TemplateBinding BorderBrush}"

                             StrokeThickness="2"

                             Fill="Transparent"

                             x:Name="BackgroundElement" />

                    <ContentPresenter x:Name="ContentPresenter"

                                      Content="{TemplateBinding Content}"

                                      ContentTransitions="{TemplateBinding ContentTransitions}"

                                      ContentTemplate="{TemplateBinding ContentTemplate}"

                                      Padding="{TemplateBinding Padding}"

                                      HorizontalContentAlignment="{TemplateBinding HorizontalContentAlignment}"

                                      VerticalContentAlignment="{TemplateBinding VerticalContentAlignment}"

                                      AutomationProperties.AccessibilityView="Raw" />

                </Grid>

            </ControlTemplate>

        </Setter.Value>

    </Setter>

</Style>
这个样式实现了一个圆形的无边框按钮。看起来各种Reveal的Brush等资源都已高度封装好,不容易自定义。实际运行起来赏心悦目,这种效果,我很喜欢:

刚开始真的觉得这是程序员为了炫技而产生的效果,实际上配合Acrylic用起来整个不仅整个UI闪闪发光(很多人就是喜欢这个效果),而且提示可操作区域的解决方案中Reveal是目前我最满意的一个。像上面那个无边框按钮,它可以比幽灵按钮更进一步的简约,但鼠标接近时又可以清清楚楚提示哪些地方是可以操作的。
3. 注意事项
Reveal虽然很美好,用起来也很多讲究,重复一次以前提过的注意事项:
- 只应该在可操作的元素上使用Reveal。
- 不要在孤立的元素上使用Reveal。
- 不要在大面积的元素上使用Reveal。
- 静态元素(例如文字和背景)不应该使用Reveal。
- 不应该让Reveal干扰重要的信息。
也就是说在List或一组按钮上使用才是正确用法。别一时兴起将SystemControlBackgroundAccentRevealBorderBrush之类的用在背景。
其它事项如Reveal没有生效及版本兼容性,可见之前的文章:如何使用Fluent Design System (下)。
4. 结语
光照一直是设计师梦寐以求的元素,但不要因为可以用就去乱用,要适可而止(讲到我自己都觉得自己很婆婆妈妈了)。
5. 参考
6. 源码
[UWP]使用Reveal的更多相关文章
- [UWP]如何使用Fluent Design System (下)
4. 兼容旧版本 FDS最常见的问题之一是如何与Fall Creators Update之前的版本兼容,其实做起来也挺简单的,ColorfulBox就实现了Creators Update与Fall C ...
- 微软最新设计Fluent Design System初体验
微软最新设计Fluent Design System初体验 本文图片不全!建议移步知乎专栏查看!!! https://zhuanlan.zhihu.com/p/30582886 原创 2017-11- ...
- [UWP]浅谈按钮设计
一时兴起想谈谈UWP按钮的设计. 按钮是UI中最重要的元素之一,可能也是用得最多的交互元素.好的按钮设计可以有效提高用户体验,构造让人眼前一亮的UI.而且按钮通常不会影响布局,小小的按钮无论怎么改也不 ...
- [UWP]如何使用Fluent Design System (上)
1. 前言 微软在Build 2017中公布了新的设计语言Fluent Design System(以下简称FDS),不过官网只是堆砌了各种华丽的词语以及一堆动画.至于在UWP中要做成怎么样,怎么做, ...
- [UWP]使用Acrylic
1. 前言 在 如何使用Fluent Design System 这篇文章里已经简单介绍过Reveal的用法,这篇再详细介绍其它内容. 自Windows 8 放弃Aero后,群众对毛玻璃回归的呼声一致 ...
- UWP 流畅设计中的光照效果(容易的 RevealBorderBrush 和不那么容易的 RevealBackgroundBrush)
在 Windows 10.0.16299 中,RevealBrush 被引入,可以实现炫酷的鼠标滑过高亮效果和点击光照.本文将告诉大家如何完整地实现这样的效果. Reveal 的效果(自带) 在微软官 ...
- [UWP]使用Acrylic(亚克力)
原文:[UWP]使用Acrylic(亚克力) 1. 前言 在 如何使用Fluent Design System 这篇文章里已经简单介绍过Reveal的用法,这篇再详细介绍其它内容. 自Windows ...
- [UWP]从头开始创建并发布一个番茄钟
1. 自己用的番茄钟自己做 在PC上我一直使用"小番茄"作为我的番茄钟软件,我把它打开后放在副显示器最大化,这样不仅可以让它尽到本分,而且还可以告诉我的同事"我正在专心工 ...
- [UWP]推荐一款很Fluent Design的bilibili UWP客户端 : 哔哩
UWP已经有好几个Bilibili的客户端,最近有多了一个: 哔哩 - Microsoft Store 作者云之幻是一位很擅长设计的UWP开发者,我也从他那里学到了很多设计方面的技巧.它还是一位Bil ...
随机推荐
- DBA之路
对于一个励志要成为DBA的人,虽然还有不足,梦想还是要有的,万一实现了呢.做一个关于DBA成长之路的相关目录,作为灯塔. --------------------------------------- ...
- Python 开发个人微信号在运维开发中的使用
一.主题:Python 开发个人微信号在运维开发中的使用 二.内容: 企业公众号 介绍开发微信公众号的后台逻辑,包括服务器验证逻辑.用户认证逻辑 个人微信号 面对企业微信的种种限制,可以使用 Itch ...
- Geohash-》通过经纬度计算两地距离的函数
/** * 根据起点坐标和终点坐标测距离 * @param [array] $from [起点坐标(经纬度),例如:array(118.012951,36.810024)] ...
- 架构师之路->架构师思维的培养
公司的CMS(综合赋码管理系统)是WINFORM的CS架构.这套系统的架构师换了3届,到现在已经几年没有架构师了.本来入职时,岗位目标就是这个“自动化架构师”. 后来和领导达成共识先争取成为储备架构师 ...
- JavaScript Dom入门
好像代码太杂了,博客园里跑不起来,单独复制到html中本地测试都是没有问题的. JavaScript JavaScript 是属于 web 的语言,它适用于 PC.笔记本电脑.平板电脑和移动电话. J ...
- promise 和 async 的用法
promise // 先构造一个 promise 函数 // resolve 和 reject 都是一个函数 // resolve 在成功时调用 // reject 在失败时调用 function p ...
- Linux Select之坑
最近在写一个demo程序,调用select()来监听socket状态,流程如下: r_set 初始化 timeout 初始化3秒超时 loop{ select(ntfs, &r_set, nu ...
- 知识点练习day9
列表 作用:多个装备,多个爱好,多门课程,多个女朋友等 定义:[]内可以有多个任意类型的值,逗号分隔 my_girl_friends=['alex','wupeiqi','yuanhao',4,5] ...
- iOS 中使用 XIB 自定义cell 的两种方法 以及 编译出现常见 的错误 ++++(xcode6.0之后)
一. 注册cell 1.创建自定义cell并勾选 xib :(勾选xib就会自动生成与cell文件关联的xib) 2.在 tableViewController里注册自定义Cell (或者遵守tabl ...
- Java学习笔记21---内部类之对成员内部类的补充说明(二)
上篇文章--笔记20补充说明了前四点,这里接着来说剩下的两点. 要点如下: 5.访问权限修饰符可以修饰成员内部类 1).访问权限修饰符对内部类的访问限制与外部类的一般成员遵循一样的规则,具体请参考笔记 ...