
Sending e-mail with Spring MVC--转载
原文地址:http://www.codejava.net/frameworks/spring/sending-e-mail-with-spring-mvc
Table of contents:
1.Spring framework’s support for e-mail
3.Creating e-mail sending form
4.Configuring SMTP server settings and Spring MVC
5.Creating Spring MVC controller class
6.Creating result page and error page
8.Download Eclipse project/WAR file
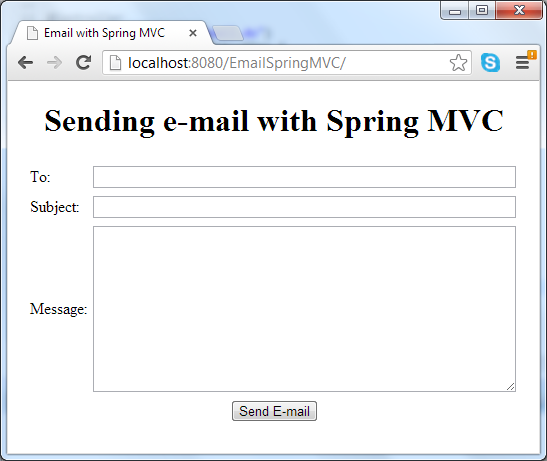
This tutorial provides a sample spring MVC application that allows user sending an e-mail message by filling a web form. The e-mail form looks like following screenshot:
In this tutorial, you are supposed to familiar with Java EE development as well as developing Spring MVC-based applications.
1. Spring framework’s support for e-mail
Based on JavaMail, Spring framework provides high-level abstraction API which greatly simplifies e-mail sending process. Let’s take a brief look at this API in the following class diagram:
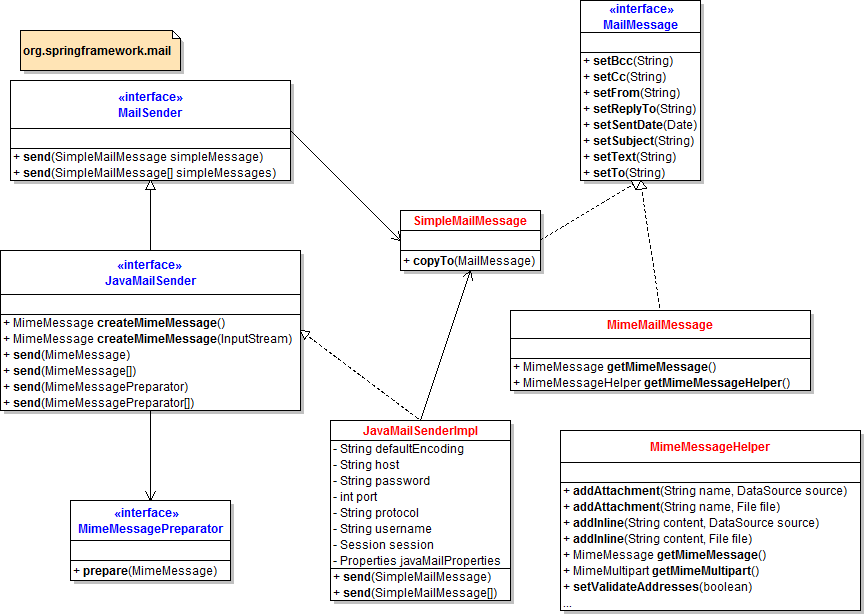
To send e-mail messages, we can use an implementation of interface MailSender – the JavaMailSenderImpl class which is built upon on JavaMail. It’s convenient to configure this implementation as a bean in Spring’s context:
|
1
2
3
4
5
6
7
8
9
10
11
12
13
14
15
16
|
<bean id="mailSender" class="org.springframework.mail.javamail.JavaMailSenderImpl"> <!-- SMTP settings --> <property name="host" value="SMTP_HOST" /> <property name="port" value="SMTP_PORT" /> <property name="username" value="USER_NAME" /> <property name="password" value="PASSWORD" /> <property name="javaMailProperties"> <!-- additional properties specific to JavaMail --> <props> <prop key="mail.transport.protocol">smtp</prop> <prop key="mail.smtp.auth">true</prop> <prop key="mail.smtp.starttls.enable">true</prop> </props> </property></bean> |
This bean holds properties for SMTP and JavaMail and can be injected to a business/service class which needs to send an e-mail, for example:
|
1
|
mailSender.send(email); |
In which email is an object of a type that implements MailMessage interface, such as SimpleMailMessage class. We can construct the email object as follows:
|
1
2
3
4
|
SimpleMailMessage email = new SimpleMailMessage();email.setTo(toAddress);email.setSubject(subject);email.setText(body); |
That’s for a simple mail message (plain text). In case if we want to send HTML e-mail or attach files to the e-mail, we can use MimeMailMessage class with the help of MimeMessagePreparator class and MimeMessageHelper class. For example, sending an e-mail in HTML format with an attachment:
|
1
2
3
4
5
6
7
8
9
10
|
mailSender.send(new MimeMessagePreparator() { public void prepare(MimeMessage mimeMessage) throws MessagingException { MimeMessageHelper message = new MimeMessageHelper(mimeMessage, true, "UTF-8"); message.setFrom(fromEmail); message.setTo(toEmail); message.setSubject("A file for you"); message.setText("<b>See the attached</b>", true); message.addAttachment("CoolStuff.doc", new File("CoolStuff.doc")); }}); |
The following table summarizes the interfaces and classes provided in org.springframework.mail package:
|
org.springframework.mail |
|
Click on a link in the table to see API documentation for the corresponding interface/class.
2. Required jar files
The application requires the following jar files copied to its WEB-INF\lib directory:
|
Required jar files |
|
|
mail.jar |
|
|
spring-beans-3.2.0.RELEASE.jar spring-context-3.2.0.RELEASE.jar spring-context-support-3.2.0.RELEASE.jar spring-core-3.2.0.RELEASE.jar spring-expression-3.2.0.RELEASE.jar spring-web-3.2.0.RELEASE.jar spring-webmvc-3.2.0.RELEASE.jar |
|
|
commons-logging-1.1.1.jar |
|
NOTE: Click on a hyperlink in the table above to download the corresponding software.
The sample application we are going to build contains the following key files:
- EmailForm.jsp: displays an e-mail form.
- Result.jsp: shows successful message after the e-mail has been sent.
- Error.jsp: shows error message in case of an exception is thrown.
- SendEmailController.java: the Spring controller class that takes input from e-mail form, calls Spring’s mailSender to send the e-mail, and redirects user to either successful page or error page.
- spring-mvc.xml: Spring’s context configuration file. Here we will configure SMTP server settings and various properties for JavaMail.
- web.xml: web deployment descriptor file.
3. Creating e-mail sending form
Create a JSP file called EmailForm.jsp with the following HTML code:
|
1
2
3
4
5
6
7
8
9
10
11
12
13
14
15
16
17
18
19
20
21
22
23
24
25
26
27
28
29
30
31
32
33
34
35
36
|
<%@ page language="java" contentType="text/html; charset=UTF-8" pageEncoding="UTF-8"%><!DOCTYPE html PUBLIC "-//W3C//DTD HTML 4.01 Transitional//EN" "http://www.w3.org/TR/html4/loose.dtd"><html><head><meta http-equiv="Content-Type" content="text/html; charset=UTF-8"><title>Email with Spring MVC</title></head><body> <center> <h1>Sending e-mail with Spring MVC</h1> <form method="post" action="sendEmail.do"> <table border="0" width="80%"> <tr> <td>To:</td> <td><input type="text" name="recipient" size="65" /></td> </tr> <tr> <td>Subject:</td> <td><input type="text" name="subject" size="65" /></td> </tr> <tr> <td>Message:</td> <td><textarea cols="50" rows="10" name="message"></textarea></td> </tr> <tr> <td colspan="2" align="center"> <input type="submit" value="Send E-mail" /> </td> </tr> </table> </form> </center></body></html> |
This is a simple form with three fields: To, Subject and Message – which are necessary attributes for a simple outgoing e-mail message. On submitting this form, the action named “sendEmail.do” will be called, as specified by the form’s actionattribute. We will implement a Spring controller class for handling this action in the next section.
4. Configuring SMTP server settings and Spring MVC
Create a Spring context configuration file called spring-mvc.xml with the following XML code:
|
1
2
3
4
5
6
7
8
9
10
11
12
13
14
15
16
17
18
19
20
21
22
23
24
25
26
27
28
29
30
31
32
33
34
35
36
37
38
39
40
|
<?xml version="1.0" encoding="UTF-8"?><beans xmlns="http://www.springframework.org/schema/beans" xmlns:xsi="http://www.w3.org/2001/XMLSchema-instance" xmlns:context="http://www.springframework.org/schema/context" xsi:schemaLocation="http://www.springframework.org/schema/beans http://www.springframework.org/schema/beans/spring-beans-3.0.xsd http://www.springframework.org/schema/context http://www.springframework.org/schema/context/spring-context-3.0.xsd"> <context:component-scan base-package="net.codejava.spring" /> <bean id="mailSender" class="org.springframework.mail.javamail.JavaMailSenderImpl"> <property name="host" value="smtp.gmail.com" /> <property name="port" value="587" /> <property name="username" value="youremail" /> <property name="password" value="yourpassword" /> <property name="javaMailProperties"> <props> <prop key="mail.transport.protocol">smtp</prop> <prop key="mail.smtp.auth">true</prop> <prop key="mail.smtp.starttls.enable">true</prop> </props> </property> </bean> <bean id="viewResolver" class="org.springframework.web.servlet.view.InternalResourceViewResolver"> <property name="prefix" value="/" /> <property name="suffix" value=".jsp" /> </bean> <bean class="org.springframework.web.servlet.handler.SimpleMappingExceptionResolver"> <property name="exceptionMappings"> <props> <prop key="java.lang.Exception">Error</prop> </props> </property> </bean> </beans> |
This configuration is pretty straightforward:
- <context:component-scan ... />: tells Spring to scan the package net.codejava.spring for initializing components which are annotated by Spring annotations (It’s a Spring controller class, in case of this application).
- Bean mailSender: this is the important part because it declares a Spring bean for e-mail implementation – theJavaMailSenderImpl class and configures SMTP server settings, which is for a Gmail account in this case. This bean will be injected to a Spring controller class which will be covered in the next section.
- Bean viewResolver: maps logical view names to real JSP file names.
- Bean SimpleMappingExceptionResolver: maps all exceptions of type java.lang.Exception to be handled byError.jsp page.
The web deployment descriptor file (web.xml) is configured as follows:
|
1
2
3
4
5
6
7
8
9
10
11
12
13
14
15
16
17
18
19
20
21
22
23
24
25
26
27
28
|
<?xml version="1.0" encoding="UTF-8"?><web-app xmlns:xsi="http://www.w3.org/2001/XMLSchema-instance" xmlns="http://java.sun.com/xml/ns/javaee" xmlns:web="http://java.sun.com/xml/ns/javaee/web-app_2_5.xsd" xsi:schemaLocation="http://java.sun.com/xml/ns/javaee http://java.sun.com/xml/ns/javaee/web-app_3_0.xsd" id="WebApp_ID" version="3.0"> <display-name>EmailSpringMVC</display-name> <servlet> <servlet-name>SpringController</servlet-name> <servlet-class>org.springframework.web.servlet.DispatcherServlet</servlet-class> <init-param> <param-name>contextConfigLocation</param-name> <param-value>/WEB-INF/spring-mvc.xml</param-value> </init-param> <load-on-startup>1</load-on-startup> </servlet> <servlet-mapping> <servlet-name>SpringController</servlet-name> <url-pattern>*.do</url-pattern> </servlet-mapping> <welcome-file-list> <welcome-file>EmailForm.jsp</welcome-file> </welcome-file-list></web-app> |
It declares Spring controller servlet with its context configuration file (/WEB-INF/spring-mvc.xml). The controller is configured to handle all requests whose URL end with pattern: *.do. And the default page when accessing the application is the email form (EmailForm.jsp).
5. Creating Spring MVC controller class
In order to handle submission from the e-mail form, we need to create a Spring controller class as follows:
|
1
2
3
4
5
6
7
8
9
10
11
12
13
14
15
16
17
18
19
20
21
22
23
24
25
26
27
28
29
30
31
32
33
34
35
36
37
38
39
40
41
|
package net.codejava.spring;import javax.servlet.http.HttpServletRequest;import org.springframework.beans.factory.annotation.Autowired;import org.springframework.mail.SimpleMailMessage;import org.springframework.mail.javamail.JavaMailSender;import org.springframework.stereotype.Controller;import org.springframework.web.bind.annotation.RequestMapping;import org.springframework.web.bind.annotation.RequestMethod;@Controller@RequestMapping("/sendEmail.do")public class SendEmailController { @Autowired private JavaMailSender mailSender; @RequestMapping(method = RequestMethod.POST) public String doSendEmail(HttpServletRequest request) { // takes input from e-mail form String recipientAddress = request.getParameter("recipient"); String subject = request.getParameter("subject"); String message = request.getParameter("message"); // prints debug info System.out.println("To: " + recipientAddress); System.out.println("Subject: " + subject); System.out.println("Message: " + message); // creates a simple e-mail object SimpleMailMessage email = new SimpleMailMessage(); email.setTo(recipientAddress); email.setSubject(subject); email.setText(message); // sends the e-mail mailSender.send(email); // forwards to the view named "Result" return "Result"; }} |
This controller class is quite simple. It is declared as a Spring MVC controller by the annotation @Controller, and is mapped to the e-mail form’s action by the @RequestMapping annotation. We inject the mailSender bean declared inspring-mvc.xml file into this controller through the private field also named mailSender. The injection is done automatically by Spring as we use the @Autowired annotation.
The method doSendEmail()is responsible for capturing input from e-mail form, creating a SimpleMailMessage object and sending the e-mail by invoking the send() method on the mailSender bean. The e-mail is in plain text format. Finally, it returns a view named “Result” which causes Spring to use the viewResolver to find and load appropriate JSP file (Result.jsp).
6. Creating result page and error page
Code the Result.jsp file as follows:
|
1
2
3
4
5
6
7
8
9
10
11
12
13
14
15
|
<%@ page language="java" contentType="text/html; charset=UTF-8" pageEncoding="UTF-8"%><!DOCTYPE html PUBLIC "-//W3C//DTD HTML 4.01 Transitional//EN" "http://www.w3.org/TR/html4/loose.dtd"><html><head><meta http-equiv="Content-Type" content="text/html; charset=UTF-8"><title>Send e-mail result</title></head><body> <center> <h2>Thank you, your email has been sent.</h2> </center></body></html> |
And code the Error.jsp as follows:
|
1
2
3
4
5
6
7
8
9
10
11
12
13
14
15
16
|
<%@ page language="java" contentType="text/html; charset=UTF-8" pageEncoding="UTF-8"%><!DOCTYPE html PUBLIC "-//W3C//DTD HTML 4.01 Transitional//EN" "http://www.w3.org/TR/html4/loose.dtd"><html><head><meta http-equiv="Content-Type" content="text/html; charset=UTF-8"><title>Error</title></head><body> <center> <h2>Sorry, the email was not sent because of the following error:</h2> <h3>${exception.message}</h3> </center></body></html> |
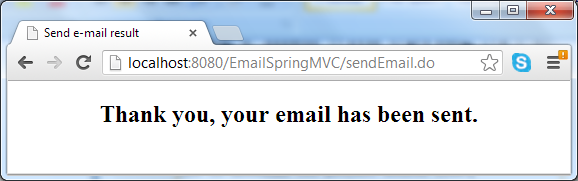
As we can see, the result page simply tells the user that the e-mail has been sent, while the error page displays an error message if any exception thrown during the process of sending e-mail.
7. Run the application
So far we have created all the key pieces of the application. Let’s deploy it on a servlet container like Tomcat, and access the application by typing the following URL into browser’s address bar (your host name and port number maybe different, depending on server configuration):
http://localhost:8080/EmailSpringMVC
The e-mail form is displayed, type in required information:
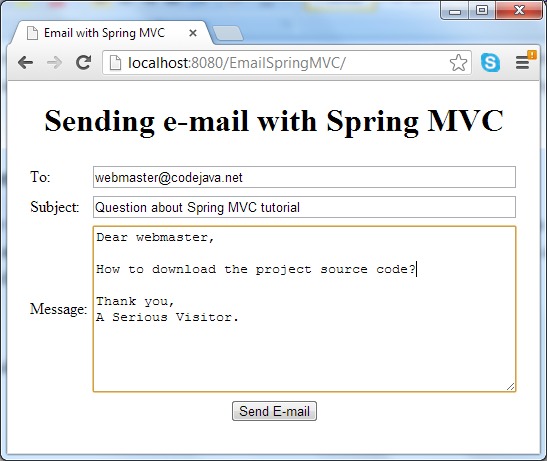
Hit Send E-mail button, it may take a while for the e-mail to be sent. A successful message comes from the result page in case everything is going well:
In case of error (such as network failure or the SMTP server could not be reached), the error page displays:
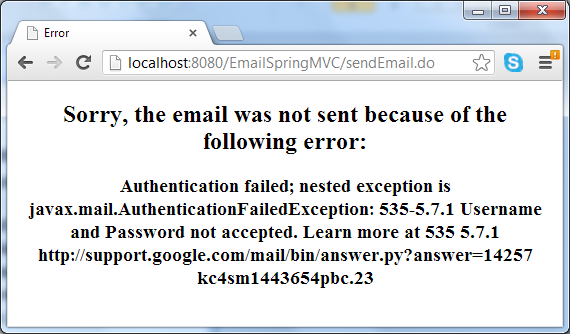
You can download the sample application as an Eclipse project or deployable WAR file in the attachment section, and remember to update SMTP settings to match your e-mail account.
Sending e-mail with Spring MVC--转载的更多相关文章
- 转载:如何让spring mvc web应用启动时就执行
转载:如何让spring mvc web应用启动时就执行特定处理 http://www.cnblogs.com/yjmyzz/p/4747251.html# Spring-MVC的应用中 一.Appl ...
- 转载 Spring、Spring MVC、MyBatis整合文件配置详解
Spring.Spring MVC.MyBatis整合文件配置详解 使用SSM框架做了几个小项目了,感觉还不错是时候总结一下了.先总结一下SSM整合的文件配置.其实具体的用法最好还是看官方文档. ...
- spring mvc入门教程 转载自【http://elf8848.iteye.com/blog/875830】
目录 一.前言二.spring mvc 核心类与接口三.spring mvc 核心流程图 四.spring mvc DispatcherServlet说明 五.spring mvc 父子上下文的说明 ...
- 转载:深入理解Spring MVC 思想
原文作者:赵磊 原文地址:http://elf8848.iteye.com/blog/875830 目录 一.前言二.spring mvc 核心类与接口三.spring mvc 核心流程图 四.sp ...
- 《转载》Spring MVC之@RequestBody, @ResponseBody 详解
引言: 接上一篇文章讲述处理@RequestMapping的方法参数绑定之后,详细介绍下@RequestBody.@ResponseBody的具体用法和使用时机: 简介: @RequestBody 作 ...
- (转载)spring mvc DispatcherServlet详解之一---处理请求深入解析
要深入理解spring mvc的工作流程,就需要先了解spring mvc的架构: 从上图可以看到 前端控制器DispatcherServlet在其中起着主导作用,理解了DispatcherServl ...
- 【转载】Spring MVC 整合 Freemarker
前言 1.为什么要使用Spring MVC呢? 2.为什么要使用Freemarker呢? 3.为什么不使用Struts2呢? 此示例出现的原因就是发现了struts2的性能太差,所以学习Spring ...
- Spring mvc 文件上传到文件夹(转载+心得)
spring mvc(注解)上传文件的简单例子,这有几个需要注意的地方1.form的enctype=”multipart/form-data” 这个是上传文件必须的2.applicationConte ...
- Spring mvc中@RequestMapping 6个基本用法小结(转载)
小结下spring mvc中的@RequestMapping的用法. 1)最基本的,方法级别上应用,例如: @RequestMapping(value="/departments" ...
- 解决 spring mvc 3.0 结合 hibernate3.2 使用<tx:annotation-driven>声明式事务无法提交的问题(转载)
1.问题复现 spring 3.0 + hibernate 3.2 spring mvc使用注解方式:service使用@service注解 事务使用@Transactional 事务配置使用 < ...
随机推荐
- OpenJDK源码研究笔记(十一):浅析Javac编译过程中的抽象语法树(IfElse,While,Switch等语句的抽象和封装)
浅析OpenJDK源码编译器Javac的语法树包com.sun.source.tree. 抽象语法树,是编译原理中的经典问题,有点难,本文只是随便写写. 0.赋值语句 public interface ...
- android 二次按返回键退出client
android中有的app退出client时弹出对话框的方法,有的是点击二次,第一次是提示用户是否退出client,第二次点击才是真正的退出app.这是用二次点击返回键的时间间隔推断, 今天就实现这简 ...
- Tomcat会话超时时怎样记录操作日志,满足安全审计要求
众所周知.在实际的Web应用程序中,会话管理一般都採用Web容器会话管理功能. 使用Tomcat做Webserver也是如此,并且从安全的角度考虑,尽量避免去更改和干预Web容器的会话管理功能. To ...
- 搭建个人博客 方式2 使用jekyll
孙广东 2016.3.12 环境安装:1.通过 RailsInstaller 来安装 Ruby https://www.ruby-lang.org/zh_cn/documentation/inst ...
- Android Studio 解决unspecified on project app resolves to an APK archive which is not supported
出现该问题unspecified on project app resolves to an APK archive which is not supported as a compilation d ...
- OA项目笔记
一.创建项目构架 1.创建一个Maven的web工程 1.1修改编译器版本 <properties> <project.build.sourceEncoding>UTF-8&l ...
- JNDI学习总结(2)——JNDI数据源的配置
一.数据源的由来 在Java开发中,使用JDBC操作数据库的四个步骤如下: ①加载数据库驱动程序(Class.forName("数据库驱动类");) ②连接数据库(Con ...
- [TypeScript] Shallow copy object by using spread opreator
For example we have an object: const todo = { text: "Water the flowers", completed: false, ...
- Android自己定义圆角ImageView 支持网络图片
先看下效果图 我们再来看一张CSDN的圆角图片 从布局能够看出csdn app 的头像也是圆角的Image,但能够看到.有明显的毛刺感.不知道是csdn 程序猿的疏忽还是 我手机的问题,本人手机(小米 ...
- Android-CheckBox 实现计算器
源码下载地址:http://download.csdn.net/detail/wu20093346/7718055 使用CheckBox的OnCheckedChangeListener做事件触发,效果 ...