
UITableView与UITableViewCell
转自:http://blog.sina.com.cn/s/blog_4cd14afb01014j97.html
UITableView用来以表格的形式显示数据。关于UITableView,我们应该注意:
(1)UITableView用来显示表格的可见部分,UITableViewCell用来显示表格的一行。
(2)UITableView并不负责存储表格中的数据,而是仅仅存储足够的数据使得可以画出当前可见部分。
(3)UITableView从UITableViewDelegate协议获取配置信息,从UITableViewDataSource协议获得数据信息。
(4)所有的UITableView实现时实际上只有一列,但是我们可以通过向UITableViewCell中添加子视图,使得它看起来有好几列。
(5)UITableView有两种风格:
① Grouped:每一组看起来像是圆矩形;
② Plain:这是默认风格,可以修改成Indexed风格。
在下边的小例子中,我们将先实现显示一列数据,然后在每行添加图像,之后再看看UITableViewCell的四种分别是什么样的。最后再进行其他操作,比如设置缩进、修改字体大小和行高等。
1、运行Xcode 4.2,新建一个Single View Application,名称为Table Sample:
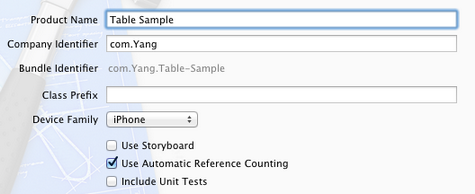
2、单击ViewController.xib,使用Interface Builder给视图添加一个UITableView控件,并使其覆盖整个视图:

3、选中新添加的UITableView控件,打开Connection Inspector,找到delegate和datasource,从它们右边的圆圈拉线到File's Owner图标:
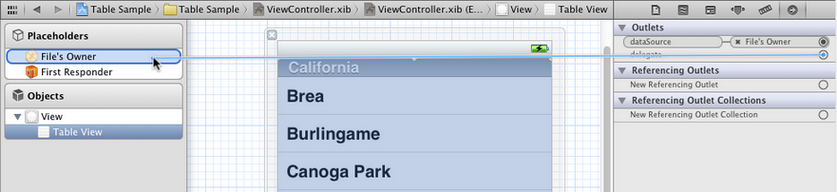
4、单击ViewController.h,在其中添加代码:
#import <UIKit/UIKit.h> @interface ViewController : UIViewController<UITableViewDelegate, UITableViewDataSource> @property (strong, nonatomic) NSArray *listData; @end
5、单击ViewController.m,在其中添加代码:
5.1 在@implementation后面添加代码:
@synthesize listData;
5.2 在viewDidLoad方法中添加代码:
- (void)viewDidLoad { [super viewDidLoad]; // Do any additional setup after loading the view, typically from a nib. NSArray *array = [[NSArray alloc] initWithObjects:@"Tree", @"Flower", @"Grass", @"Fence", @"House", @"Table", @"Chair", @"Book", @"Swing" , nil]; self.listData = array; }
5.3 在viewDidUnload方法中添加代码:
- (void)viewDidUnload { [super viewDidUnload]; // Release any retained subviews of the main view. // e.g. self.myOutlet = nil; self.listData = nil; }
5.4 在@end之前添加代码:
#pragma mark - #pragma mark Table View Data Source Methods //返回行数 - (NSInteger)tableView:(UITableView *)tableView numberOfRowsInSection:(NSInteger)section { return [self.listData count]; } //新建某一行并返回 - (UITableViewCell *)tableView:(UITableView *)tableView cellForRowAtIndexPath:(NSIndexPath *)indexPath { static NSString *TableSampleIdentifier = @"TableSampleIdentifier"; UITableViewCell *cell = [tableView dequeueReusableCellWithIdentifier: TableSampleIdentifier]; if (cell == nil) { cell = [[UITableViewCell alloc] initWithStyle:UITableViewCellStyleDefault reuseIdentifier:TableSampleIdentifier]; } NSUInteger row = [indexPath row]; cell.textLabel.text = [listData objectAtIndex:row]; return cell; }
上面的第二个方法中,
UITableViewCell *cell = [tableView dequeueReusableCellWithIdentifier: TableSampleIdentifier];
这个语句根据标识符TableSampleIdentifier寻找当前可以重用的UITableViewCell。当某行滑出当前可见区域后,我们重用它所对应的UITableViewCell对象,那么就可以节省内存和时间。
如果执行词语后,cell为nil,那我们再创建一个,并设置去标识符为TableSampleIdentifier:
cell = [[UITableViewCell alloc] initWithStyle:UITableViewCellStyleDefault reuseIdentifier:TableSampleIdentifier];
这里UITableViewCellStyleDefault是表示UITableViewCell风格的常数,除此之外,还有其他风格,后面将会用到。
注意参数(NSIndexPath *)indexPath,它将行号row和部分号section合并了,通过[indexPath row];获取行号。之后给cell设置其文本:
cell.textLabel.text = [listData objectAtIndex: row];
6、运行一下:
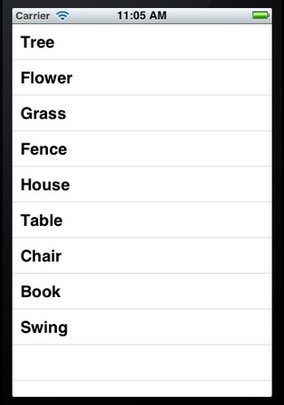
7、给每一行添加图片:
7.1 将图片资源添加到工程:拖到工程中,前面的文章有提到。
7.2 在cellForRowAtIndexPath方法的return语句之前添加代码:
UIImage *image = [UIImage imageNamed:@"blue.png"]; cell.imageView.image = image; UIImage *highLighedImage = [UIImage imageNamed:@"yellow.png"]; cell.imageView.highlighedImage = highLighedImage;
7.3 运行,效果如下:
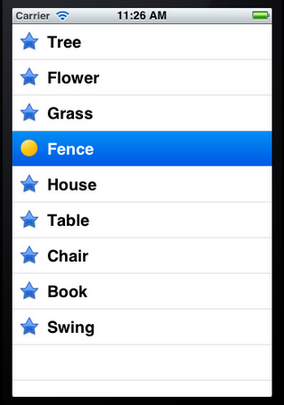
可以看到,每行左边都出现一张图片。当选中某行,其图片改变。
8、设置行的风格:
表示UITableViewCell风格的常量有:
UITableViewCellStyleDefault UITableViewCellStyleSubtile UITableViewCellStyleValue1 UITableViewCellStyleValue2
这几种风格的区别主要体现在Image、Text Label以及Detail Text Label。
为了体现风格,在cellForRowAtIndexPath方法的return语句之前添加代码:
cell.detailTextLabel.text = @"Detail Text";
然后将
cell = [[UITableViewCell alloc] initWithStyle:UITableViewCellStyleDefault reuseIdentifier:TableSampleIdentifier];
中的UITableViewCellStyleDefault依次换成上面提到的四个风格常量,并运行,效果分别如下:

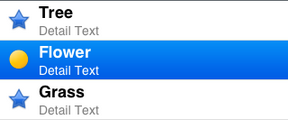
UITableViewCellStyleDefault UITableViewCellStyleSubtle
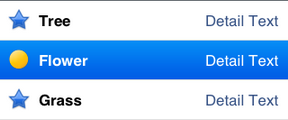

UITableViewCellStyleValue1 UITableViewCellStyleValue2
9、设置缩进:
将所有行的风格改回UITableViewCellStyleDefault,然后在@end之前添加代码如下:
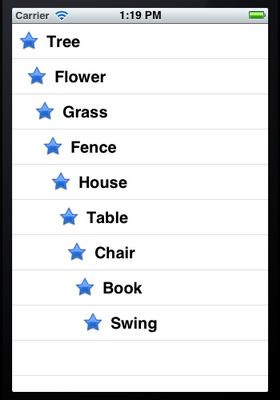
#pragma mark Table Delegate Methods - (NSInteger)tableView:(UITableView *)tableView indentationLevelForRowAtIndexPath:(NSIndexPath *)indexPath { NSUInteger row = [indexPath row]; return row; }
这里将第row行缩进row,如下图所示:
10、操纵行选择:
在@end之前添加代码:
- (NSIndexPath *)tableView:(UITableView *)tableView willSelectRowAtIndexPath:(NSIndexPath *)indexPath { NSUInteger row = [indexPath row]; if (row%2 == 0) { return nil; } return indexPath; }
上面的方法在选择某行之前执行,我们可以在这个方法中添加我们想要的操作。这里,我们实现的是,如果选择的行号(从0开始计)是偶数,则取消选择。
在@end之前添加代码:
- (void)tableView:(UITableView *)tableView didSelectRowAtIndexPath:(NSIndexPath *)indexPath { NSUInteger row = [indexPath row]; NSString *rowValue = [listData objectAtIndex:row]; NSString *message = [[NSString alloc] initWithFormat: @"You selected %@", rowValue]; UIAlertView *alert = [[UIAlertView alloc] initWithTitle:@"Row Selected!" message:message delegate:nil cancelButtonTitle:@"Yes I Did" otherButtonTitles:nil]; [alert show]; [tableView deselectRowAtIndexPath:indexPath animated:YES]; }
当选择某行之后,就弹出一个Alert,用来显示我们所做的选择。
运行一下,你会发现第0、2等行无法选择。选择奇数行时会弹出提示:

而且关闭提示框后,选择的那行也被取消了选择,用的语句
[tableView deselectRowAtIndexPath:indexPath animated:YES];
11、设置字体大小和表格行高:
11.1 在cellForRowAtIndexPath方法中的return之前添加代码,用于设置字体和大小:
cell.textLabel.font = [UIFont boldSystemFontOfSize:50];
11.2 在@end之前添加代码,用于设置行高:
- (CGFloat)tableView:(UITableView *)tableView heightForRowAtIndexPath:(NSIndexPath *)indexPath { return 70; }
运行,看看效果:

UITableView与UITableViewCell的更多相关文章
- UITableView和UITableViewCell的几种样式
UITableView和UITableViewCell的几种样式 转至 http://blog.csdn.net/crazyzhang1990/article/details/12503163 一. ...
- [OC] UITableView 与 UItableViewCell 的使用
UITableView //UIViewController里添加一个UITableView @interface ViewController : UIViewController<UITa ...
- iOS 初学UITableView、UITableViewCell、Xib
注意事项: 1.一个.xib里面最多设置一个cell 2.要仔细调整自动布局,其实它不太好用 3.记得设置<UITableViewDataSource>委托 4.记得在ViewContro ...
- UI第十八节——UITableView
在iOS开发中UITableView可以说是使用最广泛的控件,我们平时使用的软件中到处都可以看到它的影子,基本大部分应用都有UITableView.当然它的广泛使用自然离不开它强大的功能,今天就针对U ...
- iOS开发系列--UITableView全面解析
--UIKit之UITableView 概述 在iOS开发中UITableView可以说是使用最广泛的控件,我们平时使用的软件中到处都可以看到它的影子,类似于微信.QQ.新浪微博等软件基本上随处都是U ...
- UITableView或UIScrollVIew上的UIButton的高亮效果
UITableView或UIScrollVIew上的UIButton的高亮效果 原文地址:http://www.jianshu.com/p/b4331f06bd34 最近做项目的时候发现,UIScro ...
- 去掉UITableView多余的空白行分割线
一.问题描述 在学习和开发中经常会遇到下面的问题,UITableView的UITableViewCell很少或者没有时,但UITableView有很多的空白行分割线.如下图: 如何去掉UITableV ...
- UITableView全面解析
本文转自:http://www.cocoachina.com/ios/20140922/9710.html 在iOS开发中UITableView可以说是使用最广泛的控件,我们平时使用的软件中到处都可以 ...
- UITableView全面解析,讲的好详细
--UIKit之UITableView 概述 在iOS开发中UITableView可以说是使用最广泛的控件,我们平时使用的软件中到处都可以看到它的影子,类似于微信.QQ.新浪微博等软件基本上随处都是U ...
随机推荐
- ADB控制手机命令(adb命令)
手机端配置tcp方式连接 su setprop service.adb.tcp.port 5555 stop adbd start adbd 首先使用管理员权限,然后打开监听5555端口 电脑端使用a ...
- 结对编程(Java实现)
一.Github项目地址:https://github.com/qiannai/CreateArithmetic 二.PSP2.1表格: PSP2.1 Personal Software Proces ...
- 基于TCP连接的socket套接字编程
基于TCP协议的套接字编程(简单) 服务端 import socket server = socket.socket() server.bind( ('127.0.0.1', 9999) ) serv ...
- android 电容屏(四):驱动调试之驱动程序分析篇 -- FocalTech
本人用的触摸屏IC是FocalTech公司的ft5306,是一款i2c的电容屏多点触控芯片.对于它的整体驱动官方已经给了,我们就触摸屏和按键部分的代码做相关说明.说明其中应该注意的地方. 对于所有的i ...
- Tomcat下载教程
首先确定你Windows系统是64位,还是32位(现在大部分是64位) 查看操作系统位数步骤:(WindowsXP,Windows7,Windows8,Windows10查看步骤大同小异,举例Wind ...
- 03-flex-wrap是否换行
flex-wrap:运用到父元素上 结合 display: flex; flex-wrap: wrap; 换行 flex-wrap: nowrap; 不换行 #main { width: 300px ...
- HTML与CSS学习笔记(4)
1.浏览器前缀 浏览器厂商以前就一直在实时CSS3,但它还未成为真正的标准.为此,当有一些CSS3样式与法还在波动的时候,他们提出了针对不同浏览器的前缀,来解决兼容性问题. 即:CSS3去兼容不同的浏 ...
- 大宗商品交易与风险管理(CTRM)软件产品介绍
https://mp.weixin.qq.com/s/grA8MhryPfDB2PmBqsao4Q 从全球范围来看,大宗商品行业风险管理领域的主流软件产品是CTRM系列.CTRM是Commodity ...
- vue.config.json CopyWebpackPlugin 没有生效
本地生效,服务器不生效. 因为是jenkinis构建,没有留意到报错.后来发现错误:ENOENT: no such file or directory, rename 解决方法就是:删除package ...
- [Algorithm] 1290. Convert Binary Number in a Linked List to Integer
Given head which is a reference node to a singly-linked list. The value of each node in the linked l ...