
极简 Spring Boot 整合 Thymeleaf 页面模板
虽然现在慢慢在流行前后端分离开发,但是据松哥所了解到的,还是有一些公司在做前后端不分的开发,而在前后端不分的开发中,我们就会需要后端页面模板(实际上,即使前后端分离,也会在一些场景下需要使用页面模板,例如邮件发送模板)。
早期的 Spring Boot 中还支持使用 Velocity 作为页面模板,现在的 Spring Boot 中已经不支持 Velocity 了,页面模板主要支持 Thymeleaf 和 Freemarker ,当然,作为 Java 最最基本的页面模板 Jsp ,Spring Boot 也是支持的,只是使用比较麻烦。
松哥打算用三篇文章分别向大家介绍一下这三种页面模板技术。
今天我们主要来看看 Thymeleaf 在 Spring Boot 中的整合!
Thymeleaf 简介
Thymeleaf 是新一代 Java 模板引擎,它类似于 Velocity、FreeMarker 等传统 Java 模板引擎,但是与传统 Java 模板引擎不同的是,Thymeleaf 支持 HTML 原型。
它既可以让前端工程师在浏览器中直接打开查看样式,也可以让后端工程师结合真实数据查看显示效果,同时,SpringBoot 提供了 Thymeleaf 自动化配置解决方案,因此在 SpringBoot 中使用 Thymeleaf 非常方便。
事实上, Thymeleaf 除了展示基本的 HTML ,进行页面渲染之外,也可以作为一个 HTML 片段进行渲染,例如我们在做邮件发送时,可以使用 Thymeleaf 作为邮件发送模板。
另外,由于 Thymeleaf 模板后缀为 .html,可以直接被浏览器打开,因此,预览时非常方便。
整合
- 创建项目
Spring Boot 中整合 Thymeleaf 非常容易,只需要创建项目时添加 Thymeleaf 即可:
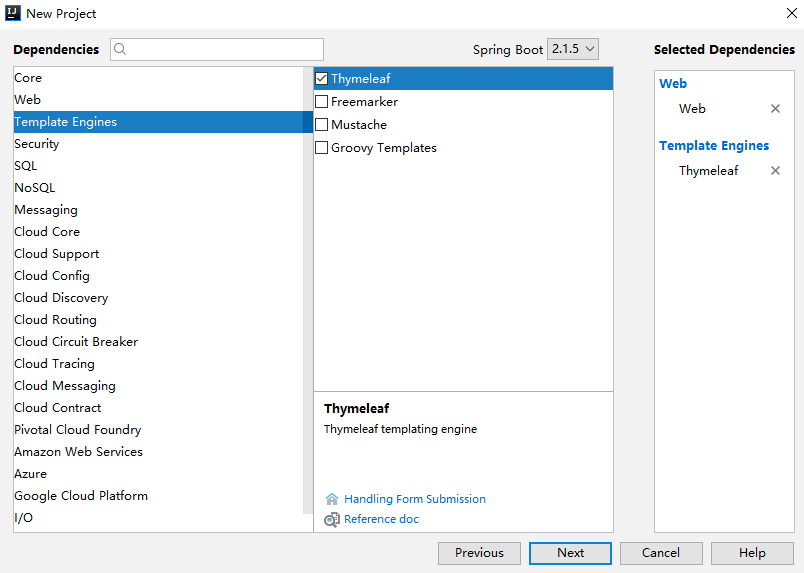
创建完成后,pom.xml 依赖如下:
<dependency>

    <groupId>org.springframework.boot</groupId>

    <artifactId>spring-boot-starter-thymeleaf</artifactId>

</dependency>

<dependency>

    <groupId>org.springframework.boot</groupId>

    <artifactId>spring-boot-starter-web</artifactId>

</dependency>
当然,Thymeleaf 不仅仅能在 Spring Boot 中使用,也可以使用在其他地方,只不过 Spring Boot 针对 Thymeleaf 提供了一整套的自动化配置方案,这一套配置类的属性在 org.springframework.boot.autoconfigure.thymeleaf.ThymeleafProperties 中,部分源码如下:
@ConfigurationProperties(prefix = "spring.thymeleaf")

public class ThymeleafProperties {

        private static final Charset DEFAULT_ENCODING = StandardCharsets.UTF_8;

        public static final String DEFAULT_PREFIX = "classpath:/templates/";

        public static final String DEFAULT_SUFFIX = ".html";

        private boolean checkTemplate = true;

        private boolean checkTemplateLocation = true;

        private String prefix = DEFAULT_PREFIX;

        private String suffix = DEFAULT_SUFFIX;

        private String mode = "HTML";

        private Charset encoding = DEFAULT_ENCODING;

        private boolean cache = true;

        //...

}
- 首先通过
@ConfigurationProperties注解,将application.properties前缀为spring.thymeleaf的配置和这个类中的属性绑定。 - 前三个
static变量定义了默认的编码格式、视图解析器的前缀、后缀等。 - 从前三行配置中,可以看出来,
Thymeleaf模板的默认位置在resources/templates目录下,默认的后缀是html。 - 这些配置,如果开发者不自己提供,则使用 默认的,如果自己提供,则在
application.properties中以spring.thymeleaf开始相关的配置。
而我们刚刚提到的,Spring Boot 为 Thymeleaf 提供的自动化配置类,则是 org.springframework.boot.autoconfigure.thymeleaf.ThymeleafAutoConfiguration ,部分源码如下:
@Configuration

@EnableConfigurationProperties(ThymeleafProperties.class)

@ConditionalOnClass({ TemplateMode.class, SpringTemplateEngine.class })

@AutoConfigureAfter({ WebMvcAutoConfiguration.class, WebFluxAutoConfiguration.class })

public class ThymeleafAutoConfiguration {

}
可以看到,在这个自动化配置类中,首先导入 ThymeleafProperties ,然后 @ConditionalOnClass 注解表示当当前系统中存在 TemplateMode 和 SpringTemplateEngine 类时,当前的自动化配置类才会生效,即只要项目中引入了 Thymeleaf 相关的依赖,这个配置就会生效。
这些默认的配置我们几乎不需要做任何更改就可以直接使用了。如果开发者有特殊需求,则可以在 application.properties 中配置以 spring.thymeleaf 开头的属性即可。
- 创建 Controller
接下来我们就可以创建 Controller 了,实际上引入 Thymeleaf 依赖之后,我们可以不做任何配置。新建的 IndexController 如下:
@Controller

public class IndexController {

    @GetMapping("/index")

    public String index(Model model) {

        List<User> users = new ArrayList<>();

        for (int i = 0; i < 10; i++) {

            User u = new User();

            u.setId((long) i);

            u.setName("javaboy:" + i);

            u.setAddress("深圳:" + i);

            users.add(u);

        }

        model.addAttribute("users", users);

        return "index";

    }

}

public class User {

    private Long id;

    private String name;

    private String address;

    //省略 getter/setter

}
在 IndexController 中返回逻辑视图名+数据,逻辑视图名为 index ,意思我们需要在 resources/templates 目录下提供一个名为 index.html 的 Thymeleaf 模板文件。
- 创建 Thymeleaf
<!DOCTYPE html>

<html lang="en" xmlns:th="http://www.thymeleaf.org">

<head>

    <meta charset="UTF-8">

    <title>Title</title>

</head>

<body>

<table border="1">

    <tr>

        <td>编号</td>

        <td>用户名</td>

        <td>地址</td>

    </tr>

    <tr th:each="user : ${users}">

        <td th:text="${user.id}"></td>

        <td th:text="${user.name}"></td>

        <td th:text="${user.address}"></td>

    </tr>

</table>

</body>

</html>
在 Thymeleaf 中,通过 th:each 指令来遍历一个集合,数据的展示通过 th:text 指令来实现,
注意 index.html 最上面要引入 thymeleaf 名称空间。
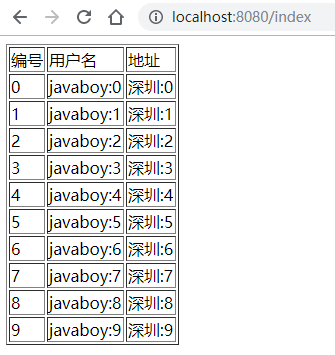
配置完成后,就可以启动项目了,访问 /index 接口,就能看到集合中的数据了:
另外,Thymeleaf 支持在 js 中直接获取 Model 中的变量。例如,在 IndexController 中有一个变量 username :
@Controller

public class IndexController {

    @GetMapping("/index")

    public String index(Model model) {

        model.addAttribute("username", "李四");

        return "index";

    }

}
在页面模板中,可以直接在 js 中获取到这个变量:
<script th:inline="javascript">

    var username = [[${username}]];

    console.log(username)

</script>
这个功能算是 Thymeleaf 的特色之一吧。
手动渲染
前面我们说的是返回一个 Thymeleaf 模板,我们也可以手动渲染 Thymeleaf 模板,这个一般在邮件发送时候有用,例如我在 resources/templates 目录下新建一个邮件模板,如下:
<!DOCTYPE html>

<html lang="en" xmlns:th="http://www.thymeleaf.org">

<head>

    <meta charset="UTF-8">

    <title>Title</title>

</head>

<body>

<p>hello 欢迎 <span th:text="${username}"></span>加入 XXX 集团,您的入职信息如下:</p>

<table border="1">

    <tr>

        <td>职位</td>

        <td th:text="${position}"></td>

    </tr>

    <tr>

        <td>薪水</td>

        <td th:text="${salary}"></td>

    </tr>

</table>

<img src="http://www.javaboy.org/images/sb/javaboy.jpg" alt="">

</body>

</html>
这一个 HTML 模板中,有几个变量,我们要将这个 HTML 模板渲染成一个 String 字符串,再把这个字符串通过邮件发送出去,那么如何手动渲染呢?
@Autowired

TemplateEngine templateEngine;

@Test

public void test1() throws MessagingException {

    Context context = new Context();

    context.setVariable("username", "javaboy");

    context.setVariable("position", "Java工程师");

    context.setVariable("salary", 99999);

    String mail = templateEngine.process("mail", context);

    //省略邮件发送

}
- 渲染时,我们需要首先注入一个 TemplateEngine 对象,这个对象就是在 Thymeleaf 的自动化配置类中配置的(即当我们引入 Thymeleaf 的依赖之后,这个实例就有了)。
- 然后构造一个 Context 对象用来存放变量。
- 调用 process 方法进行渲染,该方法的返回值就是渲染后的 HTML 字符串,然后我们将这个字符串发送出去。
这是 Spring Boot 整合 Thymeleaf 的几个关键点,关于 Thymeleaf 这个页面模板本身更多的用法,大家可以参考 Thymeleaf 的文档:https://www.thymeleaf.org。
总结
本文主要向大家简单介绍了 Spring Boot 和 Thymeleaf 整合时的几个问题,还是比较简单的,大家可以阅读 Thymeleaf 官方文档学习 Thymeleaf 的更多用法。本文案例我已上传到 GitHub ,欢迎大家 star :https://github.com/lenve/javaboy-code-samples
关于本文,有问题欢迎留言讨论。
关注公众号【江南一点雨】,专注于 Spring Boot+微服务以及前后端分离等全栈技术,定期视频教程分享,关注后回复 Java ,领取松哥为你精心准备的 Java 干货!

极简 Spring Boot 整合 Thymeleaf 页面模板的更多相关文章
- Spring Boot2 系列教程(九)Spring Boot 整合 Thymeleaf
虽然现在慢慢在流行前后端分离开发,但是据松哥所了解到的,还是有一些公司在做前后端不分的开发,而在前后端不分的开发中,我们就会需要后端页面模板(实际上,即使前后端分离,也会在一些场景下需要使用页面模板, ...
- Spring Boot整合Thymeleaf视图层
目录 Spring Boot整合Thymeleaf Spring Boot整合Thymeleaf 的项目步骤 Thymeleaf 语法详解 Spring Boot整合Thymeleaf Spring ...
- 从零开始的Spring Boot(5、Spring Boot整合Thymeleaf)
Spring Boot整合Thymeleaf 写在前面 从零开始的Spring Boot(4.Spring Boot整合JSP和Freemarker) https://www.cnblogs.com/ ...
- Spring Boot整合 Thymeleaf 模板引擎
什么是Thymeleaf Thymeleaf是一款用于渲染XML.XHTML.HTML5内容的模板引擎.类似Velocity,FreeMaker模板引擎,它也可以轻易的与Spring MVC等Web框 ...
- Spring Boot整合Thymeleaf模板引擎
什么是Thymeleaf Thymeleaf是一款用于渲染XML.XHTML.HTML5内容的模板引擎.类似Velocity,FreeMaker模板引擎,它也可以轻易的与Spring MVC等Web框 ...
- Spring Boot 整合 Thymeleaf 完整 Web 案例
Thymeleaf 是一种模板语言.那模板语言或模板引擎是什么?常见的模板语言都包含以下几个概念:数据(Data).模板(Template).模板引擎(Template Engine)和结果文档(Re ...
- spring boot整合Thymeleaf的那些坑(spring boot 学习笔记之四)
这里简单记录一下Thymeleaf配置和使用的步骤 1.修改pom文件,添加依赖 <dependency> <groupId>org.springframework.boot& ...
- spring boot整合Thymeleaf
1.引入thymeleaf: <dependency> <groupId>org.springframework.boot</groupId> <artifa ...
- spring boot 整合Thymeleaf模板
SpringBoot 是为了简化 Spring 应用的创建.运行.调试.部署等一系列问题而诞生的产物,自动装配的特性让我们可以更好的关注业务本身而不是外部的XML配置,我们只需遵循规范,引入相关的依赖 ...
随机推荐
- Ubuntu14 安装过程
系统:Description: Ubuntu 14.04.6 LTS平台:Oracle VM VirtualBox 先到阿里巴巴开源镜像站 https://opsx.alibaba.com/ 下 ...
- 其他综合-CentOS 7 使用yum 安装 PHP 5.6
其他综合-CentOS 7 使用yum 安装 PHP 5.6 1.删除旧php包 yum remove php.x86_64 php-cli.x86_64 php-common.x86_64 php- ...
- C语言的10大基础算法
C语言的10大基础算法 算法是一个程序和软件的灵魂,作为一名优秀的程序员,只有对一些基础的算法有着全面的掌握,才会在设计程序和编写代码的过程中显得得心应手.本文包括了经典的Fibonacci数列.简易 ...
- SQLAlchemy 应用创建
1.首先创建app文件夹 同django 创建app 一样 创建文件 在创建的views中写入两个蓝图函数为了操作数据库的增删改查 acc.py from flask import Blueprint ...
- 算法竞赛入门经典 LA 4329(树状数组)
题意: 一排有着不同能力值的人比赛,规定裁判的序号只能在两人之间,而且技能值也只能在两人之间 问题: <算法竞赛入门经典-训练指南>的分析: 上代码: #include<iostre ...
- JDOJ 1790: 高精度A-B
JDOJ 1790: 高精度A-B JDOJ传送门 洛谷 P2142 高精度减法 洛谷传送门 题目描述 高精度减法 输入格式 两个整数a,b(第二个可能比第一个大) 输出格式 结果(是负数要输出负号) ...
- JDOJ 3055: Nearest Common Ancestors
JDOJ 3055: Nearest Common Ancestors JDOJ传送门 Description 给定N个节点的一棵树,有K次查询,每次查询a和b的最近公共祖先. 样例中的16和7的公共 ...
- 洛谷 P4290 [HAOI2008]玩具取名
传送门 思路 博客半年没更新了,来更新个博文吧 在\(dsr\)聚聚博客的帮助下,我用半个上午和一个中午的时间苟延残喘地完成了这道题 先是读题目读大半天,最后连个样例都看不懂 之后又是想思路,实在想不 ...
- Linux性能优化实战学习笔记:第十八讲
一.内存的分配和回收 1.管理内存的过程中,也很容易发生各种各样的“事故”, 对应用程序来说,动态内存的分配和回收,是既核心又复杂的一的一个逻辑功能模块.管理内存的过程中,也很容易发生各种各样的“事故 ...
- 关于指针与引用的差别——C++
准备 https://zhuanlan.zhihu.com/p/27974028 开始 int 是int类型变量声明 int * 是int指针声明,指针其实就是地址变量,用来储存地址值的" ...