ASP.NET Web API 基本操作(CRUD)
上一篇介绍了ASP.NET Web API的基本知识和原理,这一篇我们通过一个更直观的实例,对产品进行CRUD操作(Create/Read/Update/Delete)来继续了解一下它的基本应用。
创建ASP.NET Web API应用程序
在VS中选择创建一个ASP.NET Web Application应用程序,在向导的下一个窗口中选择Web API模板。

创建Model
这里我们在Models文件夹下创建一个简单的Product model类,用来传递数据。
在Models文件夹上点击右键,选择Add -> Class
    public class Product

    {

        public int ProductID { get; set; }

        public string ProductName { get; set; }

        public decimal Price { get; set; }

        public int Count { get; set; }

        public string Description { get; set; }

    }
创建Controller
接着在Controllers文件夹下创建一个API Controller, 命名为"ProductsController"。
在Controllers文件夹上点击右键,选择Add -> Controller ,在弹出向导中选择Web API 2 Controller - Empty

在向导下一步中输入API Controller name为"ProductsController"。

创建Web API方法(CRUD)并通过JQuery和Ajax进行数据操作
1.获取Product列表
首先打开ProductsController文件,添加模拟数据以及获取Product列表的方法。
    public class ProductsController : ApiController

    {

        // Mock product list

        static List<Product> productMockList = initProductMockDataList();

        private static List<Product> initProductMockDataList()

        {

            return new List<Product>()

            {

                new Product {ProductID=,ProductName="Product A",Price=,Count=,Description="Description A"},

                new Product {ProductID=,ProductName="Product B",Price=,Count=,Description="Description B"},

                new Product {ProductID=,ProductName="Product C",Price=,Count=,Description="Description C"},

                new Product {ProductID=,ProductName="Product D",Price=,Count=,Description="Description D"},

                new Product {ProductID=,ProductName="Product E",Price=,Count=,Description="Description E"}

            };

        }

        // GET api/products

        public IEnumerable<Product> GetAllProducts()

        {

            return productMockList;

        }

   }
接着在文件夹Views->Product下创建一个View,名为"Index"。这里我们需要实现的是点击Get Product List按钮获取Product List数据,修改代码如下:
@{

    Layout = null;

}

<!DOCTYPE html>

<html>

<head>

    <meta name="viewport" content="width=device-width" />

    <title>Index</title>

    <script src="~/Scripts/jquery-1.10.2.min.js" type="text/javascript"></script>

</head>

<body>

   <p><h2>ASP.NET Web API (CRUD)</h2></p>

    <div>

        <input id="btnGetProductList" name="btnGetProductList" type="button" value="Get Product List" />

        <div id="productsBlock" style="padding-top:10px;display:none;">

            <div style="padding-left:5px;">Product List</div>

            <div id="products"></div>

        </div>

    </div>

    <script>

        // Click get product list

        $('#btnGetProductList').click(function () {

            LoadProductList();

        });

        // Load product list

        function LoadProductList() {

            $.ajax({

                url: '/api/products',

                contentType: 'application/html; charset=utf-8',

                type: 'GET',

                dataType: 'json'

            }).success(function (result) {

                $('#productsBlock').show();

                DisplayProductList(result);

            }).error(function (data) {

                alert(data);

            });

        }

        // Display product list

        function DisplayProductList(result) {

            var productTable = $("<table cellpadding='5' cellspacing='5'></table>");

            var productTableTitle = $("<tr style='background-color:#7FBA00;'><th>Product ID</th><th>Product Name</th><th>Price</th><th>Count</th><th>Description</th></tr>");

            productTableTitle.appendTo(productTable);

            for (var i = ; i < result.length; i++) {

                var productTableContent = $("<tr style='background-color: #7FBA00; color: white;'><td>"

                    + result[i].ProductID + "</td><td>"

                    + result[i].ProductName + "</td><td>"

                    + result[i].Price + "</td><td>"

                    + result[i].Count + "</td><td>"

                    + result[i].Description + "</td></tr>");

                productTableContent.appendTo(productTable);

            }

            $('#products').html(productTable);

        }

    </script>

</body>

</html>
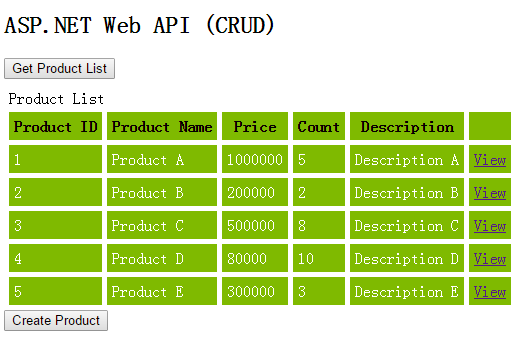
运行代码,点击Get Product List按钮之前。

点击Get Product List按钮之后

2.获取一条Product数据
这里我们的做法是点击列表右侧View链接,获取当前Product数据,并显示到列表下方各个字段对应的文本框中。
首先我们先完成Web API中获取一条Product数据的方法。
        // GET api/products/?

        public Product GetProdcut(int id)

        {

            return productMockList.Where(p => p.ProductID == id).FirstOrDefault();

        }
接着,在Product列表中添加一列View,在列表下面添加对应各个字段的textbox。实现点击View链接,获取当前Product数据,然后显示到对应的文本框中。
@{

    Layout = null;

}

<!DOCTYPE html>

<html>

<head>

    <meta name="viewport" content="width=device-width" />

    <title>Index</title>

    <script src="~/Scripts/jquery-1.10.2.min.js" type="text/javascript"></script>

</head>

<body>

   <p><h2>ASP.NET Web API (CRUD)</h2></p>

    <div>

        <input id="btnGetProductList" name="btnGetProductList" type="button" value="Get Product List" />

        <div id="productsBlock" style="padding-top:10px;display:none;">

            <div style="padding-left:5px;">Product List</div>

            <div id="products"></div>

            <div id="editProductBlock" style="padding:10px;width:20%;border:1px solid green;display:none;">

                <div style="font-weight:bold;">Edit Product</div>

                <table>

                    <tr><td>Product ID:</td><td><input id="txtProductID" name="txtProductID" type="text" disabled /></td></tr>

                    <tr><td> Product Name:</td><td><input id="txtProductName" name="txtProductName" type="text" /></td></tr>

                    <tr><td>Count:</td><td><input id="txtCount" name="txtCount" type="text" /></td></tr>

                    <tr><td> Price:</td><td><input id="txtPrice" name="txtPrice" type="text" /></td></tr>

                    <tr><td> Description:</td><td><input id="txtDescription" name="txtDescription" type="text" /></td></tr>

                </table>

                <div style="padding-top:5px;">

                    <div id="message" style="color:green;"></div>

                    <input id="btnSave" name="btnSave" type="button" value="Save" />

                </div>

            </div>

        </div>

    </div>

    <script>

        // Click get product list

        $('#btnGetProductList').click(function () {

            LoadProductList();

        });

        // Load product list

        function LoadProductList() {

            $.ajax({

                url: '/api/products',

                contentType: 'application/html; charset=utf-8',

                type: 'GET',

                dataType: 'json'

            }).success(function (result) {

                $('#productsBlock').show();

                DisplayProductList(result);

            }).error(function (data) {

                alert(data);

            });

        }

        // Display product list

        function DisplayProductList(result) {

            var productTable = $("<table cellpadding='5' cellspacing='5'></table>");

            var productTableTitle = $("<tr style='background-color:#7FBA00;'><th>Product ID</th><th>Product Name</th><th>Price</th><th>Count</th><th>Description</th><th></th></tr>");

            productTableTitle.appendTo(productTable);

            for (var i = ; i < result.length; i++) {

                var productTableContent = $("<tr style='background-color: #7FBA00; color: white;'><td>"

                    + result[i].ProductID + "</td><td>"

                    + result[i].ProductName + "</td><td>"

                    + result[i].Price + "</td><td>"

                    + result[i].Count + "</td><td>"

                    + result[i].Description + "</td>"

                    + "<td><a href='#' onclick='ViewProduct(" + result[i].ProductID + ")'>View</a></td></tr>");

                productTableContent.appendTo(productTable);

            }

            $('#products').html(productTable);

        }

        // View product

        function ViewProduct(productId) {

            $('#editProductBlock').show();

            $.ajax({

                url: '/api/products/' + productId,

                contentType: 'application/html;charset=utf-8',

                type:'GET'

            }).success(function (result) {

                if (result != null) {

                    $("#txtProductID").val(result.ProductID);

                    $("#txtProductName").val(result.ProductName);

                    $("#txtCount").val(result.Count);

                    $("#txtPrice").val(result.Price);

                    $("#txtDescription").val(result.Description);

                }

            }).error(function (data) {

                alert(data);

            })

        }

    </script>

</body>

</html>
运行程序
点击Get Product List按钮获取列表数据,显示如下。

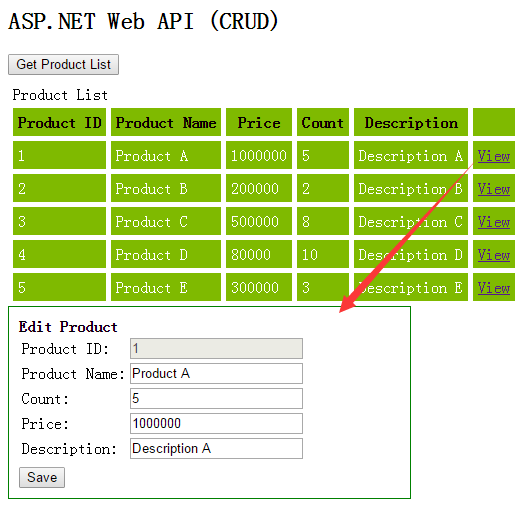
接着点击列表中任意记录右边的View链接,这里我们点击第一条数据View链接,显示如下。
3.新增一条Product
这里我们需要一个Create Product的按钮,然后利用上面创建的TextBox来实现新增数据功能。
首先我们先完成Web API中新增Product数据的方法。
        // POST api/products

        public void CreateProduct([FromBody]Product product)

        {

            var lastProduct = productMockList.OrderByDescending(p => p.ProductID).FirstOrDefault();

            int newProductID = lastProduct.ProductID + ;

            product.ProductID = newProductID;

            productMockList.Add(product);

        }
接着我们修改Index View页面实现新增Product。
@{

    Layout = null;

}

<!DOCTYPE html>

<html>

<head>

    <meta name="viewport" content="width=device-width" />

    <title>Index</title>

    <script src="~/Scripts/jquery-1.10.2.min.js" type="text/javascript"></script>

</head>

<body>

    <p><h2>ASP.NET Web API (CRUD)</h2></p>

    <div>

        <input id="btnGetProductList" name="btnGetProductList" type="button" value="Get Product List" />

        <div id="productsBlock" style="padding-top:10px;display:none;">

            <div style="padding-left:5px;">Product List</div>

            <div id="products"></div>

            <div>

                <input id="btnCreateProduct" name="btnCreateProduct" type="button" value="Create Product" />

            </div>

            <div id="editProductBlock" style="padding:10px;width:20%;border:1px solid green;display:none;">

                <div id="typeBlock" style="font-weight:bold;">Edit Product</div>

                <table>

                    <tr><td>Product ID:</td><td><input id="txtProductID" name="txtProductID" type="text" disabled /></td></tr>

                    <tr><td> Product Name:</td><td><input id="txtProductName" name="txtProductName" type="text" /></td></tr>

                    <tr><td>Count:</td><td><input id="txtCount" name="txtCount" type="text" /></td></tr>

                    <tr><td> Price:</td><td><input id="txtPrice" name="txtPrice" type="text" /></td></tr>

                    <tr><td> Description:</td><td><input id="txtDescription" name="txtDescription" type="text" /></td></tr>

                </table>

                <div style="padding-top:5px;">

                    <div id="message" style="color:green;"></div>

                    <input id="btnSave" name="btnSave" type="button" value="Save" />

                    <input id="btnCreate" name="btnCreate" type="button" value="Create"/>

                </div>

            </div>

        </div>

    </div>

    <script>

        // Click get product list

        $('#btnGetProductList').click(function () {

            LoadProductList();

        });

        // Load product list

        function LoadProductList() {

            $.ajax({

                url: '/api/products',

                contentType: 'application/html; charset=utf-8',

                type: 'GET',

                dataType: 'json'

            }).success(function (result) {

                $('#productsBlock').show();

                DisplayProductList(result);

            }).error(function (data) {

                alert(data);

            });

        }

        // Display product list

        function DisplayProductList(result) {

            var productTable = $("<table cellpadding='5' cellspacing='5'></table>");

            var productTableTitle = $("<tr style='background-color:#7FBA00;'><th>Product ID</th><th>Product Name</th><th>Price</th><th>Count</th><th>Description</th><th></th></tr>");

            productTableTitle.appendTo(productTable);

            for (var i = ; i < result.length; i++) {

                var productTableContent = $("<tr style='background-color: #7FBA00; color: white;'><td>"

                    + result[i].ProductID + "</td><td>"

                    + result[i].ProductName + "</td><td>"

                    + result[i].Price + "</td><td>"

                    + result[i].Count + "</td><td>"

                    + result[i].Description + "</td>"

                    + "<td><a href='#' onclick='ViewProduct(" + result[i].ProductID + ")'>View</a></td></tr>");

                productTableContent.appendTo(productTable);

            }

            $('#products').html(productTable);

        }

        // View product

        function ViewProduct(productId) {

            $('#editProductBlock').show();

            $('#btnCreate').hide();

            $.ajax({

                url: '/api/products/' + productId,

                contentType: 'application/html;charset=utf-8',

                type: 'GET'

            }).success(function (result) {

                if (result != null) {

                    $("#txtProductID").val(result.ProductID);

                    $("#txtProductName").val(result.ProductName);

                    $("#txtCount").val(result.Count);

                    $("#txtPrice").val(result.Price);

                    $("#txtDescription").val(result.Description);

                }

            }).error(function (data) {

                alert(data);

            });

        }

        $('#btnCreateProduct').click(function () {

            $('#editProductBlock').show();

            $('#btnCreate').show();

            $('#btnSave').hide();

            $('#typeBlock').html("Create Product");

        });

        // Create product

        $('#btnCreate').click(function () {

            var product = {

                ProductID: ,

                ProductName: $('#txtProductName').val(),

                Price: $('#txtPrice').val(),

                Count: $('#txtCount').val(),

                Description: $('#txtDescription').val()

            };

            $.ajax({

                url: '/api/products/',

                type: 'POST',

                data: JSON.stringify(product),

                contentType: 'application/json'

            }).success(function (result) {

                LoadProductList();

                $('#message').html("Product create success.");

            }).error(function (data) {

                alert(data);

            });

        });

    </script>

</body>

</html>
运行程序
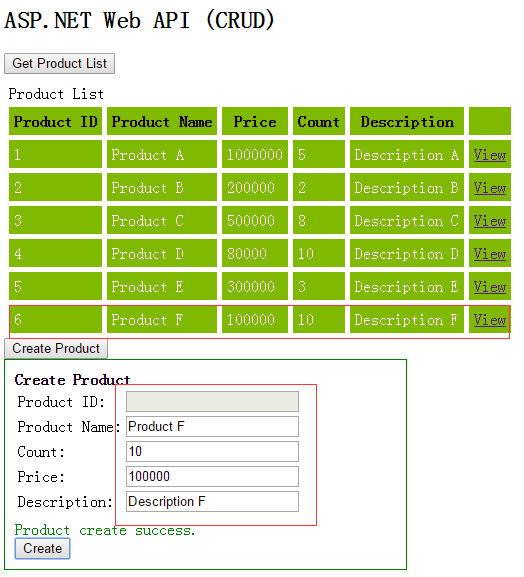
点击获取列表
点击Create Product按钮,输入新增的Product数据。

点击Create按钮,结果如下图。
4.修改Product信息
我们这里要实现的是点击列表数据中的View链接,在文本框中修改选择的Product信息,然后点击Save按钮,数据修改成功。
首先我们先完成Web API中修改Product数据的方法。
        // PUT api/products

        public void UpdateProduct(int id,[FromBody]Product product)

        {

            var currentProduct = productMockList.Where(p => p.ProductID == id).FirstOrDefault();

            if (currentProduct != null)

            {

                foreach(var item in productMockList)

                {

                    if(item.ProductID.Equals(currentProduct.ProductID))

                    {

                        item.ProductName = product.ProductName;

                        item.Price = product.Price;

                        item.Count = product.Count;

                        item.Description = product.Description;

                    }

                }

            }

        }
接着我们在Index View中添加修改Product代码如下。
        // Update product

        $('#btnSave').click(function () {

            var product = {

                ProductID: $('#txtProductID').val(),

                ProductName: $('#txtProductName').val(),

                Price: $('#txtPrice').val(),

                Count: $('#txtCount').val(),

                Description: $('#txtDescription').val()

            };

            $.ajax({

                url: '/api/products/' + $('#txtProductID').val(),

                type: 'POST',

                data: JSON.stringify(product),

                contentType: 'application/json'

            }).success(function (result) {

                LoadProductList();

                $('#message').html("Product save success.");

            }).error(function (data) {

                alert(data);

            });

        });
运行程序
加载Product列表,任意点击一条数据的View链接,这里我们点击第一条数据。

接着我们修改信息Product Name为"Product AAA",Count为10,Price为200000,Description为"Description AAA",并点击Save按钮。

5.删除Product
这里我们像View Product一样,在列表数据行中添加一个Delete链接。点击Delete链接,删除对应的Product数据。
首先我们先完成Web API中删除Product数据的方法。
        // DELETE api/products

        public void DeleteProduct(int id)

        {

            var product = productMockList.Where(p => p.ProductID == id).FirstOrDefault();

            if (product != null)

            {

                productMockList.Remove(product);

            }

        }
接着修改Index View页面,增加删除功能。
// Display product list
function DisplayProductList(result) {
var productTable = $("<table cellpadding='5' cellspacing='5'></table>");
var productTableTitle = $("<tr style='background-color:#7FBA00;'><th>Product ID</th><th>Product Name</th><th>Price</th><th>Count</th><th>Description</th><th></th></tr>");
productTableTitle.appendTo(productTable); for (var i = ; i < result.length; i++) {
var productTableContent = $("<tr style='background-color: #7FBA00; color: white;'><td>"
+ result[i].ProductID + "</td><td>"
+ result[i].ProductName + "</td><td>"
+ result[i].Price + "</td><td>"
+ result[i].Count + "</td><td>"
+ result[i].Description + "</td>"
+ "<td><a href='#' onclick='ViewProduct(" + result[i].ProductID + ")'>View</a> <a href='#' onclick='DeleteProduct(" + result[i].ProductID + ")'>Delete</a></td></tr>"); productTableContent.appendTo(productTable);
} $('#products').html(productTable);
}
        // Delete product

        function DeleteProduct(productID) {

            $.ajax({

                url: '/api/products/' + productID,

                type: 'DELETE',

            }).success(function (result) {

                LoadProductList();

                $('#message').html("Product delete success.");

            }).error(function (data) {

                alert(data);

            })

        }
运行程序
加载列表

点击Product A数据的Delete链接。

可以看到Product A的数据成功删除。
好了,本篇就先到此,希望对你有所帮助,谢谢!
ASP.NET Web API 基本操作(CRUD)的更多相关文章
- Asp.Net Web API 2(CRUD操作)第二课
Asp.Net Web API 2(CRUD操作)第二课 Asp.Net Web API 导航 Asp.Net Web API第一课:入门http://www.cnblogs.com/aehyok ...
- 【ASP.NET Web API教程】2.3 与实体框架一起使用Web API
原文:[ASP.NET Web API教程]2.3 与实体框架一起使用Web API 2.3 Using Web API with Entity Framework 2.3 与实体框架一起使用Web ...
- ASP.NET Core Web API Cassandra CRUD 操作
在本文中,我们将创建一个简单的 Web API 来实现对一个 “todo” 列表的 CRUD 操作,使用 Apache Cassandra 来存储数据,在这里不会创建 UI ,Web API 的测试将 ...
- 通过Knockout.js + ASP.NET Web API构建一个简单的CRUD应用
REFERENCE FROM : http://www.cnblogs.com/artech/archive/2012/07/04/Knockout-web-api.html 较之面向最终消费者的网站 ...
- 【ASP.NET Web API教程】2.1 创建支持CRUD操作的Web API
原文 [ASP.NET Web API教程]2.1 创建支持CRUD操作的Web API 2.1 Creating a Web API that Supports CRUD Operations2.1 ...
- 基于ASP.NET WEB API实现分布式数据访问中间层(提供对数据库的CRUD)
一些小的C/S项目(winform.WPF等),因需要访问操作数据库,但又不能把DB连接配置在客户端上,原因有很多,可能是DB连接无法直接访问,或客户端不想安装各种DB访问组件,或DB连接不想暴露在客 ...
- [转]Enabling CRUD Operations in ASP.NET Web API 1
本文转自:https://docs.microsoft.com/en-us/aspnet/web-api/overview/older-versions/creating-a-web-api-that ...
- 适用于app.config与web.config的ConfigUtil读写工具类 基于MongoDb官方C#驱动封装MongoDbCsharpHelper类(CRUD类) 基于ASP.NET WEB API实现分布式数据访问中间层(提供对数据库的CRUD) C# 实现AOP 的几种常见方式
适用于app.config与web.config的ConfigUtil读写工具类 之前文章:<两种读写配置文件的方案(app.config与web.config通用)>,现在重新整理一 ...
- 在一个空ASP.NET Web项目上创建一个ASP.NET Web API 2.0应用
由于ASP.NET Web API具有与ASP.NET MVC类似的编程方式,再加上目前市面上专门介绍ASP.NET Web API 的书籍少之又少(我们看到的相关内容往往是某本介绍ASP.NET M ...
随机推荐
- UVa 10814 - Simplifying Fractions
题目大意:给一个分数,对其进行化简.因为分子.分母最大为1030,所以用要用大数. import java.io.*; import java.util.*; import java.math.*; ...
- 用while判读循环语句1+1/2!+1/3!+...1/20!的和阶乘的计算方法 式:n!=n*(n-1)!
package com.chongrui.test; /* *用while判读循环语句1+1/2!+1/3!+...1/20!的和 *使用BigDecimal类完成大数字与高精度运算 公式:n!=n* ...
- angularjs---服务(service / factory / provider)
初angularJs时 常写一些不够优雅的代码 !我总结了一下看看各位有没有中枪的!-----( 这里只针对服务service及其相关! ) 以下做法不太优雅 兄弟controller 之间的相同 ...
- 创建 github 仓库
1. 创建入口 在右上角找到 “+” 然后,选择 “New repository” 进行创建. 2. 填入信息 输入名字和描述 . 选择 “Initialize this repository wit ...
- tomcat 安全文件夹(Java之负基础实战)
tomcat 解析网站的时候,会寻找一个文件叫 WEB-INF 这些文件外部无法访问
- centos 安装mysql 5.5.12
1.安装gcc-c++ gcc make cmake编译器 2.安装ncurses 3.添加用户组 groupadd mysql useradd -r -g mysql mysql 4.安装 tar ...
- 怎么使用OCR文字识别软件图像压缩功能
ABBYY FineReader是一款非常实用的OCR文字识别软件,在使用ABBYY FineReader保存文档时可以选择图像格式和压缩方法,通过图像压缩可以减小文件的大小,图像压缩方法视压缩率和数 ...
- MongoDB_GridFS_存储文件
GridFS mongoDB除了保存各种文档(JOSN结构)外还能够保存文件.GridFS规范提供了一种透明机制,可以将一个大文件分割成为多个较小的文档,这样的机制允许我们有效的保存大文件对象,特别对 ...
- 搭建spring工程配置数据源连接池
Spring作为一个优秀的开源框架,越来越为大家所熟知,前段时间用搭了个spring工程来管理数据库连接池,没有借助Eclipse纯手工搭建,网上此类文章不多,这里给大家分享一下,也作为一个手记. 工 ...
- [Linux] 使用openssl实现RSA非对称加密
简单定义:公钥和私钥,加密和解密使用的是两个不同的密钥,所以是非对称 系统:ubuntu 14.04 软件:openssl java php 生成公钥私钥 使用命令生成私钥: openssl genr ...