
部署puppet master/agent模型
自己画的一个简单的架构图
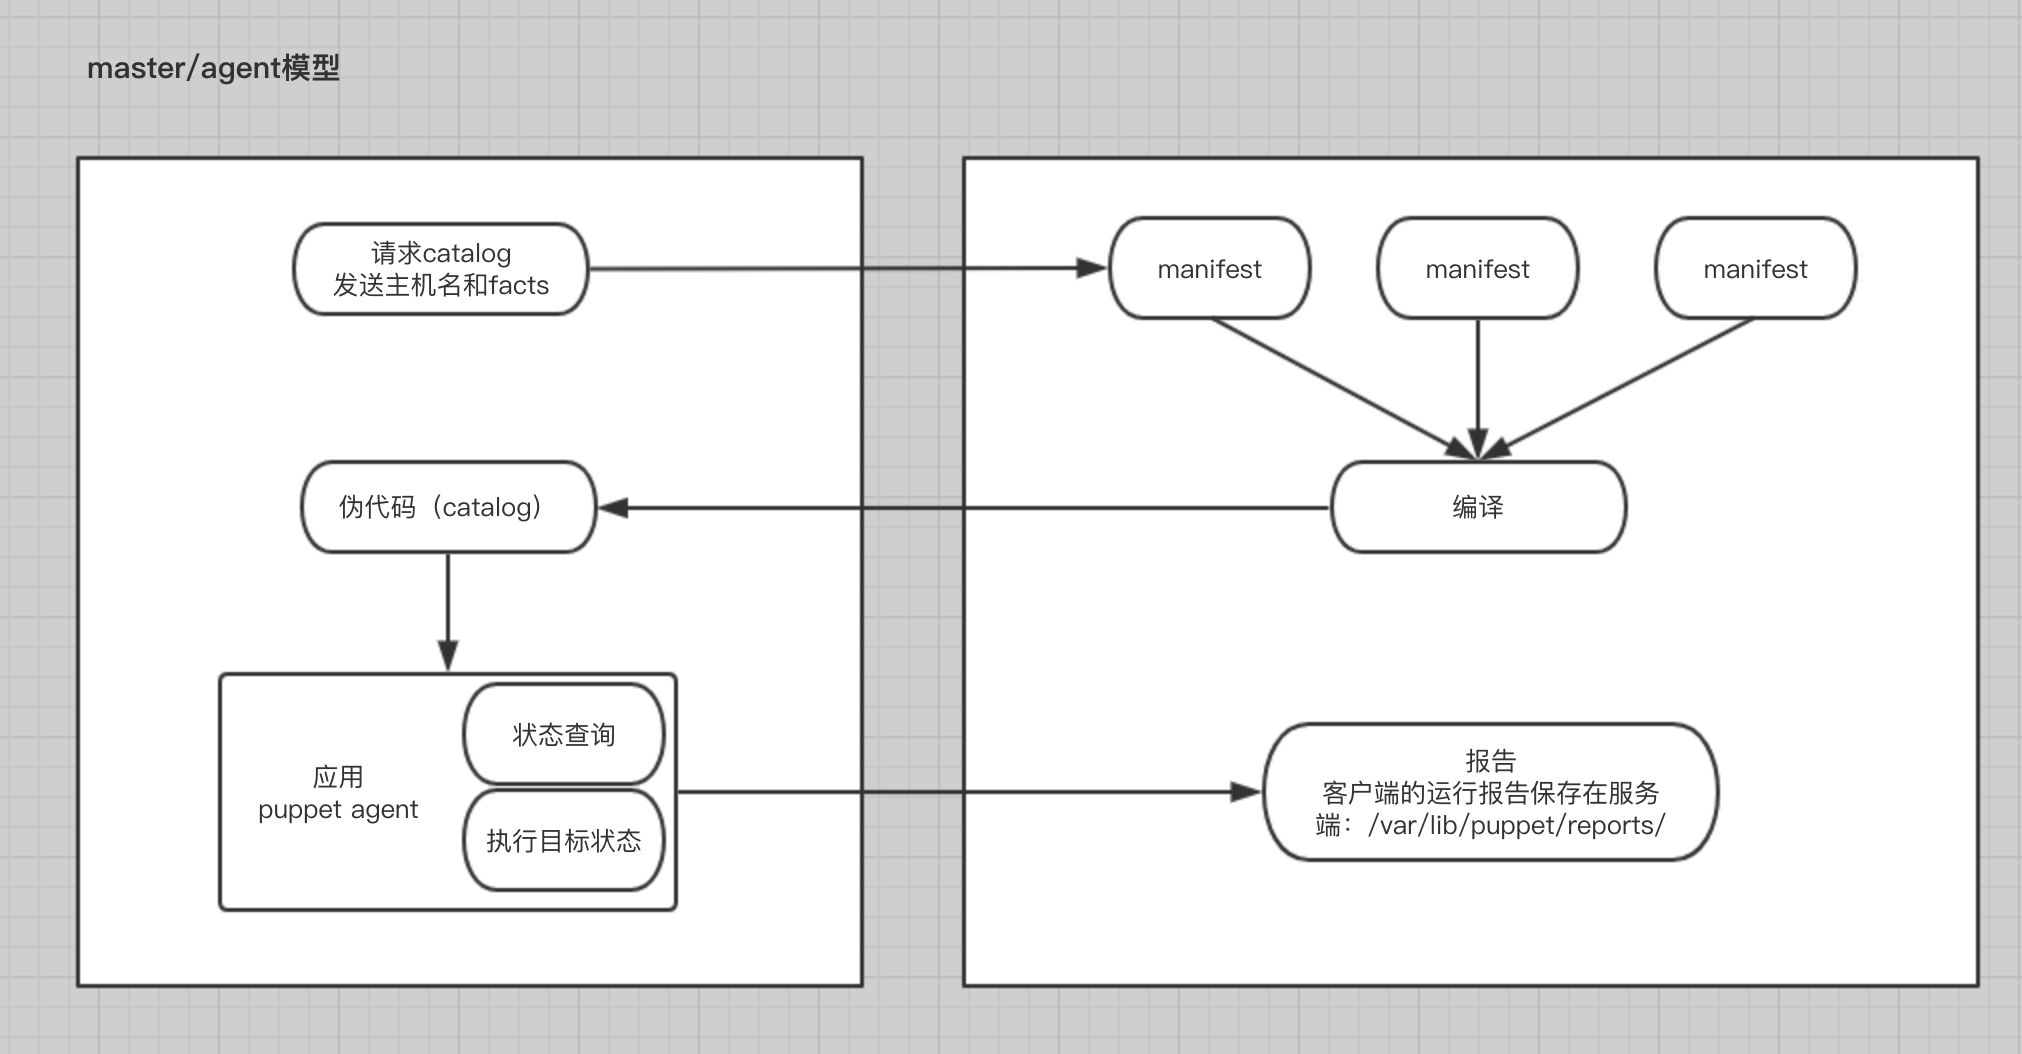
agent端每隔30分钟到master端请求与自己相关的catalog。
各节点时间要同步。
依赖DNS,各节点能通过主机名能解析。
1、同步时间
# yum install -y ntp ntpdate

# ntpdate pool.ntp.org
2、修改hosts(仅在测试时使用,大规模场景下请使用dns解析)
# vim /etc/hosts
3、安装程序包,master端安装puppet、puppet-server,agent端安装puppet即可
# yum install -y puppet puppet-server

# rpm -ql puppet-server

/etc/puppet/fileserver.conf

/etc/puppet/manifests

/usr/lib/systemd/system/puppetmaster.service

# rpm -ql puppet

/etc/puppet/modules

/etc/puppet/puppet.conf

/usr/bin/puppet

/usr/lib/systemd/system/puppet.service

/usr/lib/systemd/system/puppetagent.service

/var/lib/puppet

/var/log/puppet

/var/run/puppet
4、初始化master(这里仅是测试查看运行过程,实际上可以直接启动服务)
# puppet help master

--daemonize:Send the process into the background. This is the default.

--no-daemonize:Do not send the process into the background.

# puppet master --no-daemonize --verbose

Info: Creating a new SSL key for ca

Info: Creating a new SSL certificate request for ca

Info: Certificate Request fingerprint (SHA256): 9A:66:76:76:2F:B0:86:8E:25:7F:24:B6:A5:09:44:3E:F4:2C:DB:37:24:CC:0C:4E:40:C7:C0:81:64:1B:06:61

Notice: Signed certificate request for ca

Info: Creating a new certificate revocation list

Info: Creating a new SSL key for aliyun

Info: csr_attributes file loading from /etc/puppet/csr_attributes.yaml

Info: Creating a new SSL certificate request for aliyun

Info: Certificate Request fingerprint (SHA256): C2:59:1A:9D:63:1C:6E:6D:93:68:C9:2C:B7:FD:99:8C:95:9D:D9:C5:7F:D7:38:87:3D:86:68:99:A9:D2:EB:EE

Notice: aliyun has a waiting certificate request

Notice: Signed certificate request for aliyun

Notice: Removing file Puppet::SSL::CertificateRequest aliyun at '/var/lib/puppet/ssl/ca/requests/aliyun.pem'

Notice: Removing file Puppet::SSL::CertificateRequest aliyun at '/var/lib/puppet/ssl/certificate_requests/aliyun.pem'

Notice: Starting Puppet master version 3.6.2

# netstat -tnlp      默认监听在tcp/8140端口
5、启动master服务
# systemctl start puppetmaster

# systemctl enable puppetmaster
可以删除证书重新生成
# rm -rf /var/lib/puppet/ssl/*

# puppet master --no-daemonize --verbose
6、修改master的配置文件,这里提供的是一个ini风格的配置文件,main段是公共配置、master段是matser的配置、agent段是agent的配置
# puppet help master

# puppet man master

See the configuration file documentation at http://docs.puppetlabs.com/references/stable/configuration.html for the full list of acceptable settings.

A commented list of all settings can also be generated by running puppet master with '--genconfig'.

# vim /etc/puppet/puppet.conf
生成完整的配置列表
# puppet help config

puppet config <action> [--section SECTION_NAME]

print    Examine Puppet's current setting.

set      Set Puppet's settings.

# puppet master --genconfig > /etc/puppet/test.conf

# puppet agent --genconfig >> /etc/puppet/test.conf

# vim /etc/puppet/test.conf
替换现有的配置文件
# cp test.conf /etc/puppet/puppet.conf

# systemctl restart puppetmaster
7、修改agent的配置文件
# vim /etc/puppet/puppet.conf

server = puppetmaster.oupeng.com

# puppet help agent

# puppet man agent

--daemonize

--no-daemonize

--noop:Use 'noop' mode where the daemon runs in a no-op or dry-run mode.

-v|--verbose:Turn on verbose reporting.

-V|--version:Print the puppet version number and exit.

-t|--test:Enable the most common options used for testing. These are 'onetime','verbose','ignorecache','no-daemonize','no-usecacheonfailure','detailed-exitcodes','no-splay',and 'show_diff'.

--onetime:Run the configuration once. Runs a single (normally daemonized) Puppet run.

--detailed-exitcodes:Provide transaction information via exit codes. If this is enabled, an exit code of '2' means there were changes, an exit code of '4' means there were failures during the transaction, and an exit code of '6' means there were both changes and failures.

# puppet agent -t

# systemctl start puppet

# systemctl enable puppet
打印当前配置
# puppet config print

# puppet config print --section master

# puppet config print --section agent
获取模块位置
# puppet config print modulepath

/etc/puppet/environments/production/modules:/etc/puppet/modules:/usr/share/puppet/modules
8、在master端管理证书签署和请求
# puppet help cert

Manage certificates and requests.

list:List outstanding certificate requests. If '--all' is specified, signed certificates are also listed, prefixed by '+', and revoked or invalid certificates are prefixed by '-'. 列出证书请求,加--all可以显示所以证书,包括未签署的和已经签署的。

sign:Sign an outstanding certificate request. 签署证书请求

revoke:Revoke the certificate of a client. 吊销证书,需重启master生效

clean:Revoke a host's certificat e and remove all files related to that host from puppet cert's storage.

--all:Operate on all items. Currently only makes sense with the 'sign', 'clean', 'list', and 'fingerprint' actions.
# puppet cert list

# puppet cert list --all

# puppet cert sign --all
9、示例,定义站点清单
# cd /etc/puppet/manifests/

# vim site.pp

  node "agent1.oupeng.com" {

    include mariadb

  }

# puppet agent --no-daemonize -v --noop

# systemctl restart puppet
到这里,基础环境就部署完成了。
部署puppet master/agent模型的更多相关文章
- 自动化运维工具之Puppet master/agent模型、站点清单和puppet多环境设定
前文我们了解了puppe中模块的使用,回顾请参考https://www.cnblogs.com/qiuhom-1874/p/14086315.html:今天我来了解下puppet的master/age ...
- puppet master/agent
puppet master/agent 配置 安装 master: yum install puppet-server agent: yum install puppet 自动签名 puppet的ma ...
- Puppet master/agent installation on RHEL7
==================================================================================================== ...
- puppet(5)-master/agent模式
master/agent模式的工作流程 agent每隔固定时长会向master端发送nodename(自己的节点名,节点名至关重要)和 facts ,并且向服务器端请求自己的catalog. mast ...
- Puppet基于Master/Agent模式实现LNMP平台部署
前言 随着IT行业的迅猛发展,传统的运维方式靠大量人力比较吃力,运维人员面对日益增长的服务器和运维工作,不得不把很多重复的.繁琐的工作利用自动化处理.前期我们介绍了运维自动化工具ansible的简单应 ...
- Advacned Puppet: Puppet Master性能调优
本文是Advanced Puppet系列的第一篇:Puppet master性能调优,谈一谈如何优化和提高C/S架构下master端的性能. 故事情节往往惊人地类似:你是一名使用Puppet管理线上业 ...
- Configure Puppet Master with Passenger and Apache on Centos
What is Passenger? Passenger (AKA mod_rails or mod_rack) is an Apache 2.x module which lets you run ...
- WEBrick/Rack Puppet Master
Puppet's Services: The WEBrick Puppet Master Puppet master is the application that compiles configur ...
- puppet master 用 nginx + unicorn 作为前端
目录 1. 概要 2. nginx + unicorn 配置 2.1. package 安装 2.2. 配置文件设置 2.2.1. 配置 unicorn 2.2.2. 配置nginx 2.3. 测试配 ...
随机推荐
- python装饰器(披着羊皮的狼)
python装饰器的作用是在不改变原有函数的基础上,对函数的功能进行增加或者修改. 装饰器语法是python语言更加优美且避免很多繁琐的事情,flask中配置路由的方式便是装饰器. 首先python中 ...
- JVM类加载全过程--图解
JVM规范允许类加载器在预料某个类将要被使用时就预先加载它,下图为实例方法被调用时的JVM内存模型,1~7完整的描述了从类加载开始到方法执行前的预备过程,后面将对每一个步骤进行解释 在我们加载类的过程 ...
- Java中的==符号与equals()的使用(测试两个变量是否相等)
Java 程序中测试两个变量是否相等有两种方式:一种是利用 == 运算符,另一种是利用equals()方法. 当使用 == 来判断两个变量是否相等时,如果两个变量是基本类型变量,且都是数值类型(不一定 ...
- 基于C#的机器学习--贝叶斯定理-执行数据分析解决肇事逃逸之谜
贝叶斯定理-执行数据分析解决肇事逃逸之谜 在这一章中,我们将: 应用著名的贝叶斯定理来解决计算机科学中的一个非常著名的问题. 向您展示如何使用贝叶斯定理和朴素贝叶斯来绘制数据,从真值表中发现异常值 ...
- 使用Python一年多了,总结八个好用的Python爬虫技巧
用python也差不多一年多了,python应用最多的场景还是web快速开发.爬虫.自动化运维:写过简单网站.写过自动发帖脚本.写过收发邮件脚本.写过简单验证码识别脚本. 爬虫在开发过程中也有很多复用 ...
- TeamWork#3,Week5,Scrum Meeting 11.16
到目前为止各方面工作已经基本完成,爬虫程序也调整完毕,正在等待全部整合. 成员 已完成 待完成 彭林江 完成爬虫结构调整 新爬虫与服务器连接 郝倩 完成爬虫结构调整 新爬虫与服务器连接 高雅智 重定位 ...
- Scrum Meeting 10.31
成员 今日任务 明日任务 今日工作时长 徐越 整理开发文档,学习ip相关知识,学习servlet相关知识 代码迁移,学习数据库相关知识 5h 赵庶宏 学习学长的servlet代码 进行数据库的连接 4 ...
- Java 面试-- 1
JAVA面试精选[Java基础第一部分] 这个系列面试题主要目的是帮助你拿轻松到offer,同时还能开个好价钱.只要能够搞明白这个系列的绝大多数题目,在面试过程中,你就能轻轻松松的把面试官给忽悠了 ...
- Swift-KVC构造函数中数据类型和私有属性
- [转帖]go 命令
golang笔记——命令 https://www.cnblogs.com/tianyajuanke/p/5196436.html 1.GO命令一览 GO提供了很多命令,包括打包.格式化代码.文档生成 ...