
WPF: Creation of Text Labels for 3D Scene
原文:WPF: Creation of Text Labels for 3D Scene
转载:http://www.codeproject.com/KB/WPF/WPF_Text3D.aspx
Download demo - 26.46 KBDownload source - 37.19 KB
Introduction
Some time ago, I started working on my application that takes the advantages of 3D graphics to display some results. I am .NET developer so I have chosen Windows Presentation Foundation (WPF) as my framework to create 3D graphics. I have to admit that this
is powerful library that allows to create 3D graphics quite easy. It is not hard to understand how to create a 3D scene using sets of triangles. What is more, many articles describe how to do it. I encountered some problems when I started adding some text
to my 3D scene. I think that this article may help other developers to choose the best way of writing text on a 3D scene.
Background
Let's start, our goal is to add some text labels to the 3D scene. We have at least two approaches:
- 3D label creation
- 2D label creation and overlay it on the scene
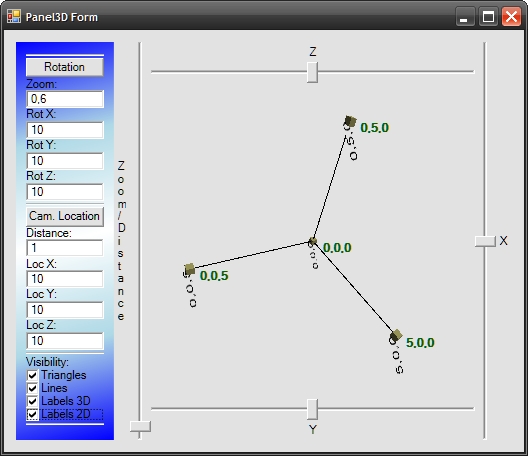
The first approach is based on the creation of a 3D object in the scene (typically it is a rectangle) and writing text on it (it can be achieved using the brush made from text). The sample result is showed in the picture below:

The second approach is based on layers. The bottom layer is Viweport3D and the top layer isCanvas. The top layer is transparent and overlays the
Viewport3D. This approach usesTexBlocks that are members of the
Canvas but the 2D location depends on the location in 3D space. The picture below presents that approach:

Of course, both approaches have some advantages and disadvantages. The 3D labels based on the first approach are more useful when the text is a part of the scene. The labels based on the second approach are more readable (but the solution is more complex).
The picture below shows both approaches:

Using the Code
The sample code draws the coordinate system and some labels on it. The scene could be rotated using the sliders.Checkboxes from the left pane allow to switch on / switch off the visibility of elements of the scene (especially labels 2D and 3D).
I do not want to go into detail as to how this application is created. I want to focus on the two approaches mentioned previously.
3D Labels
To illustrate how to create a label in 3D, I am going to describe how to create the function:CreateTextLabel3D. This function is going to be responsible for returning theModelVisual3D object that represents the label in 3D space.
Such a function has the following declaration:
 Collapse |Copy
Code
/// <summary>

/// Creates a ModelVisual3D containing a text label.

/// </summary>

/// <param name="text">The string to be drawn</param>

/// <param name="textColor">The color of the text.</param>

/// <param name="isDoubleSided">Visible from both sides?</param>

/// <param name="height">Height of the characters</param>

/// <param name="basePoint">The base point of the label</param>

/// <param name="isBasePointCenterPoint">if set to <c>true</c> the base point

/// is center point of the label.</param>

/// <param name="vectorOver">Horizontal direction of the label</param>

/// <param name="vectorUp">Vertical direction of the label</param>

/// <returns>Suitable for adding to your Viewport3D</returns>

/// <remarks>Two vectors: vectorOver and vectorUp are creating the surface

/// on which we are drawing the text. Both those vectors are used for

/// calculation of label size, so it is reasonable that each co-ordinate

/// should be 0 or 1. e.g. [1,1,0] or [1,0,1], etc...</remarks>

public static ModelVisual3D CreateTextLabel3D( string text, Brush textColor,

    bool isDoubleSided, double

    height, Point3D basePoint, bool isBasePointCenterPoint, Vector3D vectorOver,

    Vector3D vectorUp);
How It Works?
- First we need to create a
TextBlockthat allows us to create a label: Collapse |Copy
CodeTextBlock textblock = new TextBlock(new Run(text));
textblock.Foreground = textColor; // setting the text color
textblock.FontFamily = new FontFamily("Arial"); // setting the font to be used - Now we have to create a brush and material that contains the
TextBlockcreated in the previous step: Collapse |Copy
CodeDiffuseMaterial mataterialWithLabel = new DiffuseMaterial();
// Allows the application of a 2-D brush,
// like a SolidColorBrush or TileBrush, to a diffusely-lit 3-D model.
// we are creating the brush from the TextBlock
mataterialWithLabel.Brush = new VisualBrush(textblock); - Now it is time to create the object in the 3D space that will be covered by the text:
Collapse |Copy
Code//calculation of text width (assuming that characters are square):
double width = text.Length * height;
// we need to find the four corners
// p0: the lower left corner; p1: the upper left
// p2: the lower right; p3: the upper right
Point3D p0 = basePoint;
// when the base point is the center point we have to set it up in different way
if(isBasePointCenterPoint)
p0 = basePoint - width / 2 * vectorOver - height / 2 * vectorUp;
Point3D p1 = p0 + vectorUp * 1 * height;
Point3D p2 = p0 + vectorOver * width;
Point3D p3 = p0 + vectorUp * 1 * height + vectorOver * width;
// we are going to create object in 3D now:
// this object will be painted using the (text) brush created before
// the object is rectangle made of two triangles (on each side).
MeshGeometry3D mg_RestangleIn3D = new MeshGeometry3D();
mg_RestangleIn3D.Positions = new Point3DCollection();
mg_RestangleIn3D.Positions.Add(p0); // 0
mg_RestangleIn3D.Positions.Add(p1); // 1
mg_RestangleIn3D.Positions.Add(p2); // 2
mg_RestangleIn3D.Positions.Add(p3); // 3
// when we want to see the text on both sides:
if (isDoubleSided)
{
mg_RestangleIn3D.Positions.Add(p0); // 4
mg_RestangleIn3D.Positions.Add(p1); // 5
mg_RestangleIn3D.Positions.Add(p2); // 6
mg_RestangleIn3D.Positions.Add(p3); // 7
}
mg_RestangleIn3D.TriangleIndices.Add(0);
mg_RestangleIn3D.TriangleIndices.Add(3);
mg_RestangleIn3D.TriangleIndices.Add(1);
mg_RestangleIn3D.TriangleIndices.Add(0);
mg_RestangleIn3D.TriangleIndices.Add(2);
mg_RestangleIn3D.TriangleIndices.Add(3);
// when we want to see the text on both sides:
if (isDoubleSided)
{
mg_RestangleIn3D.TriangleIndices.Add(4);
mg_RestangleIn3D.TriangleIndices.Add(5);
mg_RestangleIn3D.TriangleIndices.Add(7);
mg_RestangleIn3D.TriangleIndices.Add(4);
mg_RestangleIn3D.TriangleIndices.Add(7);
mg_RestangleIn3D.TriangleIndices.Add(6);
} - We are covering the object created in the previous step using the material created at the beginning:
Collapse |Copy
Code// texture coordinates must be set to
// stretch the TextBox brush to cover
// the full side of the 3D label.
mg_RestangleIn3D.TextureCoordinates.Add(new Point(0, 1));
mg_RestangleIn3D.TextureCoordinates.Add(new Point(0, 0));
mg_RestangleIn3D.TextureCoordinates.Add(new Point(1, 1));
mg_RestangleIn3D.TextureCoordinates.Add(new Point(1, 0));
// when the label is double sided:
if (isDoubleSided)
{
mg_RestangleIn3D.TextureCoordinates.Add(new Point(1, 1));
mg_RestangleIn3D.TextureCoordinates.Add(new Point(1, 0));
mg_RestangleIn3D.TextureCoordinates.Add(new Point(0, 1));
mg_RestangleIn3D.TextureCoordinates.Add(new Point(0, 0));
} - Now it is time to create
ModelVisual3Dthat we want to return: Collapse |Copy
CodeModelVisual3D result = new ModelVisual3D();
// we are setting the content:
// our 3D rectangle object covered with material that is made of label
// (TextBox with text)
result.Content = new GeometryModel3D(mg_RestangleIn3D, mataterialWithLabel); ;
return result;
2D Labels
This solution is much more complicated and it is hard to prepare one function that deals with all tasks.
First of all, we have to create two layers:
Viewport3Das the bottom layerCanvasas the top layer
The XAML code below presents a sample of two overlaid layers:
Collapse |CopyCode
<Grid ClipToBounds="True">

<Viewport3D Name="mainViewport" ClipToBounds="True" Grid.Column="0" Grid.Row="0">

<Viewport3D.Camera>

<PerspectiveCamera FarPlaneDistance="100" LookDirection="-11,-10,-9" UpDirection="0,1,0"

    NearPlaneDistance="1" Position="11,10,9" FieldOfView="70" />

</Viewport3D.Camera> <ModelVisual3D> <ModelVisual3D.Content>

<DirectionalLight Color="White" Direction="-2,-3,-1" />

</ModelVisual3D.Content>

</ModelVisual3D>

</Viewport3D> <Canvas Name="mainViewportCanvas" ClipToBounds="True"

	Grid.Column="0" Grid.Row="0">

</Canvas>

</Grid>
The second task is localization of the point from 3D space on our overlaid canvas. To transform the location, we can use the following function:
Collapse |CopyCode
public static Point Get2DPoint(Point3D p3d, Viewport3D vp)

{

    bool TransformationResultOK;

    Viewport3DVisual vp3Dv = VisualTreeHelper.GetParent(

    vp.Children[0]) as Viewport3DVisual;

    Matrix3D m = MathUtils.TryWorldToViewportTransform

			(vp3Dv, out TransformationResultOK);

    if (!TransformationResultOK) return new Point(0, 0);

    Point3D pb = m.Transform(p3d);

    Point p2d = new Point(pb.X, pb.Y);

    return p2d;

}
Note that this function uses function TryWorldToViewportTransform from 3D Tools package (availablehere):
_3DTools.MathUtils.TryWorldToViewportTransform.
The next task is creation and localization of the TextBlock:
Collapse |CopyCode
UIElement IModelVisual3D.GetUIElement

	(ModelVisual3DFilter FilterSettings, Viewport3D DestinationViewport3D)

{

    if (FilterSettings.Texts2D)

    {

        TextBlock tb = new TextBlock();

        tb.Text = Description;

        Point p2d = Panel3DMath.Get2DPoint(this.Point3D, DestinationViewport3D);

        Canvas.SetTop(tb, p2d.Y);

        Canvas.SetLeft(tb, p2d.X);

        return tb;

    }

    else

        return new UIElement();

}
The last thing is adding the TextBlock (created before) to our canvas.
Collapse |CopyCode
this.mainViewportCanvas.Children.Add(element.GetUIElement(filter,mainViewport));
Summary
I hope that my two approaches that could be used during creation of text labels for 3D scenes might be interesting for the reader. The Polish version of this article will be available soon onmy blog.
WPF: Creation of Text Labels for 3D Scene的更多相关文章
- WPF换肤之八:创建3D浏览效果
原文:WPF换肤之八:创建3D浏览效果 上节中,我们展示了WPF中的异步以及界面线程交互的方式,使得应用程序的显示更加的流畅.这节我们主要讲解如何设计一个具有3D浏览效果的天气信息浏览器. 效果显示 ...
- 在WPF中使用PlaneProjection模拟动态3D效果
原文:在WPF中使用PlaneProjection模拟动态3D效果 虽然在WPF中也集成了3D呈现的功能,在简单的3D应用中,有时候并不需要真实光影的3D场景.毕竟使用3D引擎会消耗很多资源,有时候使 ...
- 泡泡一分钟:Project AutoVision - Localization and 3D Scene Perception for an Autonomous Vehicle with a Multi-Camera System
Project AutoVision - Localization and 3D Scene Perception for an Autonomous Vehicle with a Multi-Cam ...
- Chapter 1:Create You First 3D Scene With Three.js
1,各浏览器对WebGL的支持 手机浏览器对WebGL的支持: 书的源码:https://github.com/josdirksen/learning-threejs 第一次用浏览器打开代码可能无法正 ...
- cocos2d-x-3.1 Text Labels(官方正式译文)
介绍 cocos2d支持(true type字体)标签,和纹理地图集标签. LabelTTF 标签的优缺点: 全部 TTF 字体的长处: 随意大小,支持调整字距. 易于使用. 不须要外部编辑器. 创建 ...
- 优化WPF 3D性能
Maximize WPF 3D Performance .NET Framework 4.5 As you use the Windows Presentation Foundation (WPF ...
- Unity3D Keynote
[Unity3D Keynote] 1.场景文件扩展名为.unity. 2.up为Y正方向,down为Y负方向,right为X正方向,left为X负方向,forward为Z正方向,back为z负方向. ...
- WPF中的3D Wireframe
原文:WPF中的3D Wireframe WPF不支持画三维线,但开发人员提供了ScreenSpaceLines3D 类用于实现这个功能.我已经在程序中实现并成功显示3D Wireframe,并能够进 ...
- WPF 3D 知识点大全以及实例
引言 现在物联网概念这么火,如果监控的信息能够实时在手机的客服端中以3D形式展示给我们,那种体验大家可以发挥自己的想象. 那生活中我们还有很多地方用到这些,如上图所示的Kinect 在医疗上的应用,当 ...
随机推荐
- 《PHP 5.5从零開始学(视频教学版)》内容简单介绍、文件夹
<PHP 5.5从零開始学(视频教学版)>当当网购买地址: http://product.dangdang.com/23586810.html <PHP 5.5从零開始学(视频教学版 ...
- 【例题3-6 UVA - 1584】Circular Sequence
[链接] 我是链接,点我呀:) [题意] 在这里输入题意 [题解] 不用真的把每一位都取出来. 用一个后缀的思想. 把原串复制一遍接在后面,然后把每个字符串 都当成一个长度为n的后缀就好了. 比较每个 ...
- php面试题二--解决网站大流量高并发方案(从url到硬盘来解决高并发方案总结)
php面试题二--解决网站大流量高并发方案(从url到硬盘来解决高并发方案总结) 一.总结 从外到内解决网站大流量高并发问题---从提交一个url开始(从用户按下搜索栏回车键开始) url最开始会到d ...
- angular内置指令相关知识
原文地址 https://www.jianshu.com/p/5a5b43a8e91f 大纲 1.angular指令的分类 2.angular指令之——组件 3.angular指令之——属性指令 (n ...
- 二、Reids基础命令--字符串
11.一个字符串类型的KEY同意存储的数据的最大容量是 512MB 12.INCR 使key加1,key不存在时默认是0 . 返回递增后的值. 127.0.0.1:6379> incr num ...
- VS(Visual Studio)自动创建的文件格式
.sln:solution,解决方案文件: .vsxproj:解决方案下的项目文件: .vssettings:环境设置文件, 菜单栏 ⇒ [工具]⇒ [导入和导出设置]⇒ 进行环境设置的导入和导出操作 ...
- JavaMail| JavaMail配置属性
属性名 含义 mail.smtp.user SMTP的缺省用户名. mail.smtp.host 要连接的SMTP服务器. mail.smtp.port 要连接的SMTP服务器的端口号,如果conne ...
- POJ 3252 Round Numbers(数位dp&记忆化搜索)
题目链接:[kuangbin带你飞]专题十五 数位DP E - Round Numbers 题意 给定区间.求转化为二进制后当中0比1多或相等的数字的个数. 思路 将数字转化为二进制进行数位dp,由于 ...
- [React Router v4] Render Catch-All Routes with the Switch Component
There are many cases where we will need a catch-all route in our web applications. This can include ...
- python启动应用程序和终止应用程序
python启动应用程序和终止应用程序 1. 目的 每天上班,工作需要,电脑上需要每天开机启动一些软件,下班时候,需要关掉一些软件.一个一个打开和关闭貌似是很繁琐的,于是乎,这个脚本产生了. 2. 环 ...