ES系列二、CentOS7安装ES head6.3.1
1.Head插件简介
ElasticSearch-head是一个H5编写的ElasticSearch集群操作和管理工具,可以对集群进行傻瓜式操作。
- 显示集群的拓扑,并且能够执行索引和节点级别操作
- 搜索接口能够查询集群中原始json或表格格式的检索数据
- 能够快速访问并显示集群的状态
- 有一个输入窗口,允许任意调用RESTful API。这个接口包含几个选项,可以组合在一起以产生有趣的结果;
- 5.0版本之前可以通过plugin名安装,5.0之后可以独立运行。
2.Head插件安装
2.1安装NodeJS
[root@node1 ~]# yum install -y nodejs2.2安装npm
[root@node1 ~]# npm install -g cnpm --registry=https://registry.npm.taobao.org2.3使用npm安装grunt
[root@node1 ~]# npm install -g grunt

npm WARN deprecated coffee-script@1.10.0: CoffeeScript on NPM has moved to "coffeescript" (no hyphen)

npm WARN gentlyRm not removing /usr/bin/grunt as it wasn't installed by /usr/lib/node_modules/grunt

/usr/bin/grunt -> /usr/lib/node_modules/grunt/bin/grunt

/usr/lib

└── grunt@1.0.1

[root@node1 ~]#
[root@node1 ~]# npm install -g grunt-cli --registry=https://registry.npm.taobao.org --no-proxy
/usr/bin/grunt -> /usr/lib/node_modules/grunt-cli/bin/grunt
/usr/lib
└─┬ grunt-cli@1.2.0
├─┬ findup-sync@0.3.0
│ └─┬ glob@5.0.15
│ ├─┬ inflight@1.0.6
│ │ └── wrappy@1.0.2
│ ├── inherits@2.0.3
│ ├─┬ minimatch@3.0.4
│ │ └─┬ brace-expansion@1.1.8
│ │ ├── balanced-match@1.0.0
│ │ └── concat-map@0.0.1
│ ├── once@1.4.0
│ └── path-is-absolute@1.0.1
├── grunt-known-options@1.1.0
├─┬ nopt@3.0.6
│ └── abbrev@1.1.1
└── resolve@1.1.7
[root@node1 ~]# 2.4版本确认
[es@node1 ~]$ node -v

v6.12.0

[es@node1 ~]$ npm -v

3.10.10

[es@node1 ~]$ grunt -version

grunt-cli v1.2.0

[es@node1 ~]$
3.安装head
3.1下载head插件源码
[es@node1 ~]$ wget https://github.com/mobz/elasticsearch-head/archive/master.zip

--2017-12-18 09:58:08--  https://github.com/mobz/elasticsearch-head/archive/master.zip

Resolving github.com (github.com)... 192.30.255.113, 192.30.255.112

Connecting to github.com (github.com)|192.30.255.113|:443... connected.

HTTP request sent, awaiting response... 302 Found

Location: https://codeload.github.com/mobz/elasticsearch-head/zip/master [following]

--2017-12-18 09:58:09--  https://codeload.github.com/mobz/elasticsearch-head/zip/master

Resolving codeload.github.com (codeload.github.com)... 192.30.255.120, 192.30.255.121

Connecting to codeload.github.com (codeload.github.com)|192.30.255.120|:443... connected.

HTTP request sent, awaiting response... 200 OK

Length: 921421 (900K) [application/zip]

Saving to: ‘master.zip’

100%[===============================================================>] 921,421     9.64KB/s   in 67s

2017-12-18 09:59:18 (13.4 KB/s) - ‘master.zip’ saved [921421/921421]

[es@node1 ~]$ ls

master.zip

[es@node1 ~]$ unzip master.zip
3.2下载依赖
进入elasticsearch-head-master目录,执行下面命令:
[es@node1 elasticsearch-head-master]$ npm install

> phantomjs-prebuilt@2.1.16 install /home/es/elasticsearch-head-master/node_modules/phantomjs-prebuilt

> node install.js

PhantomJS not found on PATH

Download already available at /tmp/phantomjs/phantomjs-2.1.1-linux-x86_64.tar.bz2

Verified checksum of previously downloaded file

Extracting tar contents (via spawned process)

Removing /home/es/elasticsearch-head-master/node_modules/phantomjs-prebuilt/lib/phantom

Copying extracted folder /tmp/phantomjs/phantomjs-2.1.1-linux-x86_64.tar.bz2-extract-1515165531727/phantomjs-2.1.1-linux-x86_64 -> /home/es/elasticsearch-head-master/node_modules/phantomjs-prebuilt/lib/phantom

Writing location.js file

Done. Phantomjs binary available at /home/es/elasticsearch-head-master/node_modules/phantomjs-prebuilt/lib/phantom/bin/phantomjs

elasticsearch-head@0.0.0 /home/es/elasticsearch-head-master

└─┬ grunt-contrib-jasmine@1.0.3

  └─┬ grunt-lib-phantomjs@1.1.0

    └── phantomjs-prebuilt@2.1.16

npm WARN optional SKIPPING OPTIONAL DEPENDENCY: fsevents@^1.0.0 (node_modules/chokidar/node_modules/fsevents):

npm WARN notsup SKIPPING OPTIONAL DEPENDENCY: Unsupported platform for fsevents@1.1.3: wanted {"os":"darwin","arch":"any"} (current: {"os":"linux","arch":"x64"})

npm WARN elasticsearch-head@0.0.0 license should be a valid SPDX license expression

[es@node1 elasticsearch-head-master]$
如果上面命令安装较慢或失败,可以尝试国内镜像安装
[es@node1 elasticsearch-head-master]$ sudo npm install -g cnpm --registry=https://registry.npm.taobao.org

[sudo] password for es:

/usr/bin/cnpm -> /usr/lib/node_modules/cnpm/bin/cnpm

/usr/lib

└─┬ cnpm@5.1.1

  ├─┬ npminstall@3.3.0

  │ ├── binary-mirror-config@1.7.3

  │ ├── moment@2.20.1

  │ └─┬ tar@4.2.0

  │   └── minizlib@1.1.0

  └─┬ urllib@2.25.3

    └─┬ proxy-agent@2.1.0

      └─┬ pac-proxy-agent@2.0.0

        └─┬ socks-proxy-agent@3.0.1

          └─┬ agent-base@4.1.2

            └─┬ es6-promisify@5.0.0

              └── es6-promise@4.2.2

[es@node1 elasticsearch-head-master]$ cnpm install

⠸ [6/10] Installing json-schema-traverse@^0.3.0platform unsupported karma@1.3.0 › chokidar@1.7.0 › fsevents@^1.0.0 Package require os(darwin) not compatible with your platform(linux)

[fsevents@^1.0.0] optional install error: Package require os(darwin) not compatible with your platform(linux)

✔ Installed 10 packages

✔ Linked 313 latest versions

PhantomJS not found on PATH

Download already available at /tmp/phantomjs/phantomjs-2.1.1-linux-x86_64.tar.bz2

Verified checksum of previously downloaded file

Extracting tar contents (via spawned process)

Removing /home/es/elasticsearch-head-master/node_modules/_phantomjs-prebuilt@2.1.16@phantomjs-prebuilt/lib/phantom

Copying extracted folder /tmp/phantomjs/phantomjs-2.1.1-linux-x86_64.tar.bz2-extract-1515223629881/phantomjs-2.1.1-linux-x86_64 -> /home/es/elasticsearch-head-master/node_modules/_phantomjs-prebuilt@2.1.16@phantomjs-prebuilt/lib/phantom

Writing location.js file

Done. Phantomjs binary available at /home/es/elasticsearch-head-master/node_modules/_phantomjs-prebuilt@2.1.16@phantomjs-prebuilt/lib/phantom/bin/phantomjs

✔ Run 1 scripts

deprecate grunt-contrib-connect@1.0.2 › http2@^3.3.4 Use the built-in module in node 9.0.0 or newer, instead

deprecate grunt@1.0.1 › coffee-script@~1.10.0 CoffeeScript on NPM has moved to "coffeescript" (no hyphen)

anti semver karma@1.3.0 › useragent@2.2.1 › tmp@0.0.x delcares tmp@0.0.x(resolved as 0.0.33) but using ancestor(karma)'s dependency tmp@0.0.28(resolved as 0.0.28)

✔ All packages installed (365 packages installed from npm registry, used 17s, speed 497.82kB/s, json 323(581.43kB), tarball 7.64MB)

[es@node1 elasticsearch-head-master]$
4.配置
4.1停止ElasticSearch
如果ElasticSearch已经启动,需要先停止
[es@node1 ~]$ jps

3261 Elasticsearch

3375 Jps

[es@node1 ~]$ kill 3261
4.2配置 ElasticSearch,使得HTTP对外提供服务
[es@node1 elasticsearch-6.1.1]$ vi config/elasticsearch.yml添加如下内容
# 增加新的参数,这样head插件可以访问es。设置参数的时候:后面要有空格

http.cors.enabled: true

http.cors.allow-origin: "*"
4.3 修改Head插件配置文件
[es@node1 elasticsearch-head-master]$ vi Gruntfile.js找到connect:server,添加hostname一项,如下
connect: {

                        server: {

                                options: {

                                        hostname: '0.0.0.0',

                                        port: 9100,

                                        base: '.',

                                        keepalive: true

                                }

                        }

                }
5.启动
5.1启动elasticsearch
首先确认elasticsearch已经启动
[es@node1 elasticsearch-6.1.1]$ bin/elasticsearch -d

[es@node1 elasticsearch-6.1.1]$ jps

3451 Jps

3436 Elasticsearch

[es@node1 elasticsearch-6.1.1]$
5.2启动head
通过命令grunt server启动head
[es@node1 elasticsearch-head-master]$ grunt server

Running "connect:server" (connect) task

Waiting forever...

Started connect web server on http://node1:9100或者通过命令npm run start也可以启动head
[es@node1 elasticsearch-head-master]$ npm run start
> elasticsearch-head@0.0.0 start /home/es/elasticsearch-head-master
> grunt server
Running "connect:server" (connect) task
Waiting forever...
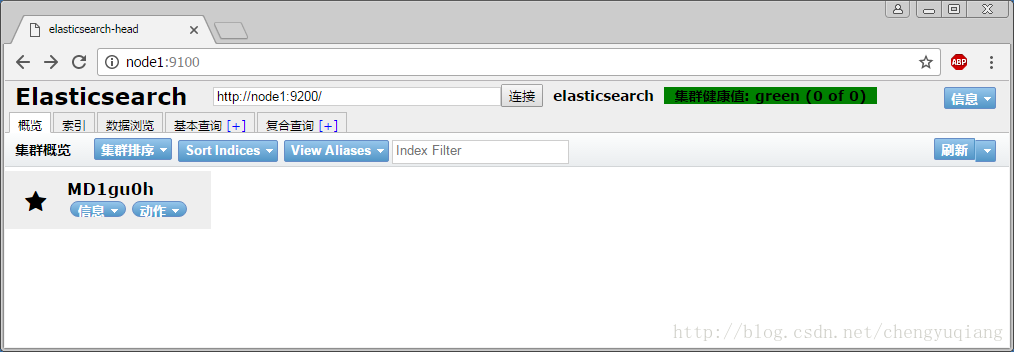
Started connect web server on http://node1:91005.3访问9100端口
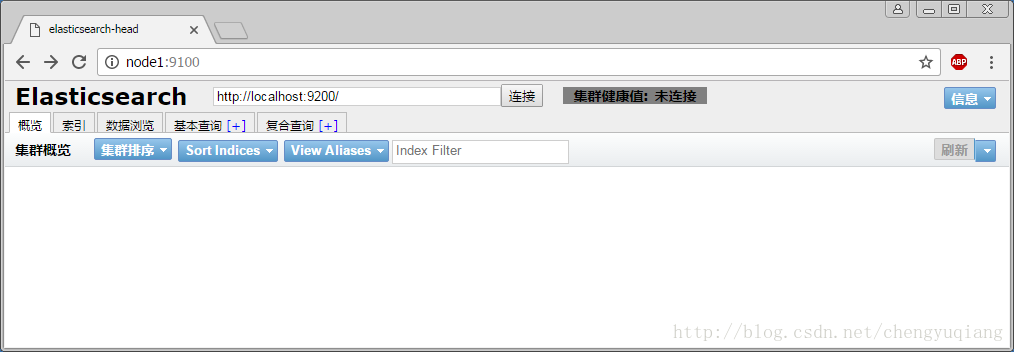
如果出现“未连接”,请修改localhost为node1,然后单击“连接”按钮
6 简单应用
6.1创建索引
[root@node1 ~]# curl -XPUT node1:9200/test

{"acknowledged":true,"shards_acknowledged":true,"index":"test"}[root@node1 ~]#
6.2查看head变化 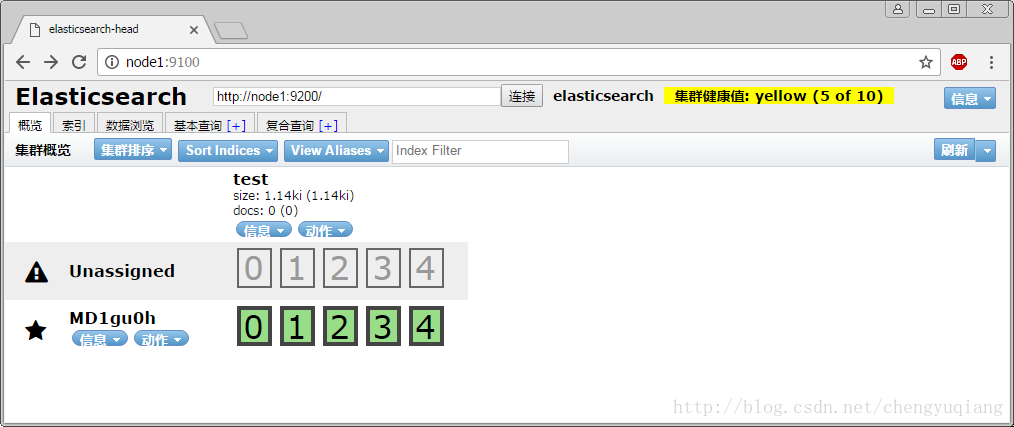
ES系列二、CentOS7安装ES head6.3.1的更多相关文章
- ES系列一、CentOS7安装ES 6.3.1、集成IK分词器
Elasticsearch 6.3.1 地址: wget https://artifacts.elastic.co/downloads/elasticsearch/elasticsearch-6.3. ...
- Centos7安装ES 和 Docker搭建ES
本文版权归博客园和作者吴双本人共同所有 转载和爬虫请注明原文地址 www.cnblogs.com/tdws 一.linux centos7.x安装ES 1.下载java sudo yum instal ...
- ELK搭建<二>:安装ES插件head
1.去github下载head,针对ES版本不同,安装方式也不一样, =>在2.x以前版本可以通过插件安装 for Elasticsearch 2.x: sudo elasticsearch/b ...
- 基于GTK+3 开发远程控制管理软件(C语言实现)系列二 Centos7下开发环境搭建
一.安装gcc gcc-c++ make等编译工具 yum install gcc gcc-c++ kernel-devel 这一步,其实可以不用做,你在安装Centos7的时候,如果选择开发模式安装 ...
- centos7安装es
#安装java1.8rpm -ivh jdk-8u191-linux-x64.rpm #解压estar -zxvf elasticsearch-6.4.0.tar.gz -C /usr #修改es限制 ...
- ES系列(二):基于多播的集群发现实现原理解析
ES作用超强悍的搜索引擎,除了需要具有齐全的功能支持,超高的性能,还必须要有任意扩展的能力.一定程度上,它是一个大数据产品.而要做扩展性,集群自然少不了.然而单独的集群又是不够的,能够做的事情太少,所 ...
- ES系列十五、ES常用Java Client API
一.简介 1.先看ES的架构图 二.ES支持的客户端连接方式 1.REST API http请求,例如,浏览器请求get方法:利用Postman等工具发起REST请求:java 发起httpClien ...
- ES系列十四、ES聚合分析(聚合分析简介、指标聚合、桶聚合)
一.聚合分析简介 1. ES聚合分析是什么? 聚合分析是数据库中重要的功能特性,完成对一个查询的数据集中数据的聚合计算,如:找出某字段(或计算表达式的结果)的最大值.最小值,计算和.平均值等.ES作为 ...
- Docker系列之CentOS7安装Docker(一)
0.前言 整体架构目录:ASP.NET Core分布式项目实战-目录 一.瞎扯淡(只讲有用的) 感兴趣的同学可以上网搜索一下docker具体的介绍.我这边主要介绍偏实战的内容,不喜勿喷,有问题也请指出 ...
随机推荐
- 【转】如何基于linux进程通信设计方案
前言 linux下的进程通信手段基本上是从Unix平台上的进程通信手段继承而来的.而对Unix发展做出重大贡献的两大主力AT&T的贝尔实验室及BSD(加州大学伯克利分校的伯克利软件发布中心)在 ...
- UVALive - 6440(模拟)
题目链接:https://vjudge.net/contest/241341#problem/G 题目大意:输入一个N,n次操作.对于第一种操作增加一个病人,告诉病人的t0,st0,r.第二种操作,在 ...
- POJ1088(记忆搜索加dp)
滑雪 Time Limit: 1000MS Memory Limit: 65536K Total Submissions: 106415 Accepted: 40499 Description ...
- Logstash解析Json array
logstash解析json数组是一种常见的需求,我以网上一组数据为例来描述 我们的数据test.json内容如下:(此处我linux上的json文本需要是compact的) {"type& ...
- android关闭日志
我们在开发时,经常会输出各种日志来debug代码.但是等到应用发布的apk运行时不希望它输出日志. 关闭输出日志Log.v(),Log.i(),Log.w(),Log.v(),Log.e()等 原理: ...
- Python使用TCPServer编写(多线程)Socket服务
SocketServer包对socket包进行了包装(封装),使得创建socket服务非常简单. TCPServer+BaseRequestHandler 使用TCPServer和BaseReques ...
- jquery&bootstrap
学会了用bootstarp和jquery的引用,布局就简单多了,但就是不怎么自由,必须按照固定的来: 引用文件: <script type="text/javascript" ...
- 【bzoj2038】小Z的袜子
莫队算法是一种针对询问进行分块的离线算法,如果已知区间 [ l , r ] 内的答案,并且可以在较快的时间内统计出区间 [ l-1, r ],[ l , r+1 ] 的答案,即可使用莫队算法. 莫队复 ...
- 笔记: c开发gui程序 (WM_CREATE, WS_CLIPCHILDREN , SetWindowPos)
过去两年,用c写的gui程序我一般使用的套路是: 在 winMain()中, 先创建一个主窗口, 紧接着就是在下面创建子窗口(子控件). 可能是因为写这方面的程序较少,所以也没遇到什么大问题,之前就是 ...
- typescript变量声明(学习笔记非干货)
var a=10; function f(){ var message="hello,world"; return message; } function f(){ a=10; r ...