
转: Linux磁盘扩容
How to Increase the size of a Linux LVM by expanding the virtual machine disk
This post will cover how to increase the disk space for a VMware virtual machine running Linux that is using logical volume manager (LVM). Firstly we will be increasing the size of the actual disk on the VMware virtual machine, so at the hardware level – this is the VM’s .vmdk file. Once this is complete we will get into the virtual machine and make the necessary changes through the operating system in order to take advantage of the additional space that has been provided by the hard drive being extended. This will involve creating a new partition with the new space, expanding the volume group and logical group, then finally resizing the file system.
As there are a number of different ways to increase disk space I have also posted some different methods here:
- Use GParted to increase disk size of a Linux native partition – In this article the virtual disk is expanded, however there is no LVM here just a Linux native partition that is expanded with the GParted live CD.
- How to Increase the size of a Linux LVM by adding a new disk – In this article a new virtual disk is added to the virtual machine, a new partition is created, the volume group and logical volume are both expanded and then the filesystem is resized.
- How to Decrease the size of a Linux LVM – In this article the file system is shrunk followed by the LVM, allowing you to reclaim space in the volume group.
Update 18/04/2015: I have created a video guide of this post in CentOS 7 shown below.
Important Note: Be very careful when working with the commands in this article as they have the potential to cause a lot of damage to your data. If you are working with virtual machines make sure you take a snapshot of your virtual machine beforehand, or otherwise have some other form of up to date backup before proceeding. Note that a snapshot must not be taken until after the virtual disk has been increased, otherwise you will not be able to increase it. It could also be worth cloning the virtual machine first and testing out this method on the clone.
Prerequisites: As this method uses the additional space to create a primary partition, you must not already have 4 partitions as you will not be able to create more than 4. If you do not have space for another partition then you will need to consider a different method, there are some others in the above list.
Throughout my examples I will be working with a VMware virtual machine running Debian 6, this was set up with a 20gb disk and we will be increasing it by 10gb for a total final size of 30gb.
Identifying the partition type
As this method focuses on working with LVM, we will first confirm that our partition type is actually Linux LVM by running the below command.
fdisk -l
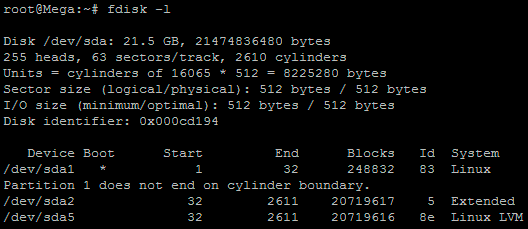
As you can see in the above image /dev/sda5 is listed as “Linux LVM” and it has the ID of 8e. The 8e hex code shows that it is a Linux LVM, while 83 shows a Linux native partition. Now that we have confirmed we are working with an LVM we can continue. For increasing the size of a Linux native partition (hex code 83) see this article.
Below is the disk information showing that our initial setup only has the one 20gb disk currently, which is under the logical volume named /dev/mapper/Mega-root – this is what we will be expanding with the new disk.
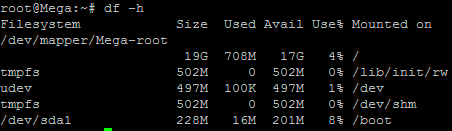
Note that /dev/mapper/Mega-root is the volume made up from /dev/sda5 currently – this is what we will be expanding.
Increasing the virtual hard disk
First off we increase the allocated disk space on the virtual machine
itself. This is done by right clicking the virtual machine in vSphere,
selecting edit settings, and then selecting the hard disk. In the below
image I have changed the previously set hard disk of 20gb to 30gb while
the virtual machine is up and running. Once complete click OK, this is
all that needs to be done in VMware for this process.
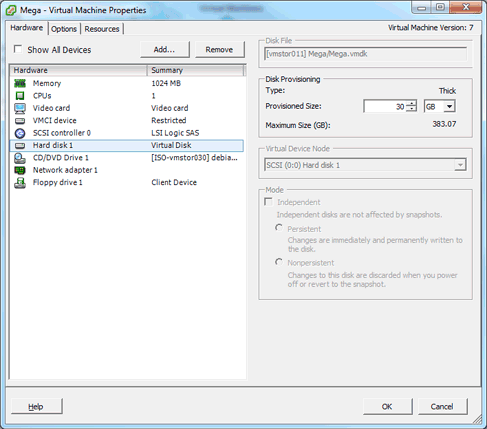
If you are not able to modify the size of the disk, the provisioned
size setting is greyed out. This can happen if the virtual machine has a
snapshot in place, these will need to be removed prior to making the
changes to the disk. Alternatively you may need to shut down the virtual
machine if it does not allow you to add or increase disks on the fly,
if this is the case make the change then power it back on.
Detect the new disk space
Once the physical disk has been increased at the hardware level, we
need to get into the operating system and create a new partition that
makes use of this space to proceed.
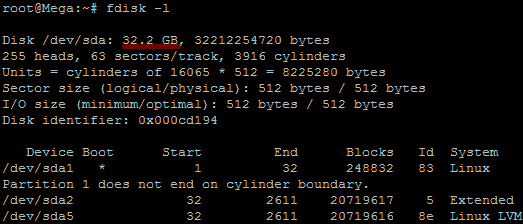
Before we can do this we need to check that the new unallocated disk
space is detected by the server, you can use “fdisk -l” to list the
primary disk. You will most likely see that the disk space is still
showing as the same original size, at this point you can either reboot
the server and it will detect the changes on boot or you can rescan your
devices to avoid rebooting by running the below command. Note you may
need to change host0 depending on your setup.
echo "- - -" > /sys/class/scsi_host/host0/scan
Below is an image after performing this and confirming that the new space is displaying.
Partition the new disk space
As outlined in my previous images the disk in my example that I am working with is /dev/sda, so we use fdisk to create a new primary partition to make use of the new expanded disk space. Note that we do not have 4 primary partitions already in place, making this method possible.
fdisk /dev/sda
We are now using fdisk to create a new partition, the inputs I have entered in are shown below in bold. Note that you can press ‘m’ to get a full listing of the fdisk commands.
‘n’ was selected for adding a new partition.
WARNING: DOS-compatible mode is deprecated. It's strongly recommended to

         switch off the mode (command 'c') and change display units to

         sectors (command 'u').

Command (m for help): n
‘p’ is then selected as we are making a primary partition.
Command action

   l   logical (5 or over)

   p   primary partition (1-4)

p
As I already have /dev/sda1 and /dev/sda2 as shown in previous images, I have gone with using ‘3’ for this new partition which will be created as /dev/sda3
Partition number (1-4): 3
We just press enter twice above as by default the first and last cylinders of the unallocated space should be correct. After this the partition is then ready.
First cylinder (2611-3916, default 2611): "enter"

Using default value 2611

Last cylinder, +cylinders or +size{K,M,G} (2611-3916, default 3916): "enter"

Using default value 3916
‘t’ is selected to change to a partition’s system ID, in this case we change to ‘3’ which is the one we just created.
Command (m for help): t

Partition number (1-5): 3
The hex code ‘8e’ was entered as this is the code for a Linux LVM which is what we want this partition to be, as we will be joining it with the original /dev/sda5 Linux LVM.
Hex code (type L to list codes): 8e

Changed system type of partition 3 to 8e (Linux LVM)
‘w’ is used to write the table to disk and exit, basically all the changes that have been done will be saved and then you will be exited from fdisk.
Command (m for help): w

The partition table has been altered!

Calling ioctl() to re-read partition table.

WARNING: Re-reading the partition table failed with error 16: Device or resource busy.

The kernel still uses the old table. The new table will be used at

the next reboot or after you run partprobe(8) or kpartx(8)

Syncing disks.
You will see a warning which basically means in order to use the new table with the changes a system reboot is required. If you can not see the new partition using “fdisk -l” you may be able to run “partprobe -s” to rescan the partitions. In my test I did not require either of those things at this stage (I do a reboot later on), straight after pressing ‘w’ in fdisk I was able to see the new /dev/sda3 partition of my 10gb of space as displayed in the below image.
For CentOS/RHEL run a “partx -a /dev/sda3” to avoid rebooting later on.
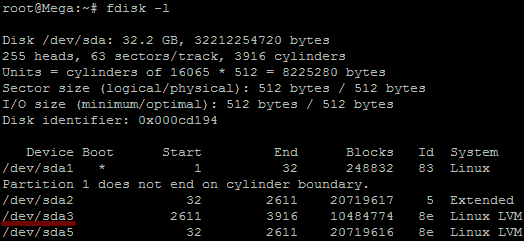
That’s all for partitioning, we now have a new partition which is making use of the previously unallocated disk space from the increase in VMware.
Increasing the logical volume
We use the pvcreate command which creates a physical volume for later use by the logical volume manager (LVM). In this case the physical volume will be our new /dev/sda3 partition.
root@Mega:~# pvcreate /dev/sda3

  Device /dev/sda3 not found (or ignored by filtering).
In order to get around this you can either reboot, or use partprobe/partx as previously mentioned to avoid a reboot, as in this instance the disk does not appear to be there correctly despite showing in “fdisk -l”. After a reboot or partprobe/partx use the same command which will succeed.
root@Mega:~# pvcreate /dev/sda3

  Physical volume "/dev/sda3" successfully created
Next we need to confirm the name of the current volume group using the vgdisplay command. The name will vary depending on your setup, for me it is the name of my test server. vgdisplay provides lots of information on the volume group, I have only shown the name and the current size of it for this example.
root@Mega:~# vgdisplay

  --- Volume group ---

  VG Name               Mega

...

VG Size               19.76 GiB
Now we extend the ‘Mega’ volume group by adding in the physical volume of /dev/sda3 which we created using the pvcreate command earlier.
root@Mega:~# vgextend Mega /dev/sda3

  Volume group "Mega" successfully extended
Using the pvscan command we scan all disks for physical volumes, this should confirm the original /dev/sda5 partition and the newly created physical volume /dev/sda3
root@Mega:~# pvscan

  PV /dev/sda5   VG Mega   lvm2 [19.76 GiB / 0    free]

  PV /dev/sda3   VG Mega   lvm2 [10.00 GiB / 10.00 GiB free]

  Total: 2 [29.75 GiB] / in use: 2 [29.75 GiB] / in no VG: 0 [0   ]
Next we need to increase the logical volume (rather than the physical volume) which basically means we will be taking our original logical volume and extending it over our new partition/physical volume of /dev/sda3.
Firstly confirm the path of the logical volume using lvdisplay. This path name will vary depending on your setup.
root@Mega:~# lvdisplay

  --- Logical volume ---

  LV Path                /dev/Mega/root
The logical volume is then extended using the lvextend command.
root@Mega:~# lvextend /dev/Mega/root /dev/sda3

  Extending logical volume root to 28.90 GiB

  Logical volume root successfully resized
There is then one final step which is to resize the file system so that it can take advantage of this additional space, this is done using the resize2fs command for ext based file systems. Note that this may take some time to complete, it took about 30 seconds for my additional space.
root@Mega:~# resize2fs /dev/Mega/root

resize2fs 1.41.12 (17-May-2010)

Filesystem at /dev/Mega/root is mounted on /; on-line resizing required

old desc_blocks = 2, new_desc_blocks = 2

Performing an on-line resize of /dev/Mega/root to 7576576 (4k) blocks.

The filesystem on /dev/Mega/root is now 7576576 blocks long.
Alternatively if you’re running the XFS file system (default as of RedHat/CentOS 7) you can grow the file system with “xfs_growfs /dev/Mega/root”.
That’s it, now with the ‘df’ command we can see that the total available disk space has been increased.
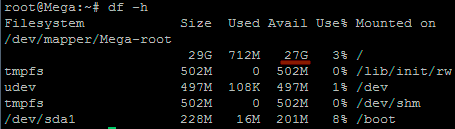
Summary
With this method we have increased the virtual disk drive through VMware, created a new partition out of this newly unallocated space within the guest OS, turned it into a physical volume, extended the volume group, and then finally extended the original logical volume over the newer physical volume resulting in overall disk space being increased successfully.
转: Linux磁盘扩容的更多相关文章
- Linux磁盘扩容
Linux磁盘扩容 fdisk -l # 查看硬盘信息 lvextend -L +1G /dev/mapper/vg00-lvroot 或者 lvextend -l +%FREE /dev/mappe ...
- vmware workstation LINUX磁盘扩容
1.edit virtual machine settings -> 选中硬盘->右侧utilities->expand(虚拟机不能存在镜像),输入要扩容到的大小 2.扩容之后进入系 ...
- linux磁盘扩容常见问题
1.对于云主机可以对硬盘进行在线扩容,如果不方便重启服务器,可以键入以下命令系统能够马上识别新增空间: echo '1' > /sys/class/scsi_disk/0\:0\:0\:0/de ...
- linux磁盘扩容日志
//针对ext4文件格式的操作系统(如CentOS6):// umount /dev/vdb e2fsck -f /dev/vdb resize2fs /dev/vdb mount /dev/vdb ...
- Linux磁盘空间扩容(LVM)
Linux磁盘空间扩容(lvm) 随着系统的运行时间增长,业务数据的增长,原有磁盘的空间会存在空间不足情况,导致系统不能正常运行,或者系统管理员磁盘没有完全划完,根据使用者的需求自行划分.那么怎么才能 ...
- ECS Linux服务器xfs磁盘扩容
ECS Linux服务器xfs磁盘扩 ECS Linux服务器xfs磁盘使用阿里云官方提供的磁盘扩容方法扩容会有报错: [root@iZ28u04wmy2Z ~]# e2fsck /dev/xvdb1 ...
- Linux磁盘分区扩容
随着业务的增长,aliyun数据盘容量可能无法满足数据存储的需要,这时可以使用“”磁盘扩容“”功能扩容数据盘. 本文以一个SSD云盘的数据盘和一个运行Ubuntu 16..4 64位的 ECS 实例为 ...
- LINUX 11G RAC ASM磁盘组在线增加磁盘扩容
LINUX 11G RAC ASM磁盘组在线增加磁盘扩容 1.操作系统版本 OEL 6.1 [root@cqltjcpt1 ~]# more /etc/redhat-release Red Hat E ...
- Vmware Linux虚拟机磁盘扩容方法
我的LINUX版本是ubuntu12.04 32bit.今天在下载android源代码的时候发现自己最初给这个虚拟机分配的磁盘空间不足了(只有20G).所以就需要给磁盘扩容.网上大致搜索了一下,主要有 ...
随机推荐
- Bridge模式——对象结构型模式
今天看了Bridge模式,对其进行简单的总结,并给出几篇通俗易懂的文章链接. (一)意图--将抽象部分和它的实现部分分离,使它们都可以独立地变化. 适用于从多维度描述的类型,拆解开来,使其能沿着各维度 ...
- 【原】iOS学习之XML与JSON两种数据结构比较和各自底层实现
1.XML与JSON两种数据结构的优缺点 1> XML 优点: 格式统一, 符合标准 容易与其他系统进行远程交互, 数据共享比较方便 缺点: XML文件格式文件庞大, 格式复杂, 传输占 ...
- linux 安装eclipse 和cdt
这个东西说起来简单,但是经历了无数次到失败,终于还是安装完成了. 最早到时候我下载了eclipse和cdt让后安装,安装完成以后,无法运行和编译程序 后来我学到了一个牛逼的命令yum 这个命令会帮助我 ...
- curl/wget 测试http请求的响应头信息
1. wget –debug wget可以使用debug信息来查看信息头,如下: [root@localhost ~]# wget --debug http://192.168.1.101:8080/ ...
- 基于单决策树的AdaBoost
①起源:Boosting算法 Boosting算法的目的是每次基于全部数据集,通过使用同一种分类器不同的抽取参数方法(如决策树,每次都可以抽取不同的特征维度来剖分数据集) 训练一些不同弱分类器(单次分 ...
- Codeforces Round #228 (Div. 2) B. Fox and Cross
#include <iostream> #include <string> #include <vector> #include <algorithm> ...
- CODEVS 1817 灾后重建 Label:Floyd || 最短瓶颈路
描述 灾后重建(rebuild) B地区在地震过后,所有村庄都造成了一定的损毁,而这场地震却没对公路造成什么影响.但是在村庄重建好之前,所有与未重建完成的村庄的公路均无法通车.换句话说,只有连接着两 ...
- jQueryUI日期显示
<script type="text/javascript" src="js/My97DatePicker/WdatePicker.js">< ...
- 【BZOJ2038】【2009国家集训队】小Z的袜子(hose) 分块+莫队
Description 作为一个生活散漫的人,小Z每天早上都要耗费很久从一堆五颜六色的袜子中找出一双来穿.终于有一天,小Z再也无法忍受这恼人的找袜子过程,于是他决定听天由命……具体来说,小Z把这N只袜 ...
- C语言与水仙花数
C语言与水仙花数 水仙花数:前提三位数,"个位数的立方"加上"十位数的立方"加上"百位数的立方"恰好等于这个数. 我们来用C语言书写水仙花数 ...