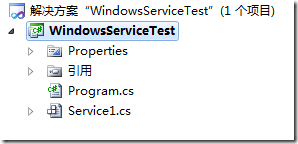
C# Windows Service 基础
Windows Service这一块并不复杂,但是注意事项太多了,网上资料也很凌乱,偶尔自己写也会丢三落四的。所以本文也就产生了,本文不会写复杂的东西,完全以基础应用的需求来写,所以不会对Windows Service写很深入。
本文介绍了如何用C#创建、安装、启动、监控、卸载简单的Windows Service 的内容步骤和注意事项。
一、创建一个Windows Service
1)创建Windows Service项目

2)对Service重命名
将Service1重命名为你服务名称,这里我们命名为ServiceTest。
二、创建服务安装程序
1)添加安装程序


之后我们可以看到上图,自动为我们创建了ProjectInstaller.cs以及2个安装的组件。
2)修改安装服务名
右键serviceInsraller1,选择属性,将ServiceName的值改为ServiceTest。

3)修改安装权限
右键serviceProcessInsraller1,选择属性,将Account的值改为LocalSystem。

三、写入服务代码
1)打开ServiceTest代码
右键ServiceTest,选择查看代码。
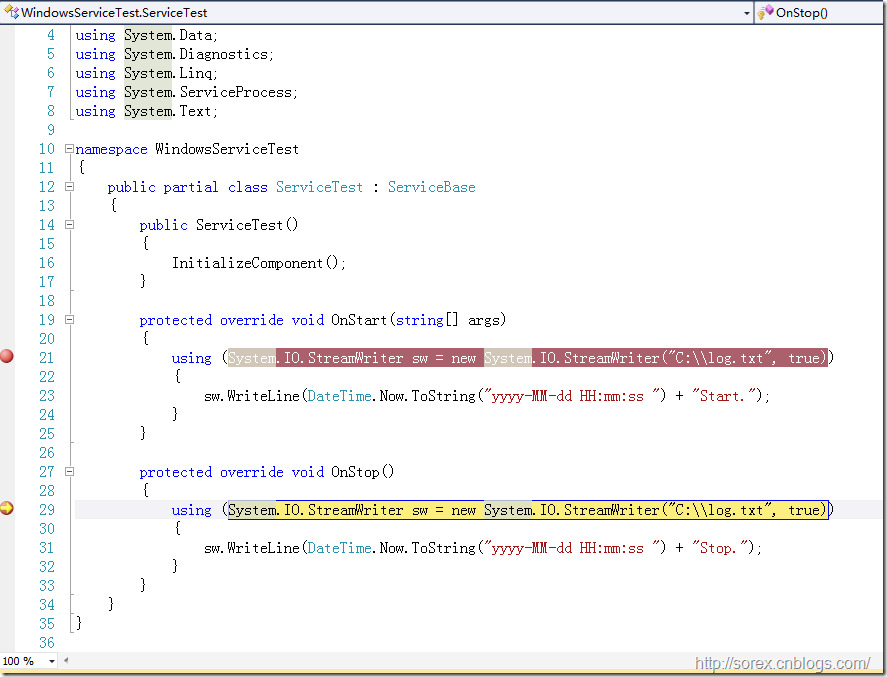
2)写入Service逻辑
添加如下代码:
using System;

using System.Collections.Generic;

using System.ComponentModel;

using System.Data;

using System.Diagnostics;

using System.Linq;

using System.ServiceProcess;

using System.Text;

namespace WindowsServiceTest

{

    public partial class ServiceTest : ServiceBase

    {

        public ServiceTest()

        {

            InitializeComponent();

        }

        protected override void OnStart(string[] args)

        {

            using (System.IO.StreamWriter sw = new System.IO.StreamWriter("C:\\log.txt", true))

            {

                sw.WriteLine(DateTime.Now.ToString("yyyy-MM-dd HH:mm:ss ") + "Start.");

            }

        }

        protected override void OnStop()

        {

            using (System.IO.StreamWriter sw = new System.IO.StreamWriter("C:\\log.txt", true))

            {

                sw.WriteLine(DateTime.Now.ToString("yyyy-MM-dd HH:mm:ss ") + "Stop.");

            }

        }

    }

}
这里我们的逻辑很简单,启动服务的时候写个日志,关闭的时候再写个日志。
四、创建安装脚本
在项目中添加2个文件如下(必须是ANSI或者UTF-8无BOM格式):
1)安装脚本Install.bat
 %SystemRoot%\Microsoft.NET\Framework\v4.0.30319\installutil.exe WindowsServiceTest.exe

 Net Start ServiceTest

 sc config ServiceTest start= auto
2)卸载脚本Uninstall.bat
%SystemRoot%\Microsoft.NET\Framework\v4.0.30319\installutil.exe /u WindowsServiceTest.exe
3)安装脚本说明
第二行为启动服务。
第三行为设置服务为自动运行。
这2行视服务形式自行选择。
4)脚本调试
如果需要查看脚本运行状况,在脚本最后一行加入pause
五、在C#中对服务进行控制
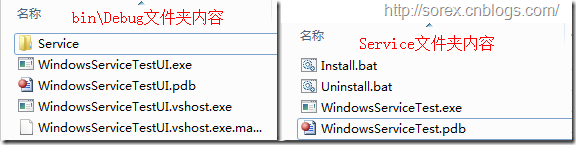
0)配置目录结构
简历一个新WPF项目,叫WindowsServiceTestUI,添加对System.ServiceProcess的引用。
在WindowsServiceTestUI的bin\Debug目录下建立Service目录。
将WindowsServiceTest的生成目录设置为上面创建的Service目录。
生成后目录结构如下图
1)安装
安装时会产生目录问题,所以安装代码如下:
 string CurrentDirectory = System.Environment.CurrentDirectory;

 System.Environment.CurrentDirectory = CurrentDirectory + "\\Service";

 Process process = new Process();

 process.StartInfo.UseShellExecute = false;

 process.StartInfo.FileName = "Install.bat";

 process.StartInfo.CreateNoWindow = true;

 process.Start();

 System.Environment.CurrentDirectory = CurrentDirectory;
2)卸载
卸载时也会产生目录问题,所以卸载代码如下:
string CurrentDirectory = System.Environment.CurrentDirectory;

System.Environment.CurrentDirectory = CurrentDirectory + "\\Service";

Process process = new Process();

process.StartInfo.UseShellExecute = false;

process.StartInfo.FileName = "Uninstall.bat";

process.StartInfo.CreateNoWindow = true;

process.Start();

System.Environment.CurrentDirectory = CurrentDirectory;
3)启动
代码如下:
using System.ServiceProcess;

ServiceController serviceController = new ServiceController("ServiceTest");

serviceController.Start();
4)停止
 ServiceController serviceController = new ServiceController("ServiceTest");

 if (serviceController.CanStop)

     serviceController.Stop();
5)暂停/继续
 ServiceController serviceController = new ServiceController("ServiceTest");

 if (serviceController.CanPauseAndContinue)

 {

     if (serviceController.Status == ServiceControllerStatus.Running)

         serviceController.Pause();

     else if (serviceController.Status == ServiceControllerStatus.Paused)

         serviceController.Continue();

 }
6)检查状态
 ServiceController serviceController = new ServiceController("ServiceTest");

 string Status = serviceController.Status.ToString();
六、调试Windows Service
1)安装并运行服务
2)附加进程
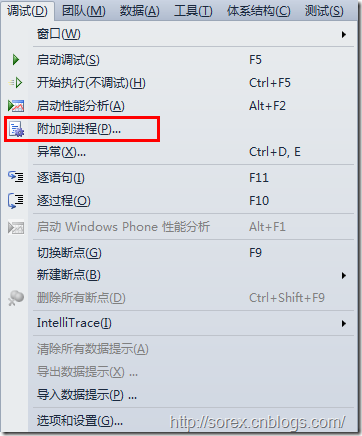
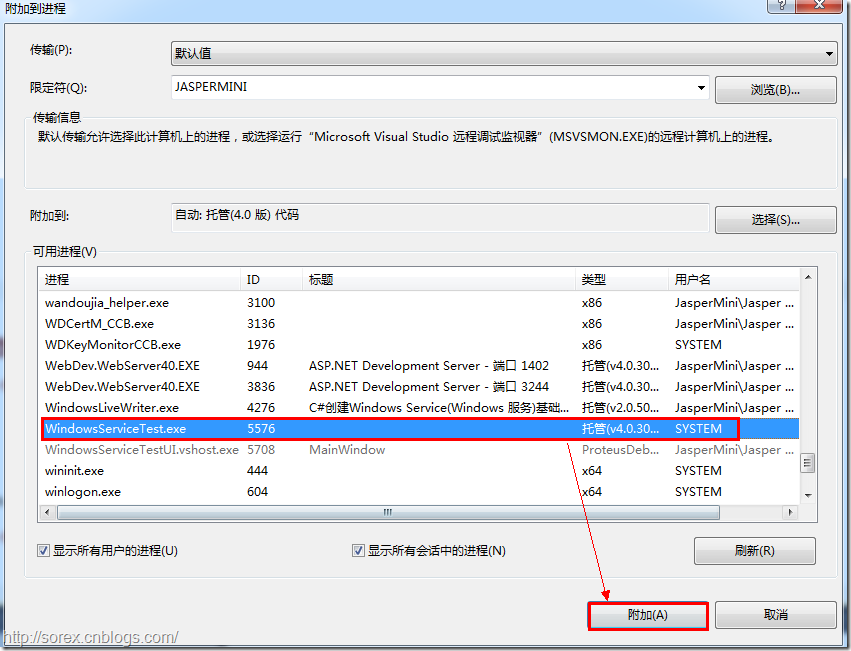
3)在代码中加入断点进行调试
七、总结
本文对Windows service的上述配置都未做详细解释,但是按上述步骤就可以制作可运行的Windows Service,从而达到了工作的需求。
C# Windows Service 基础的更多相关文章
- C#创建Windows Service(Windows 服务)基础教程
Windows Service这一块并不复杂,但是注意事项太多了,网上资料也很凌乱,偶尔自己写也会丢三落四的.所以本文也就产生了,本文不会写复杂的东西,完全以基础应用的需求来写,所以不会对Window ...
- Windows批处理以服务的方式启动解决思路(ShadowsockR注册成Windows Service)
我以ShadowsockR的server启动来解释: 由于这东西是python,如果要启动,可以写一个批处理(python.exe server.py)来启动,但是我观察发现启动的时候是附带pytho ...
- C# Windows Service服务的创建和调试
前言 关于Windows服务创建和调试的文章在网络上的很多文章里面都有,直接拿过来贴在这里也不过仅仅是个记录,不会让人加深印象.所以本着能够更深刻了解服务项目的创建和调试过程及方法的目的,有了这篇记录 ...
- C# Windows Service调用IBM Lotus Notes发送邮件
近日研究了下IBM Lotus Mail,这货果然是麻烦,由于公司策略,没有开放smtp,很多系统邮件都没有办法发送,于是入手google学习Lotus Mail,想做成Windows服务,提供wcf ...
- C#中级-Windows Service程序安装注意事项
一.前言 这周除了改写一些识别算法外,继续我的Socket服务编写.服务器端的Socket服务是以Windows Service的形式运行的. 在我完成Windows Service编写后,启动服务时 ...
- windows service创建使用整合
C#创建Windows Service(Windows 服务)基础教程 C#winform windows服务程序创建与安装 C#实现WinForm随WINDOWS服务一起启动
- C# 通过 Quartz .NET 实现Timer Job并将其注册成为Windows Service
之前的一篇文章讲述了如何通过 Quartz .NET 实现 Timer Job (http://www.cnblogs.com/mingmingruyuedlut/p/8037263.html) 在此 ...
- C#创建一个Windows Service
Windows Service这一块并不复杂,但是注意事项太多了,网上资料也很凌乱,偶尔自己写也会丢三落四的.所以本文也就产生了,本文不会写复杂的东西,完全以基础应用的需求来写,所以不会对Window ...
- 震惊!Windows Service服务和定时任务框架quartz之间原来是这种关系……
过场CG: 接到公司领导的文件指示,“小熊”需要在6月底去海外执行一个行动代号为[定时任务]的营救计划,这个计划关系到公司某个项目的生死(数据安全漏洞),作战部拟定两个作战方案: 方案一:使用务定 ...
随机推荐
- python实现以application/json格式为请求体的http post请求
接口传递数据格式类型为json格式,如下图抓包查看 Python实现脚本请求接口并以中文打印接口返回的数据 import json import requests url = "https: ...
- django中邮件、日志的配置
邮件的发送及配置 # 配置邮件 EMAIL_USE_SSL = True EMAIL_HOST = 'smtp.qq.com' # 如果是 163 改成 smtp.163.com EMAIL_PORT ...
- 在flask中使用websocket-实时消息推送
- flask默认使用wsgi支持http协议,如需使用websocket需要安装gevent-websocket模块,http,websocket协议都可以支持 Django应用:channel T ...
- 6、什么是TypeScript、TypeScript的安装、转换为.js文件
1.什么是TypeScript (本人用自己的理解梳理了一下,不代表官方意见) TypeScript:Type+ECMAScript6 TypeScript是一种预处理编程语言,遵循es6标准规范,在 ...
- Go used as value问题
练习Go变参时遇到一个报错:used as value 代码如下: // 错误代码 func myfunc(arg ...int) { for _, n := range arg { fmt.Prin ...
- Saiku免登录嵌入其他系统使用(十一)
Saiku免登录嵌入其他系统使用 Saiku可通过iframe嵌入其他系统使用,但是正常情况下都需要先登录系统,然后还需要登录saiku,最后才能访问saiku中的数据 下面来讲解一下如何使Saiku ...
- MegaCli 简易使用介绍
查看帮助 MegaCli64 -h 适配卡配置 查看RAID控制器的数量 MegaCli64 -adpCount 查看所有raid卡详细信息 MegaCli64 -AdpAllInfo -aALL 查 ...
- python-基础数据类型,集合及深浅copy
一 数据类型定义及分类 我们人类可以很容易的分清数字与字符的区别,但是计算机并不能呀,计算机虽然很强大,但从某种角度上看又很傻,除非你明确的告诉它,1是数字,“汉”是文字,否则它是分不清1和‘汉’的区 ...
- spring boot 添加客户端负载均衡
1.pom.xml文件中,添加依赖包 <dependency> <groupId>org.springframework.cloud</groupId> <a ...
- Redis常用命令与高级应用
附: 127.0.0.1:6379> set xiaofei 小飞 OK 127.0.0.1:6379> get xiaofei "\xe5\xb0\x8f\xe9\xa3\x9 ...