Windows 配置nginx服务器 运行php项目
1下载
http://nginx.org/en/download.html
选择稳定版下载。
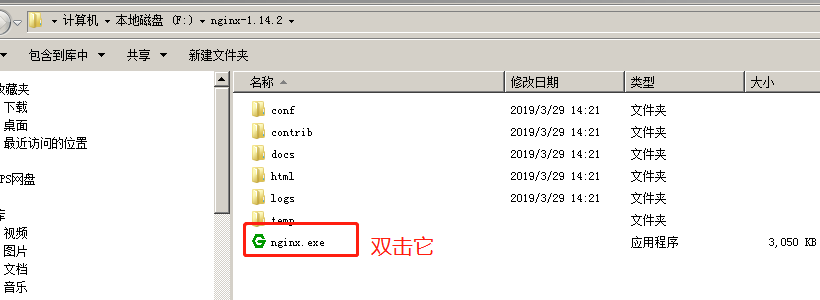
2 解压后 直接双击nginx.exe
双击后一个黑色的弹窗一闪而过
3 修改配置文件nginx.conf
3.1 修改你的站点名称 我这边还是localhost
3.2

   location / {

            #root   html;

            root    E:/ts.p2ps.cn;

            index  index.html index.htm index.php;

            try_files $uri $uri/ /index.php?$query_string;

            if (!-e $request_filename){

                rewrite ^/(.*) /index.php last;

            }

        }
3.3
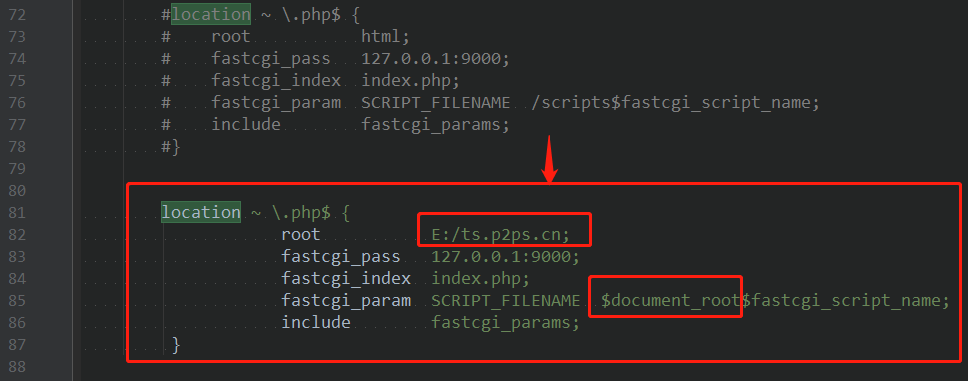
location ~ \.php$ {

                    root           E:/ts.p2ps.cn;

                    fastcgi_pass   127.0.0.1:9000;

                    fastcgi_index  index.php;

                    fastcgi_param  SCRIPT_FILENAME  $document_root$fastcgi_script_name;

                    include        fastcgi_params;

         }
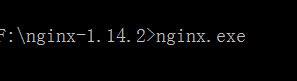
4 启动nginx
在cmd窗口下切换目录 输入命令: nginx.exe
5 修改php.ini配置
修改E:\PHP\php5.5\php5.5.12\ext下的php.ini-development文件,将文件名修改为php.ini,打开php配置文件php.ini:
搜索“extension_dir”,找到: ;extension_dir = “ext” 先去前面的分号再改为 extension_dir = “E:\PHP\php5.5\php5.5.12\ext”
搜索“date.timezone”,找到:;date.timezone = 先去前面的分号再改为 date.timezone = Asia/Shanghai
搜索“enable_dl”,找到:enable_dl = Off 改为 enable_dl = On
搜索“cgi.force_redirect” ;cgi.force_redirect = 1 先去前面的分号再改为 cgi.force_redirect = 0
搜索“fastcgi.impersonate”,找到: ;fastcgi.impersonate = 1 去掉前面的分号
搜索“cgi.rfc2616_headers”,找到:;cgi.rfc2616_headers = 0 先去前面的分号再改为 cgi.rfc2616_headers = 1
搜索“php_mysql”,找到:”extension=php_mysql.dll和extension=php_mysqli.dll 去掉前面的“;”extension=php_mysql.dll和extension=php_mysqli.dll (支持MYSQL数据库)
6 运行php
F:\xmapp\php>php-cgi.exe -b 127.0.0.1:9000 -c php.ini

7 打开浏览器 输入localhost 运行成功
8 停止nginx服务器
nginx -s stop

如果使用cmd命令窗口启动nginx,关闭cmd窗口是不能结束nginx进程的,可使用两种方法关闭nginx
(1)输入nginx命令 nginx -s stop(快速停止nginx) 或 nginx -s quit(完整有序的停止nginx)
(2)使用taskkill taskkill /f /t /im nginx.exe
10 制作批处理命令快速启动与关闭
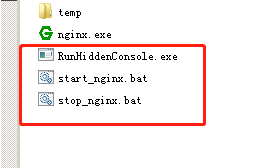
下载软件RunHiddenConsole.exe:
http://redmine.lighttpd.net/attachments/660/RunHiddenConsole.zip
start_nginx.bat
@echo off

REM set PHP_FCGI_CHILDREN=5

set PHP_FCGI_MAX_REQUESTS=1000

echo Starting PHP FastCGI...

F:\nginx-1.14.2\RunHiddenConsole "F:\xmapp\php\php-cgi.exe" -b 127.0.0.1:9000 -c "F:\xmapp\php\php.ini"

echo Starting nginx...

F:\nginx-1.14.2\RunHiddenConsole "F:/nginx-1.14.2/nginx.exe" -p "F:/nginx-1.14.2/"
stop_nginx.bat
@echo off

echo Stopping nginx...

taskkill /F /IM nginx.exe > nul

echo Stopping PHP FastCGI...

taskkill /F /IM php-cgi.exe > nul

exit
就可以双击运行控制启动与停止了。
11 参考资料
https://blog.csdn.net/weixin_41782253/article/details/82706617
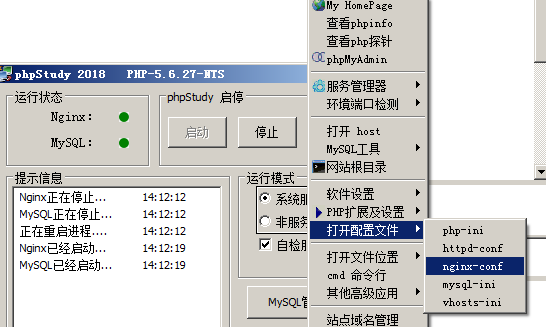
12 直接用phpstudy
#user  nobody;

worker_processes  1;

#error_log  logs/error.log;

#error_log  logs/error.log  notice;

#error_log  logs/error.log  info;

#pid        logs/nginx.pid;

events {

    worker_connections  1024;

}

http {

    include       mime.types;

    default_type  application/octet-stream;

    #log_format  main  '$remote_addr - $remote_user [$time_local] "$request" '

    #                  '$status $body_bytes_sent "$http_referer" '

    #                  '"$http_user_agent" "$http_x_forwarded_for"';

    #access_log  logs/access.log  main;

    sendfile        on;

    #tcp_nopush     on;

    #keepalive_timeout  0;

    keepalive_timeout  65;

    #gzip  on;

server {

        listen          80;

        server_name     localhost;

        root            E:/ts.p2ps.cn;

        #access_log  /tmp/testing.p2ps.cn.log;

        #error_log   /tmp/testing.p2ps.cn.log;

        #"upstream sent too big header" issue

        #nginx 错误

        # FirePHP 等造成头部过大的错误

        fastcgi_buffers  16 16k;

        fastcgi_buffer_size  32k;

        # 设置expires和max-age的时间

        location ~* "^.+\.(jpe?g|gif|css|png|js|ico|pdf|zip|tar|t?gz|mp3|wav|swf)$" {

            expires         30d;

            log_not_found   off;

        }

        #location / {

        #    try_files $uri $uri/ /index.php?$args;

        #}

        #将request指向index.php

        location / {

            index  index.php index.html index.htm;

            if (-f $request_filename) {

                break;

            }

           if (-d $request_filename) {

                break;

            }

           rewrite ^(.+)$ /index.php last;

        }

        #主程序目录不能被访问

        #location  /www/{

        #    deny    all;

        #}

 	location /src/ {

            fastcgi_pass 127.0.0.1:9000;

            fastcgi_index index.php;

            fastcgi_connect_timeout 300;

            fastcgi_send_timeout 300;

            fastcgi_read_timeout 300;

            #fastcgi_param SCRIPT_FILENAME $document_root$fastcgi_script_name;

            fastcgi_param SCRIPT_FILENAME $document_root/src/index.php;

            include fastcgi_params;

            #client_max_body_size  50m;

        }

        #引用PHP CGI

        location ~ .*\.(php|php5)?$ {

            fastcgi_pass   127.0.0.1:9000;

            fastcgi_param  SCRIPT_FILENAME $document_root$fastcgi_script_name;

            fastcgi_read_timeout 600;

            include fastcgi_params;

        }

    }

    # another virtual host using mix of IP-, name-, and port-based configuration

    #

    #server {

    #    listen       8000;

    #    listen       somename:8080;

    #    server_name  somename  alias  another.alias;

    #    location / {

    #        root   html;

    #        index  index.html index.htm;

    #    }

    #}

    # HTTPS server

    #

    #server {

    #    listen       443 ssl;

    #    server_name  localhost;

    #    ssl_certificate      cert.pem;

    #    ssl_certificate_key  cert.key;

    #    ssl_session_cache    shared:SSL:1m;

    #    ssl_session_timeout  5m;

    #    ssl_ciphers  HIGH:!aNULL:!MD5;

    #    ssl_prefer_server_ciphers  on;

    #    location / {

    #        root   html;

    #        index  index.html index.htm;

    #    }

    #}

}
Windows 配置nginx服务器 运行php项目的更多相关文章
- windows配置nginx实现负载均衡集群
windows配置nginx实现负载均衡集群2014-08-20 09:44:40 来源:www.abcde.cn 评论:0 点击:617 网上大部分关于nginx负载均衡集群的教程都是lin ...
- windows配置nginx实现负载均衡集群 -请求分流
windows配置nginx实现负载均衡集群 一.windows上安装nginx 1.下载nginx的windows版本http://nginx.org/en/download.html 2.把压缩文 ...
- Windows Server - SVN 服务器搭建与项目配置、客户端安装与配置
本教程以Windows Server 2012 R12 为例搭建SVN服务器,安装部署完成后,客户端可通过SVN客户端访问SVN服务器上的项目,也可以访问网上其他SVN服务器上的项目. 一.首先准备三 ...
- mac 安装nginx,并配置nginx的运行环境
1. 安装nginx // 查询有没有nginx brew search nginx //开始安装nignx brew install nginx 2. 检查nignx是否安装成功 nginx -V ...
- Linux服务器安装配置Nginx服务器
Nginx("engine x")是一款是由俄罗斯的程序设计师Igor Sysoev所开发高性能的 Web和 反向代理 服务器,也是一个 IMAP/POP3/SMTP 代理服务 ...
- 基于Windows 配置 nginx 集群 & 反向代理
1.下载 nginx 下载页面 : http://nginx.org/en/download.html 具体文件: http://nginx.org/download/nginx-1.7.0.zip ...
- Linux安装配置Nginx服务器
如有需要可以加我Q群[308742428]大家一起讨论技术,有偿服务. 后面会不定时为大家更新文章,敬请期待. 喜欢的朋友可以关注下. 前言 今天搭建nginx服务器,来访问静态资源文件. Nginx ...
- ubuntu14.04安装与配置nginx服务器
去年曾经配置过nginx服务器,可惜的是,几个月前因故障磁盘被格式化.今天又要用到nginx服务,所以从新配置了一番,但这次就不是那么顺利了.在此,愿与大家分享一下经验.只是简单的局域网应用,并未复杂 ...
- eclipse中配置Tomcat服务器以及新建项目
eclipse配置Tomcat服务器 http://jingyan.baidu.com/article/ca2d939dd90183eb6d31ce79.html eclipse中配置Tomcat服务 ...
随机推荐
- 【转】使用Mybatis时遇到的延迟加载造成返回异常的问题——HttpMessageConversionException: Type definition error
在使用Mybatis的过程中,使用了resultMap延迟加载. 延迟加载:association联表查询的过程中,查询另外两个表的对象.而延迟加载是指只有在使用这两个对象的时候才会进行查询. 问题的 ...
- XXS level6
(1输入框输入与第五关 相同的payload 查看页面源代码,发现“href"变成了”hr_ef“ (2)查看PHP源代码 <?php ini_set("display_er ...
- js封装选项卡
<div class="forestcamp_box"> <img src="img/home_02.jpg" /> <div c ...
- Netty权威指南(笔记一)
转载:http://blog.csdn.net/clarkkentyang/article/details/52529785 第一章(略) 第二章 NIO入门 2.1传统的BIO编程(同步阻塞I/O服 ...
- (拼接SQL语句)mysql中date类型,datetime类型
: , . _ - / % & # @ ! * | [ ] { } ; + = update ky set date = '18,9-2' where id = 1 // 2 ...
- 虚拟机环境配置(Docker)
安装虚拟机完毕后 在linux虚拟机上安装docker 使用远程工具连接虚拟机,查看ip地址 ip addr Docker常用命令&操作 1).镜像操作 | 操作 | 命令 | 说明 | | ...
- JDK 8 安装及配置
1.配置java环境变量 注意:jdk文件夹名字取名不要用汉语取名. 1)鼠标右键点击我的电脑(计算机)选择属性栏 2)再点击左边高级系统设置 3)点击环境变量 4)在用户变量窗口新建变量名为JAVA ...
- docker之 网络模式和跨主机通信
Docker的四种网络模式Bridge模式 当Docker进程启动时,会在主机上创建一个名为docker0... Docker的四种网络模式 Bridge模式 当Docker进程启动时,会在主机上创建 ...
- 十八、springcloud(四)熔断器
1.熔断器(Hystrix) a.断路器机制 断路器很好理解, 当Hystrix Command请求后端服务失败数量超过一定比例(默认50%), 断路器会切换到开路状态(Open). 这时所有请求会直 ...
- Android jni中回调java的方法
在上一篇的基础上,添加在C++代码中回调java方法. 代码如下: Demo.java 中添加callback函数, 打印一条log. package com.example.scarecrow.dy ...