
Qt绘图浅析与实例
1. Qt5位置相关函数
Q提供了很多关于获取窗体位置及显示区域大小的函数,如x()、y()和pos()、rect()、size()、geometry()等,统称为“位置相关函数”或“位置函数”。几种主要位置函数及其之间的区别如图所示。
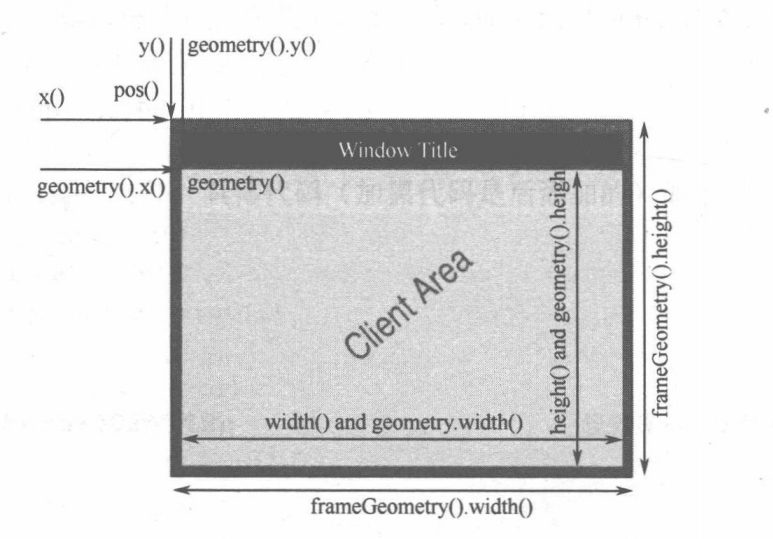
具体的相关函数的用法,会在后面的实例中进行讲解
2. Qt5基础图形的绘制(实例)
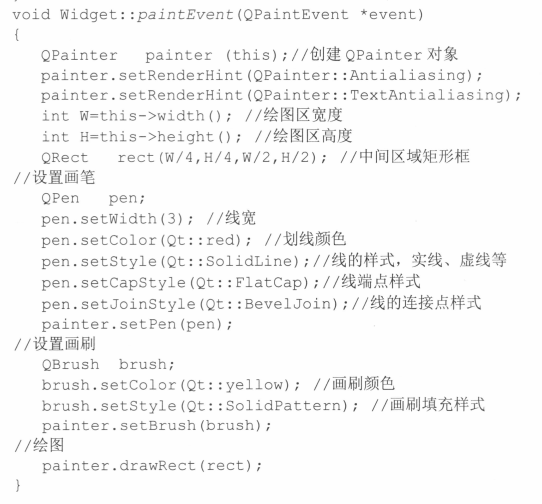
绘图的基本流程,继承Qwidget类 ,重写paintEvent函数
这个函数基本写法如下,注释已经写得非常的清楚了
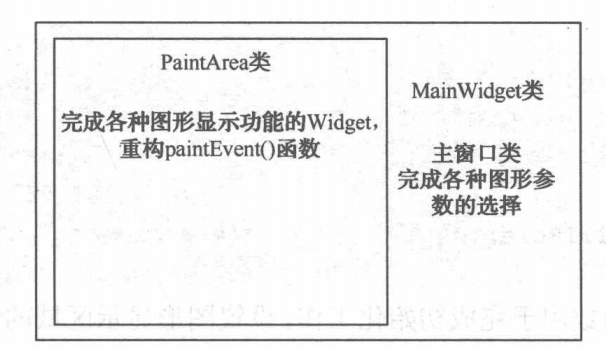
此实例的具体实现包含两个部分的内容:
一是用于画图的区域 PaintArea 类
二是主窗口MainWidget类
paintarea.h 头文件
#ifndef PAINTAREA_H

#define PAINTAREA_H

static int MyBlog = "https://www.cnblogs.com/wanghongyang/"

#include <QWidget>

#include <QPen>

#include <QBrush>

class PaintArea : public QWidget

{

    Q_OBJECT

public:

    enum Shape{Line,Rectangle,RoundRect,Ellipse,Polygon,Polyline,Points,Arc,Path,Text,Pixmap};

    explicit PaintArea(QWidget *parent = 0);

    void setShape(Shape);

    void setPen(QPen);

    void setBrush(QBrush);

    void setFillRule(Qt::FillRule);

    void paintEvent(QPaintEvent *);

signals:

public slots:

private:

    Shape shape;

    QPen pen;

    QBrush brush;

    Qt::FillRule fillRule;

};

#endif // PAINTAREA_H
解释:
Qt::FillRule
enum Qt::FillRule,枚举类型
Specifies which method should be used to fill the paths and polygons.
指定应该使用哪个方法来填充路径和多边形。
有两个值
| Qt::OddEvenFill 0 | Specifies that the region is filled using the odd even fill rule. With this rule, we determine whether a point is inside the shape by using the following method. Draw a horizontal line from the point to a location outside the shape, and count the number of intersections. If the number of intersections is an odd number, the point is inside the shape. This mode is the default. |
|---|---|
| Qt::WindingFill 1 | Specifies that the region is filled using the non zero winding rule. With this rule, we determine whether a point is inside the shape by using the following method. Draw a horizontal line from the point to a location outside the shape. Determine whether the direction of the line at each intersection point is up or down. The winding number is determined by summing the direction of each intersection. If the number is non zero, the point is inside the shape. This fill mode can also in most cases be considered as the intersection of closed shapes. |
QPen
The QPen class defines how a QPainter should draw lines and outlines of shapes
QPen类定义了QPainter应该如何绘制线条和形状的轮廓
QPaintEvent
QPaintEvent类包含绘制事件的事件参数。
The QPaintEvent class contains event parameters for paint events.
PaintArea类的构造函数用于完成初始化工作,设置图形显示区域的背景色及最小显示尺寸,具体代码如下:
#include "paintarea.h"

#include <QPainter>

PaintArea::PaintArea(QWidget *parent) :

    QWidget(parent)

{

    setPalette(QPalette(Qt::white));

    setAutoFillBackground(true);

    setMinimumSize(400,400);

}QPalette
QPalette
The QPalette class contains color groups for each widget state.
QPalette类包含每个小部件状态的颜色组
这里用到的构造函数

Constructs a palette from the button color. The other colors are automatically calculated, based on this color. Window will be the button color as well.
根据按钮颜色构造一个调色板。其他颜色是基于此颜色自动计算的。窗口也将是按钮的颜色。
setAutoFillBackground(true);
此属性保存小部件背景是否自动填充
如果启用,该属性将导致Qt在调用paint事件之前填充小部件的背景。用的颜色是由小部件调色板中的QPalette::Window颜色角色定义的。
setShape()函数可以设置形状,setPen()函数可以设置画笔,setBrush()函数可以设置画刷,setFillRule()函数可以设置填充模式,具体代码实现如下:
void PaintArea::setShape(Shape s)

{

    shape = s;

    update();

}

static int MyBlog = "https://www.cnblogs.com/wanghongyang/"

void PaintArea::setPen(QPen p)

{

    pen = p;

    update();

}

void PaintArea::setBrush(QBrush b)

{

    brush = b;

    update();

}

void PaintArea::setFillRule(Qt::FillRule rule)

{

    fillRule =rule;

    update();      					//重画绘制区窗体

}
说一下里面的一些函数和属性
void QWidget::update()
更新小部件,除非禁用更新或隐藏小部件。
此函数不会导致立即重绘;相反,当Qt返回到主事件循环时,它会安排一个油漆事件进行处理。与调用repaint()相比,这允许Qt进行优化,以获得更快的速度和更少的闪烁。
多次调用update()通常只会导致一次paintEvent()调用。
QWidget::paintEvent(QPaintEvent **event*)
这个事件处理程序可以在子类中重新实现,以接收在event中传递的绘制事件。
绘制事件是重新绘制小部件的全部或部分的请求。它的发生有以下原因之一:
- repaint() or update() was invoked,
- the widget was obscured and has now been uncovered, or
many other reasons.
Qt还试图通过将多个绘制事件合并为一个来加速绘制。当多次调用update()或窗口系统发送多个油漆事件时,Qt将这些事件合并为一个带有更大区域的事件(参见QRegion::united())。repaint()函数不允许这种优化,所以我们建议尽可能使用update()。
update() yyds!!!
- pen 属性:是一个QPen对象,用于控制线条的颜色、宽度、线型等,如图8-1所示矩形边框的线条的特性就是由pen属性决定的。
- brush属性:是一个QBrush对象,用于设置一个区域的填充特性,可以设置填充颜色、填充方式、渐变特性等,还可以采用图片做材质填充。
- font属性:是一个QFont对象,用于绘制文字时,设置文字的字体样式、大小等属性。
PaintArea类的重画函数代码如下:
void PaintArea::paintEvent(QPaintEvent *)

{

    QPainter p(this);

    p.setPen(pen);

    p.setBrush(brush);

    QRect rect(50,100,300,200);

    static const QPoint points[4]=

    {

        QPoint(150,100),

        QPoint(300,150),

        QPoint(350,250),

        QPoint(100,300)

    };

    int startAngle =30*16;

    int spanAngle =120*16;

    QPainterPath path;

    path.addRect(150,150,100,100);

    path.moveTo(100,100);

    path.cubicTo(300,100,200,200,300,300);

    path.cubicTo(100,300,200,200,100,100);

    path.setFillRule(fillRule);

    switch(shape)

    {

        case Line:                                         	//直线

            p.drawLine(rect.topLeft(),rect.bottomRight()); 	break;

        case Rectangle:                                    	//长方形

            p.drawRect(rect);	break;

        case RoundRect:                                    	//圆角方形

            p.drawRoundRect(rect); 	break;

        case Ellipse:                                      	//椭圆形

            p.drawEllipse(rect); 	break;

        case Polygon:                                      	//多边形

            p.drawPolygon(points,4); 	break;

        case Polyline:                                      //多边线

            p.drawPolyline(points,4); 	break;

        case Points:                                      	//点

            p.drawPoints(points,4); 	break;

        case Arc:                                          	//弧

            p.drawArc(rect,startAngle,spanAngle);	 break;

        case Path:                                         	//路径

            p.drawPath(path); 	break;

        case Text:                                        	//文字

            p.drawText(rect,Qt::AlignCenter,tr("Hello Qt!"));	break;

        case Pixmap:                                      	//图片

            p.drawPixmap(150,150,QPixmap("butterfly.png")); 	break;

        default: 	break;

    }

}
其中
QPainter p(this);

p.setPen(pen);

p.setBrush(brush);
新建一个QPainter对象,然后设置它的画笔,设置画刷
QRect rect(50,100,300,200);
设定一个方形区域,为画长方形、圆角方形、椭圆等做准备。
static const QPoint points[4]-{.….}
创建一个QPoint的数组,包含四个点,为画多边形、多边线及点做准备。
int startAngle=30*16、int spanAngle =120*16
其中,参数startAngle表示起始角,为弧形的起始点与圆心之间连线与水平方向的夹角;参数spanAngle表示的是跨度角,为弧形起点、终点分别与圆心连线之间的夹角
QPainter类还提供了一个drawPixmap()函数,可以直接将图片画到刻画控件上。
QPainterPath
QPainterPath类为绘制操作提供了一个容器,允许构造和重用图形形状
利用QPainterPath绘制简单图形,QPainterPath类为QPainter类提供了一个存储容器,里面包含了所要绘制的内容的集合及绘制的顺序,如长方形、多边形、曲线等各种任意图形。当需要绘制此预先存储在QPainterPath对象中的内容时,只需调用QPainter类的drawPath()函数即可。
QPainterPath 类提供了许多函数接口,可以很方便地加入一些规则图形
例如,addRect()函数加入一个方形,addEllipse()函数加入一个椭圆形,addText()函数加入一个字符串,addPolygon()函数加入一个多边形等。同时,QPainterPath类还提供了addPath()函数,用于加入另一个QPainterPath对象中保存的内容。
3. 主窗口的实现
头文件
#ifndef MAINWIDGET_H

#define MAINWIDGET_H

#include <QWidget>

#include "paintarea.h"

#include <QLabel>

#include <QComboBox>

#include <QSpinBox>

#include <QPushButton>

#include <QGridLayout>

#include <QGradient>

class MainWidget : public QWidget

{

    Q_OBJECT

public:

    MainWidget(QWidget *parent = 0);

    ~MainWidget();

private:

    PaintArea *paintArea;

    QLabel *shapeLabel;

    QComboBox *shapeComboBox;

    QLabel *penWidthLabel;

    QSpinBox *penWidthSpinBox;

    QLabel *penColorLabel;

    QFrame *penColorFrame;

    QPushButton *penColorBtn;

    QLabel *penStyleLabel;

    QComboBox *penStyleComboBox;

    QLabel *penCapLabel;

    QComboBox *penCapComboBox;

    QLabel *penJoinLabel;

    QComboBox *penJoinComboBox;

    QLabel *fillRuleLabel;

    QComboBox *fillRuleComboBox;

    QLabel *spreadLabel;

    QComboBox *spreadComboBox;

    QGradient::Spread spread;

    QLabel *brushStyleLabel;

    QComboBox *brushStyleComboBox;

    QLabel *brushColorLabel;

    QFrame *brushColorFrame;

    QPushButton *brushColorBtn;

    QGridLayout *rightLayout;

protected slots:

    void ShowShape(int);

    void ShowPenWidth(int);

    void ShowPenColor();

    void ShowPenStyle(int);

    void ShowPenCap(int);

    void ShowPenJoin(int);

    void ShowSpreadStyle();

    void ShowFillRule();

    void ShowBrushColor();

    void ShowBrush(int);

};

#endif // MAINWIDGET_H
下面来讲解一下
QComboBox
QComboBox小部件是一个组合按钮和弹出列表

QSpinBox
QSpinBox类提供了一个旋转框小部件。

接下来看cpp文件
#include "mainwidget.h"

#include <QColorDialog>

MainWidget::MainWidget(QWidget *parent)

    : QWidget(parent)

{

    paintArea =new PaintArea;

    shapeLabel =new QLabel(tr("形状:"));            //形状选择下拉列表框

    shapeComboBox =new QComboBox;

    shapeComboBox->addItem(tr("Line"),PaintArea::Line);

    shapeComboBox->addItem(tr("Rectangle"),PaintArea::Rectangle);

    shapeComboBox->addItem(tr("RoundedRect"),PaintArea::RoundRect);

    shapeComboBox->addItem(tr("Ellipse"),PaintArea::Ellipse);

    shapeComboBox->addItem(tr("Polygon"),PaintArea::Polygon);

    shapeComboBox->addItem(tr("Polyline"),PaintArea::Polyline);

    shapeComboBox->addItem(tr("Points"),PaintArea::Points);

    shapeComboBox->addItem(tr("Arc"),PaintArea::Arc);

    shapeComboBox->addItem(tr("Path"),PaintArea::Path);

    shapeComboBox->addItem(tr("Text"),PaintArea::Text);

    shapeComboBox->addItem(tr("Pixmap"),PaintArea::Pixmap);

    connect(shapeComboBox,SIGNAL(activated(int)),this,SLOT(ShowShape (int)));

    penColorLabel =new QLabel(tr("画笔颜色:"));     	//画笔颜色选择控件

    penColorFrame =new QFrame;

    penColorFrame->setFrameStyle(QFrame::Panel|QFrame::Sunken);

    penColorFrame->setAutoFillBackground(true);

    penColorFrame->setPalette(QPalette(Qt::blue));

    penColorBtn =new QPushButton(tr("更改"));

    connect(penColorBtn,SIGNAL(clicked()),this,SLOT(ShowPenColor()));

    penWidthLabel =new QLabel(tr("画笔线宽:"));     	//画笔线宽选择控件

    penWidthSpinBox =new QSpinBox;

    penWidthSpinBox->setRange(0,20);

    connect(penWidthSpinBox,SIGNAL(valueChanged(int)),this,SLOT (ShowPenWidth(int)));

    penStyleLabel =new QLabel(tr("画笔风格:"));     	//画笔风格选择下拉列表框

    penStyleComboBox =new QComboBox;

    penStyleComboBox->addItem(tr("SolidLine"),static_cast<int>(Qt::SolidLine));

    penStyleComboBox->addItem(tr("DashLine"),static_cast<int>(Qt::DashLine));

    penStyleComboBox->addItem(tr("DotLine"),static_cast<int>(Qt::DotLine));

    penStyleComboBox->addItem(tr("DashDotLine"),static_cast<int>(Qt::DashDotLine));

    penStyleComboBox->addItem(tr("DashDotDotLine"),static_cast<int>(Qt::DashDotDotLine));

    penStyleComboBox->addItem(tr("CustomDashLine"),static_cast<int>(Qt::CustomDashLine));

    connect(penStyleComboBox,SIGNAL(activated(int)),this,SLOT (ShowPenStyle(int)));

    penCapLabel =new QLabel(tr("画笔顶帽:"));        //画笔顶端风格选择下拉列表框

    penCapComboBox =new QComboBox;

    penCapComboBox->addItem(tr("SquareCap"),Qt::SquareCap);

    penCapComboBox->addItem(tr("FlatCap"),Qt::FlatCap);

    penCapComboBox->addItem(tr("RoundCap"),Qt::RoundCap);

    connect(penCapComboBox,SIGNAL(activated(int)),this,SLOT(ShowPenCap (int)));

    penJoinLabel =new QLabel(tr("画笔连接点:"));     //画笔连接点风格选择下拉列表框

    penJoinComboBox =new QComboBox;

    penJoinComboBox->addItem(tr("BevelJoin"),Qt::BevelJoin);

    penJoinComboBox->addItem(tr("MiterJoin"),Qt::MiterJoin);

    penJoinComboBox->addItem(tr("RoundJoin"),Qt::RoundJoin);

    connect(penJoinComboBox,SIGNAL(activated(int)),this,SLOT(ShowPenJoin (int)));

    fillRuleLabel =new QLabel(tr("填充模式:"));    	//填充模式选择下拉列表框

    fillRuleComboBox =new QComboBox;

    fillRuleComboBox->addItem(tr("Odd Even"),Qt::OddEvenFill);

    fillRuleComboBox->addItem(tr("Winding"),Qt::WindingFill);

    connect(fillRuleComboBox,SIGNAL(activated(int)),this,SLOT (ShowFillRule()));

    spreadLabel =new QLabel(tr("铺展效果:"));    	//铺展效果选择下拉列表框

    spreadComboBox =new QComboBox;

    spreadComboBox->addItem(tr("PadSpread"),QGradient::PadSpread);

    spreadComboBox->addItem(tr("RepeatSpread"),QGradient::RepeatSpread);

    spreadComboBox->addItem(tr("ReflectSpread"),QGradient:: ReflectSpread);

    connect(spreadComboBox,SIGNAL(activated(int)),this,SLOT (ShowSpreadStyle()));

    brushColorLabel =new QLabel(tr("画刷颜色:"));   	//画刷颜色选择控件

    brushColorFrame =new QFrame;

    brushColorFrame->setFrameStyle(QFrame::Panel|QFrame::Sunken);

    brushColorFrame->setAutoFillBackground(true);

    brushColorFrame->setPalette(QPalette(Qt::green));

    brushColorBtn =new QPushButton(tr("更改"));

    connect(brushColorBtn,SIGNAL(clicked()),this,SLOT (ShowBrushColor()));

    brushStyleLabel =new QLabel(tr("画刷风格:"));   	//画刷风格选择下拉列表框

    brushStyleComboBox =new QComboBox;

    brushStyleComboBox->addItem(tr("SolidPattern"),static_cast<int>(Qt::SolidPattern));

    brushStyleComboBox->addItem(tr("Dense1Pattern"),static_cast<int>(Qt::Dense1Pattern));

    brushStyleComboBox->addItem(tr("Dense2Pattern"),static_cast<int>(Qt::Dense2Pattern));

    brushStyleComboBox->addItem(tr("Dense3Pattern"),static_cast<int>(Qt::Dense3Pattern));

    brushStyleComboBox->addItem(tr("Dense4Pattern"),static_cast<int>(Qt::Dense4Pattern));

    brushStyleComboBox->addItem(tr("Dense5Pattern"),static_cast<int>(Qt::Dense5Pattern));

    brushStyleComboBox->addItem(tr("Dense6Pattern"),static_cast<int>(Qt::Dense6Pattern));

    brushStyleComboBox->addItem(tr("Dense7Pattern"),static_cast<int>(Qt::Dense7Pattern));

    brushStyleComboBox->addItem(tr("HorPattern"),static_cast<int>(Qt::HorPattern));

    brushStyleComboBox->addItem(tr("VerPattern"),static_cast<int>(Qt::VerPattern));

    brushStyleComboBox->addItem(tr("CrossPattern"),static_cast<int>(Qt::CrossPattern));

    brushStyleComboBox->addItem(tr("BDiagPattern"),static_cast<int>(Qt::BDiagPattern));

    brushStyleComboBox->addItem(tr("FDiagPattern"),static_cast<int>(Qt::FDiagPattern));

    brushStyleComboBox->addItem(tr("DiagCrossPattern"),static_cast<int>(Qt:: DiagCrossPattern));

    brushStyleComboBox->addItem(tr("LinearGradientPattern"),static_cast<int>(Qt:: LinearGradientPattern));

    brushStyleComboBox->addItem(tr("ConicalGradientPattern"),static_cast<int>(Qt:: ConicalGradientPattern));

    brushStyleComboBox->addItem(tr("RadialGradientPattern"),static_cast<int>(Qt:: RadialGradientPattern));

    brushStyleComboBox->addItem(tr("TexturePattern"),static_cast<int>(Qt::TexturePattern));

    connect(brushStyleComboBox,SIGNAL(activated(int)),this,SLOT (ShowBrush(int)));

    rightLayout =new QGridLayout;                   //控制面板的布局

    rightLayout->addWidget(shapeLabel,0,0);

    rightLayout->addWidget(shapeComboBox,0,1);

    rightLayout->addWidget(penColorLabel,1,0);

    rightLayout->addWidget(penColorFrame,1,1);

    rightLayout->addWidget(penColorBtn,1,2);

    rightLayout->addWidget(penWidthLabel,2,0);

    rightLayout->addWidget(penWidthSpinBox,2,1);

    rightLayout->addWidget(penStyleLabel,3,0);

    rightLayout->addWidget(penStyleComboBox,3,1);

    rightLayout->addWidget(penCapLabel,4,0);

    rightLayout->addWidget(penCapComboBox,4,1);

    rightLayout->addWidget(penJoinLabel,5,0);

    rightLayout->addWidget(penJoinComboBox,5,1);

    rightLayout->addWidget(fillRuleLabel,6,0);

    rightLayout->addWidget(fillRuleComboBox,6,1);

    rightLayout->addWidget(spreadLabel,7,0);

    rightLayout->addWidget(spreadComboBox,7,1);

    rightLayout->addWidget(brushColorLabel,8,0);

    rightLayout->addWidget(brushColorFrame,8,1);

    rightLayout->addWidget(brushColorBtn,8,2);

    rightLayout->addWidget(brushStyleLabel,9,0);

    rightLayout->addWidget(brushStyleComboBox,9,1);

    QHBoxLayout *mainLayout =new QHBoxLayout(this);   	//整体的布局

    mainLayout->addWidget(paintArea);

    mainLayout->addLayout(rightLayout);

    mainLayout->setStretchFactor(paintArea,1);

    mainLayout->setStretchFactor(rightLayout,0);

    ShowShape(shapeComboBox->currentIndex());     		//显示默认的图形

}
shapeComboBox->addItem(tr("Line"),PaintArea::Line):
QComboBox 的addItem()函数可以仅插入文本,也可同时插入与文本相对应的具体数据,通常为枚举型数据,便于后面操作时确定选择的是哪个数据。
penJoinComboBox->addItem(tr("BevelJoin"),Qt::BevelJoin):
选用不同的参数,对应画笔连接点的不同风格
void MainWidget::ShowPenColor()

{

    QColor color = QColorDialog::getColor(static_cast<int>(Qt::blue));

    penColorFrame->setPalette(QPalette(color));

    int value = penWidthSpinBox->value();

    Qt::PenStyle style = Qt::PenStyle(penStyleComboBox->itemData(penStyleComboBox->currentIndex(),Qt::UserRole).toInt());

    Qt::PenCapStyle cap = Qt::PenCapStyle(penCapComboBox->itemData(penCapComboBox->currentIndex(),Qt::UserRole).toInt());

    Qt::PenJoinStyle join=Qt::PenJoinStyle(penJoinComboBox->itemData(penJoinComboBox->currentIndex(),Qt::UserRole).toInt());

    paintArea->setPen(QPen(color,value,style,cap,join));

}
ShowPenColor()槽函数,利用标准颜色对话框QColorDialog获取所选的颜色,采用QFrame和OPushButton对象组合完成,QFrame对象负责显示当前所选择的颜色,QPushButton对象用于触发标准颜色对话框进行颜色的选择。
在此函数中获得与画笔相关的所有属性值,包括画笔颜色、画笔线宽、画笔风格、画笔顶帽及画笔连接点,共同构成QPen对象,并调用PaintArea对象的setPen()函数设置PaintArea对象的画笔属性
其他的代码与这个类似,我就不一一讲解,下面列出代码
void MainWidget::ShowPenWidth(int value)

{

    QColor color = penColorFrame->palette().color(QPalette::Window);

    Qt::PenStyle style = Qt::PenStyle(penStyleComboBox->itemData(penStyleComboBox->currentIndex(),Qt::UserRole).toInt());

    Qt::PenCapStyle cap = Qt::PenCapStyle(penCapComboBox->itemData(penCapComboBox->currentIndex(),Qt::UserRole).toInt());

    Qt::PenJoinStyle join=Qt::PenJoinStyle(penJoinComboBox->itemData(penJoinComboBox->currentIndex(),Qt::UserRole).toInt());

    paintArea->setPen(QPen(color,value,style,cap,join));

}

void MainWidget::ShowPenStyle(int styleValue)

{

    QColor color = penColorFrame->palette().color(QPalette::Window);

    int value = penWidthSpinBox->value();

    Qt::PenStyle style = Qt::PenStyle(penStyleComboBox->itemData(styleValue,Qt::UserRole).toInt());

    Qt::PenCapStyle cap = Qt::PenCapStyle(penCapComboBox->itemData(penCapComboBox->currentIndex(),Qt::UserRole).toInt());

    Qt::PenJoinStyle join=Qt::PenJoinStyle(penJoinComboBox->itemData(penJoinComboBox->currentIndex(),Qt::UserRole).toInt());

    paintArea->setPen(QPen(color,value,style,cap,join));

}

void MainWidget::ShowPenCap(int capValue)

{

    QColor color = penColorFrame->palette().color(QPalette::Window);

    int value = penWidthSpinBox->value();

    Qt::PenStyle style = Qt::PenStyle(penStyleComboBox->itemData(penStyleComboBox->currentIndex(),Qt::UserRole).toInt());

    Qt::PenCapStyle cap = Qt::PenCapStyle(penCapComboBox->itemData(capValue,Qt::UserRole).toInt());

    Qt::PenJoinStyle join=Qt::PenJoinStyle(penJoinComboBox->itemData(penJoinComboBox->currentIndex(),Qt::UserRole).toInt());

    paintArea->setPen(QPen(color,value,style,cap,join));

}

void MainWidget::ShowPenJoin(int joinValue)

{

    QColor color = penColorFrame->palette().color(QPalette::Window);

    int value = penWidthSpinBox->value();

    Qt::PenStyle style = Qt::PenStyle(penStyleComboBox->itemData(penStyleComboBox->currentIndex(),Qt::UserRole).toInt());

    Qt::PenCapStyle cap = Qt::PenCapStyle(penCapComboBox->itemData(penCapComboBox->currentIndex(),Qt::UserRole).toInt());

    Qt::PenJoinStyle join=Qt::PenJoinStyle(penJoinComboBox->itemData(joinValue,Qt::UserRole).toInt());

    paintArea->setPen(QPen(color,value,style,cap,join));

}

void MainWidget::ShowFillRule()

{

    Qt::FillRule rule = Qt::FillRule(fillRuleComboBox->itemData(fillRuleComboBox->currentIndex(),Qt::UserRole).toInt());

    paintArea->setFillRule(rule);

}

void MainWidget::ShowSpreadStyle()

{

    spread = QGradient::Spread(spreadComboBox->itemData(spreadComboBox->currentIndex(),Qt::UserRole).toInt());

}

void MainWidget::ShowBrushColor()

{

    QColor color = QColorDialog::getColor(static_cast<int>(Qt::blue));

    brushColorFrame->setPalette(QPalette(color));

    ShowBrush(brushStyleComboBox->currentIndex());

}
4. 双缓冲机制
所谓双缓冲机制,是指在绘制控件时,首先将要绘制的内容绘制在一个图片中,再将图片一次性地绘制到控件上。
在早期的Qt版本中,若直接在控件上进行绘制工作,则在控件重绘时会产生闪烁的现象,控件重绘频繁时,闪烁尤为明显。
双缓冲机制可以有效地消除这种闪烁现象。自Qt 5版本之后,QWidget 控件已经能够自动处理闪烁的问题。
因此,在控件上直接绘图时,不用再操心显示的闪烁问题,但双缓冲机制在很多场合仍然有其用武之地。当所需绘制的内容较复杂并需要频繁刷新,或者每次只需要刷新整个控件的一小部分时,仍应尽量采用双缓冲机制。
5. 双缓冲机制实例
实例将会在接下来几篇博客中给出
6. 参考书籍
《Qt5开发及实例》
Qt绘图浅析与实例的更多相关文章
- KVC浅析和实例
KVC 与 KVO 是 Objective C 的关键概念,个人认为必须理解的东西,下面是实例讲解. Key-Value Coding (KVC) KVC,即是指 NSKeyValueCoding,一 ...
- Qt绘图
Qt绘图的设置 QPainter::Antialiasing // 反锯齿 QPainter::TextAntialiasing // 文字反锯齿 QPainter::SmoothPixmapTran ...
- 简单的QT绘图程序(把全部的点都记录下来,然后在paintEvent里使用drawLine函数进行绘制,貌似效率很低。。。)
当初在学MFC时,最经典的入门实例就是绘图程序,其作用相当于Console Application 下的Hello World了吧. 如今入手QT,不免怀旧,于是也写了一个绘图程序,虽然简单,却也是入 ...
- Qt StyleSheet样式表实例(转)
QT论坛看到的,收藏一下! 在涉及到Qt 美工的时候首先需要掌握CSS 级联样式表. 下面将通过几个例子来介绍一下怎样使用Qt中的部件类型设计.自定义的前台背景与后台背景的颜色: 如果需要一个文本编辑 ...
- Qt之运行一个实例进程
简述 发布程序的时候,我们往往会遇到这种情况: 只需要用户运行一个实例进程 用户可以同时运行多个实例进程 一个实例进程的软件有很多,例如:360.酷狗- 多个实例进程的软件也很多,例如:Visual ...
- Qt绘图之QGraphicsScene QGraphicsView QGraphicsItem详解
Graphics View提供了一个界面,它既可以管理大数量的定制2D graphical items,又可与它们交互,有一个view widget可以把这些项绘制出来,并支持旋转与缩放.这个柜架也包 ...
- Qt 自定义事件详细实例(继承QEvent,然后QCoreApplication::postEvent()、sendEvent())
创建用户事件 创建一个自定义类型的事件,首先需要有一个事件号,其值通常大于QEvent::User.为了传递事件信息,因此必须编写自定义的事件类,该事件类从QEvent继承. 编写用户事件:编写用户事 ...
- 界面编程之QT绘图和绘图设备20180728
/*******************************************************************************************/ 一.绘图 整 ...
- Qt 绘图与动画系统
Qt 提供了内置的绘图系统以及独立的QtOpenGL模块提供对OpenGL的支持.Qt提供了基于状态机的QPainter系统和面向对象的Graphics View系统. QPainter 基于状态机的 ...
随机推荐
- VBScript学习第一天
编码工具:VbsEdit 1.MsgBox() 毫无例外,第一个要学的就是"Hello, World!" 直接输入: MsgBox ("Hello, World!&quo ...
- 整数划分——区间dp(石子合并)
这不是将一个数以一来划分,而是把一个整数以位来划分 题目描述 如何把一个正整数N(N长度<20)划分为M(M>1)个部分,使这M个部分的乘积最大.N.M从键盘输入,输出最大值及一种划分方式 ...
- JAVA并发(5)-并发队列LinkedBlockingQueue的分析
本文介绍LinkedBlockingQueue,这个队列在线程池中常用到.(请结合源码,看本文) 1. 介绍 LinkedBlockingQueue, 不支持null,基于单向链表的可选有界阻塞队列. ...
- 如何写新的Python OP
如何写新的Python OP Paddle 通过 py_func 接口支持在Python端自定义OP. py_func的设计原理在于Paddle中的Tensor可以与numpy数组可以方便的互相转换, ...
- Pandas高级教程之:Dataframe的合并
目录 简介 使用concat 使用append 使用merge 使用join 覆盖数据 简介 Pandas提供了很多合并Series和Dataframe的强大的功能,通过这些功能可以方便的进行数据分析 ...
- 【NX二次开发】Block UI 从列表选择部件
属性说明 属性 类型 描述 常规 BlockID String 控件ID Enable Logical 是否可操作 Group ...
- Redis 性能问题分析
在一些网络服务的系统中,Redis 的性能,可能是比 MySQL 等硬盘数据库的性能更重要的课题.比如微博,把热点微博[1],最新的用户关系,都存储在 Redis 中,大量的查询击中 Redis,而不 ...
- LockSupport中的park()与unpark()
类注释原文:Basic thread blocking primitives for creating locks and other synchronization classes.意思就是Lock ...
- org.openqa.selenium.NoSuchElementException: no such element: Unable to locate element
org.openqa.selenium.NoSuchElementException: no such element: Unable to locate element(识别不到想要的元素) 想获取 ...
- 【题解】Luogu P3052 【USACO12】摩天大楼里的奶牛Cows in a Skyscraper
迭代加深搜索基础 题目描述 A little known fact about Bessie and friends is that they love stair climbing races. A ...