Cesium之原生控件
1. 控件概述
Cesium的开始,基本上是从new一个Viewer开始
// ...

<div id="cesiumContainer"></div>

<script>

    const viewer = new Cesium.Viewer('cesiumContainer')

</script>

// ...
Cesium初始化时配置原生控件也是在Viewer的构造函数里配置的,有关控件的配置参数可以参考下面的表格,表格来源:Viewer - Cesium Documentation
| Name | Type | Attributes | Default | Description |
|---|---|---|---|---|
animation |
boolean | true | If set to false, the Animation widget will not be created. | |
baseLayerPicker |
boolean | true | If set to false, the BaseLayerPicker widget will not be created. | |
fullscreenButton |
boolean | true | If set to false, the FullscreenButton widget will not be created. | |
vrButton |
boolean | false | If set to true, the VRButton widget will be created. | |
geocoder |
boolean | Array | true | If set to false, the Geocoder widget will not be created. | |
homeButton |
boolean | true | If set to false, the HomeButton widget will not be created. | |
infoBox |
boolean | true | If set to false, the InfoBox widget will not be created. | |
sceneModePicker |
boolean | true | If set to false, the SceneModePicker widget will not be created. | |
selectionIndicator |
boolean | true | If set to false, the SelectionIndicator widget will not be created. | |
timeline |
boolean | true | If set to false, the Timeline widget will not be created. | |
navigationHelpButton |
boolean | true | If set to false, the navigation help button will not be created. | |
projectionPicker |
boolean | false | If set to true, the ProjectionPicker widget will be created. |
不防把这些控件都显示出来看看:
<!DOCTYPE html>

<html lang="en">

<head>

  <meta charset="utf-8">

  <!-- Include the CesiumJS JavaScript and CSS files -->

  <script src="https://cesium.com/downloads/cesiumjs/releases/1.114/Build/Cesium/Cesium.js"></script>

  <link href="https://cesium.com/downloads/cesiumjs/releases/1.114/Build/Cesium/Widgets/widgets.css" rel="stylesheet">

</head>

<body>

  <div id="cesiumContainer"></div>

  <script type="module">

    // Your access token can be found at: https://ion.cesium.com/tokens.

    // Replace `your_access_token` with your Cesium ion access token.

    // Cesium.Ion.defaultAccessToken = 'your_access_token';

    // Initialize the Cesium Viewer in the HTML element with the `cesiumContainer` ID.

    const viewer = new Cesium.Viewer('cesiumContainer', {

      animation: true,

      baseLayerPicker: true,

      fullscreenButton: true,

      vrButton: true,

      geocoder: true,

      homeButton: true,

      infoBox: true,

      sceneModePicker: true,

      selectionIndicator: false,

      timeline: true,

      navigationHelpButton: true,

      projectionPicker: true

    });

  </script>

  </div>

</body>

</html>
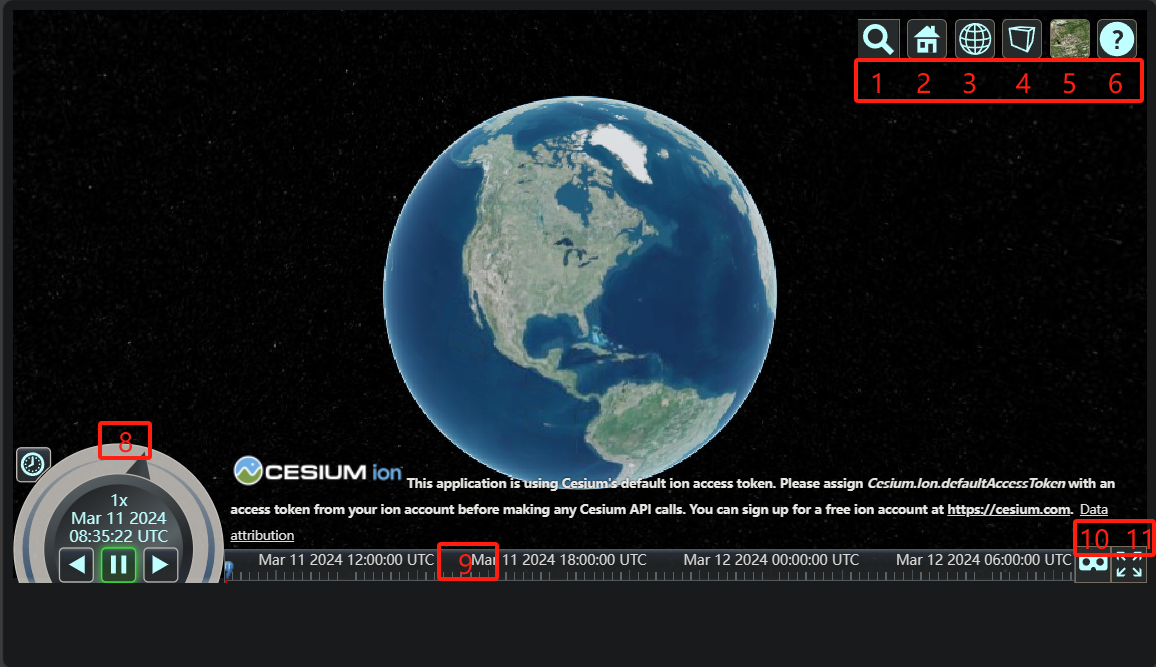
上图中所显示的,就是Cesium原生自带的控件,分别是:
| 名字 | 图中序号 |
|---|---|
animation |
8 |
baseLayerPicker |
5 |
fullscreenButton |
11 |
vrButton |
10 |
geocoder |
1 |
homeButton |
2 |
sceneModePicker |
3 |
projectionPicker |
4 |
timeline |
9 |
navigationHelpButton |
6 |
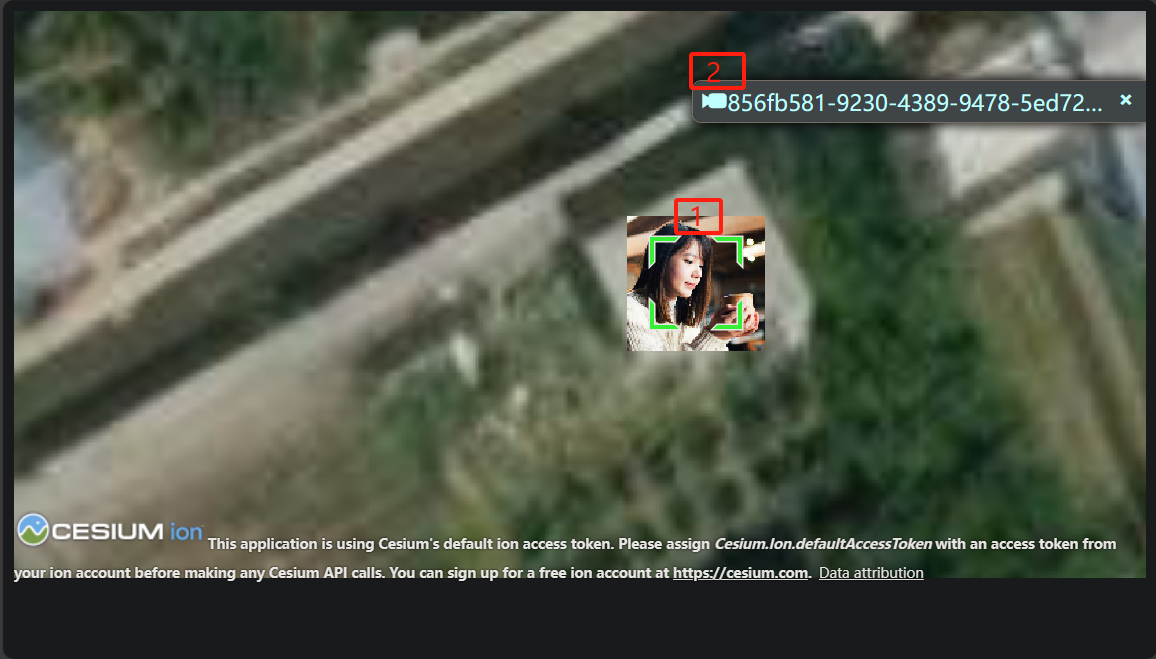
除了上述控件外,还有selectionIndicator和infoBox图中没有显示,下图中的 1 和 2 分别就是selectionIndicator和infoBox
2. 控件构造
根据Viewer的初始化函数,可以到对应的Cesium源码找到相关控件的代码,这里以 NavigationHelpButton 为例
首先是Viewer的构造函数里:
// Navigation Help Button

let navigationHelpButton;

if (

    !defined(options.navigationHelpButton) ||

    options.navigationHelpButton !== false

) {

    let showNavHelp = true;

	// ...

    navigationHelpButton = new NavigationHelpButton({

        container: toolbar,

        instructionsInitiallyVisible: defaultValue(

            options.navigationInstructionsInitiallyVisible,

            showNavHelp

        ),

    });

}
- 很简单,就是根据Viewer的配置觉得是否创建
进入到NavigationHelpButton.js里:
function NavigationHelpButton(options) {

  const container = getElement(options.container);

  const viewModel = new NavigationHelpButtonViewModel();

  // ...

  const clickInstructions = document.createElement("div");

  clickInstructions.className =

    "cesium-click-navigation-help cesium-navigation-help-instructions";

  clickInstructions.setAttribute(

    "data-bind",

    'css: { "cesium-click-navigation-help-visible" : !_touch}'

  );

  clickInstructions.innerHTML = `\

            <table>\

                <tr>\

                    <td><img src="${buildModuleUrl(

                      "Widgets/Images/NavigationHelp/MouseLeft.svg"

                    )}" width="48" height="48" /></td>\

                    <td>\

                        <div class="cesium-navigation-help-pan">Pan view</div>\

                        <div class="cesium-navigation-help-details">Left click + drag</div>\

                    </td>\

                </tr>\

                <tr>\

                    <td><img src="${buildModuleUrl(

                      "Widgets/Images/NavigationHelp/MouseRight.svg"

                    )}" width="48" height="48" /></td>\

                    <td>\

                        <div class="cesium-navigation-help-zoom">Zoom view</div>\

                        <div class="cesium-navigation-help-details">Right click + drag, or</div>\

                        <div class="cesium-navigation-help-details">Mouse wheel scroll</div>\

                    </td>\

                </tr>\

                <tr>\

                    <td><img src="${buildModuleUrl(

                      "Widgets/Images/NavigationHelp/MouseMiddle.svg"

                    )}" width="48" height="48" /></td>\

                    <td>\

                        <div class="cesium-navigation-help-rotate">Rotate view</div>\

                        <div class="cesium-navigation-help-details">Middle click + drag, or</div>\

                        <div class="cesium-navigation-help-details">CTRL + Left/Right click + drag</div>\

                    </td>\

                </tr>\

            </table>`;

  instructionContainer.appendChild(clickInstructions);

  // ...

  knockout.applyBindings(viewModel, wrapper);

  this._container = container;

  this._viewModel = viewModel;

  this._wrapper = wrapper;

  this._closeInstructions = function (e) {

    if (!wrapper.contains(e.target)) {

      viewModel.showInstructions = false;

    }

  };

  if (FeatureDetection.supportsPointerEvents()) {

    document.addEventListener("pointerdown", this._closeInstructions, true);

  } else {

    document.addEventListener("mousedown", this._closeInstructions, true);

    document.addEventListener("touchstart", this._closeInstructions, true);

  }

}
- 可以看到这里主要就是编写UI部分的代码并且绑定点击事件,代码里面提到的
NavigationHelpButtonViewModel是一种基于knockout.js实现的ViewModel(可以类比于Vue的ViewModel)
查看整个NavigationHelpButton的目录:
> ls NavigationHelpButton

    目录: \cesium\packages\widgets\Source\NavigationHelpButton

Mode                 LastWriteTime         Length Name

----                 -------------         ------ ----

-a----         2023/12/4     11:57           1055 lighter.css

-a----         2023/12/4     11:57           2130 NavigationHelpButton.css

-a----         2023/12/4     11:57          10807 NavigationHelpButton.js

-a----         2023/12/4     11:57           1906 NavigationHelpButtonViewModel.js
可以看到NavigationHelpButton控件主要由ViewModel、类函数NavigationHelpButton.js、相关CSS构成
作为使用Cesium的开发者,能不能自定义控件并添加到Cesium中呢?
从上面的介绍来看,并不容易,Cesium并没有提供一个扩展接口给开发者统一管理控件
3. 参考资料
[1] Index - Cesium Documentation
Cesium之原生控件的更多相关文章
- JS调用Android、Ios原生控件
在上一篇博客中已经和大家聊了,关于JS与Android.Ios原生控件之间相互通信的详细代码实现,今天我们一起聊一下JS调用Android.Ios通信的相同点和不同点,以便帮助我们在进行混合式开发时, ...
- JS与APP原生控件交互
"热更新"."热部署"相信对于混合式开发的童鞋一定不陌生,那么APP怎么避免每次升级都要在APP应用商店发布呢?这里就用到了混合式开发的概念,对于电商网站尤其显 ...
- 论如何在手机端web前端实现自定义原生控件的样式
手机开发webapp的同学一定遇到过这样问题,如何为丑极了的手机元素应用自定义的样式.首先,要弄清楚为什么要定义手机原生控件的样式,就需要看看手机的那些原生框样式的丑陋摸样: android: ios ...
- 带着问题写React Native原生控件--Android视频直播控件
最近在做的采用React Native项目有一个需求,视频直播与直播流播放同一个布局中,带着问题去思考如何实现,能更容易找到问题关键点,下面分析这个控件解决方法: 现在条件:视频播放控件(开源的ijk ...
- WPF自定义控件(二)の重写原生控件样式模板
话外篇: 要写一个圆形控件,用Clip,重写模板,去除样式引用圆形图片可以有这三种方式. 开发过程中,我们有时候用WPF原生的控件就能实现自己的需求,但是样式.风格并不能满足我们的需求,那么我们该怎么 ...
- cesium页面小控件的隐藏
cesium页面小控件的隐藏 1 创建一个Viewer var viewer = new Cesium.Viewer('cesiumContainer');//cesiumContainer为di ...
- [C#] (原创)一步一步教你自定义控件——05,Label(原生控件)
一.前言 技术没有先进与落后,只有合适与不合适. 自定义控件可以分为三类: 一类是"无中生有".就如之前文章中的的那些控件,都是继承基类Control,来实现特定的功能效果: 一类 ...
- Cesium之基础控件
1. 引言 Cesium是一款三维地球和地图可视化开源JavaScript库,使用WebGL来进行硬件加速图形,使用时不需要任何插件支持,基于Apache2.0许可的开源程序,可以免费用于商业和非商业 ...
- Cesium中Clock控件及时间序列瓦片动态加载
前言 前面已经写了两篇博客介绍Cesium,一篇整体上简单介绍了Cesium如何上手,还有一篇介绍了如何将Cesium与分布式地理信息处理框架Geotrellis相结合.Cesium的强大之处也在于其 ...
- Phonegap 原生控件(Android)与html混合
1. 用命令创建cordova项目 cordova coreate hello com.example.hello hello 2.打开MainActivity 在onCreate方法中加入 setC ...
随机推荐
- [Ngbatis源码学习][SpringBoot] ApplicationContextInitializer接口类的使用和原理解读
ApplicationContextInitializer接口类的使用和原理解读 在看Ngbatis源码的过程中,看到了自定义的ApplicationContextInitializer实现类,对Ap ...
- SP21690 POWERUP - Power the Power Up 题解
题目传送门 前置知识 扩展欧拉定理 解法 直接对 \(a\) 和 \(b^c\) 分讨,跑一遍扩展欧拉定理就行了. 另外由于本题的特殊规定 \(0^0=1\),故需要在当 \(a=0\) 时,对 \( ...
- JS 这一次彻底理解插入排序
壹 ❀ 引 在前两篇排序文章中,我们分别介绍了冒泡排序与选择排序,趁热打铁,我们接着聊插入排序.老实说,在分析排序过程中头脑很清楚,过后再尝试写出排序代码还有点坎坷...可能是我脑瓜子不太机灵的问题, ...
- 提高Java开发生产力,我选Stream API,真香啊
Java 8 引入的Stream API提供了一种新的数据处理方式,它以声明式.函数式的编程模型,极大地简化了对集合.数组或其他支持数据源的操作.Stream可以被看作是一系列元素的流水线.允许你高效 ...
- NC20667 数学题
题目链接 题目 题目描述 最近,华东交通大学ACM训练基地的老阿姨被一个数学问题困扰了很久,她希望你能够帮她解决这个问题. 这个数学问题是这样的,给你一个N,要求你计算 gcd(a,b)表示a和b的最 ...
- SATA学习笔记——Link Layer 加扰/解扰/CRC
一.故事前传 我们之前说到Link layer的结构,link layer的作用大致可以包括以下几点: Frame flow control CRC的生成与检测 对数据与控制字符的Scrmable/D ...
- Docker 容器逃逸漏洞 (CVE-2020-15257)
漏洞详情 Docker发布一个容器逃逸漏洞,攻击者利用该漏洞可以实现容器逃逸,提升特权并破坏主机. containerd使用的抽象套接字仅使用UID做验证,即任意UID为0的进程均可访问此API. 当 ...
- P2P通讯方式
概述 实现p2p通讯我们提供两种方式,这两种方式分别是通过客户端直接互通和p2p映射: 无论哪一种,首先设备两端都得部署好fastnat客户端,NAT类型不能是对称类型NAT(Symmetric),否 ...
- Git合并固定分支的某一部分至当前分支
在 Git 中,通常使用 git merge 命令来将一个分支的更改合并到另一个分支.如果你只想合并某个分支的一部分代码,可以使用以下两种方法: 1.批量文件合并 1.1.创建并切换到一个新的临时分支 ...
- spring事务的传播
目录 事务的传播行为类型 注意事项 关于事务的传播,我们先确定一个场景:方法A调用方法B,方法A可能存在事务,也可能不存在事务,我们这里重点关注方法B上定义的事务传播行为,以及方法B中出现异常时,方法 ...