TensorFlow和pytorch中的pin_memory和non_blocking设置是做什么的,又是否有用???(续2)
接前文:
TensorFlow和pytorch中的pin_memory和non_blocking设置是做什么的,又是否有用???
TensorFlow和pytorch中的pin_memory和non_blocking设置是做什么的,又是否有用???(续)
参考:
如何实现nvidia显卡的cuda的多kernel并发执行???
===========================================
关于How to Overlap Data Transfers in CUDA C/C++中的介绍内容还有一部分没有交代,这里继续。
Demo代码:


/* Copyright (c) 1993-2015, NVIDIA CORPORATION. All rights reserved.

 *

 * Redistribution and use in source and binary forms, with or without

 * modification, are permitted provided that the following conditions

 * are met:

 *  * Redistributions of source code must retain the above copyright

 *    notice, this list of conditions and the following disclaimer.

 *  * Redistributions in binary form must reproduce the above copyright

 *    notice, this list of conditions and the following disclaimer in the

 *    documentation and/or other materials provided with the distribution.

 *  * Neither the name of NVIDIA CORPORATION nor the names of its

 *    contributors may be used to endorse or promote products derived

 *    from this software without specific prior written permission.

 *

 * THIS SOFTWARE IS PROVIDED BY THE COPYRIGHT HOLDERS ``AS IS'' AND ANY

 * EXPRESS OR IMPLIED WARRANTIES, INCLUDING, BUT NOT LIMITED TO, THE

 * IMPLIED WARRANTIES OF MERCHANTABILITY AND FITNESS FOR A PARTICULAR

 * PURPOSE ARE DISCLAIMED.  IN NO EVENT SHALL THE COPYRIGHT OWNER OR

 * CONTRIBUTORS BE LIABLE FOR ANY DIRECT, INDIRECT, INCIDENTAL, SPECIAL,

 * EXEMPLARY, OR CONSEQUENTIAL DAMAGES (INCLUDING, BUT NOT LIMITED TO,

 * PROCUREMENT OF SUBSTITUTE GOODS OR SERVICES; LOSS OF USE, DATA, OR

 * PROFITS; OR BUSINESS INTERRUPTION) HOWEVER CAUSED AND ON ANY THEORY

 * OF LIABILITY, WHETHER IN CONTRACT, STRICT LIABILITY, OR TORT

 * (INCLUDING NEGLIGENCE OR OTHERWISE) ARISING IN ANY WAY OUT OF THE USE

 * OF THIS SOFTWARE, EVEN IF ADVISED OF THE POSSIBILITY OF SUCH DAMAGE.

 */

#include <stdio.h>

// Convenience function for checking CUDA runtime API results

// can be wrapped around any runtime API call. No-op in release builds.

inline

cudaError_t checkCuda(cudaError_t result)

{

#if defined(DEBUG) || defined(_DEBUG)

  if (result != cudaSuccess) {

    fprintf(stderr, "CUDA Runtime Error: %s\n", cudaGetErrorString(result));

    assert(result == cudaSuccess);

  }

#endif

  return result;

}

__global__ void kernel(float *a, int offset)

{

  int i = offset + threadIdx.x + blockIdx.x*blockDim.x;

  float x = (float)i;

  float s = sinf(x);

  float c = cosf(x);

  a[i] = a[i] + sqrtf(s*s+c*c);

}

float maxError(float *a, int n)

{

  float maxE = 0;

  for (int i = 0; i < n; i++) {

    float error = fabs(a[i]-1.0f);

    if (error > maxE) maxE = error;

  }

  return maxE;

}

int main(int argc, char **argv)

{

  const int blockSize = 256, nStreams = 4;

  const int n = 4 * 1024 * blockSize * nStreams;

  const int streamSize = n / nStreams;

  const int streamBytes = streamSize * sizeof(float);

  const int bytes = n * sizeof(float);

  int devId = 0;

  if (argc > 1) devId = atoi(argv[1]);

  cudaDeviceProp prop;

  checkCuda( cudaGetDeviceProperties(&prop, devId));

  printf("Device : %s\n", prop.name);

  checkCuda( cudaSetDevice(devId) );

  // allocate pinned host memory and device memory

  float *a, *d_a;

  checkCuda( cudaMallocHost((void**)&a, bytes) );      // host pinned

  checkCuda( cudaMalloc((void**)&d_a, bytes) ); // device

  float ms; // elapsed time in milliseconds

  // create events and streams

  cudaEvent_t startEvent, stopEvent, dummyEvent;

  cudaStream_t stream[nStreams];

  checkCuda( cudaEventCreate(&startEvent) );

  checkCuda( cudaEventCreate(&stopEvent) );

  checkCuda( cudaEventCreate(&dummyEvent) );

  for (int i = 0; i < nStreams; ++i)

    checkCuda( cudaStreamCreate(&stream[i]) );

  // baseline case - sequential transfer and execute

  memset(a, 0, bytes);

  checkCuda( cudaEventRecord(startEvent,0) );

  checkCuda( cudaMemcpy(d_a, a, bytes, cudaMemcpyHostToDevice) );

  kernel<<<n/blockSize, blockSize>>>(d_a, 0);

  checkCuda( cudaMemcpy(a, d_a, bytes, cudaMemcpyDeviceToHost) );

  checkCuda( cudaEventRecord(stopEvent, 0) );

  checkCuda( cudaEventSynchronize(stopEvent) );

  checkCuda( cudaEventElapsedTime(&ms, startEvent, stopEvent) );

  printf("Time for sequential transfer and execute (ms): %f\n", ms);

  printf("  max error: %e\n", maxError(a, n));

  // asynchronous version 1: loop over {copy, kernel, copy}

  memset(a, 0, bytes);

  checkCuda( cudaEventRecord(startEvent,0) );

  for (int i = 0; i < nStreams; ++i) {

    int offset = i * streamSize;

    checkCuda( cudaMemcpyAsync(&d_a[offset], &a[offset],

                               streamBytes, cudaMemcpyHostToDevice,

                               stream[i]) );

    kernel<<<streamSize/blockSize, blockSize, 0, stream[i]>>>(d_a, offset);

    checkCuda( cudaMemcpyAsync(&a[offset], &d_a[offset],

                               streamBytes, cudaMemcpyDeviceToHost,

                               stream[i]) );

  }

  checkCuda( cudaEventRecord(stopEvent, 0) );

  checkCuda( cudaEventSynchronize(stopEvent) );

  checkCuda( cudaEventElapsedTime(&ms, startEvent, stopEvent) );

  printf("Time for asynchronous V1 transfer and execute (ms): %f\n", ms);

  printf("  max error: %e\n", maxError(a, n));

  // asynchronous version 2:

  // loop over copy, loop over kernel, loop over copy

  memset(a, 0, bytes);

  checkCuda( cudaEventRecord(startEvent,0) );

  for (int i = 0; i < nStreams; ++i)

  {

    int offset = i * streamSize;

    checkCuda( cudaMemcpyAsync(&d_a[offset], &a[offset],

                               streamBytes, cudaMemcpyHostToDevice,

                               stream[i]) );

  }

  for (int i = 0; i < nStreams; ++i)

  {

    int offset = i * streamSize;

    kernel<<<streamSize/blockSize, blockSize, 0, stream[i]>>>(d_a, offset);

  }

  for (int i = 0; i < nStreams; ++i)

  {

    int offset = i * streamSize;

    checkCuda( cudaMemcpyAsync(&a[offset], &d_a[offset],

                               streamBytes, cudaMemcpyDeviceToHost,

                               stream[i]) );

  }

  checkCuda( cudaEventRecord(stopEvent, 0) );

  checkCuda( cudaEventSynchronize(stopEvent) );

  checkCuda( cudaEventElapsedTime(&ms, startEvent, stopEvent) );

  printf("Time for asynchronous V2 transfer and execute (ms): %f\n", ms);

  printf("  max error: %e\n", maxError(a, n));

  // cleanup

  checkCuda( cudaEventDestroy(startEvent) );

  checkCuda( cudaEventDestroy(stopEvent) );

  checkCuda( cudaEventDestroy(dummyEvent) );

  for (int i = 0; i < nStreams; ++i)

    checkCuda( cudaStreamDestroy(stream[i]) );

  cudaFree(d_a);

  cudaFreeHost(a);

  return 0;

}
这个代码是关于overlap data transfer的,原文中给出的是比较老的显卡环境,为此我在2070super显卡上运行,结果如下:
Device : NVIDIA GeForce RTX 2070 SUPER
Time for sequential transfer and execute (ms): 5.685216
max error: 1.192093e-07
Time for asynchronous V1 transfer and execute (ms): 4.635808
max error: 1.192093e-07
Time for asynchronous V2 transfer and execute (ms): 4.183488
max error: 1.192093e-07
上面代码每次运行都是对同一任务使用三次不同GPU调用方式:
第一次,是对总的计算任务用一个和host同步的cudaMemcpy函数实现数据从host到device的传输,然后使用一个stream队列进行kernel运算,最后再将计算好的结果用一个和host同步的cudaMemcpy函数实现数据从device到host的传输;
第二次,是将总的计算任务划分多个子计算任务,以子任务为单位循环的调用每个子计算任务中的从host到device的cudaMemcpy数据传输、单独stream队列的kernel运算、计算结果从device到host的cudaMemcpy数据传输;
第三次,是将总的计算任务划分多个子计算任务,首先执行完所有子计算任务中的从host到device的cudaMemcpy数据传输,然后执行完每个子任务各自stream队列的kernel运算,最后将各子任务的计算结果从device到host的cudaMemcpy数据传输。
使用nvvp查看上面代码运行是CUDA的运行情况:
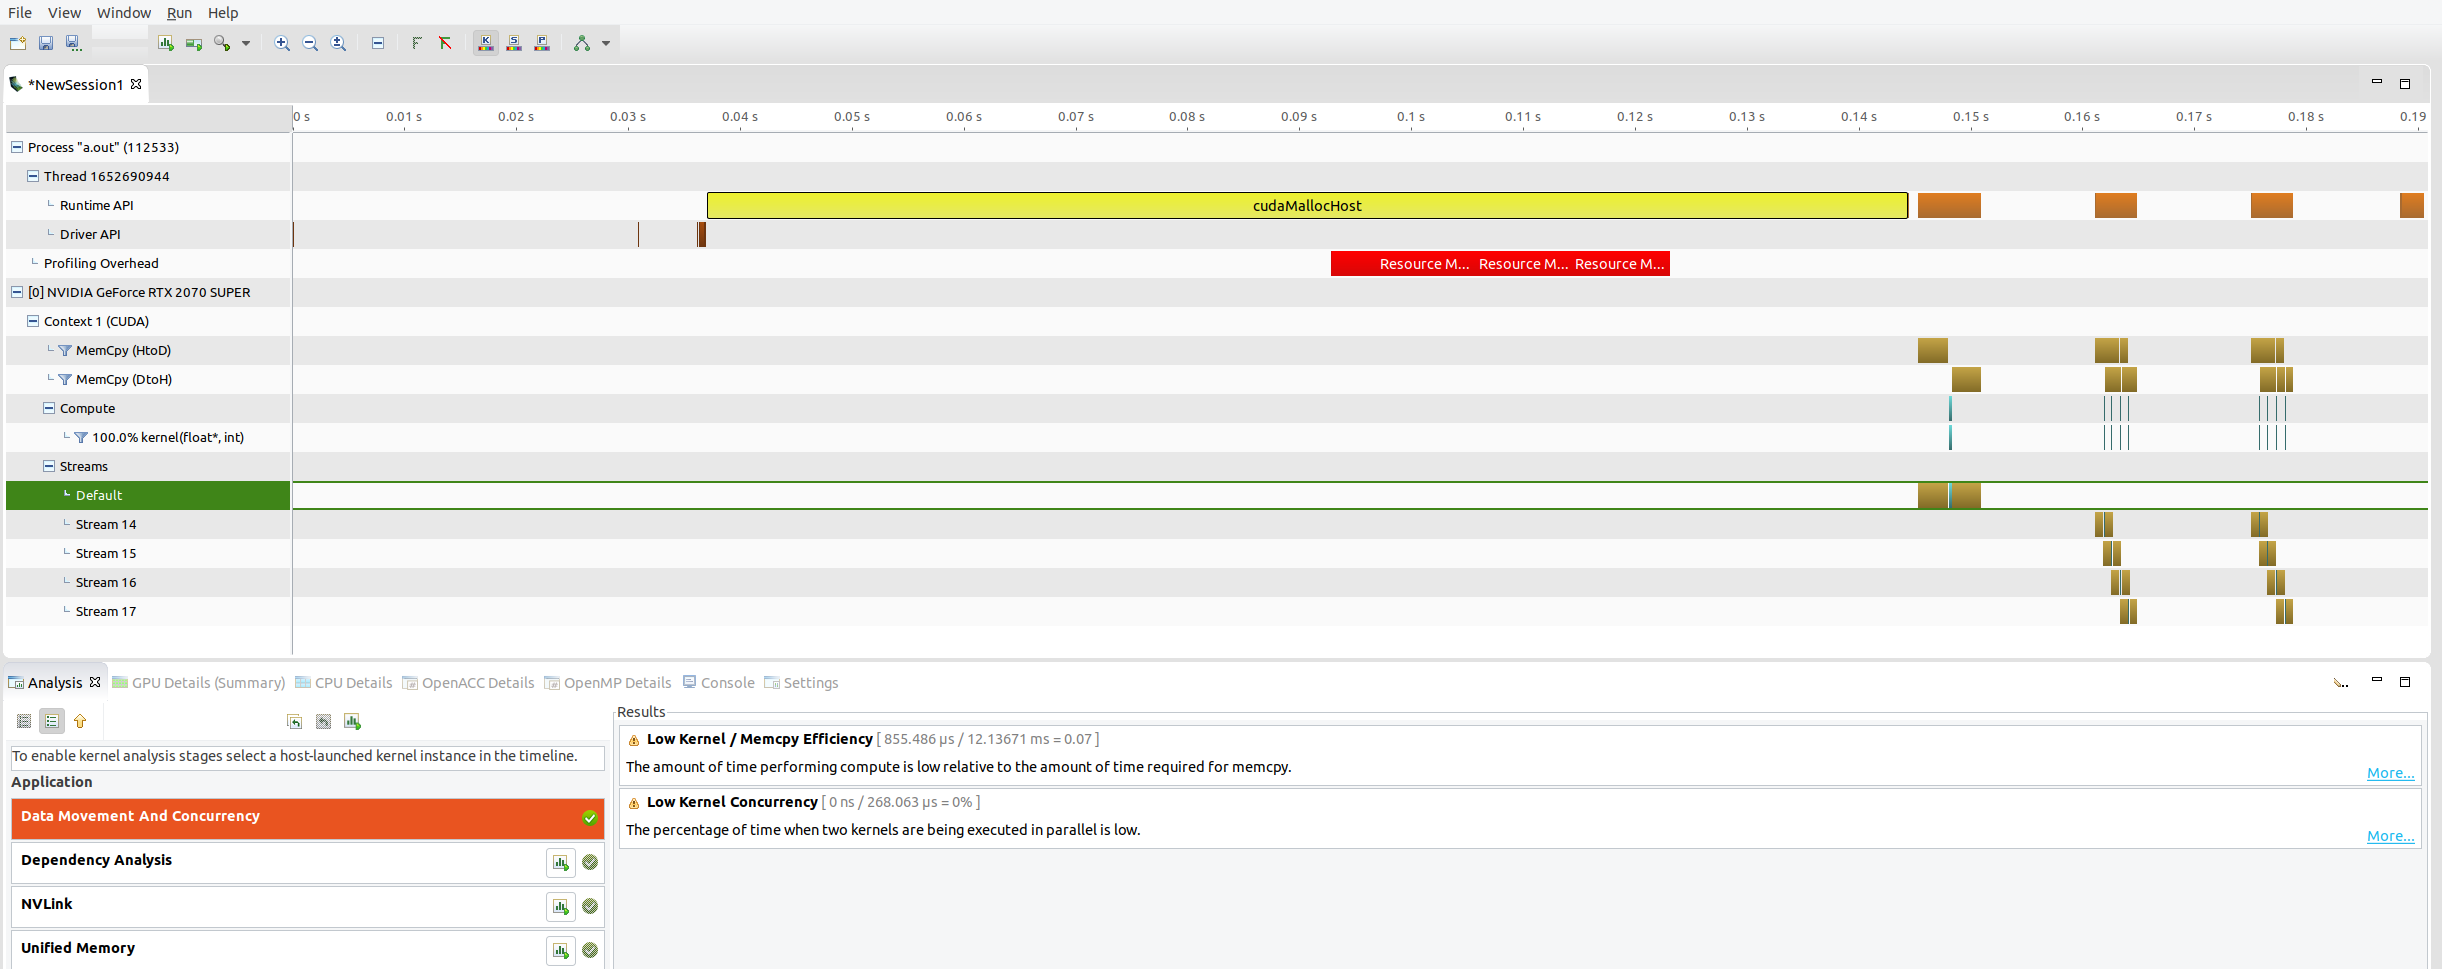
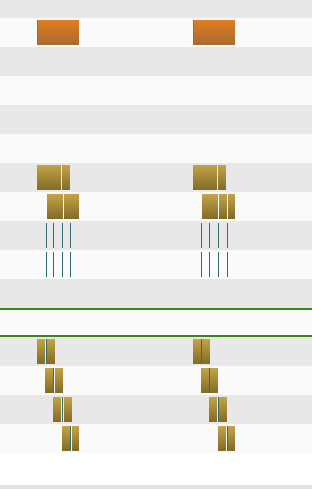
可以看到第二次GPU的调用和第三次的运行图是差不多的,甚至是几乎一样的,那么为啥第三次要比第二次运行时间短呢,没有想到什么比较好的解释。
=============================================
pytorch代码中pin_memory和non_blocking设置性能对比代码(CPU 10700k 5.0Ghz,GPU 2070 super):
import torch

import time

_x = torch.arange(1000000,2000000, device="cpu")

_y = torch.arange(2000000,3000000, device="cpu")

_z = torch.arange(3000000,4000000, device="cpu")

_k = torch.arange(3000000,4000000, device="cpu")

_p = torch.arange(3000000,4000000, device="cpu")

a_time = time.time()

x = _x.to("cuda:1")

b_time = time.time()

print("pytorch的显存管理机制,为保证公平在显存中预先申请空间","用时:", b_time - a_time)

del x

time.sleep(3)

a_time = time.time()

y = _y.to("cuda:1")

b_time = time.time()

print(b_time - a_time)

del y

time.sleep(3)

a_time = time.time()

z = _z.to("cuda:1", non_blocking=True)

b_time = time.time()

print(b_time - a_time)

del z

time.sleep(3)

_k = torch.Tensor.pin_memory(_k)

a_time = time.time()

k = _k.to("cuda:1", non_blocking=True)

b_time = time.time()

print("{:<10f}".format(b_time - a_time))

del k

time.sleep(3)

_p = torch.Tensor.pin_memory(_p)

a_time = time.time()

p = _p.to("cuda:1")

b_time = time.time()

print("{:<10f}".format(b_time - a_time))

del p

time.sleep(30)
运行结果:
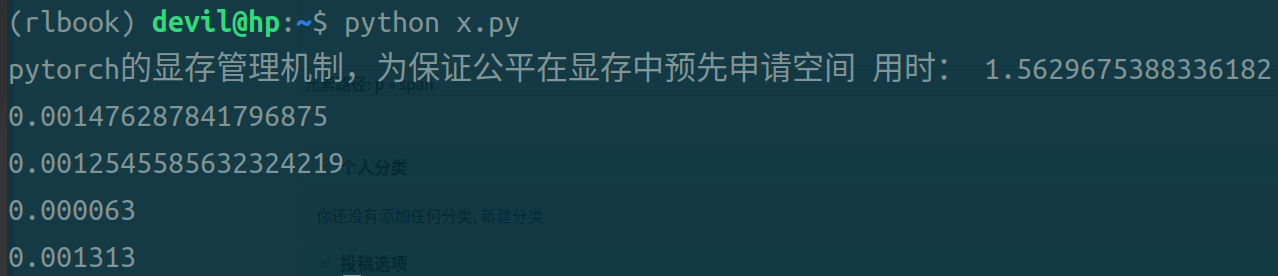
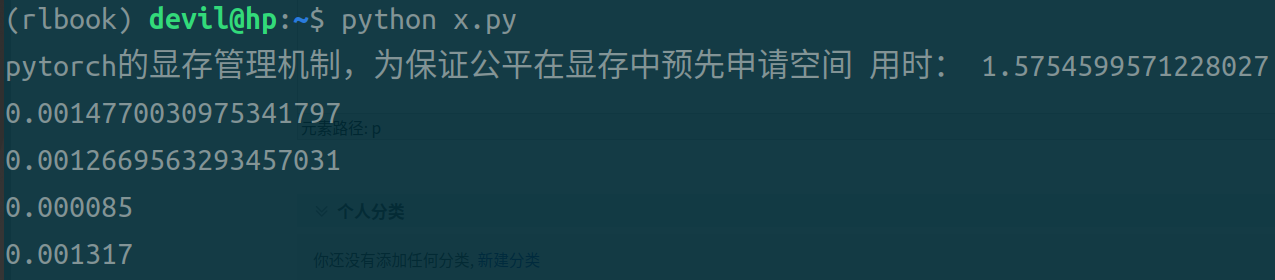

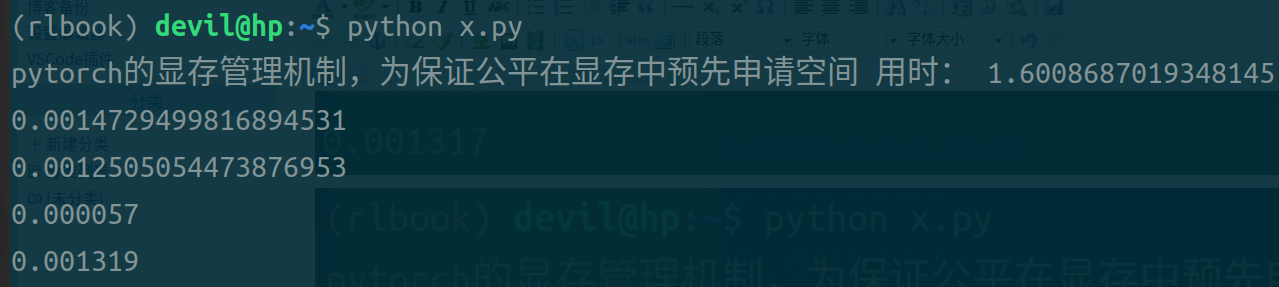
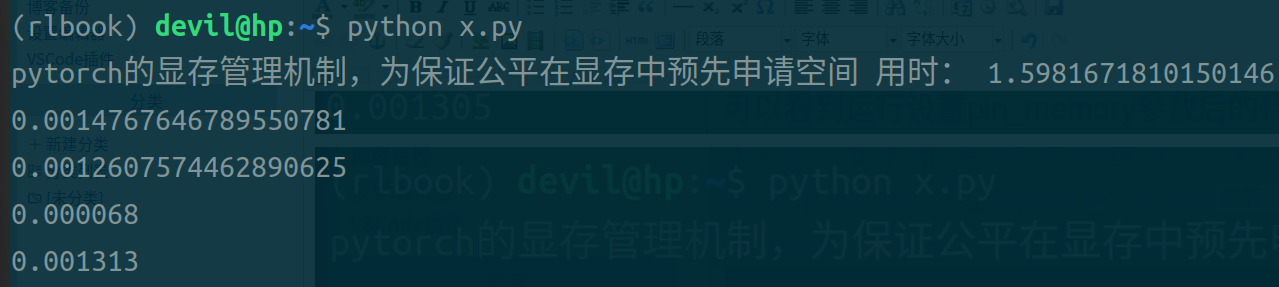
第一条时间是不使用pin_memory和non_blocking参数后的代码,用时最长;
第二条时间是设置non_blocking参数后的代码;
第三条时间是设置pin_memory和non_blocking参数后的代码;
第四条时间是设置pin_memory参数后的代码;
可以看到,同时设置pin_memory和non_blocking参数后的代码运行时间最短;单独设置pin_memory或non_blocking参数后的代码虽然也可以缩短时间但是缩小的幅度不大;只设置pin_memory参数后的代码比只设置non_blocking参数后的代码运行时间快,但是个人观点不认为这个数据可以说明pin_memory就比non_blocking的效果好,由于pytorch本身是对cuda的包装,不能把pytorch的运行效果和naive的CUDA代码等同来看,个人认为不管是是只设置pin_memory还是只设置non_blocking都是需要CPU进行一定的操作的,而在pytorch中很可能只要CPU启动开始做这样的操作都需要一定的时间花费,所以导致只加pin_memory参数和只加non_blocking参数与什么参数都不加的情况也没有太大的提速,而只有不需要CPU做任何操作的两个参数全加的情况还得到了极大的提速效果。
必须要注意的是,即使使用pin_memory和non_blocking参数其主要功能就是使CPU的操作和GPU的copy操作同时运行,其所提高的效率就是CPU避免了阻塞,但是如果CPU立刻再次调用GPU中的model则会隐式implicit的进行再次同步,这样就失去了设置参数的作用,为此给出例子:
不能实现CPU提速的操作,implicit的隐式的再次阻塞CPU:
_k = torch.Tensor.pin_memory(_k)
k = _k.to("cuda:1", non_blocking=True)
target=model(k) // 神经网络
cpu_fun()
可以提高CPU效率的形式:
_k = torch.Tensor.pin_memory(_k)
k = _k.to("cuda:1", non_blocking=True)
cpu_fun()
target=model(k) // 神经网络
其实说白了,就是不阻塞CPU后要CPU做一些和GPU无关联的操作后再必须和GPU同步的时候再同步,由此通过减少CPU阻塞来释放一定的CPU运算能力。
===========================================================
TensorFlow和pytorch中的pin_memory和non_blocking设置是做什么的,又是否有用???(续2)的更多相关文章
- [转] 理解CheckPoint及其在Tensorflow & Keras & Pytorch中的使用
作者用游戏的暂停与继续聊明白了checkpoint的作用,在三种主流框架中演示实际使用场景,手动点赞. 转自:https://blog.floydhub.com/checkpointing-tutor ...
- pytorch中tensorboardX的用法
在代码中改好存储Log的路径 命令行中输入 tensorboard --logdir /home/huihua/NewDisk1/PycharmProjects/pytorch-deeplab-xce ...
- 分别基于TensorFlow、PyTorch、Keras的深度学习动手练习项目
×下面资源个人全都跑了一遍,不会出现仅是字符而无法运行的状况,运行环境: Geoffrey Hinton在多次访谈中讲到深度学习研究人员不要仅仅只停留在理论上,要多编程.个人在学习中也体会到单单的看理 ...
- pytorch 中的重要模块化接口nn.Module
torch.nn 是专门为神经网络设计的模块化接口,nn构建于autgrad之上,可以用来定义和运行神经网络 nn.Module 是nn中重要的类,包含网络各层的定义,以及forward方法 对于自己 ...
- pytorch中如何使用DataLoader对数据集进行批处理
最近搞了搞minist手写数据集的神经网络搭建,一个数据集里面很多个数据,不能一次喂入,所以需要分成一小块一小块喂入搭建好的网络. pytorch中有很方便的dataloader函数来方便我们进行批处 ...
- Tensorflow、Pytorch、Keras的多GPU使用
Tensorflow.Pytorch.Keras的多GPU的并行操作 方法一 :使用深度学习工具提供的 API指定 1.1 Tesorflow tensroflow指定GPU的多卡并行的时候,也是可以 ...
- 【PyTorch】PyTorch中的梯度累加
PyTorch中的梯度累加 使用PyTorch实现梯度累加变相扩大batch PyTorch中在反向传播前为什么要手动将梯度清零? - Pascal的回答 - 知乎 https://www.zhihu ...
- PyTorch中的C++扩展
今天要聊聊用 PyTorch 进行 C++ 扩展. 在正式开始前,我们需要了解 PyTorch 如何自定义module.这其中,最常见的就是在 python 中继承torch.nn.Module,用 ...
- pytorch中DataLoader, DataSet, Sampler之间的关系
转自:https://mp.weixin.qq.com/s/RTv0cUWvc0kuXBeNoXVu_A 自上而下理解三者关系 首先我们看一下DataLoader.__next__的源代码长什么样,为 ...
- TensorFlow or PyTorch
既然你已经读到了这篇文章,我就断定你已经开始了你的深度学习之旅了,并且对人造神经网络的研究已经有一段时间了:或者也许你正打算开始你的学习之旅.无论是哪一种情况,你都是因为发现你陷入了困惑中,才找到了这 ...
随机推荐
- 增补博客 第七篇 python 比较不同Python图形处理库或图像处理库的异同点
OpenCV.Pillow 和 scikit image OpenCV(OpenCV 是一个强大的计算机视觉库,它提供了各种图像处理和计算机视觉算法的实现,可以处理各种图像和视频数据. 异同点 跨平台 ...
- [ABC347C] Ideal Holidays题解
[ABC347C] Ideal Holidays题解 原题传送门 原题传送门(洛谷) 题意翻译: 在 \(AtCoder\) 王国中,一个周有 \(A+B\) 天.其中在一周中, \([1,A ...
- 15分钟面试被5连CALL,你扛得住么?
最近一个朋友跳槽找工作,跟V 哥说被15分钟内一个问题5连 CALL,还好是自己比较熟悉的技术点,面试官最后跟他说,面了几十个人,你是第一个回答比较满意的,我好奇都是什么问题,原来是关于锁的问题连环问 ...
- TGI 基准测试
本文主要探讨 TGI 的小兄弟 - TGI 基准测试工具.它能帮助我们超越简单的吞吐量指标,对 TGI 进行更全面的性能剖析,以更好地了解如何根据实际需求对服务进行调优并按需作出最佳的权衡及决策.如果 ...
- 用基础Array数组实现动态数组、链表、栈和队列
代码地址: https://gitee.com/Tom-shushu/Algorithm-and-Data-Structure.git 一.ArrayList自定义封装 package com.zho ...
- 实验5.OSPF配置实验
# 实验5.OSPF配置实验 配置ospf使全网联通 实验组 拓扑,路由器选择为AR2220,交换机为S5700 联通配置 给每台路由器的对应端口配置相应的ip,并启动ospf协议,可以看到此时5台设 ...
- 设备树DTS 学习:学习总结(应用篇)
设备树DTS 学习:学习总结(应用篇) 背景 经过前几章的学习,我们可以说是掌握了设备树的基础用法,现在作为总结回顾. 1.设备树DTS 学习:有关概念 介绍了什么是设备树,设备树的作用,如何编译设备 ...
- 基于Mock.js,使用C#生成模拟数据
获取某前端框架, 使用 Mock.js 生成模拟数据, 想要对api进行改造,并且保留原始数据,需要使用C# 重写后端api 的数据 模拟的内容: Random.guid() uuid: '@uuid ...
- 《DNK210使用指南 -CanMV版 V1.0》第四章 基于CanMV的C开发环境搭建
第四章 基于CanMV的C开发环境搭建 1)实验平台:正点原子DNK210开发板 2) 章节摘自[正点原子]DNK210使用指南 - CanMV版 V1.0 3)购买链接:https://detail ...
- 嵌入式HLS 案例开发手册——基于Zynq-7010/20工业开发板(2)
目 录 2 led_flash 案例 19 2.1 HLS 工程说明 19 2.2 编译与仿真 20 2.3 IP 核测试 23 3 key_led_demo 案例 23 3.1 HLS 工程说明 2 ...