【SpringBoot】15 数据访问P3 整合Mybatis
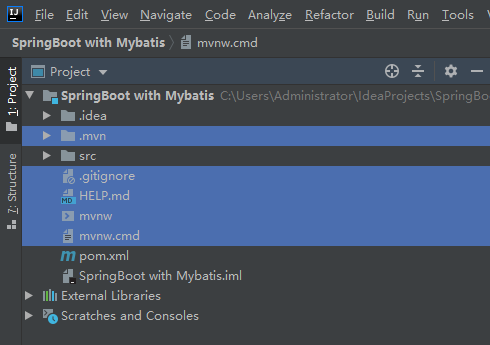
重新建立一个SpringBoot工程
选择依赖组件

然后删除不需要的Maven&Git文件
还是先查看我们的POM文件
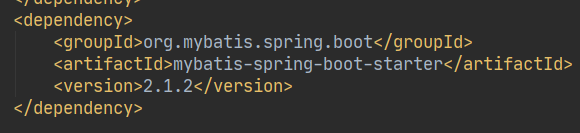
整合Mybatis的组件多了这一个,默认的版本是3.5.4

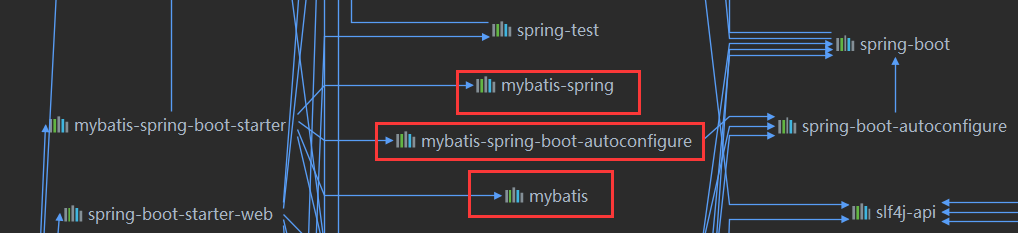
然后再看看整个Mybatis整合的体系
创建数据库信息:
部门表:
CREATE TABLE `t_department` (

  `id` int unsigned NOT NULL AUTO_INCREMENT,

  `department_name` varchar(10) CHARACTER SET utf8 COLLATE utf8_general_ci DEFAULT NULL,

  PRIMARY KEY (`id`)

) ENGINE=InnoDB AUTO_INCREMENT=5 DEFAULT CHARSET=utf8
职员表
CREATE TABLE `t_employee` (

  `id` int unsigned NOT NULL AUTO_INCREMENT,

  `last_name` varchar(10) DEFAULT NULL,

  `email` varchar(50) DEFAULT NULL,

  `gender` int DEFAULT NULL,

  `department_id` int unsigned NOT NULL,

  PRIMARY KEY (`id`),

  KEY `fk_emp_dp_dpid` (`department_id`),

  CONSTRAINT `fk_emp_dp_dpid` FOREIGN KEY (`department_id`) REFERENCES `t_department` (`id`)

) ENGINE=InnoDB AUTO_INCREMENT=7 DEFAULT CHARSET=utf8
添加外键关联:【每次都会不可绑定,因为一些约束没有一致,要仔细找找】
ALTER TABLE table_name

ADD CONSTRAINT fk_table1_table2

FOREIGN KEY (column_name)

REFERENCES table2(column_name);
然后编写我们的数据源配置信息【用的默认Hikari】
spring:

  datasource:

    type: com.zaxxer.hikari.HikariDataSource

    driver-class-name: com.mysql.cj.jdbc.Driver

    url: jdbc:mysql:///mybatis?serverTimezone=Asia/Shanghai&useUnicode=true&characterEncoding=utf-8

    username: root

    password: 123456
编写ORM实体类
部门类
package cn.dai.pojo;

import lombok.AllArgsConstructor;

import lombok.Data;

import lombok.NoArgsConstructor;

import org.apache.ibatis.type.Alias;

/**

 * @author ArkD42

 * @file SpringBoot with Mybatis

 * @create 2020 - 05 - 31 - 22:43

 */

@Alias("department")

@Data

@NoArgsConstructor

@AllArgsConstructor

public class Department {

    private Integer id;

    private String department_name;

}
然后是职员类
package cn.dai.pojo;

import lombok.AllArgsConstructor;

import lombok.Data;

import lombok.NoArgsConstructor;

import org.apache.ibatis.type.Alias;

/**

 * @author ArkD42

 * @file SpringBoot with Mybatis

 * @create 2020 - 05 - 31 - 22:40

 */

@Alias("employee")

@Data

@AllArgsConstructor

@NoArgsConstructor

public class Employee {

    private Integer id;

    private String last_name;

    private String email;

    private Integer gender;

    private Integer department_id;

}
1、【使用全注解完成映射配置】
编写映射接口
package cn.dai.mapper; import cn.dai.pojo.Department;
import org.apache.ibatis.annotations.*; import java.util.List; /**
* @author ArkD42
* @file SpringBoot with Mybatis
* @create 2020 - 05 - 31 - 22:46
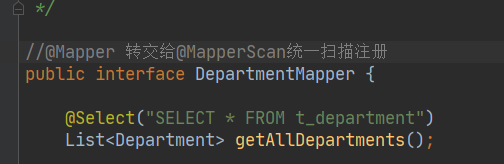
*/ @Mapper //指定这是映射接口
public interface DepartmentMapper { @Select("SELECT * FROM t_department")
List<Department> getAllDepartments(); @Select("SELECT * FROM t_department WHERE id = #{dp_id}")
Department getDepartmentById(@Param("dp_id") Integer id); @Delete("DELETE FROM t_department WHERE id = #{dp_id}")
int deleteDepartmentById(@Param("dp_id")Integer id); @Insert("INSERT INTO t_department(department_name) VALUES(#{name})")
int addDepartment(@Param("name") String department_name); @Update("UPDATE t_department SET department_name = #{department_name} WHERE id = #{id}")
int updateDepartmentById(Department department); }
测试使用的部门控制器,通过地址参数进行SQL测试
package cn.dai.controller;

import cn.dai.mapper.DepartmentMapper;

import cn.dai.pojo.Department;

import org.springframework.beans.factory.annotation.Autowired;

import org.springframework.web.bind.annotation.GetMapping;

import org.springframework.web.bind.annotation.PathVariable;

import org.springframework.web.bind.annotation.RestController;

import java.io.UnsupportedEncodingException;

import java.net.URLDecoder;

import java.util.List;

/**

 * @author ArkD42

 * @file SpringBoot with Mybatis

 * @create 2020 - 05 - 31 - 23:02

 */

@RestController

public class DepartmentController {

    @Autowired

    DepartmentMapper departmentMapper;

    @GetMapping("/department/get_by_id/{id}")

    public Department getDepartmentById(@PathVariable("id") Integer id){

        return departmentMapper.getDepartmentById(id);

    }

    @GetMapping("/department/listAll")

    public List<Department> getAllDepartments(){

        return departmentMapper.getAllDepartments();

    }

    @GetMapping("/department/del_by_id/{id}")

    public String deleteDepartmentById(@PathVariable("id")Integer id){

        return "删除结果:" + departmentMapper.deleteDepartmentById(id);

    }

    @GetMapping("/department/update_by_id/{dept}")

    public String updateDepartmentById(@PathVariable("dept")Department department){

        return "更新结果:" + departmentMapper.updateDepartmentById(department);

    }

    @GetMapping("/department/add/{dept_name}")

    public String addDepartment(@PathVariable("dept_name")String name) throws UnsupportedEncodingException {

        String decode = URLDecoder.decode(name, "utf-8");

        return "添加结果:" + departmentMapper.addDepartment(decode);

    }

}
不过这里要注意的一点是这个自动装配会爆红警告,说无法装配,因为没有注册这个部门映射接口Bean类型

直接无视测试运行
测试结果
查询所有部门

按ID查询部门

然后是这个通过名字查询出现了BUG
因为地址栏解析会变成URL字符,这里要变换成UTF8注入才行
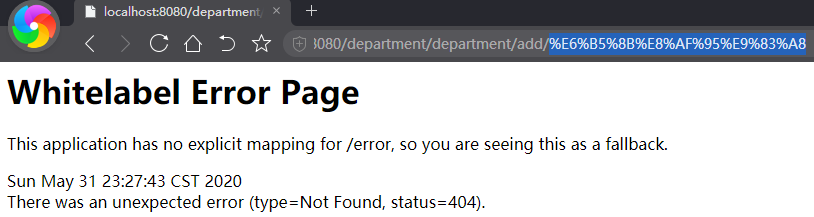
然后更改为URL解码即可
    @GetMapping("/department/add/{dept_name}")

    public String addDepartment(@PathVariable("dept_name")String name) throws UnsupportedEncodingException {

        String decode = URLDecoder.decode(name, "utf-8");

        return "添加结果:" + departmentMapper.addDepartment(decode);

    }
在原生Mybatis的时候一切设置交给Mybatis核心配置文件设置xml标签完成
如果整合的是Spring容器,则通过SQL会话工厂Bean注入配置完成
现在在SpringBoot中,我们通过自定义配置类来实现这个功能
package cn.dai.config;

import org.apache.ibatis.session.Configuration;

import org.mybatis.spring.boot.autoconfigure.ConfigurationCustomizer;

import org.springframework.context.annotation.Bean;

/**

 * @author ArkD42

 * @file SpringBoot with Mybatis

 * @create 2020 - 06 - 01 - 11:23

 */

//自定义Mybatis配置规则

@org.springframework.context.annotation.Configuration

public class MybatisConfig {

    @Bean

    public ConfigurationCustomizer configurationCustomizer(){

        return new ConfigurationCustomizer(){

            @Override

            public void customize(Configuration configuration) {

                // 开启驼峰命名,如果这里的ORM和表字段一样,不要开启

                //configuration.setMapUnderscoreToCamelCase(true);

            }

        };

    }

}
另外,如果映射接口数量众多,不可能每一个接口都要这样打注解Mapper
所以我们需要这样一个注解@MapperScan打在启动Main类
在Main入口类中

注意和MapperScans区分开来,这个是没有S的
2、【使用配置文件完成映射配置】
Mybatis的配置文件包括核心配置文件和映射配置
我们先来编写映射接口
package cn.dai.mapper;

import cn.dai.pojo.Employee;

import java.util.List;

/**

 * @author ArkD42

 * @file SpringBoot with Mybatis

 * @create 2020 - 06 - 01 - 11:35

 */

public interface EmployeeMapper {

    List<Employee> getAllEmployees();

    Employee getEmployeeById();

    int addEmployee(Employee employee);

    int deleteEmployeeById(Integer id);

    int updateEmployeeById(Employee employee);

}
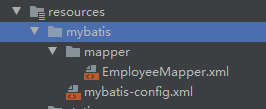
这里不用注解则采用原生Mybatis映射器配置【EmployeeMapper.xml】
<?xml version="1.0" encoding="UTF-8" ?>

<!DOCTYPE mapper

        PUBLIC "-//mybatis.org//DTD Mapper 3.0//EN"

        "http://mybatis.org/dtd/mybatis-3-mapper.dtd">

<mapper namespace="cn.dai.mapper.EmployeeMapper">

<!--

    List<Employee> getAllEmployees();

    Employee getEmployeeById();

    int addEmployee(Employee employee);

    int deleteEmployeeById(Integer id);

    int updateEmployeeById(Employee employee);

-->

    <select id="getAllEmployees" resultType="cn.dai.pojo.Employee">

        SELECT * FROM t_employee

    </select>

    <select id="getEmployeeById" resultType="cn.dai.pojo.Employee">

        SELECT * FROM t_employee WHERE id = #{emp_id}

    </select>

    <insert id="addEmployee" parameterType="cn.dai.pojo.Employee">

        INSERT INTO t_employee(last_name,email,gender,department_id)

        VALUES(#{last_name},#{email},#{gender},#{department_id})

    </insert>

    <delete id="deleteEmployeeById" parameterType="int">

        DELETE FROM t_employee WHERE id = #{id}

    </delete>

    <update id="updateEmployeeById" parameterType="int">

        UPDATE

            t_employee

        SET

            last_name = #{last_name},

            email = #{email},

            gender = #{gender},

            department_id = #{department_id}

        WHERE

            id = #{id}

    </update>

</mapper>
要让SpringBoot加载原生Mybatis的XML配置,就必须在配置信息中加入这些东西
mybatis:

  config-location: classpath:mybatis/mybatis-config.xml

  mapper-locations: classpath:mybatis/mapper/*.xml
这里还忘了核心XML配置,补上
【注意这个核心配置文件,不需要写映射器注册,这个工作在SpringBoot配置信息里设置】
【否则重复注册会导致SpringBoot启动异常,说找不到这个Bean,然后结尾是导入注册异常】
<?xml version="1.0" encoding="UTF-8" ?>

<!DOCTYPE configuration

        PUBLIC "-//mybatis.org//DTD Config 3.0//EN"

        "http://mybatis.org/dtd/mybatis-3-config.dtd">

<configuration>

</configuration>
配置文件位置
在SpringBoot中配置Mybatis配置文件的信息
mybatis:

  config-location: classpath:mybatis/mybatis-config.xml

  mapper-locations: classpath:mybatis/mapper/*.xml
然后编写员工表测试控制器类
package cn.dai.controller;

import cn.dai.mapper.EmployeeMapper;

import cn.dai.pojo.Employee;

import org.springframework.beans.factory.annotation.Autowired;

import org.springframework.web.bind.annotation.GetMapping;

import org.springframework.web.bind.annotation.PathVariable;

import org.springframework.web.bind.annotation.PostMapping;

import org.springframework.web.bind.annotation.RestController;

import java.util.List;

/**

 * @author ArkD42

 * @file SpringBoot with Mybatis

 * @create 2020 - 06 - 01 - 13:28

 */

@RestController

public class EmployeeController {

    @Autowired

    EmployeeMapper employeeMapper;

    @GetMapping("/employee/listAll")

    public List<Employee> getAllEmployees(){

        return employeeMapper.getAllEmployees();

    }

    @GetMapping("/employee/get_by_id/{emp_id}")

    public Employee getEmployeeById(@PathVariable("emp_id") Integer id){

        return employeeMapper.getEmployeeById();

    }

    @PostMapping("/employee/add")

    public String addEmployee(Employee employee){

        return "添加结果:" + employeeMapper.addEmployee(employee);

    }

    @GetMapping("/employee/del_by_id/{emp_id}")

    public String deleteEmployeeById(@PathVariable("emp_id") Integer id){

        return "删除结果:" + employeeMapper.deleteEmployeeById(id);

    }

    @PostMapping("/employee/upd_by_id/")

    public String updateEmployeeById(Employee employee){

        return "修改结果:" + employeeMapper.updateEmployeeById(employee);

    }

}
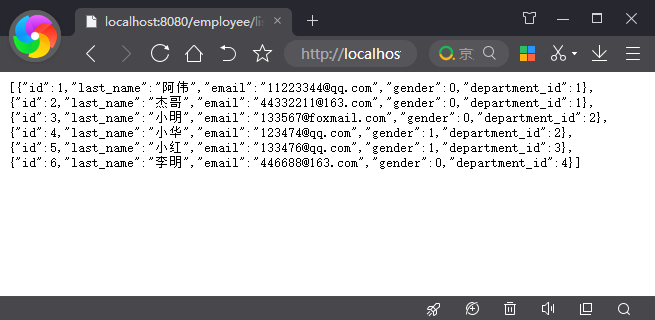
测试结果
关于Mybatis的一些Dao设置也可以在核心配置中设置
总结:
一定要注意跟映射接口相关的映射器配置,不要重复性注册映射器
遇上找不到的异常错误,一般都出现在这个问题上面,仔细留意
【另外跟重复设置有关的还有日志输出,等等,都是因为重复配置导致的问题】
【SpringBoot】15 数据访问P3 整合Mybatis的更多相关文章
- java框架之SpringBoot(9)-数据访问及整合MyBatis
简介 对于数据访问层,无论是 SQL 还是 NOSQL,SpringBoot 默认采用整合 SpringData 的方式进行统一处理,添加了大量的自动配置,引入了各种 Template.Reposit ...
- SpringBoot数据访问之整合mybatis注解版
SpringBoot数据访问之整合mybatis注解版 mybatis注解版: 贴心链接:Github 在网页下方,找到快速开始文档 上述链接方便读者查找. 通过快速开始文档,搭建环境: 创建数据库: ...
- SpringBoot数据访问之整合Mybatis配置文件
环境搭建以及前置知识回顾 SpringBoot中有两种start的形式: 官方:spring-boot-starter-* 第三方:*-spring-boot-starter Mybatis属于第三方 ...
- Spring Boot数据访问之整合Mybatis
在Mybatis整合Spring - 池塘里洗澡的鸭子 - 博客园 (cnblogs.com)中谈到了Spring和Mybatis整合需要整合的点在哪些方面,需要将Mybatis中数据库连接池等相关对 ...
- 六、SpringBoot与数据访问
六.SpringBoot与数据访问 1.JDBC spring: datasource: username: root password: 123456 url: jdbc:mysql://192.1 ...
- SpringBoot之数据访问和事务-专题三
SpringBoot之数据访问和事务-专题三 四.数据访问 4.1.springboot整合使用JdbcTemplate 4.1.1 pom文件引入 <parent> <groupI ...
- springboot使用之二:整合mybatis(xml方式)并添加PageHelper插件
整合mybatis实在前面项目的基础上进行的,前面项目具体整合请参照springboot使用之一. 一.整合mybatis 整合mybatis的时候可以从mybatis官网下载mybatis官网整合的 ...
- SpringBoot的数据访问
一.JDBC方式 引入starter. <dependency> <groupId>org.springframework.boot</groupId> <a ...
- SpringBoot(九) -- SpringBoot与数据访问
一.简介 对于数据访问层,无论是SQL还是NOSQL,Spring Boot默认采用整合Spring Data的方式进行统一处理,添加大量自动配置,屏蔽了很多设置.引入各种xxxTemplate,xx ...
- SpringBoot 之数据访问
1. Spring Boot 与 JDBC 默认使用 org.apache.tomcat.jdbc.pool.DataSource 数据源; // application.yml spring: da ...
随机推荐
- ts的keyof
keyof 是 TypeScript 中的一种类型操作符,用于获取一个类型的所有键(属性名)作为联合类型.它的语法如下: type KeysOfType = keyof ObjectType; 其中: ...
- LeetCode 146. LRU CacheLRU缓存机制 (C++/Java)
题目: Design and implement a data structure for Least Recently Used (LRU) cache. It should support the ...
- 支付宝支付jemter 插件,导入到高版本jmeter 中使用
官方支付宝压力测试文档中: 蚂蚁金服开放平台 - 文档中心 (alipay.com) 有个 temp.jmx 文件(http://p.tb.cn/rmsportal_10157_temp.jmx.zi ...
- 前端开发环境配置 nvm | npm 镜像 | git
安装 nvm nvm 是一个node版本管理工具,它可以让我们安装多个node版本并在需要的时候切换 # nvm 下载地址 https://github.com/coreybutler/nvm-win ...
- Angular 集成 StreamSaver
应用场景: 实现目标: 在网页端实现大文件(文件大小 >= 2 G) 断点续传 实际方案: 发送多次请求, 每次请求一部分文件数据, 然后通过续写将文件数据全部写入. 难点: 无法实现文件续写, ...
- python解析字符串中的省市区字符串
#python解析字符串中的省市区字符串 #str4 = "XX省XX市辛桥乡赵庄村XX号" #str4 = "XX省XX市XX区八卦二路XX号XX栋XX楼" ...
- 汽车生产车间PMC组态画面应该怎么设计
通常我们所说的汽车制造四大工艺指的是:冲压.焊装.涂装.总装.一般来说,在汽车制造工厂,这四大工艺分别对应四大车间.本文结合一些实际应用案例,向大家展示一下 TopStack 在汽车制造业各工艺车间中 ...
- .Net8 AddKeyedScoped键值key注册服务异常
异常描述:This service descriptor is keyed. Your service provider may not support keyed services. 场景:.Net ...
- 准入控制器(Admission Controller):ResourceQuota,ImagePolicyWebhook
目录 一.系统环境 二.前言 三.准入控制器简介 四.为什么需要准入控制器 五.启用/禁用ResourceQuota资源配额 5.1 查看默认启用/禁用的准入控制器插件 5.2 ResourceQuo ...
- Dell服务器配置RIAD并创建热备盘
在系统启动期间,按F2键进入System Setup(系统设置)主菜单 单击Device Settings(设备设置). 单击所需的RAID controller(RAID控制器)设备. 4.单击Co ...