
SpringBoot(九) -- SpringBoot与数据访问
一.简介
对于数据访问层,无论是SQL还是NOSQL,Spring Boot默认采用整合Spring Data的方式进行统一处理,添加大量自动配置,屏蔽了很多设置。引入各种xxxTemplate,xxxRepository来简化我们对数据访问层的操作。对我们来说只需要进行简单的设置即可。
二.整合JDBC和数据源
1.查看POM依赖: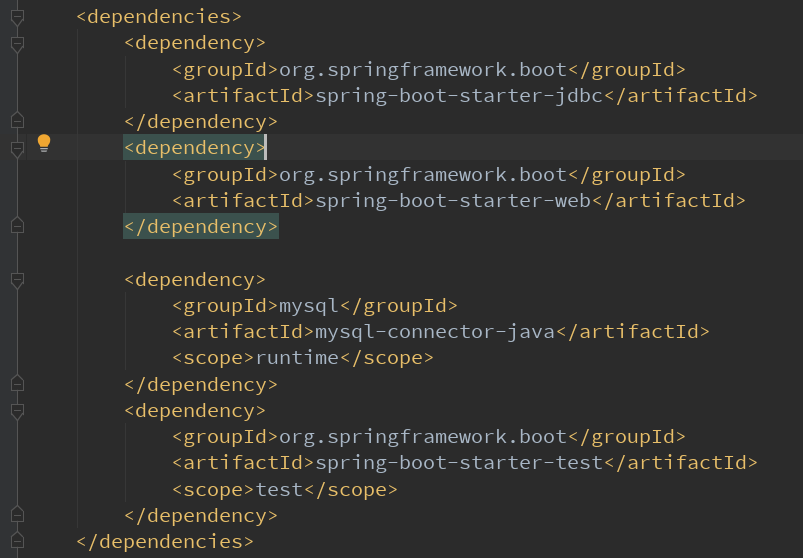
2.配置datasource: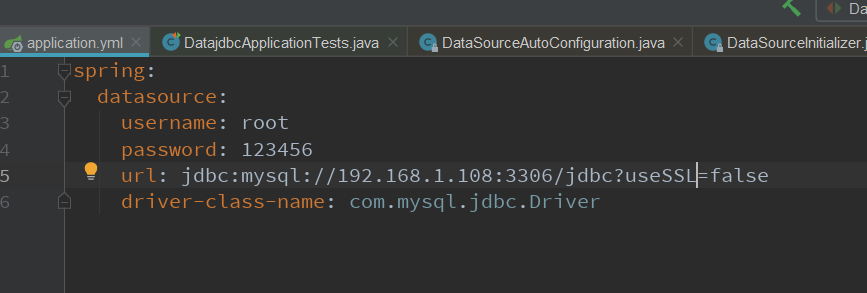
3.观察其自动装配: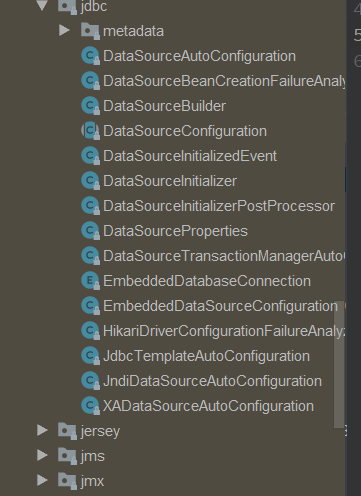
4.在其运行时,具有一个DataSourceConfiguration的类,可以实现自定义的数据源配置,默认启用tomcat.jdbc数据源,同时还支持HikariDataSource,dbcp,dbcp2等数据源,我们还可以自定义数据源:
     /**

      * Generic DataSource configuration.

      */

     @ConditionalOnMissingBean(DataSource.class)

     @ConditionalOnProperty(name = "spring.datasource.type")

     static class Generic {

         @Bean

         public DataSource dataSource(DataSourceProperties properties) {

             return properties.initializeDataSourceBuilder().build();

         }

     }
4.自定义的数据源使用DataSourceBulider来实现自定义数据源的装配,使用反射去创建我们自定义的数据源:
     public DataSource build() {

         Class<? extends DataSource> type = getType();

         DataSource result = BeanUtils.instantiate(type);

         maybeGetDriverClassName();

         bind(result);

         return result;

     }
5.在DataSourceInitializer类中定义了一个 DataSourceInitializer implements ApplicationListener<DataSourceInitializedEvent>,该类主要可以帮助我们在程序初始化的时候自动云运行 schema-*.sql data-*.sql:
     @PostConstruct

     public void init() {

         if (!this.properties.isInitialize()) {

             logger.debug("Initialization disabled (not running DDL scripts)");

             return;

         }

         if (this.applicationContext.getBeanNamesForType(DataSource.class, false,

                 false).length > 0) {

             this.dataSource = this.applicationContext.getBean(DataSource.class);

         }

         if (this.dataSource == null) {

             logger.debug("No DataSource found so not initializing");

             return;

         }

         runSchemaScripts();

     }
6.可以在程序运行时帮助我们执行建表语句;
7.运行插入数据的sql语句:
     @Override

     public void onApplicationEvent(DataSourceInitializedEvent event) {

         if (!this.properties.isInitialize()) {

             logger.debug("Initialization disabled (not running data scripts)");

             return;

         }

         // NOTE the event can happen more than once and

         // the event datasource is not used here

         if (!this.initialized) {

             runDataScripts();

             this.initialized = true;

         }

     }
8.其默认规则只需要将这些文件命名为scheme-*.sql(建表语句),data-*.sql(数据形式的sql文件);将建表语句的sql文件放置在resources文件夹下命名为schema-all(schema).sql,则将在程序运行时自动创建我们的建表语句: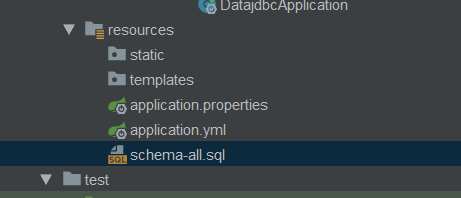
9.我们也可以在配置属性文件中直接指定schema: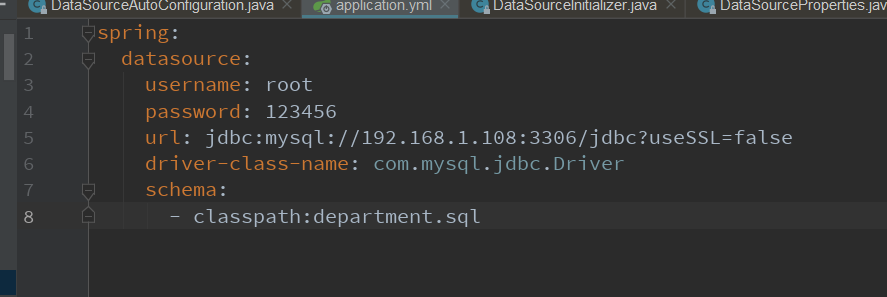
10.如果我们要操作数据库,SpringBoot还具有一个默认的自动配置:JdbcTemplateAutoConfiguration:自动配置了JdbcTemplate操纵数据库
三.数据库操纵演示
自定义一个Controller实现数据查询:
 package com.skykuqi.springboot.datajdbc.controller;

 import org.springframework.beans.factory.annotation.Autowired;

 import org.springframework.jdbc.core.JdbcTemplate;

 import org.springframework.stereotype.Controller;

 import org.springframework.web.bind.annotation.GetMapping;

 import org.springframework.web.bind.annotation.ResponseBody;

 import java.util.List;

 import java.util.Map;

 /**

  * @author : S K Y

  * @version :0.0.1

  */

 @Controller

 public class HelloController {

     @Autowired

     JdbcTemplate template;

     @ResponseBody

     @GetMapping("/query")

     public Map<String, Object> map() {

         List<Map<String, Object>> list = template.queryForList("select * from department");

         return list.get(0);

     }

 }
四.整合使用druid数据源
1.引入druid:
         <!--引入druid数据源-->

         <dependency>

             <groupId>com.alibaba</groupId>

             <artifactId>druid</artifactId>

             <version>1.1.8</version>

         </dependency>
2.配置druid数据源
 package com.skykuqi.springboot.datajdbc.condig;

 import com.alibaba.druid.pool.DruidDataSource;

 import com.alibaba.druid.support.http.StatViewServlet;

 import com.alibaba.druid.support.http.WebStatFilter;

 import org.springframework.boot.context.properties.ConfigurationProperties;

 import org.springframework.boot.web.servlet.FilterRegistrationBean;

 import org.springframework.boot.web.servlet.ServletRegistrationBean;

 import org.springframework.context.annotation.Bean;

 import org.springframework.context.annotation.Configuration;

 import javax.sql.DataSource;

 import java.util.Collections;

 import java.util.HashMap;

 import java.util.Map;

 /**

  * @author : S K Y

  * @version :0.0.1

  */

 @Configuration

 public class DruidConfig {

     @Bean

     @ConfigurationProperties(prefix = "spring.datasource")

     public DataSource druid() {

         return new DruidDataSource();

     }

     //配置Durid的监控

     //1. 配置一个管理后台的Service

     @Bean

     public ServletRegistrationBean statViewServlet() {

         ServletRegistrationBean bean = new ServletRegistrationBean(new StatViewServlet(), "/druid/*");

         Map<String, String> initParameters = new HashMap<>();

         //配置登录后台时的用户名

         initParameters.put("loginUsername", "admin");

         //配置登录后台的密码

         initParameters.put("loginPassword", "123456");

         //默认允许所有访问,配置只允许本地登录

         initParameters.put("allow", "127.0.0.1");

         //阻止该地址的访问

         initParameters.put("deny", "192.168.1.108");

         bean.setInitParameters(initParameters);

         return bean;

     }

     //2.配置一个监控的filter

     @Bean

     public FilterRegistrationBean webStartFilter() {

         FilterRegistrationBean bean = new FilterRegistrationBean();

         bean.setFilter(new WebStatFilter());

         Map<String, String> initParameters = new HashMap<>();

         //设置不拦截以下请求

         initParameters.put("exclusions","*.js,*.css,/druid");

         //设置拦截以下所有请求

         bean.setInitParameters(initParameters);

         bean.setUrlPatterns(Collections.singletonList("/*"));

         return bean;

     }

 }
 spring:

   datasource:

     username: root

     password: 123456

     url: jdbc:mysql://192.168.1.108:3306/jdbc?useSSL=false

     driver-class-name: com.mysql.jdbc.Driver

     schema:

       - classpath:department.sql

     type: com.alibaba.druid.pool.DruidDataSource

     #   数据源其他配置

     initialSize: 5

     minIdle: 5

     maxActive: 20

     maxWait: 60000

     timeBetweenEvictionRunsMillis: 60000

     minEvictableIdleTimeMillis: 300000

     validationQuery: SELECT 1 FROM DUAL

     testWhileIdle: true

     testOnBorrow: false

     testOnReturn: false

     poolPreparedStatements: true

     #   配置监控统计拦截的filters,去掉后监控界面sql无法统计,'wall'用于防火墙

     filters: stat,wall,log4j

     maxPoolPreparedStatementPerConnectionSize: 20

     useGlobalDataSourceStat: true

     connectionProperties: druid.stat.mergeSql=true;druid.stat.slowSqlMillis=500
五.整合Mybatis
1.查看POM依赖
     <dependencies>

         <dependency>

             <groupId>org.springframework.boot</groupId>

             <artifactId>spring-boot-starter-jdbc</artifactId>

         </dependency>

         <dependency>

             <groupId>org.springframework.boot</groupId>

             <artifactId>spring-boot-starter-web</artifactId>

         </dependency>

         <dependency>

             <groupId>org.mybatis.spring.boot</groupId>

             <artifactId>mybatis-spring-boot-starter</artifactId>

             <version>2.1.1</version>

         </dependency>

         <dependency>

             <groupId>mysql</groupId>

             <artifactId>mysql-connector-java</artifactId>

             <scope>runtime</scope>

         </dependency>

         <dependency>

             <groupId>org.springframework.boot</groupId>

             <artifactId>spring-boot-starter-test</artifactId>

             <scope>test</scope>

         </dependency>

     </dependencies>
2.配置使用Mybatis
(1)配置数据源相关;
(2)在数据库中建立相关数据表
(3)创建javaBean;
(4)使用SpringBoot整合Mybatis;
 package com.skykuqi.springboot.mybatis.mapper;

 import com.skykuqi.springboot.mybatis.entity.Department;

 import org.apache.ibatis.annotations.*;

 /**

  * @author : S K Y

  * @version :0.0.1

  */

 @Mapper     //指定这是一个操作数据库的mapper

 public interface DepartmentMapper {

     @Select("select * from department where id=#{id}")

     Department queryDepartmentById(Integer id);

     @Delete("delete from department where id=#{id}")

     int deleteDepartmentById(Integer id);

     @Insert("insert into department(departmentName) values(#{departmentName}) ")

     int insertDepartment(Department department);

     @Update("update department set departmentName=#{departmentName} where id=#{id}")

     int updataDepartment(Department department);

 }
 package com.skykuqi.springboot.mybatis.controller;

 import com.skykuqi.springboot.mybatis.entity.Department;

 import com.skykuqi.springboot.mybatis.mapper.DepartmentMapper;

 import org.springframework.beans.factory.annotation.Autowired;

 import org.springframework.web.bind.annotation.GetMapping;

 import org.springframework.web.bind.annotation.PathVariable;

 /**

  * @author : S K Y

  * @version :0.0.1

  */

 @org.springframework.web.bind.annotation.RestController

 public class RestController {

     @Autowired

     DepartmentMapper departmentMapper;

     @GetMapping("/dept/{id}")

     public Department getDepartment(@PathVariable("id") Integer id) {

         return departmentMapper.queryDepartmentById(id);

     }

     @GetMapping("/dept")

     public Department insertDept(Department department) {

         departmentMapper.insertDepartment(department);

         return department;

     }

 }
--实现插入语句的id值回显:
     @Options(useGeneratedKeys = true,keyProperty = "id")

     @Insert("insert into department(departmentName) values(#{departmentName}) ")

     int insertDepartment(Department department);
(5)当javaBean中的名称与数据库中的名称不一致时.例如javaBean中为departmentName,而在数据库中为department_name,在Mybatis的自动配置中存在ConfigurationCustomizer相关的配置,我们可以自定义实现该接口:
 package com.skykuqi.springboot.mybatis.config;

 import org.mybatis.spring.boot.autoconfigure.ConfigurationCustomizer;

 import org.springframework.context.annotation.Bean;

 import org.springframework.context.annotation.Configuration;

 /**

  * @author : S K Y

  * @version :0.0.1

  */

 @Configuration

 public class MyBatisConfig {

     @Bean

     public ConfigurationCustomizer configurationCustomizer() {

         return configuration -> {

             configuration.setMapUnderscoreToCamelCase(true);        //开启驼峰命名法

         };

     }

 }
(6)可以使用@MapperScan 来配置mapper包扫描,避免过多的Mapper注解的实现
3.使用配置文件的方式来进行Mybatis的整合
(1)在yml配置文件中注册配置类:
(2)在xml文件中配置启用mapUnderscoreToCamelCase
 <?xml version="1.0" encoding="UTF-8" ?>

 <!DOCTYPE configuration

         PUBLIC "-//mybatis.org//DTD Config 3.0//EN"

         "http://mybatis.org/dtd/mybatis-3-config.dtd">

 <configuration>

     <settings>

         <setting name="mapUnderscoreToCamelCase" value="true"/>

     </settings>

 </configuration>
(3)编写mapper.xml
 <?xml version="1.0" encoding="UTF-8"?>

 <!DOCTYPE mapper

         PUBLIC "-//mybatis.org//DTD Mapper 3.0//EN"

         "http://mybatis.org/dtd/mybatis-3-mapper.dtd">

 <mapper namespace="com.skykuqi.springboot.mybatis.mapper.EmployeeMapper">

     <select id="queryEmpById" parameterType="Integer"

             resultType="com.skykuqi.springboot.mybatis.entity.Employee">

         select *

         from employee

         where id = #{id}

     </select>

     <insert id="insertEmp" parameterType="com.skykuqi.springboot.mybatis.entity.Employee">

         insert into employee(lastName, email, gender, d_id)

         values (#{lastName}, #{email}, #{gender}, #{d_id})

     </insert>

 </mapper>
SpringBoot(九) -- SpringBoot与数据访问的更多相关文章
- SpringBoot系列之JDBC数据访问
SpringBoot系列之JDBC数据访问 New->Project or Module->Spring Initializer 选择JDBC和mysql驱动,为了方便测试web等等也可以 ...
- SpringBoot详细研究-02数据访问
Springboot对数据访问部分提供了非常强大的集成,支持mysql,oracle等传统数据库的同时,也支持Redis,MongoDB等非关系型数据库,极大的简化了DAO的代码,尤其是Spring ...
- SpringBoot:Mybatis + Druid 数据访问
西部开源-秦疆老师:基于SpringBoot 2.1.7 的博客教程 秦老师交流Q群号: 664386224 未授权禁止转载!编辑不易 , 转发请注明出处!防君子不防小人,共勉! 简介 对于数据访问层 ...
- SpringBoot(3):SpringData 数据访问
一. 简介 Spring Data是一个用于简化数据库访问,并支持云服务的开源框架:其主要目标是 使得对数据的访问变得方便快捷.对于数据访问层,无论是 SQL(关系型数据库) 还是 NOSQL(非关系 ...
- SpringBoot(九):SpringBoot集成Mybatis
(1)新建一个SpringBoot工程,在pom.xml中配置相关jar依赖 贴代码: <!--加载mybatis整合springboot--> <dependency> &l ...
- Springboot数据访问,棒棒哒!
Springboot对数据访问部分提供了非常强大的集成,支持mysql,oracle等传统数据库的同时,也支持Redis,MongoDB等非关系型数据库,极大的简化了DAO的代码,尤其是Spring ...
- SpringBoot之旅第五篇-数据访问
一.引言 大部分系统都离不开数据访问,数据库包括SQL和NOSQL,SQL是指关系型数据库,常见的有SQL Server,Oracle,MySQL(开源),NOSQL是泛指非关系型数据库,常见的有Mo ...
- java框架之SpringBoot(9)-数据访问及整合MyBatis
简介 对于数据访问层,无论是 SQL 还是 NOSQL,SpringBoot 默认采用整合 SpringData 的方式进行统一处理,添加了大量的自动配置,引入了各种 Template.Reposit ...
- 六、SpringBoot与数据访问
六.SpringBoot与数据访问 1.JDBC spring: datasource: username: root password: 123456 url: jdbc:mysql://192.1 ...
随机推荐
- python request.args 解析
requst.args 获得的是 列表类型原始 aa=ff&&bb=gg 通过request.args 分解为 ImmutableMultiDict([('page', u'10')] ...
- MASM DEBUG LINKER免费下载
这资源全被CSDN霸占了,对于我这种不使用CSND的人,没积分,真TM不好找,搞个共享的. 网盘链接,永久有效 https://pan.baidu.com/s/1Ws5axrfos1cpWL9jyAE ...
- springboot2.0+mysql整合mybatis,发现查询出来的时间比数据库datetime值快了8小时
参考:https://blog.csdn.net/lx12345_/article/details/82020858 修改后查询数据正常
- webkit内核的浏览器常见7种分别是..
Google Chrome Safari 遨游浏览器 3.x 搜狗浏览器 阿里云浏览器 QQ浏览器 360浏览器 ...
- import Vue form 'vue' 解释
- 举个例子去理解vuex(状态管理),通俗理解vuex原理,通过vue例子类比
通俗理解vuex原理---通过vue例子类比 本文主要通过简单的理解来解释下vuex的基本流程,而这也是vuex难点之一. 首先我们先了解下vuex的作用vuex其实是集中的数据管理仓库,相当于数 ...
- React Native 之FlatList 下拉刷新和上拉加载更多
接上一篇代码: 只修改了FlatListDemo.js里面的代码 import React, {Fragment,Component} from 'react'; import { SafeAreaV ...
- [window] Pyhton轻便好用的spyder IDE如何去除E501 line too long提示
spyder 使用pep8作为代码规范的标准,默认单行长度是89个字符以内. 作为一个完美控,在使用spyer有的进行coding时,每当看到以下这个小小的warning时,心情都不是很爽: 89个字 ...
- luogu 2698 [USACO12MAR]花盆Flowerpot 单调队列
刷水~ Code: #include<bits/stdc++.h> using namespace std; #define setIO(s) freopen(s".in&quo ...
- 2017ICPC南宁补题
https://www.cnblogs.com/2462478392Lee/p/11650548.html https://www.cnblogs.com/2462478392Lee/p/116501 ...