
非极大值抑制(NMS)的几种实现
因为之前对比了RoI pooling的几种实现,发现python、pytorch的自带工具函数速度确实很慢,所以这里再对Faster-RCNN中另一个速度瓶颈NMS做一个简单对比试验。
这里做了四组对比试验,来简单验证不同方法对NMS速度的影响。
方法1:纯python语言实现:简介方便、速度慢
方法2:直接利用Cython模块编译
方法3:先将全部变量定义为静态类型,再利用Cython模块编译
方法4:在方法3的基础上再加入cuda加速模块, 再利用Cython模块编译,即利用gpu加速
一. 几点说明
1. 简单说明Cython:
Cython是一个快速生成Python扩展模块的工具,从语法层面上来讲是Python语法和C语言语法的混血,当Python性能遇到瓶颈时,Cython直接将C的原生速度植入Python程序,这样使Python程序无需使用C重写,能快速整合原有的Python程序,这样使得开发效率和执行效率都有很大的提高,而这些中间的部分,都是Cython帮我们做了。
2. 简单介绍NMS:
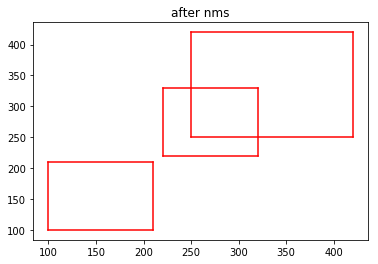
Faster-RCNN中有两处使用NMS,第一处是训练+预测的时候,利用ProposalCreator来生成proposal的时候,因为只需要一部分proposal,所以利用NMS进行筛选。第二处使用是预测的时候,当得到300个分类与坐标偏移结果的时候,需要对每个类别逐一进行非极大值抑制。也许有人问为什么对于每个类别不直接取置信度最高的那一个?因为一张图中某个类别可能不止一个,例如一张图中有多个人,直接取最高置信度的只能预测其中的一个人,而通过NMS理想情况下可以使得每个人(每类中的每个个体)都会有且仅有一个bbox框。
二. 四种方法实现
1. 纯python实现:nms_py.py
#!/usr/bin/env python3

# -*- coding: utf-8 -*-

"""

Created on Mon May  7 21:45:37 2018

@author: lps

"""

import numpy as np

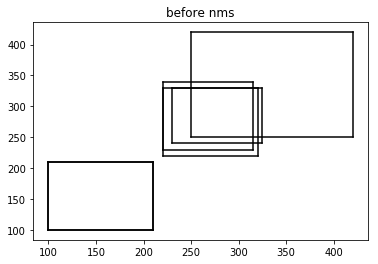
boxes=np.array([[100,100,210,210,0.72],

        [250,250,420,420,0.8],

        [220,220,320,330,0.92],

        [100,100,210,210,0.72],

        [230,240,325,330,0.81],

        [220,230,315,340,0.9]])

def py_cpu_nms(dets, thresh):

    # dets:(m,5)  thresh:scaler

    x1 = dets[:,0]

    y1 = dets[:,1]

    x2 = dets[:,2]

    y2 = dets[:,3]

    areas = (y2-y1+1) * (x2-x1+1)

    scores = dets[:,4]

    keep = []

    index = scores.argsort()[::-1]

    while index.size >0:

        i = index[0]       # every time the first is the biggst, and add it directly

        keep.append(i)

        x11 = np.maximum(x1[i], x1[index[1:]])    # calculate the points of overlap

        y11 = np.maximum(y1[i], y1[index[1:]])

        x22 = np.minimum(x2[i], x2[index[1:]])

        y22 = np.minimum(y2[i], y2[index[1:]])

        w = np.maximum(0, x22-x11+1)    # the weights of overlap

        h = np.maximum(0, y22-y11+1)    # the height of overlap

        overlaps = w*h

        ious = overlaps / (areas[i]+areas[index[1:]] - overlaps)

        idx = np.where(ious<=thresh)[0]

        index = index[idx+1]   # because index start from 1

    return keep

import matplotlib.pyplot as plt

def plot_bbox(dets, c='k'):

    x1 = dets[:,0]

    y1 = dets[:,1]

    x2 = dets[:,2]

    y2 = dets[:,3]

    plt.plot([x1,x2], [y1,y1], c)

    plt.plot([x1,x1], [y1,y2], c)

    plt.plot([x1,x2], [y2,y2], c)

    plt.plot([x2,x2], [y1,y2], c)

    plt.title("after nms")

plot_bbox(boxes,'k')   # before nms

keep = py_cpu_nms(boxes, thresh=0.7)

plot_bbox(boxes[keep], 'r')# after nms
结果大致这样:
新建nms文件夹,将nms_py.py 和__init__.py(空)文件放在其内成为包,可以调用。然后在nms文件夹外新建测试运行时间脚本 test_num.py:
import numpy as np

import time

from nms.nums_py import py_cpu_nms  # for cpu

#from nms.gpu_nms import gpu_nms   # for gpu

np.random.seed( 1 )   # keep fixed

num_rois = 6000

minxy = np.random.randint(50,145,size=(num_rois ,2))

maxxy = np.random.randint(150,200,size=(num_rois ,2))

score = 0.8*np.random.random_sample((num_rois ,1))+0.2

boxes_new = np.concatenate((minxy,maxxy,score), axis=1).astype(np.float32)

def nms_test_time(boxes_new):

    thresh = [0.7,0.8,0.9]

    T = 50

    for i in range(len(thresh)):

        since = time.time()

        for t in range(T):

            keep = py_cpu_nms(boxes_new, thresh=thresh[i])     # for cpu

#            keep = gpu_nms(boxes_new, thresh=thresh[i])       # for gpu

        print("thresh={:.1f}, time wastes:{:.4f}".format(thresh[i], (time.time()-since)/T))

    return keep

if __name__ =="__main__":

    nms_test_time(boxes_new)
测试数据为6000个初始的rois,并设置nms阈值为0.7~0.9。阈值越大越慢,因为满足小于阈值的roi越多,需要循环的次数也越多。对每个阈值循环执行NMS 50次求平均:
直接运行得到运行时间:
thresh=0.7, time wastes:0.0287

thresh=0.8, time wastes:0.1057

thresh=0.9, time wastes:0.4204
2.直接利用Cython模块编译:nms_py1.pyx
首先复制一份nms_py.py并重命名为nms_py1.pyx,pyx即为Cython文件。然后在nms文件夹下新建setup1.py:
from distutils.core import setup

from Cython.Build import cythonize

setup(

      name = 'nms_module',

      ext_modules = cythonize('nums_py1.pyx'),

      )
下面开始生成动态链接库:在终端执行:
python3 setup1.py build
然后在当前目录会生成nums_py1.c,即C源代码,然后在nms/build/lib.linux-x86_64-3.5下会生成nums_py1.cpython-35m-x86_64-linux-gnu.so这一动态链接库,将其复制一份至nms文件夹下,则现在可以在测试脚本中进行测试了:只需将测试脚本中的 from nms.nums_py import py_cpu_nms 改为 from nms.nums1_py import py_cpu_nms 即可。因为pyx是不可以直接执行的,只有build完成后才可以。
运行测试脚本得到以下结果:
thresh=0.7, time wastes:0.0272
thresh=0.8, time wastes:0.1038
thresh=0.9, time wastes:0.4184
发现与纯python速度相比仅有微小提升,下面再利用第3种方法。
3. 更改变量定义后再利用Cython模块编译:nms_py2.pyx
import numpy as np

cimport numpy as np

#

#boxes=np.array([[100,100,210,210,0.72],

#        [250,250,420,420,0.8],

#        [220,220,320,330,0.92],

#        [100,100,210,210,0.72],

#        [230,240,325,330,0.81],

#        [220,230,315,340,0.9]])

#

cdef inline np.float32_t max(np.float32_t a, np.float32_t b):

    return a if a >= b else b

cdef inline np.float32_t min(np.float32_t a, np.float32_t b):

    return a if a <= b else b

def py_cpu_nms(np.ndarray[np.float32_t,ndim=2] dets, np.float thresh):

    # dets:(m,5)  thresh:scaler

    cdef np.ndarray[np.float32_t, ndim=1] x1 = dets[:,0]

    cdef np.ndarray[np.float32_t, ndim=1] y1 = dets[:,1]

    cdef np.ndarray[np.float32_t, ndim=1] x2 = dets[:,2]

    cdef np.ndarray[np.float32_t, ndim=1] y2 = dets[:,3]

    cdef np.ndarray[np.float32_t, ndim=1] scores = dets[:, 4]

    cdef np.ndarray[np.float32_t, ndim=1] areas = (y2-y1+1) * (x2-x1+1)

    cdef np.ndarray[np.int_t, ndim=1]  index = scores.argsort()[::-1]    # can be rewriten

    keep = []

    cdef int ndets = dets.shape[0]

    cdef np.ndarray[np.int_t, ndim=1] suppressed = np.zeros(ndets, dtype=np.int)

    cdef int _i, _j

    cdef int i, j

    cdef np.float32_t ix1, iy1, ix2, iy2, iarea

    cdef np.float32_t w, h

    cdef np.float32_t overlap, ious

    j=0

    for _i in range(ndets):

        i = index[_i]

        if suppressed[i] == 1:

            continue

        keep.append(i)

        ix1 = x1[i]

        iy1 = y1[i]

        ix2 = x2[i]

        iy2 = y2[i]

        iarea = areas[i]

        for _j in range(_i+1, ndets):

            j = index[_j]

            if suppressed[j] == 1:

                continue

            xx1 = max(ix1, x1[j])

            yy1 = max(iy1, y1[j])

            xx2 = max(ix2, x2[j])

            yy2 = max(iy2, y2[j])

            w = max(0.0, xx2-xx1+1)

            h = max(0.0, yy2-yy1+1)

            overlap = w*h

            ious = overlap / (iarea + areas[j] - overlap)

            if ious>thresh:

                suppressed[j] = 1

    return keep

import matplotlib.pyplot as plt

def plot_bbox(dets, c='k'):

    x1 = dets[:,0]

    y1 = dets[:,1]

    x2 = dets[:,2]

    y2 = dets[:,3]

    plt.plot([x1,x2], [y1,y1], c)

    plt.plot([x1,x1], [y1,y2], c)

    plt.plot([x1,x2], [y2,y2], c)

    plt.plot([x2,x2], [y1,y2], c)
其中变量静态类型可以极大的提高效率,原因是参与计算的主要是变量,主要的变化是将变量利用cdef定义。
然后同上建立setup2.py:
from distutils.core import setup

from Cython.Build import cythonize

setup(

      name = 'nms_module',

      ext_modules = cythonize('nums_py2.pyx'),

      )
build后将动态库.so拷贝到nms文件夹下,然后同上修改测试脚本,执行测试脚本:
thresh=0.7, time wastes:0.0019

thresh=0.8, time wastes:0.0028

thresh=0.9, time wastes:0.0036
发现速度相较于纯python分别提升了15倍、38倍、118倍!
4. 在方法3的基础上利用GPU:gpu_nms.pyx
import numpy as np

cimport numpy as np

assert sizeof(int) == sizeof(np.int32_t)

cdef extern from "gpu_nms.hpp":

    void _nms(np.int32_t*, int*, np.float32_t*, int, int, float, int)

def gpu_nms(np.ndarray[np.float32_t, ndim=2] dets, np.float thresh,

            np.int32_t device_id=0):

    cdef int boxes_num = dets.shape[0]

    cdef int boxes_dim = dets.shape[1]

    cdef int num_out

    cdef np.ndarray[np.int32_t, ndim=1] \

        keep = np.zeros(boxes_num, dtype=np.int32)

    cdef np.ndarray[np.float32_t, ndim=1] \

        scores = dets[:, 4]

    cdef np.ndarray[np.int_t, ndim=1] \

        order = scores.argsort()[::-1]

    cdef np.ndarray[np.float32_t, ndim=2] \

        sorted_dets = dets[order, :]

    _nms(&keep[0], &num_out, &sorted_dets[0, 0], boxes_num, boxes_dim, thresh, device_id)

    keep = keep[:num_out]

    return list(order[keep])
再建立文件nms_gpu.hpp:
void _nms(int* keep_out, int* num_out, const float* boxes_host, int boxes_num,

          int boxes_dim, float nms_overlap_thresh, int device_id);
和nms_kernel.cu文件:
#include "gpu_nms.hpp"
#include <vector>
#include <iostream> #define CUDA_CHECK(condition) \
/* Code block avoids redefinition of cudaError_t error */ \
do { \
cudaError_t error = condition; \
if (error != cudaSuccess) { \
std::cout << cudaGetErrorString(error) << std::endl; \
} \
} while () #define DIVUP(m,n) ((m) / (n) + ((m) % (n) > 0))
int const threadsPerBlock = sizeof(unsigned long long) * ; __device__ inline float devIoU(float const * const a, float const * const b) {
float left = max(a[], b[]), right = min(a[], b[]);
float top = max(a[], b[]), bottom = min(a[], b[]);
float width = max(right - left + , .f), height = max(bottom - top + , .f);
float interS = width * height;
float Sa = (a[] - a[] + ) * (a[] - a[] + );
float Sb = (b[] - b[] + ) * (b[] - b[] + );
return interS / (Sa + Sb - interS);
} __global__ void nms_kernel(const int n_boxes, const float nms_overlap_thresh,
const float *dev_boxes, unsigned long long *dev_mask) {
const int row_start = blockIdx.y;
const int col_start = blockIdx.x; // if (row_start > col_start) return; const int row_size =
min(n_boxes - row_start * threadsPerBlock, threadsPerBlock);
const int col_size =
min(n_boxes - col_start * threadsPerBlock, threadsPerBlock); __shared__ float block_boxes[threadsPerBlock * ];
if (threadIdx.x < col_size) {
block_boxes[threadIdx.x * + ] =
dev_boxes[(threadsPerBlock * col_start + threadIdx.x) * + ];
block_boxes[threadIdx.x * + ] =
dev_boxes[(threadsPerBlock * col_start + threadIdx.x) * + ];
block_boxes[threadIdx.x * + ] =
dev_boxes[(threadsPerBlock * col_start + threadIdx.x) * + ];
block_boxes[threadIdx.x * + ] =
dev_boxes[(threadsPerBlock * col_start + threadIdx.x) * + ];
block_boxes[threadIdx.x * + ] =
dev_boxes[(threadsPerBlock * col_start + threadIdx.x) * + ];
}
__syncthreads(); if (threadIdx.x < row_size) {
const int cur_box_idx = threadsPerBlock * row_start + threadIdx.x;
const float *cur_box = dev_boxes + cur_box_idx * ;
int i = ;
unsigned long long t = ;
int start = ;
if (row_start == col_start) {
start = threadIdx.x + ;
}
for (i = start; i < col_size; i++) {
if (devIoU(cur_box, block_boxes + i * ) > nms_overlap_thresh) {
t |= 1ULL << i;
}
}
const int col_blocks = DIVUP(n_boxes, threadsPerBlock);
dev_mask[cur_box_idx * col_blocks + col_start] = t;
}
} void _set_device(int device_id) {
int current_device;
CUDA_CHECK(cudaGetDevice(¤t_device));
if (current_device == device_id) {
return;
}
// The call to cudaSetDevice must come before any calls to Get, which
// may perform initialization using the GPU.
CUDA_CHECK(cudaSetDevice(device_id));
} void _nms(int* keep_out, int* num_out, const float* boxes_host, int boxes_num,
int boxes_dim, float nms_overlap_thresh, int device_id) {
_set_device(device_id); float* boxes_dev = NULL;
unsigned long long* mask_dev = NULL; const int col_blocks = DIVUP(boxes_num, threadsPerBlock); CUDA_CHECK(cudaMalloc(&boxes_dev,
boxes_num * boxes_dim * sizeof(float)));
CUDA_CHECK(cudaMemcpy(boxes_dev,
boxes_host,
boxes_num * boxes_dim * sizeof(float),
cudaMemcpyHostToDevice)); CUDA_CHECK(cudaMalloc(&mask_dev,
boxes_num * col_blocks * sizeof(unsigned long long))); dim3 blocks(DIVUP(boxes_num, threadsPerBlock),
DIVUP(boxes_num, threadsPerBlock));
dim3 threads(threadsPerBlock);
nms_kernel<<<blocks, threads>>>(boxes_num,
nms_overlap_thresh,
boxes_dev,
mask_dev); std::vector<unsigned long long> mask_host(boxes_num * col_blocks);
CUDA_CHECK(cudaMemcpy(&mask_host[],
mask_dev,
sizeof(unsigned long long) * boxes_num * col_blocks,
cudaMemcpyDeviceToHost)); std::vector<unsigned long long> remv(col_blocks);
memset(&remv[], , sizeof(unsigned long long) * col_blocks); int num_to_keep = ;
for (int i = ; i < boxes_num; i++) {
int nblock = i / threadsPerBlock;
int inblock = i % threadsPerBlock; if (!(remv[nblock] & (1ULL << inblock))) {
keep_out[num_to_keep++] = i;
unsigned long long *p = &mask_host[] + i * col_blocks;
for (int j = nblock; j < col_blocks; j++) {
remv[j] |= p[j];
}
}
}
*num_out = num_to_keep; CUDA_CHECK(cudaFree(boxes_dev));
CUDA_CHECK(cudaFree(mask_dev));
}
然后在nms文件夹外建立setup3.py:
from distutils.core import setup

from Cython.Build import cythonize

from distutils.extension import Extension

from Cython.Distutils import build_ext

import subprocess

import numpy as np

import os

from os.path import join as pjoin

def find_in_path(name, path):

    "Find a file in a search path"

    # Adapted fom

    # http://code.activestate.com/recipes/52224-find-a-file-given-a-search-path/

    for dir in path.split(os.pathsep):

        binpath = pjoin(dir, name)

        if os.path.exists(binpath):

            return os.path.abspath(binpath)

    return None

def locate_cuda():

    """Locate the CUDA environment on the system

    Returns a dict with keys 'home', 'nvcc', 'include', and 'lib64'

    and values giving the absolute path to each directory.

    Starts by looking for the CUDAHOME env variable. If not found, everything

    is based on finding 'nvcc' in the PATH.

    """

    # first check if the CUDAHOME env variable is in use

    if 'CUDAHOME' in os.environ:

        home = os.environ['CUDAHOME']

        nvcc = pjoin(home, 'bin', 'nvcc')

    else:

        # otherwise, search the PATH for NVCC

        default_path = pjoin(os.sep, 'usr', 'local', 'cuda', 'bin')

        nvcc = find_in_path('nvcc', os.environ['PATH'] + os.pathsep + default_path)

        if nvcc is None:

            raise EnvironmentError('The nvcc binary could not be '

                'located in your $PATH. Either add it to your path, or set $CUDAHOME')

        home = os.path.dirname(os.path.dirname(nvcc))

    cudaconfig = {'home':home, 'nvcc':nvcc,

                  'include': pjoin(home, 'include'),

                  'lib64': pjoin(home, 'lib64')}

    for k, v in cudaconfig.items():

        if not os.path.exists(v):

            raise EnvironmentError('The CUDA %s path could not be located in %s' % (k, v))

    return cudaconfig

CUDA = locate_cuda()

try:

    numpy_include = np.get_include()

except AttributeError:

    numpy_include = np.get_numpy_include()

def customize_compiler_for_nvcc(self):

    """inject deep into distutils to customize how the dispatch

    to gcc/nvcc works.

    If you subclass UnixCCompiler, it's not trivial to get your subclass

    injected in, and still have the right customizations (i.e.

    distutils.sysconfig.customize_compiler) run on it. So instead of going

    the OO route, I have this. Note, it's kindof like a wierd functional

    subclassing going on."""

    # tell the compiler it can processes .cu

    self.src_extensions.append('.cu')

    # save references to the default compiler_so and _comple methods

    default_compiler_so = self.compiler_so

    super = self._compile

    # now redefine the _compile method. This gets executed for each

    # object but distutils doesn't have the ability to change compilers

    # based on source extension: we add it.

    def _compile(obj, src, ext, cc_args, extra_postargs, pp_opts):

        if os.path.splitext(src)[1] == '.cu':

            # use the cuda for .cu files

            self.set_executable('compiler_so', CUDA['nvcc'])

            # use only a subset of the extra_postargs, which are 1-1 translated

            # from the extra_compile_args in the Extension class

            postargs = extra_postargs['nvcc']

        else:

            postargs = extra_postargs['gcc']

        super(obj, src, ext, cc_args, postargs, pp_opts)

        # reset the default compiler_so, which we might have changed for cuda

        self.compiler_so = default_compiler_so

    # inject our redefined _compile method into the class

    self._compile = _compile

# run the customize_compiler

class custom_build_ext(build_ext):

    def build_extensions(self):

        customize_compiler_for_nvcc(self.compiler)

        build_ext.build_extensions(self)

ext_modules =     [Extension('nms.gpu_nms',

        ['nms/nms_kernel.cu', 'nms/gpu_nms.pyx'],

        library_dirs=[CUDA['lib64']],

        libraries=['cudart'],

        language='c++',

        runtime_library_dirs=[CUDA['lib64']],

        # this syntax is specific to this build system

        # we're only going to use certain compiler args with nvcc and not with

        # gcc the implementation of this trick is in customize_compiler() below

        extra_compile_args={'gcc': ["-Wno-unused-function"],

                            'nvcc': ['-arch=sm_35',

                                     '--ptxas-options=-v',

                                     '-c',

                                     '--compiler-options',

                                     "'-fPIC'"]},

        include_dirs = [numpy_include, CUDA['include']]

    )]

setup(

    name='fast_rcnn',

    ext_modules=ext_modules,

    # inject our custom trigger

    cmdclass={'build_ext': custom_build_ext},

)
然后同上修改测试脚本,执行测试脚本:
import numpy as np

import time

#from nms.nums_py2 import py_cpu_nms  # for cpu

from nms.gpu_nms import gpu_nms   # for gpu

np.random.seed( 1 )   # keep fixed

num_rois = 6000

minxy = np.random.randint(50,145,size=(num_rois ,2))

maxxy = np.random.randint(150,200,size=(num_rois ,2))

score = 0.8*np.random.random_sample((num_rois ,1))+0.2

boxes_new = np.concatenate((minxy,maxxy,score), axis=1).astype(np.float32)

def nms_test_time(boxes_new):

    thresh = [0.7,0.8,0.9]

    T = 50

    for i in range(len(thresh)):

        since = time.time()

        for t in range(T):

#            keep = py_cpu_nms(boxes_new, thresh=thresh[i])     # for cpu

            keep = gpu_nms(boxes_new, thresh=thresh[i])       # for gpu

        print("thresh={:.1f}, time wastes:{:.4f}".format(thresh[i], (time.time()-since)/T))

    return keep

if __name__ =="__main__":

    nms_test_time(boxes_new)
结果:
thresh=0.7, time wastes:0.0120

thresh=0.8, time wastes:0.0063

thresh=0.9, time wastes:0.0071
发现比方法3还要慢一点,应该是计算量较小,而且时间损耗在调用GPU上吧。如果在Faster-RCNN中利方法4肯定是最快的,毕竟是rbg的实现,暂时来看方法3也足够了(我不会cuda啊)
完整代码见:github
Reference:
Cython的简单使用: 利用Cython快速实现生成C代码
py-faster-rcnn: rbg的NMS实现
一些不错的博客:
基于 NVRTC 和 CUPY 的 Python CUDA 扩展
非极大值抑制(NMS)的几种实现的更多相关文章
- 非极大值抑制(NMS)
非极大值抑制顾名思义就是抑制不是极大值的元素,搜索局部的极大值.这个局部代表的是一个邻域,邻域有两个参数可变,一个是邻域的维数,二是邻域的大小.这里不讨论通用的NMS算法,而是用于在目标检测中提取分数 ...
- pytorch实现yolov3(4) 非极大值抑制nms
在上一篇里我们实现了forward函数.得到了prediction.此时预测出了特别多的box以及各种class probability,现在我们要从中过滤出我们最终的预测box. 理解了yolov3 ...
- 非极大值抑制(Non-Maximum Suppression,NMS)
概述 非极大值抑制(Non-Maximum Suppression,NMS),顾名思义就是抑制不是极大值的元素,可以理解为局部最大搜索.这个局部代表的是一个邻域,邻域有两个参数可变,一是邻域的维数,二 ...
- 非极大值抑制(NMS)
转自:https://www.cnblogs.com/makefile/p/nms.html 概述 非极大值抑制(Non-Maximum Suppression,NMS),顾名思义就是抑制不是极大值的 ...
- 非极大值抑制Non-Maximum Suppression(NMS)
非极大值抑制(Non-Maximum Suppression,NMS) 概述 非极大值抑制(Non-Maximum Suppression,NMS),顾名思义就是抑制不是极大值的元素,可以理解为局 ...
- 目标检测后处理之NMS(非极大值抑制算法)
1.定义: 非极大值抑制算法NMS广泛应用于目标检测算法,其目的是为了消除多余的候选框,找到最佳的物体检测位置. 2.原理: 使用深度学习模型检测出的目标都有多个框,如下图,针对每一个被检测目标,为了 ...
- Non-Maximum Suppression,NMS非极大值抑制
Non-Maximum Suppression,NMS非极大值抑制概述非极大值抑制(Non-Maximum Suppression,NMS),顾名思义就是抑制不是极大值的元素,可以理解为局部最大搜索. ...
- 目标检测 非极大值抑制(Non-Maximum Suppression,NMS)
非极大值抑制(Non-Maximum Suppression,NMS),顾名思义就是抑制不是极大值的元素,可以理解为局部最大搜索.也可以理解为只取置信度最高的一个识别结果. 举例:  如图所示,现在 ...
- 输出预测边界框,NMS非极大值抑制
我们预测阶段时: 生成多个锚框 每个锚框预测类别和偏移量 但是,当同一个目标上可能输出较多的相似的预测边界框.我们可以移除相似的预测边界框.——NMS(非极大值抑制). 对于一个预测边界框B,模型会计 ...
随机推荐
- my live boadband
id_boadband tel: 02511931324 ¥1600 包2年,10MB/S =100Mb,2018.12.1 ~ 2020.12.1 end
- java8的Streams
首先看一个问题:在这个task集合中一共有多少个OPEN状态的?计算出它们的points属性和.在Java 8之前,要解决这个问题,则需要使用foreach循环遍历task集合:但是在Java 8中可 ...
- inux进程/线程调度策略与 进程优先级
目的: 系统性的认识linux的调度策略(SCHED_OTHER.SCHED_FIFO.SCHED_RR): 实时调度?分时调度? 混搭系统(实时任务+分时任务),怎样调度. linux的调度策略 l ...
- G1垃圾收集器的实现原理
(G1垃圾收集器的实现原理.G1和CMS经常被单独拎出来问) https://tech.meituan.com/g1.html G1太复杂,说下CMS吧
- Spark源码剖析 - SparkContext的初始化(四)_Hadoop相关配置及Executor环境变量
4. Hadoop相关配置及Executor环境变量的设置 4.1 Hadoop相关配置信息 默认情况下,Spark使用HDFS作为分布式文件系统,所以需要获取Hadoop相关配置信息的代码如下: 获 ...
- 解析ArcGis的字段计算器(三)——文本型字段计算,编号那些事儿
实际操作中我们一般会将编号字段定义为文本型,因为编号不是序号,序号是一个递增数值,而编号往往是一个数字串代码. 本篇无说明的均使用VBScript语句1.怎么编号?最简单的编号—>直接在编号字段 ...
- DataReader分页性能测试
参考程序地址:http://www.cnblogs.com/eaglet/archive/2008/10/09/1306806.html 最近遇见程序慢的问题,使用的DataReader,猜想是分页导 ...
- Rose 2003使用的问题
1.win10下直接找exe版本的,虚拟光驱版本的麻烦. 2.安装后要重启计算机会自动再安装一个组件,不然无法启动. 3.用例图.活动图在这里. 下载地址:http://www.downcc.com/ ...
- IDEA 远程调试 Tomcat 和 Debugger
一般来说我们本地环境使用Tomcat,生产环境使用GlassFish. 准备工作 明确远程服务器的 IP 地址,比如:192.168.92.128 关掉服务器防火墙:service iptables ...
- 【bzoj 3524】[Poi2014]Couriers
Description 给一个长度为n的序列a.1≤a[i]≤n.m组询问,每次询问一个区间[l,r],是否存在一个数在[l,r]中出现的次数大于(r-l+1)/2.如果存在,输出这个数,否则输出0. ...