
linux下nginx日常操作
一、检查配置文件语法
[root@node2 /]# nginx -tc /usr/local/nginx/conf/nginx.conf

nginx: the configuration file /usr/local/nginx/conf/nginx.conf syntax is ok

nginx: configuration file /usr/local/nginx/conf/nginx.conf test is successful
二、重载配置
[root@node2 /]# nginx -s reload
三、加载连接状态统计模块
编辑nginx.conf文件,加入一个location,加载stub_status模块
创建配置文件目录,将默认配置文件复制到此目录
[root@node2 /]# mkdir /etc/nginx

[root@node2 /]# cp /usr/local/nginx/conf/nginx.conf /etc/nginx
vim /etc/nginx/nginx.conf
在server里加入一个location
        location /stats{

           stub_status;

        }
保存、退出,检查语法
[root@node2 sbin]# nginx -tc /etc/nginx/nginx.conf

nginx: [emerg] open() "/etc/nginx/mime.types" failed (: No such file or directory) in /etc/nginx/nginx.conf:

nginx: configuration file /etc/nginx/nginx.conf test failed
报错,将mime.types文件以及html目录复制到/etc/nginx/下
cp /usr/local/nginx/conf/mime.types /etc/nginx

cp -r /usr/local/nginx/html/ /etc/nginx/
再检查语法
[root@node2 nginx]# nginx -tc /etc/nginx/nginx.conf

nginx: the configuration file /etc/nginx/nginx.conf syntax is ok

nginx: configuration file /etc/nginx/nginx.conf test is successful
重载配置
[root@node2 nginx]# nginx -s reload
浏览器打开http://ip/stats
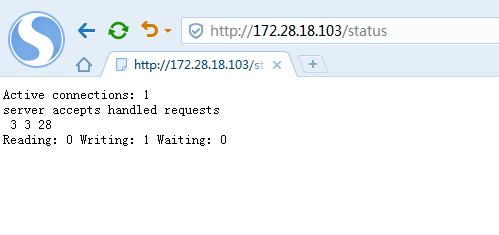
显示以上信息:
Active connections: 1
当前活动连接数:1
server accepts handled requests
3 3 28
分别表示:握手次数、连接次数、请求次数
正常情况下,握手次数和连接次数是相等的,表明没有丢失的连接
Reading: 0 Writing: 1 Waiting: 2
Reading:表示当前状态正在读的连接个数、
Writing:表示当前状态正在写的连接个数
Waiting:表示当前状态空闲的连接个数,当nginx开启了长连接keepalive后,会出现空闲连接
在nginx.conf配置文件中有一个keepalive_timeout参数,用于设置长连接超时时间
keepalive_timeout 65;
四、加载请求限制模块
vim /etc/nginx/nginx.conf
在server之前加上
limit_req_zone $binary_remote_addr zone=req_zone:1m rate=1r/s;
location里加上
        location / {

            root   html;

            index  index.html index.htm;

            limit_req zone=req_zone;

        }
保存,检查语法并重载
[root@node2 nginx]# nginx -tc /etc/nginx/nginx.conf

nginx: the configuration file /etc/nginx/nginx.conf syntax is ok

nginx: configuration file /etc/nginx/nginx.conf test is successful

[root@node2 nginx]# nginx -s reload

[root@node2 nginx]#
压测
[root@node2 logs]# ab -n  -c  http://127.0.0.1/

This is ApacheBench, Version 2.3 <$Revision:  $>

Copyright  Adam Twiss, Zeus Technology Ltd, http://www.zeustech.net/

Licensed to The Apache Software Foundation, http://www.apache.org/

Benchmarking 127.0.0.1 (be patient).....done

Server Software:        nginx/1.14.

Server Hostname:        127.0.0.1

Server Port:

Document Path:          /

Document Length:         bytes

Concurrency Level:

Time taken for tests:   0.002 seconds

Complete requests:

Failed requests:

   (Connect: , Receive: , Length: , Exceptions: )

Write errors:

Non-2xx responses:

Total transferred:       bytes

HTML transferred:        bytes

Requests per second:    4854.37 [#/sec] (mean)

Time per request:       0.206 [ms] (mean)

Time per request:       0.206 [ms] (mean, across all concurrent requests)

Transfer rate:          3519.42 [Kbytes/sec] received
显示只有1次请求正常,其他9次被限制了
添加延迟响应参数
        location / {

            root   html;

            index  index.html index.htm;

            limit_req zone=req_zone burst=;

        }
保存,重载,再次压测
[root@node2 logs]# ab -n  -c  http://127.0.0.1/

This is ApacheBench, Version 2.3 <$Revision:  $>

Copyright  Adam Twiss, Zeus Technology Ltd, http://www.zeustech.net/

Licensed to The Apache Software Foundation, http://www.apache.org/

Benchmarking 127.0.0.1 (be patient).....done

Server Software:        nginx/1.14.

Server Hostname:        127.0.0.1

Server Port:

Document Path:          /

Document Length:         bytes

Concurrency Level:

Time taken for tests:   9.002 seconds

Complete requests:

Failed requests:

Write errors:

Total transferred:       bytes

HTML transferred:        bytes

Requests per second:    1.11 [#/sec] (mean)

Time per request:       900.161 [ms] (mean)

Time per request:       900.161 [ms] (mean, across all concurrent requests)

Transfer rate:          0.92 [Kbytes/sec] received
结果显示,请求全部成功,但是耗时变成了9秒,请求被延迟响应。
linux下nginx日常操作的更多相关文章
- 【转】linux下nginx相关操作
参考文章 <nginx启动,重启,关闭命令> 停止操作 停止操作是通过向nginx进程发送信号(什么是信号请参阅linux文 章)来进行的 步骤1:查询nginx主进程号 ps -ef | ...
- Linux下nginx编译安装教程和编译参数详解
这篇文章主要介绍了Linux下nginx编译安装教程和编译参数详解,需要的朋友可以参考下 一.必要软件准备1.安装pcre 为了支持rewrite功能,我们需要安装pcre 复制代码代码如下: # y ...
- 【转】Linux下nginx配置https协议访问的方法
一.配置nginx支持https协议访问,需要在编译安装nginx的时候添加相应的模块--with-http_ssl_module 查看nginx编译参数:/usr/local/nginx/sbin/ ...
- VMware Linux 下 Nginx
负载 VMware Linux 下 Nginx 安装配置 - nginx.conf 配置 [负载两个 Tomcat] (三) Weiseditor 2014-11-26 23:42 阅读:1 评论 ...
- VMware Linux 下 Nginx 安装配置 - nginx.conf 配置 [负载两个 Tomcat] (三)
首先启动Nginx 1. 相关浏览 两个 Tomcat 配置: VMware Linux 下 Nginx 安装配置 - Tomcat 配置 (二) Nginx 安装配置启动: VMware Linu ...
- VMware Linux 下 Nginx 安装配置 - Tomcat 配置 (二)
准备工作 相关浏览: VMware Linux 下 Nginx 安装配置 (一) 1. 选在 /usr/local/ 下创建 softs 文件夹,通过 ftp 命令 把 apache-tomcat-7 ...
- linux下的shell操作mysql
(1)MySQL的启动 重启了一次服务器后,使用> mysql -u root -p登陆是出现下面的错误: ERROR 2002 (HY000): Can't connect to local ...
- linux下的文本操作之 文本查找——grep
摘要:你有没有这样的应用场景:调试一个程序,出现debug的提示信息,现在你需要定位是哪个文件包含了这个debug信息,也就是说,你需要在一个目录下的多个文件(可能包含子目录)中查找某个字符串的位置: ...
- linux下通过sysfs操作GPIO
linux下通过sysfs操作GPIO 在嵌入式设备中对GPIO的操作是最基本的操作.一般的做法是写一个单独驱动程序,网上大多数的例子都是这样的.其实linux下面有一个通用的GPIO操作接口,那就是 ...
随机推荐
- 【剑指Offer】只出现一次的字符
题目描述 请实现一个函数用来找出字符流中第一个只出现一次的字符.例如,当从字符流中只读出前两个字符"go"时,第一个只出现一次的字符是"g".当从该字符流中读出 ...
- (转)Android之发送短信的两种方式
https://www.cnblogs.com/dongweiq/p/4866022.html if(TextUtils.isEmpty(number)||TextUtils.isEmpty(cont ...
- Kong(v1.0.2)代理参考
介绍 在本文中,我们将通过详细解释Kong的路由功能和内部工作原理来介绍它的代理功能. Kong公开了几个接口,可以通过两个配置属性进行调整: proxy_listen,它定义了一个地址/端口列表,K ...
- selenium 添加动态隧道代理
# 无须密码验证方法 chromeOptions = webdriver.ChromeOptions() chromeOptions.add_argument('--proxy-server=http ...
- 爬虫系列3:Requests+Xpath 爬取租房网站信息并保存本地
数据保存本地 [抓取]:参考前文 爬虫系列1:https://www.cnblogs.com/yizhiamumu/p/9451093.html [分页]:参考前文 爬虫系列2:https://www ...
- udev磁盘绑定
udev磁盘绑定 [grid@db-rac02 ~]$ cat 99-asm-multipath.rules KERNEL=="sd*",SUBSYSTEM=="bloc ...
- docker环境安装与开启远程访问
一,安装docker 1,服务器安装 docker yum install docker 直接yum安装版本太低 2,卸载:老版本的Docker在yum中名称为docker或docker-engine ...
- SQL 生日得到年龄
CREATE FUNCTION ufn_hr_getagefrombirthday ( @birthday DATE, @now DATE =NULL ) ) BEGIN IF (@now IS NU ...
- [org.springframework.context.annotation.ComponentScanBeanDefinitionParser] are only available on JDK 1.5 and higher 问题--MyEclipse设置JDK版本
org.springframework.beans.factory.BeanDefinitionStoreException: Unexpected exception parsing XML doc ...
- js 连接mqtt
js连接mqtt 项目中要用到mqtt,前端调用,使用github开源的paho-mqtt.js,api还是挺全面的,网上各种教程很全面,但是感觉代码过于杂乱,故而封装的一下.仿jquery ajax ...