
centos6.4安装 jupyter-notebook
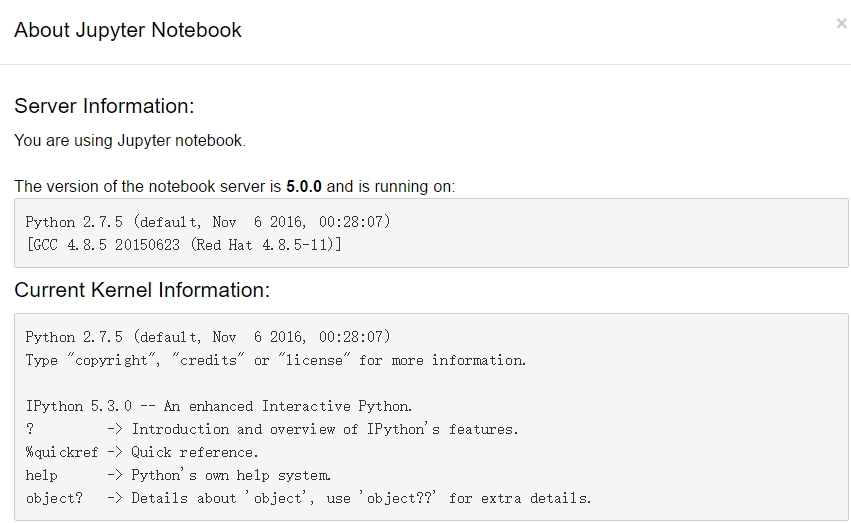
系统:最小化安装[习惯性]
关闭防火墙:
- systemctl stop firewalld && systemctl disable firewalld
禁用SELINUX:
- [root@jupyter ~]# sed -i 's#SELINUX=enforcing#SELINUX=disabled#g' /etc/selinux/config
- [root@jupyter ~]# setenforce 0
添加EPLE源:
- rpm -ivh http://mirrors.yun-idc.com/epel/epel-release-latest-7.noarch.rpm
安装部分可能用到的依赖包:
- yum install vim openssl-devel readline-devel python-devel python-pip -y
- tar xf Python-3.5.2.tgz
- cd Python-3.5.2
- ./configure --prefix=/usr/local/python-3.5.2
- make && make install
- #创建一个软连接:
- ln -sf /usr/local/python-3.5.2/bin/python3 /usr/bin/python3
- ln -sf /usr/local/python-3.5.2/bin/pip3 /usr/bin/pip3
- pip install jupyter //这命令默认使用的是Python2.7.5版本安装;
安装完后即可以启动:jupyter-notebook
- jupyter-notebook
如果在启动的时候提示,说明默认不建议使用root来运行,不过我们可以配置文件修改,接下来会介绍如何修改;
- [C 15:03:06.778 NotebookApp] Running as root is not recommended. Use --allow-root to bypass.
- [root@pydev ~]# jupyter notebook --generate-config --allow-root
- Writing default config to: /root/.jupyter/jupyter_notebook_config.py
创建一个密码:[这样就不用每次复制URL地址]
- [root@jupyter ~]# ipython
- Python 2.7.5 (default, Nov 6 2016, 00:28:07)
- Type "copyright", "credits" or "license" for more information.
- IPython 5.3.0 -- An enhanced Interactive Python.
- ? -> Introduction and overview of IPython's features.
- %quickref -> Quick reference.
- help -> Python's own help system.
- object? -> Details about 'object', use 'object??' for extra details.
- In [1]: from notebook.auth import passwd
- In [2]: passwd()
- Enter password:
- Verify password:
- Out[2]: 'sha1:da874cad4309:4104089e5ef97c8fcbe69c2ac7d6a1071ca50a40'
- 62 #c.NotebookApp.allow_root = False
- 去掉62行的注释,并修改成True即可解决root权限运行的问题。
- 163 #c.NotebookApp.ip = 'localhost'
- 去掉注释,并把localhost改成0.0.0.0,这样就可以外部访问了,默认只有在本机可以访问的;
- 163 c.NotebookApp.ip = '0.0.0.0'
- 203 #c.NotebookApp.notebook_dir = u''
- 改成如下,这样就会默认把notebook上创建的文件保存到指定目录下;需要事先创建。
- 203 c.NotebookApp.notebook_dir = u'/opt/jupyter'
- 218 #c.NotebookApp.password = u''
- 加入上面创建的密码:
- 218 c.NotebookApp.password = u'sha1:da874cad4309:4104089e5ef97c8fcbe69c2ac7d6a1071ca50a40'
保存,重新运行程序:
- [root@jupyter~]# jupyter-notebook
- [I 15:20:53.313 NotebookApp] Serving notebooks from local directory: /opt/jupyter
- [I 15:20:53.313 NotebookApp] 0 active kernels
- [I 15:20:53.313 NotebookApp] The Jupyter Notebook is running at: http://0.0.0.0:8888/
- [I 15:20:53.313 NotebookApp] Use Control-C to stop this server and shut down all kernels (twice to skip confirmation).
- [W 15:20:53.313 NotebookApp] No web browser found: could not locate runnable browser.
URL地址:10.0.10.253:8888
密码:123456
不过在查看版本的时候还是有个问题,就是切换了python版后,使用命令还是一样显示为python2.7.5
验证:输入命令:netstat -ntlp
[root@localhost centos]$  netstat -ntlp

Active Internet connections (only servers)

Proto Recv-Q Send-Q Local Address           Foreign Address         State       PID/Program name

tcp        0      0 0.0.0.0:111             0.0.0.0:*               LISTEN      1/systemd

tcp        0      0 192.168.122.1:53        0.0.0.0:*               LISTEN      1980/dnsmasq

tcp        0      0 0.0.0.0:22              0.0.0.0:*               LISTEN      1598/sshd

tcp        0      0 127.0.0.1:631           0.0.0.0:*               LISTEN      1601/cupsd

tcp        0      0 0.0.0.0:8888            0.0.0.0:*               LISTEN      18997/python

tcp        0      0 127.0.0.1:25            0.0.0.0:*               LISTEN      1874/master

tcp6       0      0 :::111                  :::*                    LISTEN      1/systemd

tcp6       0      0 :::22                   :::*                    LISTEN      1598/sshd

tcp6       0      0 ::1:631                 :::*                    LISTEN      1601/cupsd

tcp6       0      0 :::8888                 :::*                    LISTEN      18997/python

tcp6       0      0 ::1:25                  :::*                    LISTEN      1874/master
centos6.4安装 jupyter-notebook的更多相关文章
- Docker 安装jupyter notebook
1. 利用image运行一个container sudo docker run -it --net=host tingting --net=host:让container可以上网,安装原来的sudo ...
- linux安装python3 ,安装IPython ,安装jupyter notebook
安装python3 下载到 /opt/中 1.下载python3源码,选择3.6.7因为ipython依赖于>3.6的python环境wget https://www.python.org ...
- ubuntu14.04安装jupyter notebook
1.使用pip安装Jupyter notebook: pip install jupyter notebook 2.创建Jupyter默认配置文件: jupyter notebook --genera ...
- windows安装Jupyter Notebook
这是我自定义的Python 的安装目录 (D:\SoftWare\Python\Python36\Scripts) 1.Jupyter Notebook 和 pip 为了更加方便地写 Python 代 ...
- Python---virtualenv + Tensorflow + 安装jupyter notebook
一.ubuntu系统下安装完caffe后,安装 jupyter notebook. 在终端中执行,安装指令: sudo pip install jupyter 安装完成后运行 notebook : j ...
- python如何安装Jupyter notebook
一,安装Jupyter notebook 环境:win10,python3.7 两种安装方式,这里只讲pip安装 pip install jupyter notebook 二,启动Jupyter no ...
- 环境配置 | 安装Jupyter Notebook及jupyter_contrib_nbextensions库实现代码自动补全
一.Jupyter Notebook的安装与启动 安装Jupyter Notebook pip3 install jupyter 启动 jupyter notebook 输入命令后会自动弹出浏览器窗口 ...
- Centos7安装jupyter notebook
安装python3 查看当前python版本 [root@iz1i4qd6oynml0z /]# python -V Python 2.7.5 安装python3以及检查python3的版本 yum ...
- Ubuntu安装Jupyter Notebook
一.Jupyter介绍 Jupyter Notebook是一个交互式笔记本,支持运行40多种编程语言.Jupyter Notebook 的本质是一个 Web 应用程序,便于创建和共享文学化程序文档,支 ...
- 安装Conda并在Conda下安装jupyter notebook
1:安装 conda install jupyter notebook 2:启动 jupyter notebook
随机推荐
- 使用OAuth Server PHP实现OAuth2服务
在现在的网络服务中,OAuth2.0服务已经很普遍了,无论是facebook或者微博的第三方登录,还是手机APP登录,都有很广泛的应用.它主要的目的如下:如果用户的照片在A网站,他想要在B网站使用A网 ...
- 转换基于Maven的Java项目支持Eclipse IDE
在过去的教程中,使用 Maven 创建了一个Java项目,但是这个项目不能导入到Eclipse IDE中,因为它不是 Eclipse 风格的项目. 这里有一个指南,向您演示如何转换 Maven 生成 ...
- c、c++---linux上的GetTickCount函数
http://blog.csdn.net/guang11cheng/article/details/6865992 http://wenda.so.com/q/1378766306062794
- 嵌入式开发之zynq驱动—— zynq ps pl ddr 内存地址空间映射
http://www.wiki.xilinx.com/Zynq-7000+AP+SoC+-+32+Bit+DDR+Access+with+ECC+Tech+Tip http://patchwork.o ...
- 某软件大赛C#版考题整理——【编程题】
三.编程题(4小题共40.0分)程序及结果写入对应文框内 1. 孪生素数查找程序. 所谓孪生素数指的是间隔为2 的相邻素数,就像孪生兄弟.最小的孪生素数是(3, 5),在100 以内的孪生素数还有 ( ...
- 由“如何取得CPU的温度与型号”学到的知识延伸WQL
[Base]:WMI是一项核心的 Windows 管理技术:用户可以使用 WMI 管理本地和远程计算机.WQL就是 WMI 中的查询语言,翻译成中文好像可以成为 Windows 管理规范查询语言. 1 ...
- Websphere多个应用session相互覆盖问题解决办法
原文链接:http://my.oschina.net/moyuqi/blog/98475 使用apache反向代理解决在应用A使用Iframe嵌入应用B的功能而产生的跨域问题后,应用B的功能能正常使用 ...
- C# 校验给定的ip地址是否合法
函数用于检测ip地址格式是否合法,包括ip的组成格式,每隔段是否不超过255等,但这个函数不能验证这个ip地址是否可以ping通. /// <summary> /// 验证IP地址是否合法 ...
- GBT算法在拖动滑块辨别人还是机器中的应用
1.数据源格式:(x,y,t),第一个值x是x坐标范围是1-250的整数,y是1-10的整数,t是滑块从上一个坐标到下一个坐标的时间差,ok是判断是人操作的,Fail是判断是机器操作的,数据看的出,同 ...
- svn管理码云项目
1.设置SVN管理项目 进入项目->管理 2.获取SVN地址 3.SVN添加项目.单击右键 -> 检出->版本库Url(这里填写svn地址)