Cas Server源码编译现场实例
最近公司有项目需要做单点登录,根据要求就写下这篇从github上下载的包到项目编译通过,再到修改原代码实现自己的特殊逻辑。
前提:
java环境
tomcat环境
maven环境
MyEclipse开发环境
一、cas项目构建方式汇总
cas-4.2.0以后(包括4.2.0)使用gradle构建

二、怎样构建一个自定义的cas源码项目
2.1 资源地址
官网:https://www.apereo.org/projects/cas
源码:https://github.com/Jasig/cas
https://github.com/Jasig/java-cas-client(后面要用到)
PS: 我这里演示的cas-server版本是Maven版的4.0.5
2.2 下载源码并转成项目代码
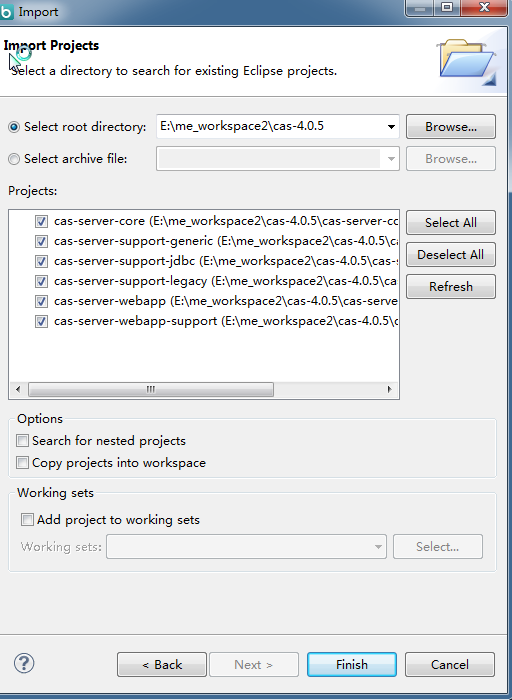
从https://github.com/apereo/cas/releases?after=v4.1.0下载cas-4.0.5的源码Source code (zip),然后解压放至你的workspace中。打开命令窗口,进入cas项目的根目录(E:\me_workspace2\cas-4.0.5>),键入命令mvn eclipse:eclipse,回车,让它飞一会,结束后你就可以。然后你可以使用MyEclipse导入项目了,如下图:
2.3 将源码编译成war包
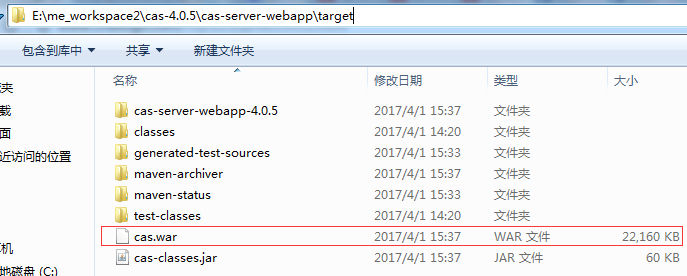
在命令窗口执行E:\me_workspace2\cas-4.0.5>mvn install -DskipTests,等待若干分钟后\cas-4.0.5\cas-server-webapp\target\目录下未发现生成cas.war 文件,并且发现下文的问题1,并且在问题1中得到你想要的war包。
2.4 怎样将构建一个带有源码的cas项目
将cas.war包修改扩展名,cas.zip,解压。得到一堆文件。
新建一个Web项目,并将解压好的文件放入项目中,\WEB-INF\classes目录下文件统统放入src目录下,其他的文件根据下图自行拷贝。
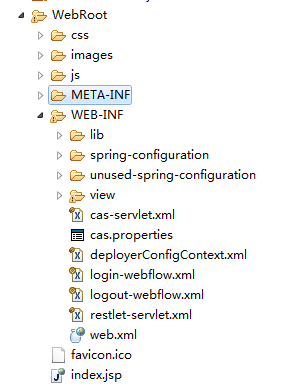
这样的话,你就可以部署到Tomcat中运行了,localhost:8080/项目名。
2.5 新增数据库
这里使用SQLserver数据库,配置文件在WEB-INF目录下的deployerConfigContext.xml文件,内容如下:
 <?xml version="1.0" encoding="UTF-8"?>

 <!--

     Licensed to Jasig under one or more contributor license

     agreements. See the NOTICE file distributed with this work

     for additional information regarding copyright ownership.

     Jasig licenses this file to you under the Apache License,

     Version 2.0 (the "License"); you may not use this file

     except in compliance with the License.  You may obtain a

     copy of the License at the following location:

       http://www.apache.org/licenses/LICENSE-2.0

     Unless required by applicable law or agreed to in writing,

     software distributed under the License is distributed on an

     "AS IS" BASIS, WITHOUT WARRANTIES OR CONDITIONS OF ANY

     KIND, either express or implied.  See the License for the

     specific language governing permissions and limitations

     under the License.

 -->

 <!--

 | deployerConfigContext.xml centralizes into one file some of the declarative configuration that

 | all CAS deployers will need to modify.

 |

 | This file declares some of the Spring-managed JavaBeans that make up a CAS deployment.

 | The beans declared in this file are instantiated at context initialization time by the Spring

 | ContextLoaderListener declared in web.xml.  It finds this file because this

 | file is among those declared in the context parameter "contextConfigLocation".

 |

 | By far the most common change you will need to make in this file is to change the last bean

 | declaration to replace the default authentication handler with

 | one implementing your approach for authenticating usernames and passwords.

 +-->

 <beans xmlns="http://www.springframework.org/schema/beans"

        xmlns:xsi="http://www.w3.org/2001/XMLSchema-instance"

        xmlns:p="http://www.springframework.org/schema/p"

        xmlns:c="http://www.springframework.org/schema/c"

        xmlns:tx="http://www.springframework.org/schema/tx"

        xmlns:util="http://www.springframework.org/schema/util"

        xmlns:sec="http://www.springframework.org/schema/security"

        xsi:schemaLocation="http://www.springframework.org/schema/beans http://www.springframework.org/schema/beans/spring-beans-3.2.xsd

        http://www.springframework.org/schema/tx http://www.springframework.org/schema/tx/spring-tx-3.2.xsd

        http://www.springframework.org/schema/security http://www.springframework.org/schema/security/spring-security-3.2.xsd

        http://www.springframework.org/schema/util http://www.springframework.org/schema/util/spring-util.xsd">

     <!--

        | The authentication manager defines security policy for authentication by specifying at a minimum

        | the authentication handlers that will be used to authenticate credential. While the AuthenticationManager

        | interface supports plugging in another implementation, the default PolicyBasedAuthenticationManager should

        | be sufficient in most cases.

        +-->

     <bean id="authenticationManager" class="org.jasig.cas.authentication.PolicyBasedAuthenticationManager">

         <constructor-arg>

             <map>

                 <!--

                    | IMPORTANT

                    | Every handler requires a unique name.

                    | If more than one instance of the same handler class is configured, you must explicitly

                    | set its name to something other than its default name (typically the simple class name).

                    -->

                 <entry key-ref="proxyAuthenticationHandler" value-ref="proxyPrincipalResolver" />

                 <!--原始配置-->

                 <!--<entry key-ref="primaryAuthenticationHandler" value-ref="primaryPrincipalResolver" />-->

                 <!--接入自定义数据库-->

                 <entry key-ref="dbAuthenticationHandler" value-ref="primaryPrincipalResolver" />

             </map>

         </constructor-arg>

         <!-- Uncomment the metadata populator to allow clearpass to capture and cache the password

              This switch effectively will turn on clearpass.

         <property name="authenticationMetaDataPopulators">

            <util:list>

               <bean class="org.jasig.cas.extension.clearpass.CacheCredentialsMetaDataPopulator"

                     c:credentialCache-ref="encryptedMap" />

            </util:list>

         </property>

         -->

         <!--

            | Defines the security policy around authentication. Some alternative policies that ship with CAS:

            |

            | * NotPreventedAuthenticationPolicy - all credential must either pass or fail authentication

            | * AllAuthenticationPolicy - all presented credential must be authenticated successfully

            | * RequiredHandlerAuthenticationPolicy - specifies a handler that must authenticate its credential to pass

            -->

         <property name="authenticationPolicy">

             <bean class="org.jasig.cas.authentication.AnyAuthenticationPolicy" />

         </property>

     </bean>

     <!-- Required for proxy ticket mechanism. -->

     <!--默认配置:开启SSL-->

     <bean id="proxyAuthenticationHandler"

           class="org.jasig.cas.authentication.handler.support.HttpBasedServiceCredentialsAuthenticationHandler"

           p:httpClient-ref="httpClient" />

     <!--新配置关闭SSL

     <bean id="proxyAuthenticationHandler"

           class="org.jasig.cas.authentication.handler.support.HttpBasedServiceCredentialsAuthenticationHandler"

           p:httpClient-ref="httpClient" p:requireSecure="false"/>

     -->

     <!--

        | TODO: Replace this component with one suitable for your enviroment.

        |

        | This component provides authentication for the kind of credential used in your environment. In most cases

        | credential is a username/password pair that lives in a system of record like an LDAP directory.

        | The most common authentication handler beans:

        |

        | * org.jasig.cas.authentication.LdapAuthenticationHandler

        | * org.jasig.cas.adaptors.jdbc.QueryDatabaseAuthenticationHandler

        | * org.jasig.cas.adaptors.x509.authentication.handler.support.X509CredentialsAuthenticationHandler

        | * org.jasig.cas.support.spnego.authentication.handler.support.JCIFSSpnegoAuthenticationHandler

        -->

      <!--默认配置:直接配置账号密码-->

     <!--

     <bean id="primaryAuthenticationHandler"

           class="org.jasig.cas.authentication.AcceptUsersAuthenticationHandler">

         <property name="users">

             <map>

                 <entry key="casuser" value="Mellon"/>

                 <entry key="castest" value="castest"/>

             </map>

         </property>

     </bean>

     -->

     <bean class="org.jasig.cas.adaptors.jdbc.QueryDatabaseAuthenticationHandler">

          <property name="sql" value="select password from ucenter_user where username=? " />

          <property name="dataSource" ref="dataSource" />

     </bean>

   <bean id="dataSource" class="org.springframework.jdbc.datasource.DriverManagerDataSource">

       <!--MySql数据库认证-->

       <!--

       <property name="driverClassName"><value>com.mysql.jdbc.Driver</value></property>

        <property name="url"><value>jdbc:mysql://192.168.0.58:3306/cassso</value></property>

        <property name="username"><value>metro_monitor</value></property>

        <property name="password"><value>123456</value></property>

       -->

       <!--MsSql数据库认证-->

        <property name="driverClassName"><value>com.microsoft.sqlserver.jdbc.SQLServerDriver</value></property>

        <property name="url"><value>jdbc:sqlserver://192.168.0.58:1433;DatabaseName=CasSso</value></property>

        <property name="username"><value>sa</value></property>

        <property name="password"><value>123456</value></property>

     </bean>

     <!--Mysql密码加密-->

     <bean id="passwordEncoder"

       class="org.jasig.cas.authentication.handler.DefaultPasswordEncoder"

       c:encodingAlgorithm="MD5"

       p:characterEncoding="UTF-8" />

     <!--验证处理-->

   <bean id="dbAuthenticationHandler"

     class="org.jasig.cas.adaptors.jdbc.QueryDatabaseAuthenticationHandler">

       <property name="dataSource" ref="dataSource"></property>

       <property name="sql" value="select LoginPassword as password from ssoaccount where LoginAccount=? "></property>

       <property name="passwordEncoder" ref="passwordEncoder"></property>

   </bean>

     <!-- Required for proxy ticket mechanism -->

     <bean id="proxyPrincipalResolver"

           class="org.jasig.cas.authentication.principal.BasicPrincipalResolver" />

     <!--

        | Resolves a principal from a credential using an attribute repository that is configured to resolve

        | against a deployer-specific store (e.g. LDAP).

        -->

     <bean id="primaryPrincipalResolver"

           class="org.jasig.cas.authentication.principal.PersonDirectoryPrincipalResolver" >

         <property name="attributeRepository" ref="attributeRepository" />

     </bean>

     <!--

     Bean that defines the attributes that a service may return.  This example uses the Stub/Mock version.  A real implementation

     may go against a database or LDAP server.  The id should remain "attributeRepository" though.

     +-->

     <!--注释掉默认配置

     <bean id="attributeRepository" class="org.jasig.services.persondir.support.StubPersonAttributeDao"

             p:backingMap-ref="attrRepoBackingMap" />

     <util:map id="attrRepoBackingMap">

         <entry key="uid" value="uid" />

         <entry key="eduPersonAffiliation" value="eduPersonAffiliation" />

         <entry key="groupMembership" value="groupMembership" />

     </util:map>

     -->

  <!-- 此处为增加部分 start -->

     <bean id="attributeRepository" class="org.jasig.services.persondir.support.jdbc.SingleRowJdbcPersonAttributeDao" >

         <constructor-arg index="0" ref="dataSource"/>

         <constructor-arg index="1" value="SELECT * FROM ssoaccount WHERE {0}"/>

         <property name="queryAttributeMapping">

             <map>

                 <!-- key对应登录信息, vlaue对应数据库字段 -->

                 <entry key="username" value="LoginAccount"/>

             </map>

         </property>

         <property name="resultAttributeMapping">

             <map>

                 <!-- key对应数据库字段  value对应attribute中的key -->

                 <entry key="Sex" value="Sex"/>

                 <entry key="Address" value="Address"/>

             </map>

         </property>

     </bean>

     <!-- 此处为增加部分 end -->

     <!--

     Sample, in-memory data store for the ServiceRegistry. A real implementation

     would probably want to replace this with the JPA-backed ServiceRegistry DAO

     The name of this bean should remain "serviceRegistryDao".

     +-->

     <bean id="serviceRegistryDao" class="org.jasig.cas.services.InMemoryServiceRegistryDaoImpl"

             p:registeredServices-ref="registeredServicesList" />

     <util:list id="registeredServicesList">

         <bean class="org.jasig.cas.services.RegexRegisteredService"

               p:id="0" p:name="HTTP and IMAP" p:description="Allows HTTP(S) and IMAP(S) protocols"

               p:serviceId="^(https?|imaps?)://.*" p:evaluationOrder="10000001" />

         <!--

         Use the following definition instead of the above to further restrict access

         to services within your domain (including sub domains).

         Note that example.com must be replaced with the domain you wish to permit.

         This example also demonstrates the configuration of an attribute filter

         that only allows for attributes whose length is 3.

         -->

         <!--

         <bean class="org.jasig.cas.services.RegexRegisteredService">

             <property name="id" value="1" />

             <property name="name" value="HTTP and IMAP on example.com" />

             <property name="description" value="Allows HTTP(S) and IMAP(S) protocols on example.com" />

             <property name="serviceId" value="^(https?|imaps?)://([A-Za-z0-9_-]+\.)*example\.com/.*" />

             <property name="evaluationOrder" value="0" />

             <property name="attributeFilter">

               <bean class="org.jasig.cas.services.support.RegisteredServiceRegexAttributeFilter" c:regex="^\w{3}$" />

             </property>

         </bean>

         -->

     </util:list>

     <bean id="auditTrailManager" class="com.github.inspektr.audit.support.Slf4jLoggingAuditTrailManager" />

     <bean id="healthCheckMonitor" class="org.jasig.cas.monitor.HealthCheckMonitor" p:monitors-ref="monitorsList" />

     <util:list id="monitorsList">

       <bean class="org.jasig.cas.monitor.MemoryMonitor" p:freeMemoryWarnThreshold="10" />

       <!--

         NOTE

         The following ticket registries support SessionMonitor:

           * DefaultTicketRegistry

           * JpaTicketRegistry

         Remove this monitor if you use an unsupported registry.

       -->

       <bean class="org.jasig.cas.monitor.SessionMonitor"

           p:ticketRegistry-ref="ticketRegistry"

           p:serviceTicketCountWarnThreshold="5000"

           p:sessionCountWarnThreshold="100000" />

     </util:list>

 </beans>
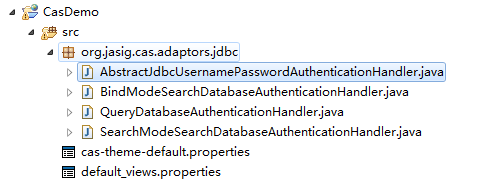
但是配置好后,编译出现了问题,Error creating bean with name 'centralAuthenticationService' defined in .
这个问题是因为少了cas中jdbc的源码,将上述mvn eclipse:eclipse编译好的cas-server-support-jdbc项目导入Myeclipse中,并将项目中的代码按现有目录拷贝到Web项目中,

现项目图片
最后编译项目,打开项目地址,并输入数据库中的账号与密码,即可变废为宝了。
再次就是其他4个jar的代码,你可以通过拷贝的方式考入当前项目中。
问题1:
Failed to execute goal org.apache.maven.plugins:maven-checkstyle-plugin
该问题是因为你想在源码的根目录直接运行编译命令 C:\Users\Jadyer\Desktop\cas-4.0.5>mvn install -DskipTests 但最终没发现\cas-4.0.5\cas-server-webapp\target\目录下生成cas.war 文件
其实,是需要在 C:\Users\Jadyer\Desktop\cas-4.0.5\cas-server-webapp>目录下执行该命令,才会生成war文件。如图:
 、
、
最后编译了30分钟

最终是生成了一大堆文件
查阅资料
http://blog.csdn.net/jadyer/article/details/46875393
http://blog.csdn.net/yanjunlu/article/details/45498509
http://blog.csdn.net/shadowsick/article/details/42191273
http://blog.csdn.net/small_love/article/details/6664831
Cas Server源码编译现场实例的更多相关文章
- 单点登录(六)-----遇到问题-----cas server 源码部署导入gradle后有感叹号---错误信息A cycle was detected in the build path of pr
cas server 源码部署导入gradle后有感叹号---错误信息A cycle was detected in the build path of project 'cas-server-cor ...
- 单点登录(五)-----遇到问题-----cas server 源码部署tomcat运行报错BeanCreationException:Error creating bean with name 's
我们在上一篇文章已经解决了把下载好的cas server源码部署到tomcat缺少子项目编辑文件或者jar包导致找不到class报错的问题 单点登录(四)-----遇到问题-----cas serve ...
- 单点登录(四)-----遇到问题-----cas server 源码部署tomcat运行报错ClassNotFoundException: org.jasig.cas.CasEnvironmentCo
情况 cas单点登录 cas server 源码部署tomcat运行报错 把cas server的代码下载下来后使用gradle插件或者maven插件以及转化成eclipse·后导入发现部署到tomc ...
- 单点登录(三)-----实战-----cas server 源码下载和部署
我们在上一篇文章中使用的是4.0版本的cas,4.0版本的有发布好的war包可以直接使用,那如果我们要使用更新的版本怎么办呢? 就需要下载源码自己编辑打包了. 步骤如下: 版本选择 我们在cas的gi ...
- MySQL数据库的二进制安装、源码编译和基础入门操作
一.MySQL安装 (1)安装方式: 1 .程序包yum安装 优点:安装快,简单 缺点:定死了各个文件的地方,需要修改里边的相关配置文件,很麻烦 2 .二进制格式的程序包:展开至特定路径,并经过简单配 ...
- MySQL数据库企业级应用实践(多实例源码编译)
MySQL数据库企业级应用实践(多实例源码编译) 链接:https://pan.baidu.com/s/1ANGg3Kd_28BzQrA5ya17fQ 提取码:ekpy 复制这段内容后打开百度网盘手机 ...
- 保姆级教程——Ubuntu16.04 Server下深度学习环境搭建:安装CUDA8.0,cuDNN6.0,Bazel0.5.4,源码编译安装TensorFlow1.4.0(GPU版)
写在前面 本文叙述了在Ubuntu16.04 Server下安装CUDA8.0,cuDNN6.0以及源码编译安装TensorFlow1.4.0(GPU版)的亲身经历,包括遇到的问题及解决办法,也有一些 ...
- 转载-FileZilla Server源码分析(1)
FileZilla Server源码分析(1) 分类: VC 2012-03-27 17:32 2363人阅读 评论(0) 收藏 举报 serversocketftp服务器usersockets工作 ...
- 源码编译安装MySQL8.0
源码编译安装MySQL8.0 0.前期准备条件 查看linux的版本 [root@mysql etc]# cat /etc/redhat-release CentOS Linux release 7. ...
随机推荐
- AppStore中使用IDFA后提交应用的注意事项
在ios7.0出来以前,我们都是通过wifi的mac来当作IOS设备的唯一标识符.如何在ios下获取设备的MAC,你可以参数这篇文章:获取ios的MAC地址 在没有使用IDFA之前,我们在ios7及以 ...
- JAVA 是否会发生内存泄露(转)
原文链接: JAVA 是否会发生内存泄露 几次面试,面试官都问到了这个问题,于是搜集了答案.总结出虽然java自身有垃圾回收机制,但是很多情况下还是发生内存泄露的. java导致内存泄露的原因很明确: ...
- 阿里jstorm和storm区别
转自:https://www.cnblogs.com/cn-leodream/p/6497277.html 看介绍文档貌似挺好:https://github.com/alibaba/jstorm ...
- C++ 变量默认初始值不确定(代码测试)
C++ int变量默认初始值是不确定的,因此使用时初始化是很有必要的. 下面写个小程序测试一下int变量默认初始值. #include <iostream> #include <ve ...
- tensorflow语义分割api使用(deeplab训练cityscapes)
安装教程:https://github.com/tensorflow/models/blob/master/research/deeplab/g3doc/installation.md citysca ...
- C#窗体读取EXCEL存入SQL数据库
windows窗体上放了一个Textbox1,2个按钮button1和button2~按button1选择excel文件~按button2进行相关处理 Code Snippet private vo ...
- Oracle数据库将varchar类型的字段改为clob类型
alter table pwlp_accuse_info modify INSTRUCTION_STYLE long; alter table pwlp_accuse_info modify INST ...
- 大数据开发实战:Stream SQL实时开发二
1.介绍 本节主要利用Stream SQL进行实时开发实战,回顾Beam的API和Hadoop MapReduce的API,会发现Google将实际业务对数据的各种操作进行了抽象,多变的数据需求抽象为 ...
- [置顶] 刘汝佳《训练指南》动态规划::Beginner (25题)解题报告汇总
本文出自 http://blog.csdn.net/shuangde800 刘汝佳<算法竞赛入门经典-训练指南>的动态规划部分的习题Beginner 打开 这个专题一共有25题,刷完 ...
- R 分组计算描述性统计量
统计学区内各个小区的房价均值 数据格式 id|community_name|house_area|house_structure|house_total|house_avg|agency_name|h ...