1、SpringBoot+Mybatis整合------简单CRUD的实现
编译工具:STS
代码下载链接:https://github.com/theIndoorTrain/SpringBoot_Mybatis01/commit/b757cd9bfa4e2de551b2e9e5c095ded585c90566
一、项目的建立
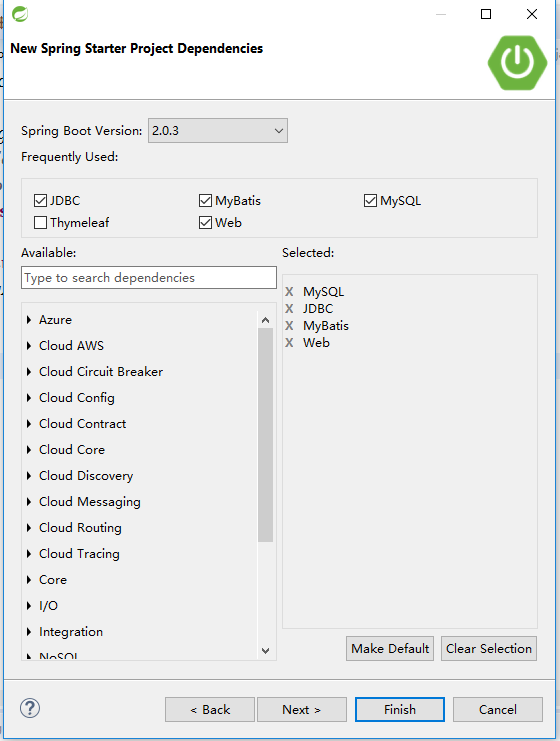
选择依赖:Mybatis,Web,MySql,JDBC
SpringBoot版本:2.0.3
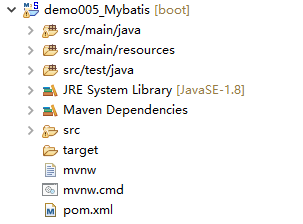
项目生成结构:
pom依赖:
 <?xml version="1.0" encoding="UTF-8"?>

 <project xmlns="http://maven.apache.org/POM/4.0.0" xmlns:xsi="http://www.w3.org/2001/XMLSchema-instance"

     xsi:schemaLocation="http://maven.apache.org/POM/4.0.0 http://maven.apache.org/xsd/maven-4.0.0.xsd">

     <modelVersion>4.0.0</modelVersion>

     <groupId>com.xm</groupId>

     <artifactId>demo005_Mybatis</artifactId>

     <version>0.0.1-SNAPSHOT</version>

     <packaging>jar</packaging>

     <name>demo005_Mybatis</name>

     <description>Demo project for Spring Boot</description>

     <parent>

         <groupId>org.springframework.boot</groupId>

         <artifactId>spring-boot-starter-parent</artifactId>

         <version>2.0.2.RELEASE</version>

         <relativePath/> <!-- lookup parent from repository -->

     </parent>

     <properties>

         <project.build.sourceEncoding>UTF-8</project.build.sourceEncoding>

         <project.reporting.outputEncoding>UTF-8</project.reporting.outputEncoding>

         <java.version>1.8</java.version>

     </properties>

     <dependencies>

         <dependency>

             <groupId>org.springframework.boot</groupId>

             <artifactId>spring-boot-starter-jdbc</artifactId>

         </dependency>

         <dependency>

             <groupId>org.springframework.boot</groupId>

             <artifactId>spring-boot-starter-web</artifactId>

         </dependency>

         <dependency>

             <groupId>org.mybatis.spring.boot</groupId>

             <artifactId>mybatis-spring-boot-starter</artifactId>

             <version>1.3.2</version>

         </dependency>

         <dependency>

             <groupId>mysql</groupId>

             <artifactId>mysql-connector-java</artifactId>

             <scope>runtime</scope>

         </dependency>

         <dependency>

             <groupId>org.springframework.boot</groupId>

             <artifactId>spring-boot-starter-test</artifactId>

             <scope>test</scope>

         </dependency>

     </dependencies>

     <build>

         <plugins>

             <plugin>

                 <groupId>org.springframework.boot</groupId>

                 <artifactId>spring-boot-maven-plugin</artifactId>

             </plugin>

         </plugins>

     </build>

 </project>
pom.xml
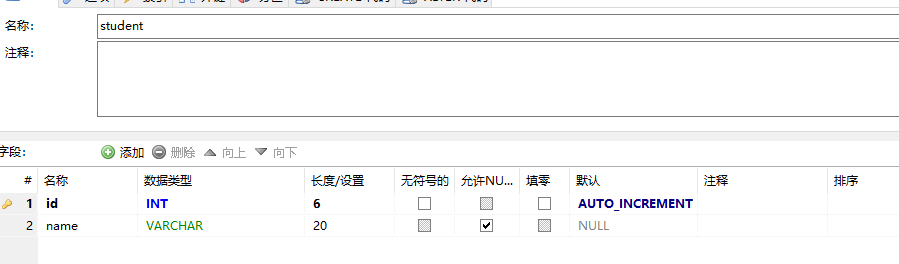
二、创建数据库
三、项目配置
1.添加yml配置文件:application.yml
 #配置mybatis

 mybatis:

   #配置xml映射路径

   mapper-locations: classpath:mapper/*.xml

    #配置实体类的别名

   type-aliases-package: com.xm.pojo

   configuration:

     #开启驼峰命名法

     map-underscore-to-camel-case: true

 #配置mysql连接

 spring:

   datasource:

     url: jdbc:mysql://10.1.51.31:3306/xm

     username: root

     password: cube1501

     driver-class-name: com.mysql.jdbc.Driver
application.yml
2.在source文件夹下建立mapper文件夹

3.在Springboot启动类添加@MapperScan注解
 package com.xm;

 import org.mybatis.spring.annotation.MapperScan;

 import org.springframework.boot.SpringApplication;

 import org.springframework.boot.autoconfigure.SpringBootApplication;

 @MapperScan(value="com.xm.mapper")

 @SpringBootApplication

 public class Demo005MybatisApplication {

     public static void main(String[] args) {

         SpringApplication.run(Demo005MybatisApplication.class, args);

     }

 }
Demo005MybatisApplication.java
注意:添加@MapperScan注解后,每个mapper都会自动扫描成为Bean。否则,需要在每个mapper接口上添加@Mapper接口
四、代码实现
1.实体类Student
 package com.xm.pojo;

 /**

  * name:学生实体

  * @author xxm

  *

  */

 public class Student {

     /**

      * content:主键id

      */

     private int id;

     /**

      * content:姓名

      */

     private String name;

     public int getId() {

         return id;

     }

     public void setId(int id) {

         this.id = id;

     }

     public String getName() {

         return name;

     }

     public void setName(String name) {

         this.name = name;

     }

 }
Student.java
2.数据操作层StudentMapper
 package com.xm.mapper;

 import java.util.List;

 import com.xm.pojo.Student;

 public interface StudentMapper {

     /**

      * 根据id查询

      * @param id

      * @return

      */

     public Student getById(Integer id);

     /**

      * 查询全部

      * @return

      */

     public List<Student> list();

     /**

      * 插入

      * @param student

      */

     public void insert(Student student);

     /**

      * 根据student的id修改

      * @param student

      */

     public void update(Student student);

     /**

      * 根据id删除

      * @param id

      */

     public void delete(Integer id);

 }
StudentMapper.java
3.mapper映射Studentmapper
 <?xml version="1.0" encoding="UTF-8" ?>

 <!DOCTYPE mapper PUBLIC "-//mybatis.org//DTD Mapper 3.0//EN" "http://mybatis.org/dtd/mybatis-3-mapper.dtd" >

 <mapper namespace="com.xm.mapper.StudentMapper">

     <!-- 根据id查询 -->

     <select id="getById" parameterType="int" resultType="student">

     select * from student where id=#{id}

     </select>

     <!-- 查询所有 -->

     <select id="list" parameterType="int" resultType="student">

     select * from student

     </select>

     <!-- 插入一个学生 -->

     <insert id="insert" parameterType="student">

     insert into student(name) values(#{name})

     </insert>

     <!-- 根据id修改学生信息 -->

     <update id="update" parameterType="student">

     update student set name=#{name} where id=#{id}

     </update>

     <!-- 根据id删除学生 -->

     <delete id="delete" parameterType="int">

     delete  from student where id=#{id}

     </delete>

 </mapper>
StudentMapper.xml
4.控制层StudentController
 package com.xm.controller;

 import java.util.List;

 import javax.websocket.server.PathParam;

 import org.springframework.beans.factory.annotation.Autowired;

 import org.springframework.web.bind.annotation.DeleteMapping;

 import org.springframework.web.bind.annotation.GetMapping;

 import org.springframework.web.bind.annotation.PathVariable;

 import org.springframework.web.bind.annotation.PostMapping;

 import org.springframework.web.bind.annotation.PutMapping;

 import org.springframework.web.bind.annotation.RestController;

 import com.xm.mapper.StudentMapper;

 import com.xm.pojo.Student;

 @RestController

 public class StudentController {

     @Autowired

     private StudentMapper studentMapper;

     /**

      * 根据id查询学生

      * @param id

      * @return

      */

     @GetMapping("/student/{id}")

     public Student getById(@PathVariable("id") Integer id) {

         Student student = studentMapper.getById(id);

         return student;

     }

     /**

      * 查询全部

      * @return

      */

     @GetMapping("/students")

     public List<Student> list(){

         List<Student> students = studentMapper.list();

         return students;

     }

     /**

      * 插入

      * @param student

      */

     @PostMapping("/student")

     public void insert( Student student) {

         studentMapper.insert(student);

     }

     /**

      * 修改

      * @param student

      */

     @PutMapping("/student/{id}")

     public void update(Student student,@PathVariable("id")Integer id) {

         studentMapper.update(student);

     }

     /**

      * 根据id删除

      * @param id

      */

     @DeleteMapping("/student/{id}")

     public void delete(@PathVariable("id") Integer id) {

         studentMapper.delete(id);

     }

 }
StudentController.java
2018-06-1517:31:14
1、SpringBoot+Mybatis整合------简单CRUD的实现的更多相关文章
- SpringBoot Mybatis整合(注解版),SpringBoot集成Mybatis(注解版)
SpringBoot Mybatis整合(注解版),SpringBoot集成Mybatis(注解版) ================================ ©Copyright 蕃薯耀 2 ...
- SpringBoot第十一篇:SpringBoot+MyBatis+Thymelaf实现CRUD
作者:追梦1819 原文:https://www.cnblogs.com/yanfei1819/p/10936304.html 版权声明:本文为博主原创文章,转载请附上博文链接! 引言 总结前面几 ...
- SpringBoot+Mybatis整合入门(一)
SpringBoot+Mybatis 四步整合 第一步 添加依赖 springBoot+Mybatis相关依赖 <!--springBoot相关--> <parent> < ...
- 7、SpringBoot+Mybatis整合------PageHelper简单分页
开发工具:STS 代码下载链接:https://github.com/theIndoorTrain/SpringBoot_Mybatis/tree/1d30d2a573ce6784149a28af9b ...
- SpringBoot+Mybatis整合实例
前言 大家都知道springboot有几大特点:能创建独立的Spring应用程序:能嵌入Tomcat,无需部署WAR文件:简化Maven配置:自动配置Spring等等.这里整合mybatis,创建一个 ...
- 2、SpringBoot+Mybatis整合------一对一
开发工具:STS 代码下载链接:https://github.com/theIndoorTrain/SpringBoot_Mybatis01/tree/93398da60c647573645917b2 ...
- Vue+SpringBoot+Mybatis的简单员工管理项目
本文项目参考自:https://github.com/boylegu/SpringBoot-vue 为了完成此项目你需要会springBoot,mybatis的一些基本操作 运行界面 第一步:搭建前端 ...
- springboot/Mybatis整合
正题 本项目使用的环境: 开发工具:Intellij IDEA 2017.1.3 springboot: 1.5.6 jdk:1.8.0_161 maven:3.3.9 额外功能 PageHelper ...
- springboot+mybatis整合(单元测试,异常处理,日志管理,AOP)
我用的事IDEA,jdk版本是1.7.新建项目的时候这个地方的选择需要注意一下,springboot版本是1.5的,否则不支持1.7的jdk pom.xml <dependency> &l ...
随机推荐
- Robotframework测试相关库
一. 官网地址 http://robotframework.org/#libraries 二.几类测试所用到的常用库初步整理 1. UI自动化测试 Selenium2Library.BuiltIn(自 ...
- 数据库版本管理工具flyway
引入flyway_core jar包 java 代码实现 public class FlywayMigration { @Resource private DataSource dataSource ...
- AUTO Uninstaller 下载 (maya/3dsmax/cad/Inventor/Revit uninstall tool 卸载修复工具)
小伙伴是不是遇到 MAYA/CAD/3DSMAX/INVENTOR/REVIT 安装失败或者安装不了的问题了呢?AUTODESK系列软件着实令人头疼,MAYA/CAD/3DSMAX/INVENTOR/ ...
- fireFox在中国的https网站的时候,老会出 ssl_error_unsupported_version 这个错误。
fireFox在中国的https网站的时候,老会出 ssl_error_unsupported_version 这个错误. 出现在 这个的解决办法就是 在地址栏里输入 about:config 查找 ...
- pat04-树9. Path in a Heap (25)
04-树9. Path in a Heap (25) 时间限制 150 ms 内存限制 65536 kB 代码长度限制 8000 B 判题程序 Standard 作者 CHEN, Yue Insert ...
- mysql 使用 unix 方式显示日期和时间
1.UNIX中文为时间戳.该方式显示从1970年1月1日开始经过的秒数. 2.函数 UNIX_TIMESTAMP() 返回时间戳格式的时间, FROM_UNIXTIME() 将时间戳格式的时间转换为普 ...
- 第一次尝试用Open Live Writer写日志
注册博客园很久了,一直没怎么用,今天登陆了一下,看到这个写日志工具,看着不错,试一下
- 浅谈windows.onload()与$(document).ready()
浏览器加载完DOM后,会通过javascript为DOM元素添加事件,在javascript中,通常使用window.onload()方法. 在jquery中,则使用$(document).ready ...
- IT相关术语、缩略词
CLI Command Line Interface 命令行界面 GUI Graphical User Interface 图形用户界面 IP Internet Protocol 因特网协议 JDK ...
- 设计模式之工厂模式详细读后感TT!(五)
一如既往:原文 工厂方法(factory method)模式的意义是定义一个创建产品对象的工厂接口, 将实际创建工作推迟到子类当中. 核心工厂的创建, 这样核心类成为一个抽象工厂角色, 仅仅复制工厂子 ...