
How To Secure Nginx with Let's Encrypt on Ubuntu 14.04
https://www.digitalocean.com/community/tutorials/how-to-secure-nginx-with-let-s-encrypt-on-ubuntu-14-04
Introduction
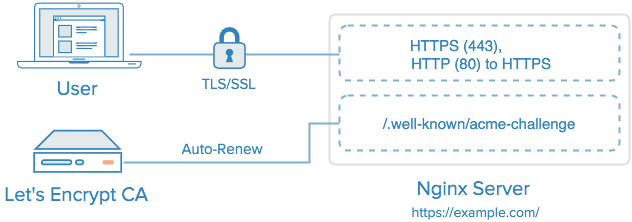
Let's Encrypt is a new Certificate Authority (CA) that provides an easy way to obtain and install free TLS/SSL certificates, thereby enabling encrypted HTTPS on web servers. It simplifies the process by providing a software client, letsencrypt, that attempts to automate most (if not all) of the required steps. Currently, as Let's Encrypt is still in open beta, the entire process of obtaining and installing a certificate is fully automated only on Apache web servers. However, Let's Encrypt can be used to easily obtain a free SSL certificate, which can be installed manually, regardless of your choice of web server software.
In this tutorial, we will show you how to use Let's Encrypt to obtain a free SSL certificate and use it with Nginx on Ubuntu 14.04. We will also show you how to automatically renew your SSL certificate. If you're running a different web server, simply follow your web server's documentation to learn how to use the certificate with your setup.
Prerequisites
Before following this tutorial, you'll need a few things.
You should have an Ubuntu 14.04 server with a non-root user who has sudo privileges. You can learn how to set up such a user account by following steps 1-3 in our initial server setup for Ubuntu 14.04 tutorial.
You must own or control the registered domain name that you wish to use the certificate with. If you do not already have a registered domain name, you may register one with one of the many domain name registrars out there (e.g. Namecheap, GoDaddy, etc.).
If you haven't already, be sure to create an A Record that points your domain to the public IP address of your server. This is required because of how Let's Encrypt validates that you own the domain it is issuing a certificate for. For example, if you want to obtain a certificate for example.com, that domain must resolve to your server for the validation process to work. Our setup will use example.com andwww.example.com as the domain names, so both DNS records are required.
Once you have all of the prerequisites out of the way, let's move on to installing the Let's Encrypt client software.
Step 1 — Install Let's Encrypt Client
The first step to using Let's Encrypt to obtain an SSL certificate is to install the letsencrypt software on your server. Currently, the best way to install Let's Encrypt is to simply clone it from the official GitHub repository. In the future, it will likely be available via a package manager.
Install Git and bc
Let's install Git and bc now, so we can clone the Let's Encrypt repository.
Update your server's package manager with this command:
- sudo apt-get update
Then install the git and bc packages with apt-get:
- sudo apt-get -y install git bc
With git and bc installed, we can easily download letsencrypt by cloning the repository from GitHub.
Clone Let's Encrypt
We can now clone the Let’s Encrypt repository in /opt with this command:
- sudo git clone https://github.com/letsencrypt/letsencrypt /opt/letsencrypt
You should now have a copy of the letsencrypt repository in the /opt/letsencrypt directory.
Step 2 — Obtain a Certificate
Let's Encrypt provides a variety of ways to obtain SSL certificates, through various plugins. Unlike the Apache plugin, which is covered in a different tutorial, most of the plugins will only help you with obtaining a certificate which you must manually configure your web server to use. Plugins that only obtain certificates, and don't install them, are referred to as "authenticators" because they are used to authenticate whether a server should be issued a certificate.
We'll show you how to use the Webroot plugin to obtain an SSL certificate.
How To Use the Webroot Plugin
The Webroot plugin works by placing a special file in the /.well-known directory within your document root, which can be opened (through your web server) by the Let's Encrypt service for validation. Depending on your configuration, you may need to explicitly allow access to the /.well-knowndirectory.
If you haven't installed Nginx yet, do so with this command:
- sudo apt-get install nginx
To ensure that the directory is accessible to Let's Encrypt for validation, let's make a quick change to our Nginx configuration. By default, it's located at /etc/nginx/sites-available/default. We'll usenano to edit it:
- sudo nano /etc/nginx/sites-available/default
Inside the server block, add this location block:
        location ~ /.well-known {

                allow all;

        }
You will also want look up what your document root is set to by searching for the root directive, as the path is required to use the Webroot plugin. If you're using the default configuration file, the root will be/usr/share/nginx/html.
Save and exit.
Reload Nginx with this command:
- sudo service nginx reload
Now that we know our webroot-path, we can use the Webroot plugin to request an SSL certificate with these commands. Here, we are also specifying our domain names with the -d option. If you want a single cert to work with multiple domain names (e.g. example.com and www.example.com), be sure to include all of them. Also, make sure that you replace the highlighted parts with the appropriate webroot path and domain name(s):
- cd /opt/letsencrypt
- ./letsencrypt-auto certonly -a webroot --webroot-path=/usr/share/nginx/html -d example.com -d www.example.com
Note: The Let's Encrypt software requires superuser privileges, so you will be required to enter your password if you haven't used sudo recently.
After letsencrypt initializes, you will be prompted for some information. The exact prompts may vary depending on if you've used Let's Encrypt before, but we'll step you through the first time.
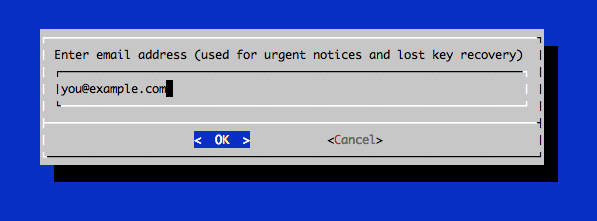
At the prompt, enter an email address that will be used for notices and lost key recovery:
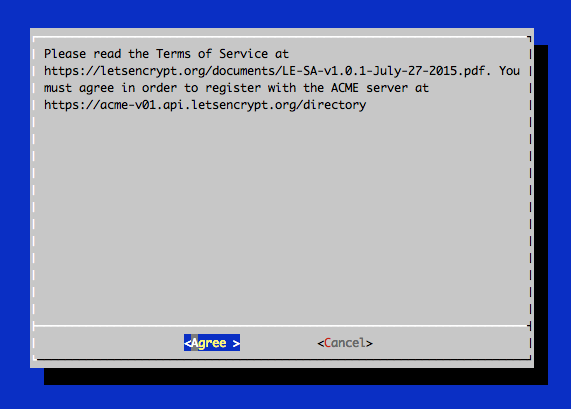
Then you must agree to the Let's Encrypt Subscribe Agreement. Select Agree:
If everything was successful, you should see an output message that looks something like this:
IMPORTANT NOTES:

 - If you lose your account credentials, you can recover through

   e-mails sent to sammy@digitalocean.com

 - Congratulations! Your certificate and chain have been saved at

   /etc/letsencrypt/live/example.com/fullchain.pem. Your

   cert will expire on 2016-03-15. To obtain a new version of the

   certificate in the future, simply run Let's Encrypt again.

 - Your account credentials have been saved in your Let's Encrypt

   configuration directory at /etc/letsencrypt. You should make a

   secure backup of this folder now. This configuration directory will

   also contain certificates and private keys obtained by Let's

   Encrypt so making regular backups of this folder is ideal.

 - If like Let's Encrypt, please consider supporting our work by:

   Donating to ISRG / Let's Encrypt:   https://letsencrypt.org/donate

   Donating to EFF:                    https://eff.org/donate-le
You will want to note the path and expiration date of your certificate, which was highlighted in the example output.
Firewall Note: If you receive an error like Failed to connect to host for DVSNI challenge, your server's firewall may need to be configured to allow TCP traffic on port 80 and 443.
Note: If your domain is routing through a DNS service like CloudFlare, you will need to temporarily disable it until you have obtained the certificate.
Certificate Files
After obtaining the cert, you will have the following PEM-encoded files:
- cert.pem: Your domain's certificate
- chain.pem: The Let's Encrypt chain certificate
- fullchain.pem:
cert.pemandchain.pemcombined - privkey.pem: Your certificate's private key
It's important that you are aware of the location of the certificate files that were just created, so you can use them in your web server configuration. The files themselves are placed in a subdirectory in/etc/letsencrypt/archive. However, Let's Encrypt creates symbolic links to the most recent certificate files in the /etc/letsencrypt/live/your_domain_name directory. Because the links will always point to the most recent certificate files, this is the path that you should use to refer to your certificate files.
You can check that the files exist by running this command (substituting in your domain name):
- sudo ls -l /etc/letsencrypt/live/your_domain_name
The output should be the four previously mentioned certificate files. In a moment, you will configure your web server to use fullchain.pem as the certificate file, and privkey.pem as the certificate key file.
Generate Strong Diffie-Hellman Group
To further increase security, you should also generate a strong Diffie-Hellman group. To generate a 2048-bit group, use this command:
- sudo openssl dhparam -out /etc/ssl/certs/dhparam.pem 2048
This may take a few minutes but when it's done you will have a strong DH group at/etc/ssl/certs/dhparam.pem.
Step 3 — Configure TLS/SSL on Web Server (Nginx)
Now that you have an SSL certificate, you need to configure your Nginx web server to use it.
Edit the Nginx configuration that contains your server block. Again, it's at /etc/nginx/sites-available/default by default:
- sudo nano /etc/nginx/sites-available/default
Find the server block. Comment out or delete the lines that configure this server block to listen on port 80. In the default configuration, these two lines should be deleted:
        listen 80 default_server;

        listen [::]:80 default_server ipv6only=on;
We are going to configure this server block to listen on port 443 with SSL enabled instead. Within yourserver { block, add the following lines but replace all of the instances of example.com with your own domain:
        listen 443 ssl;

        server_name example.com www.example.com;

        ssl_certificate /etc/letsencrypt/live/example.com/fullchain.pem;

        ssl_certificate_key /etc/letsencrypt/live/example.com/privkey.pem;
This enables your server to use SSL, and tells it to use the Let's Encrypt SSL certificate that we obtained earlier.
To allow only the most secure SSL protocols and ciphers, and use the strong Diffie-Hellman group we generated, add the following lines to the same server block:
        ssl_protocols TLSv1 TLSv1.1 TLSv1.2;

        ssl_prefer_server_ciphers on;

        ssl_dhparam /etc/ssl/certs/dhparam.pem;

        ssl_ciphers 'ECDHE-RSA-AES128-GCM-SHA256:ECDHE-ECDSA-AES128-GCM-SHA256:ECDHE-RSA-AES256-GCM-SHA384:ECDHE-ECDSA-AES256-GCM-SHA384:DHE-RSA-AES128-GCM-SHA256:DHE-DSS-AES128-GCM-SHA256:kEDH+AESGCM:ECDHE-RSA-AES128-SHA256:ECDHE-ECDSA-AES128-SHA256:ECDHE-RSA-AES128-SHA:ECDHE-ECDSA-AES128-SHA:ECDHE-RSA-AES256-SHA384:ECDHE-ECDSA-AES256-SHA384:ECDHE-RSA-AES256-SHA:ECDHE-ECDSA-AES256-SHA:DHE-RSA-AES128-SHA256:DHE-RSA-AES128-SHA:DHE-DSS-AES128-SHA256:DHE-RSA-AES256-SHA256:DHE-DSS-AES256-SHA:DHE-RSA-AES256-SHA:AES128-GCM-SHA256:AES256-GCM-SHA384:AES128-SHA256:AES256-SHA256:AES128-SHA:AES256-SHA:AES:CAMELLIA:DES-CBC3-SHA:!aNULL:!eNULL:!EXPORT:!DES:!RC4:!MD5:!PSK:!aECDH:!EDH-DSS-DES-CBC3-SHA:!EDH-RSA-DES-CBC3-SHA:!KRB5-DES-CBC3-SHA';

        ssl_session_timeout 1d;

        ssl_session_cache shared:SSL:50m;

        ssl_stapling on;

        ssl_stapling_verify on;

        add_header Strict-Transport-Security max-age=15768000;
Lastly, outside of the original server block (that is listening on HTTPS, port 443), add this server block to redirect HTTP (port 80) to HTTPS. Be sure to replace the highlighted part with your own domain name:
server {

    listen 80;

    server_name example.com www.example.com;

    return 301 https://$host$request_uri;

}
Save and exit.
Now put the changes into effect by reloading Nginx:
- sudo service nginx reload
The Let's Encrypt TLS/SSL certificate is now in place. At this point, you should test that the TLS/SSL certificate works by visiting your domain via HTTPS in a web browser.
You can use the Qualys SSL Labs Report to see how your server configuration scores:
https://www.ssllabs.com/ssltest/analyze.html?d=example.com
This SSL setup should report an A+ rating.
Step 4 — Set Up Auto Renewal
Let’s Encrypt certificates are valid for 90 days, but it’s recommended that you renew the certificates every 60 days to allow a margin of error. At the time of this writing, automatic renewal is still not available as a feature of the client itself, but you can manually renew your certificates by running the Let’s Encrypt client with the renew option.
To trigger the renewal process for all installed domains, run this command:
- /opt/letsencrypt/letsencrypt-auto renew
Because we recently installed the certificate, the command will only check for the expiration date and print a message informing that the certificate is not due to renewal yet. The output should look similar to this:
Checking for new version...

Requesting root privileges to run letsencrypt...

   /root/.local/share/letsencrypt/bin/letsencrypt renew

Processing /etc/letsencrypt/renewal/example.com.conf

The following certs are not due for renewal yet:

  /etc/letsencrypt/live/example.com/fullchain.pem (skipped)

No renewals were attempted.
Notice that if you created a bundled certificate with multiple domains, only the base domain name will be shown in the output, but the renewal should be valid for all domains included in this certificate.
A practical way to ensure your certificates won’t get outdated is to create a cron job that will periodically execute the automatic renewal command for you. Since the renewal first checks for the expiration date and only executes the renewal if the certificate is less than 30 days away from expiration, it is safe to create a cron job that runs every week or even every day, for instance.
Let's edit the crontab to create a new job that will run the renewal command every week. To edit the crontab for the root user, run:
- sudo crontab -e
Add the following lines:
30 2 * * 1 /opt/letsencrypt/letsencrypt-auto renew >> /var/log/le-renew.log

35 2 * * 1 /etc/init.d/nginx reload
Save and exit. This will create a new cron job that will execute the letsencrypt-auto renew command every Monday at 2:30 am, and reload Nginx at 2:35am (so the renewed certificate will be used). The output produced by the command will be piped to a log file located at /var/log/le-renewal.log.
For more information on how to create and schedule cron jobs, you can check our How to Use Cron to Automate Tasks in a VPS guide.
Step 5 — Updating the Let’s Encrypt Client (optional)
Whenever new updates are available for the client, you can update your local copy by running a git pull from inside the Let’s Encrypt directory:
- cd /opt/letsencrypt
- sudo git pull
This will download all recent changes to the repository, updating your client.
Conclusion
That's it! Your web server is now using a free Let's Encrypt TLS/SSL certificate to securely serve HTTPS content.
How To Secure Nginx with Let's Encrypt on Ubuntu 14.04的更多相关文章
- Nginx模块之————RTMP模块在Ubuntu 14.04年的设置与搭建
Nginx的设置,RTMP在Ubuntu 14.04 https://www.vultr.com/docs/setup-nginx-rtmp-on-ubuntu-14-04
- How To Secure Apache with Let's Encrypt on Ubuntu (Free SSL)
Introduction This tutorial will show you how to set up a TLS/SSL certificate from Let's Encrypt on a ...
- [django] Deploy Django Applications Using uWSGI and Nginx on Ubuntu 14.04
关键点1:chmod-socket=666 (mysite_uwsgi.ini) 关键点2 : 工程目录和虚拟环境目录搞清楚 几个参考: http://uwsgi-docs.readthedocs.i ...
- ubuntu 14.04安装nginx+php+mysql
前段时间的折腾,颇费一番周折,过程中发现网上的许多资料比较老旧过时了,所以在这里也简单把过程重新整理一遍,争取一帖解决问题. 基于最新的Ubuntu 14.04(2014年9月)搭建nginx.php ...
- 在Ubuntu 14.04安装Nginx
###介绍 Nginx是世界上最流行的网络服务器中的一种,负责托管网络上一些流量最高的网站.在多数情况下,Nginx比Apache在资源上更加友好,可以作为网络服务器或反向代理服务器. 这篇教程中,我 ...
- Ubuntu 14.04 上使用 Nginx 部署 Laravel
本教程将会涉及以下工具: Ubuntu 14.04 LTS PHP 5.5 MySQL Laravel 5.0 Nginx 参考文章:Ubuntu 14.04 上使用 Nginx 部署 Laravel ...
- Ubuntu 14.04 安装LNMP(nginx/1.12.1+php7.1.9+mysql5.7.19)环境
这篇教程中,我们将讨论怎样在Ubuntu 14.04搭建LNMP环境 1 安装Nginx 首先我们要更新apt源 sudo add-apt-repository ppa:nginx/stable s ...
- ubuntu 14.04安装nginx+php
转自:http://www.cnblogs.com/helinfeng/p/4219051.html 基于最新的Ubuntu 14.04(2014年9月)搭建nginx.php.mysql环境,以下全 ...
- 【转】如何在Ubuntu 14.04 LTS上设置Nginx虚拟主机
介绍 转自http://www.pandacademy.com/%E5%A6%82%E4%BD%95%E5%9C%A8ubuntu-14-04-lts%E4%B8%8A%E8%AE%BE%E7%BD% ...
随机推荐
- my.赚钱
http://mhxy.gamedog.cn/201503/999433.html (发表于 2015-03-19) 梦幻西游手游四种赚钱技巧翻身做土豪教程,在游戏中玩家需要知道的就是赚钱方法是非 ...
- 性能测试工具LoadRunner20-LR之Controller Service-Level Agreement(服务水平协议)
SLA是为负载测试场景定义的具体目标.例如,评测脚本中任意数量事务的平均响应时间,可以定义具体的目标或阈值.测试运行结束之后,LR将你定义的目标与实际录制的平均事务响应时间进行比较.如果实际的平均事务 ...
- POJ 3522 ——Slim Span——————【最小生成树、最大边与最小边最小】
Slim Span Time Limit: 5000MS Memory Limit: 65536K Total Submissions: 7102 Accepted: 3761 Descrip ...
- [HZOI 2015]树黑白
[题目描述] 给定一棵树,要求维护以下操作: 1.M u 将u节点反色 2.Q u 查询u到所有黑色节点距离和 [输入格式] 第一行n,m 表示节点总数和操作次数 之后n-1行,每行u,v表示两个端点 ...
- node搭环境(二)之 bower gulp
前面详细记录了安装node及git,接来下要安装bower,首先创建一个空文件夹bowerandgulp. 步骤:1.安装node.js 2.node里面自带了 npm 3.通过npm 安装cnpm ...
- Log4.Net日志记录解析
http://www.cnblogs.com/neekerss/archive/2011/01/04/1925171.html
- Devexpress Xtrareport 创建主从报表
效果 xtrareport 布局 From 代码 private DataSet Getdata() { DataSet ds = new DataSet(); //config配置字符串 strin ...
- Razor,aspx的占位控件(母版页)
1.razor: 母版页中:@*类似master的占位控件*@ @RenderSection("scripts", required: false) 部分页中: @section ...
- windows常用命令行总结
cmd下的命令行 1.查看当前目录下的子目录 dir 或 dir /b 类似Linux 下的 ls 或者 ls -l 2.盘符切换 d: 3.进入目录 cd [目录名] 退一个目录 cd .. ...
- 如何将运维的报警做成运营的报警--Java后端架构
转:http://mp.weixin.qq.com/s?__biz=MzI4OTU3ODk3NQ==&mid=2247483970&idx=1&sn=2a00acfb25f0c ...