
WSL (Windows Subsystem for Linux) 的 VSLAM (Visual Simultaneous Localization and Mapping) 道路
WSL 的 VSLAM 道路
以 Windows Subsystem for Linux 闯入 Visual Simultaneous Localization and Mapping 世界的艰难道路... 这里包含各种各样的 WSL 中可能用到的包,美化方案,以及相关软件的一些使用小技巧,用于自己踩坑记录的同时,希望能够帮到同为使用 Windows 踩坑的 CVer 们... ...
安装好 Windows Subsystem for Linux 后要做的
卸载原装 Vim
一波强硬操作把好删的地方先咔嚓掉(让输密码就老实输,让确认就直接'Y'):
sudo apt-get remove vim

sudo apt-get remove vim-runtime

sudo apt-get remove vim -tiny

sudo apt-get remove vim-common

sudo apt-get remove vim-doc

sudo apt-get remove vim-scripts
然后检查还剩什么带 "vim" 字眼的还活着,输入:
dpkg -l | grep vim
得到下面这三个东西:
rc  vim-common	2:8.1.2269-1ubuntu5	all	Vi IMproved - Common files

rc  vim-runtime	2:8.1.2269-1ubuntu5	all	Vi IMproved - Runtime files

rc  vim-tiny	2:8.1.2269-1ubuntu5	amd64	Vi IMproved - enhanced vi editor - compact version
扯掉它最后的救命稻草,用:
sudo dpkg -P vim-tiny vim-common vim-run
安装 Nano
这样就成功 remove 了原装的 vim,下面用 apt-get 命令安装 nano,也是一种编辑器:
sudo apt-get install nano
Linux换源
进入阿里云 Ubuntu 镜像,选择 ubuntu 20.04 (focal) 配置所对应的源:
deb http://mirrors.aliyun.com/ubuntu/ focal main restricted universe multiverse

deb-src http://mirrors.aliyun.com/ubuntu/ focal main restricted universe multiverse

deb http://mirrors.aliyun.com/ubuntu/ focal-security main restricted universe multiverse

deb-src http://mirrors.aliyun.com/ubuntu/ focal-security main restricted universe multiverse

deb http://mirrors.aliyun.com/ubuntu/ focal-updates main restricted universe multiverse

deb-src http://mirrors.aliyun.com/ubuntu/ focal-updates main restricted universe multiverse

deb http://mirrors.aliyun.com/ubuntu/ focal-proposed main restricted universe multiverse

deb-src http://mirrors.aliyun.com/ubuntu/ focal-proposed main restricted universe multiverse

deb http://mirrors.aliyun.com/ubuntu/ focal-backports main restricted universe multiverse

deb-src http://mirrors.aliyun.com/ubuntu/ focal-backports main restricted universe multiverse
在 source.list 文件中添加这些源并保存(按,Ctrl+K):
sudo nano /etc/apt/source.list # Use nano to edit the .list file
一些小型的 Tips
“右键”在 WSL 中意味着 “Paste”;
访问源列表中每个网址并读取软件列表,最后把这个更新后的列表保存在本地电脑,用的命令为:
sudo apt-get update
要想把本地已安装的软件与软件列表中对应软件进行对比,发现需要更新的文件,用下面这个:
sudo apt-get upgrade
回到 home 目录是用:
cd ~
WSL 似乎不支持这东西
# sudo apt-get install yum
要想鉴定一个网站是否正常连接,使用如下的命令:
ping XXX.com # "Packet Internet Groper", as an example, use 'ping github.com'
这是工作在 TCP/IP 网络体系结构中应用层的一个服务命令, 主要是向特定的目的主机发送 ICMP(Internet Control Message Protocol 因特网报文控制协议)Echo 请求报文,测试目的站是否可达及了解其有关状态。
等待一段时间后(你认为差不多到了统计的总时长了),使用以下命令停止:
ctrl+C
最终输出基本上是下面这个样子(github 有一定的丢包 a... ...):
PING github.com (140.82.113.3) 56(84) bytes of data.

64 bytes from github.com (140.82.113.3): icmp_seq=1 ttl=47 time=565 ms

64 bytes from github.com (140.82.113.3): icmp_seq=2 ttl=47 time=1062 ms

64 bytes from github.com (140.82.113.3): icmp_seq=3 ttl=47 time=389 ms

64 bytes from github.com (140.82.113.3): icmp_seq=4 ttl=47 time=513 ms

64 bytes from github.com (140.82.113.3): icmp_seq=5 ttl=47 time=434 ms

64 bytes from github.com (140.82.113.3): icmp_seq=6 ttl=47 time=607 ms

64 bytes from github.com (140.82.113.3): icmp_seq=7 ttl=47 time=373 ms

64 bytes from github.com (140.82.113.3): icmp_seq=8 ttl=47 time=401 ms

^C

--- github.com ping statistics ---

9 packets transmitted, 8 received, 11.1111% packet loss, time 8026ms

rtt min/avg/max/mdev = 372.733/542.963/1062.033/212.073 ms, pipe 2
只有 g++ 不足以在 Linux 上面开心地做开发,最好在一切的开始先装一下
build-essential这个包,里面有很多依赖,能够使缺省的 Ubuntu 具备 C/C++ 的编译环境,运行:sudo apt-get install build-essential
Node Package Manager(npm)能够加快下载软件包的速度(?):
sudo apt install npm
想要看看可以升级的软件以及它们的版本信息,使用:
apt list --upgradable -a
直接 Kill 当前进程:
ctrl+C
一种临时给予权限的方法:
sudo chmod 777 /dev/ttyUSB*
相应的,如果想要给串口一个永久权限,使用:
sudo usermod -a -G dialout user_name
寻找包的位置,
mlocate可以用来定位软件包,使用locate命令:sudo apt-get mlocate
sudo apt-get install mlocate
sudo updatedb
locate eigen3
就可以输出
eigen3的位置。doxygen 编译文档的方法,下载并
make doc就可以编译出一个doxygen文档:sudo apt-get install doxygen
make doc
配置一个比较漂亮的Shell
可以通过 cat 来查看当前的 Linux 系统是否有可用的 shell:
cat /etc/shells

sudo apt-get install zsh
安装完后,shells 中将出现 zsh:
# /etc/shells: valid login shells

/bin/sh

/bin/bash

/usr/bin/bash

/bin/rbash

/usr/bin/rbash

/bin/dash

/usr/bin/dash

/usr/bin/tmux

/usr/bin/screen

/bin/zsh

/usr/bin/zsh
emmmm... ... 要安装的就是叫做 zsh 的东西,可以把命令行弄得好看一些,对于提高工作效率有很好的促进作用,安装步骤很简单,直接运行:
sudo apt-get install zsh
然后切换当前 shell 至 zsh 就成功了:
chsh -s /bin/zsh
更新后会输出一个:
# Updated process:[oh-my-zsh] Would you like to update? [Y/n] Y

Updating Oh My Zsh ...

remote: Enumerating objects: 154, done.

remote: Counting objects: 100% (154/154), done.

remote: Compressing objects: 100% (78/78), done.

remote: Total 116 (delta 69), reused 84 (delta 38), pack-reused 0

Receiving objects: 100% (116/116), 27.17 KiB | 11.00 KiB/s, done.

Resolving deltas: 100% (69/69), completed with 24 local objects.

From https://github.com/ohmyzsh/ohmyzsh

 * branch            master     -> FETCH_HEAD

   93c837f..c549387  master     -> origin/master

 README.md                                      |  61 +++---

 lib/functions.zsh                              |   4 +-

 lib/termsupport.zsh                            |  12 +-

 plugins/aws/aws.plugin.zsh                     |   1 -

 plugins/bgnotify/bgnotify.plugin.zsh           |   2 +-

 plugins/brew/README.md                         |   7 +-

 plugins/brew/brew.plugin.zsh                   |   1 +

 plugins/bundler/README.md                      |  79 +++++---

 plugins/bundler/bundler.plugin.zsh             | 116 ++++++-----

 plugins/compleat/compleat.plugin.zsh           |   7 +-

 plugins/composer/composer.plugin.zsh           |   2 +

 plugins/drush/drush.plugin.zsh                 |   2 -

 plugins/git/git.plugin.zsh                     |  14 +-

 plugins/ipfs/LICENSE                           |  22 ++

 plugins/ipfs/README.md                         |  17 ++

 plugins/ipfs/_ipfs                             | 717 +++++++++++++++++++++++++++++++++++++++++++++++++++++++++++++++++

 plugins/laravel5/laravel5.plugin.zsh           |  19 +-

 plugins/minikube/minikube.plugin.zsh           |  10 +-

 plugins/pip/pip.plugin.zsh                     |   6 +-

 plugins/stack/stack.plugin.zsh                 |   1 -

 plugins/sublime-merge/README.md                |  17 ++

 plugins/sublime-merge/sublime-merge.plugin.zsh |  55 +++++

 plugins/terraform/README.md                    |   3 +-

 plugins/terraform/terraform.plugin.zsh         |   2 +

 plugins/wp-cli/wp-cli.plugin.zsh               |   1 -

 themes/agnoster.zsh-theme                      |   2 +-

 themes/avit.zsh-theme                          |   4 +-

 27 files changed, 1017 insertions(+), 167 deletions(-)

 create mode 100644 plugins/ipfs/LICENSE

 create mode 100644 plugins/ipfs/README.md

 create mode 100644 plugins/ipfs/_ipfs

 create mode 100644 plugins/sublime-merge/README.md

 create mode 100644 plugins/sublime-merge/sublime-merge.plugin.zsh

First, rewinding head to replay your work on top of it...

Fast-forwarded master to c549387745205d7fa8e91c1e6dcdae6901d9dd1d.

         __                                     __

  ____  / /_     ____ ___  __  __   ____  _____/ /_

 / __ \/ __ \   / __ `__ \/ / / /  /_  / / ___/ __ \

/ /_/ / / / /  / / / / / / /_/ /    / /_(__  ) / / /

\____/_/ /_/  /_/ /_/ /_/\__, /    /___/____/_/ /_/

                        /____/

Hooray! Oh My Zsh has been updated and/or is at the current version.

To keep up on the latest news and updates, follow us on Twitter: https://twitter.com/ohmyzsh

Want to get involved in the community? Join our Discord: https://discord.gg/ohmyzsh

Get your Oh My Zsh swag at: https://shop.planetargon.com/collections/oh-my-zsh
打开文件 .zshrc,更改 ZSH_THEME= 至 ZSH_THEME="agnoster",打开的方法如下(用 Nano 编辑):
sh -c "$(curl -fsSL https://raw.githubusercontent.com/robbyrussell/oh-my-zsh/master/tools/install.sh)"

nano ~/.zshrc
实际上,此时 reboot 后看到的是奇怪的样式,需要调整字体才能让它正常起来,进入官网下载相应的字体,直接双击安装后,在 WSL 命令行窗口直接 右键->属性->字体 并更改字体的样式即可。
输出文件树视图到.txt(Windows 版本)
打开"运行"对话框(Win+R),输入 cmd,打开控制台命令窗口...
C:\Users\a1020>g:

G:\>cd \__BiBliOthèQuE__

G:\__BiBliOthèQuE__>tree /f > saved_names.txt
Linux 中做这件事似乎需要下面这个东西:
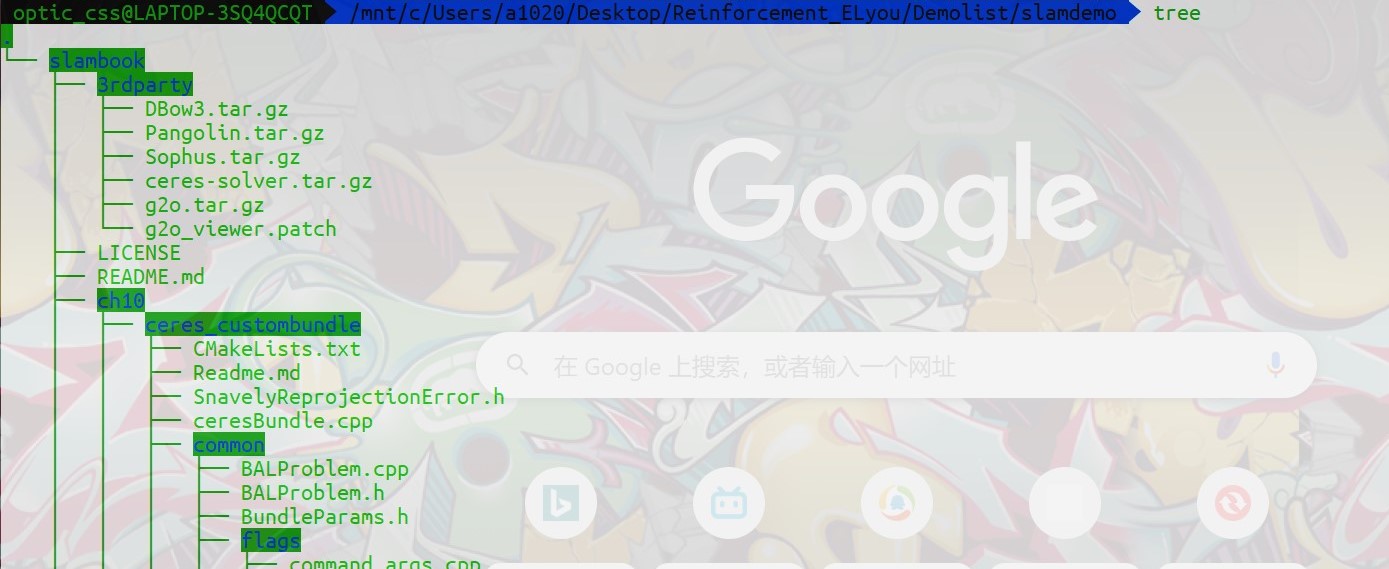
sudo apt-get install tree
这个弄出来也蛮好看的,在路径中输入:
tree
得到了下面一棵很 happy 的树图:
借助 WSL 走进 VSLAM的世界
WSL 挂载 Windows文件
WSL 是可以访问 Windows 中的文件的,除了软件要安装在根目录(?),其它的文件例如各种代码、数据文件什么的都希望可以放在别的地方,由此,可以切换路径到自己喜欢的目录里面:
cd /mnt/c/Users/a1020/Desktop/Reinforcement_ELyou/Demolist/slamdemo
下载 SLAMdemo 文件、安装 cmake、Hello SLAM
从 Gitee 中把目标文件 clone 下来:
git clone https://gitee.com/wenyawei/slambook.git
安装 cmake 的过程还是像以往一样:
sudo apt-get install cmake
完事之后随便来一下 cmake 命令,可以输出一些奇奇怪怪的东西:
Usage

  cmake [options] <path-to-source>

  cmake [options] <path-to-existing-build>

  cmake [options] -S <path-to-source> -B <path-to-build>

Specify a source directory to (re-)generate a build system for it in the

current working directory.  Specify an existing build directory to

re-generate its build system.

Run 'cmake --help' for more information.
接下来把路径切到 slambook/ch2,用g++编译一下 helloSLAM.cpp,并运行生成的可执行文件 a.out:
cd slambook/ch2

g++ helloSLAM.cpp

./a.out
得到如下所示 Hello SLAM! 的输出:

安装 Eigen、检测是否成功
直接采用 apt-get 安装:
sudo apt-get install libeigen3-dev
从前面的路径回退一位,并切换到 ch3/useEigen 的路径:
cd ..

cd ch3/useEigen
使用 cmake 进行编译,并运行:
cmake .

make

./eigenMatrix
输出为(...):
1 2 3

4 5 6

1       2       3

4       5       6

10

28

32

77

 0.680375   0.59688 -0.329554

-0.211234  0.823295  0.536459

 0.566198 -0.604897 -0.444451

 0.680375 -0.211234  0.566198

  0.59688  0.823295 -0.604897

-0.329554  0.536459 -0.444451

1.61307

1.05922

 6.80375   5.9688 -3.29554

-2.11234  8.23295  5.36459

 5.66198 -6.04897 -4.44451

-0.198521   2.22739    2.8357

  1.00605 -0.555135  -1.41603

 -1.62213   3.59308   3.28973

0.208598

Eigen values =

0.0242899

 0.992154

  1.80558

Eigen vectors =

-0.549013 -0.735943  0.396198

 0.253452 -0.598296 -0.760134

-0.796459  0.316906 -0.514998

time use in normal inverse is 0ms

time use in Qr decomposition is 0ms
安装 Pangolin、检测是否成功
详细安装步骤以及检测见我的 Pangolin Installation & Examination 教程。
安装 Sophus、检测是否成功
和之前一样,直接切入软件包的目录进行编译,指令如下:
cd /mnt/c/Users/a1020/Desktop/Reinforcement_ELyou/Demolist/slamdemo/slambook/3rdparty/Sophus

mkdir build

cd build

cmake ..

make
然后开心地发现竟然有编译错误!!具体错误为:
/mnt/c/Users/a1020/Desktop/Reinforcement_ELyou/Demolist/slamdemo/slambook/3rdparty/sophus/sophus/so2.cpp: In constructor ‘Sophus::SO2::SO2()’:

/mnt/c/Users/a1020/Desktop/Reinforcement_ELyou/Demolist/slamdemo/slambook/3rdparty/sophus/sophus/so2.cpp:32:26: error: lvalue required as left operand of assignment

   32 |   unit_complex_.real() = 1.;

      |                          ^~

/mnt/c/Users/a1020/Desktop/Reinforcement_ELyou/Demolist/slamdemo/slambook/3rdparty/sophus/sophus/so2.cpp:33:26: error: lvalue required as left operand of assignment

   33 |   unit_complex_.imag() = 0.;

      |                          ^~

make[2]: *** [CMakeFiles/Sophus.dir/build.make:66: CMakeFiles/Sophus.dir/sophus/so2.cpp.o] Error 1

make[2]: Leaving directory '/mnt/c/Users/a1020/Desktop/Reinforcement_ELyou/Demolist/slamdemo/slambook/3rdparty/sophus/build'

make[1]: *** [CMakeFiles/Makefile2:91: CMakeFiles/Sophus.dir/all] Error 2

make[1]: Leaving directory '/mnt/c/Users/a1020/Desktop/Reinforcement_ELyou/Demolist/slamdemo/slambook/3rdparty/sophus/build'

make: *** [Makefile:144: all] Error 2
于是去寻找路径下名为 so2.cpp 的源文件,找到如下代码:
SO2::SO2()

{

unit_complex_.real() = 1.;

unit_complex_.imag() = 0.;

}
显然这种赋值方式是 XXX 的,应该用实参的形式赋值,也就是说,改成下面的形式:
SO2::SO2()

{

//unit_complex_.real() = 1.;

//unit_complex_.imag() = 0.;

unit_complex_.real(1.);

unit_complex_.imag(0.);

}
然后重新编译一下,就通过了:
/usr/bin/cmake -E cmake_progress_start /mnt/c/Users/a1020/Desktop/Reinforcement_ELyou/Demolist/slamdemo/slambook/3rdparty/sophus/build/CMakeFiles 0
接着的使用中会遇到的麻烦事是找不到 Sophus 库,需要把 CMakeLists.txt 里面写上你安装的 Sophus 库的头文件路径以及共享库的路径:
# Use the set(·) command to input the directories of Sophus

set(Sophus_INCLUDE_DIRS "/mnt/c/Users/a1020/Desktop/Reinforcement_ELyou/Demolist/slamdemo/slambook/3rdparty/Sophus/sophus")

set(Sophus_LIBS "/mnt/c/Users/a1020/Desktop/Reinforcement_ELyou/Demolist/slamdemo/slambook/3rdparty/Sophus/build/libSophus.so")

find_package(Sophus REQUIRED)

include_directories(

${Sophus_INCLUDE_DIRS}

)

target_link_libraries(useSophus ${Sophus_LIBRARIES})
咳咳,上面是非模板 Sophus 的安装和使用,,下面才是模板库的,命令行如下(记得不要回滚):
git clone https://github.com/strasdat/Sophus.git

cd /mnt/c/Users/a1020/Desktop/Reinforcement_ELyou/Demolist/slamdemo/slambook/3rdparty/SophusTemplate

mkdir build

cd build

cmake ..

make

sudo make install
并没有任何编译错误,这样一下子安装下来就是只有头文件的 Sophus,就像 eigen3 一样的,它和非模板库的区别在于,这个里面的类型定义都是基于模板的,也就是说,有更强的泛化性能。
安装 Ceres、g2o、检测是否成功
同前,首先应当安装依赖:
sudo apt-get install qt5-qmake qt5-default libqglviewer-dev-qt5	libsuitesparse-dev libcxsparse3 libcholmod3

sudo apt-get install liblapack-dev libsuitesparse-dev libcxsparse3 libgflags-dev libgoogle-glog-dev libgtest-dev
然后进入编译:
git clone https://github.com/RainerKuemmerle/g2o.git

sudo apt-get install libsuitesparse-dev qtdeclarative5-dev qt5-qmake libqglviewer-dev-qt5

sudo su

cd g2o

mkdir build

cd build

cmake ../

make -j8

sudo make install
遇到了编译错误:
/usr/lib/qt5/bin/uic: error while loading shared libraries: libQt5Core.so.5: cannot open shared object file: No such file or directory

make[2]: *** [g2o/apps/g2o_viewer/CMakeFiles/viewer_library.dir/build.make:62: g2o/apps/g2o_viewer/ui_base_main_window.h] Error 127

make[1]: *** [CMakeFiles/Makefile2:1580: g2o/apps/g2o_viewer/CMakeFiles/viewer_library.dir/all] Error 2
查了一下,这个错误名为 error while loading shared libraries: libQt5Core.so.5: cannot open shared object file: No such file or directory,还好还好,有个解决思路帮助我成功解决了这个问题,似乎为 WSL 特有的,运行如下语句后再进行编译就可以了:
sudo strip --remove-section=.note.ABI-tag /usr/lib/x86_64-linux-gnu/libQt5Core.so.5
开了7个线程,花了得有接近 3~4 min 叭才弄完,但是完了就好完了就好,最后别忘了 sudo make install 一下。
用 g2o_viewer run 一下 sphere.g2o 来证明一下已经下载完成:
./g2o/bin/g2o_viewer /mnt/c/Users/a1020/Desktop/Reinforcement_ELyou/Demolist/slamdemo/slambook/3rdparty/ch10/sphere.g2o
一个需要注意的点是,最好别在别的位置编译 g2o 库,可能会报错告诉你路径里有中文。
安装 OpenCV4.4、检测是否成功
详细安装步骤以及检测见我的 OpenCV4.4.0 Installation & Examination 教程。
Cmake、g++
在 WSL 中使用 g++ 打印虚表的操作如下,会自动写到一个文件里:
g++ -fdump-class-hierarchy XXX.cpp
使用 g++ 导出继承结构的指令如下:
g++ -fdump-class-hierarchy -c XXX.cpp
Cmake 的简单用法
构建 CMakeList.txt 如下,注意一定要把保存的编码格式改成 UTF8:
# The lowest version required

cmake_minimum_required( VERSION 2.8 )

# Project name

project( HelloSLAM )

# The executable file addition

add_executable( helloSLAM helloSLAM.cpp )
在终端输入:
# Path to slambook/ch2

cd /mnt/c/Users/a1020/Desktop/Reinforcement_ELyou/Demolist/slamdemo/slambook/ch2

# CMake, the current path

cmake .

make

# Run the executable file

./helloSLAM
可以通过新建并切换到 build 文件夹,并对于上一个文件夹进行编译,就可以将 cmake 编译时产生的文件生成在 build 里面,这样有利于源代码的发布:
mkdir build

cd build

cmake ..

make
注意每次编译时都记得把以前的 Makefile 删除。
Python 的简单用例
学会用命令行调用 Python 标准库的 doctest,从而生成代码的分析文件,首先自然是切换到相应的路径:
cd /mnt/c/Users/a1020/Desktop/Reinforcement_ELyou/#Pythonic/Fluent-Python/01-data-model
运行下面的指令,调用 doctest,可以获得一个名为 frenchdeck.doctest 的文件:
python3 -m doctest frenchdeck.py
文件内容为代码的分析:
>>> from frenchdeck import FrenchDeck, Card

>>> beer_card = Card('7', 'diamonds')

>>> beer_card

Card(rank='7', suit='diamonds')

>>> deck = FrenchDeck()

>>> len(deck)

52

>>> deck[:3]

[Card(rank='2', suit='spades'), Card(rank='3', suit='spades'), Card(rank='4', suit='spades')]

>>> deck[12::13]

[Card(rank='A', suit='spades'), Card(rank='A', suit='diamonds'), Card(rank='A', suit='clubs'), Card(rank='A', suit='hearts')]

>>> Card('Q', 'hearts') in deck

True

>>> Card('Z', 'clubs') in deck

False

>>> for card in deck:  # doctest: +ELLIPSIS

...   print(card)

Card(rank='2', suit='spades')

Card(rank='3', suit='spades')

Card(rank='4', suit='spades')

...

>>> for card in reversed(deck):  # doctest: +ELLIPSIS

...   print(card)

Card(rank='A', suit='hearts')

Card(rank='K', suit='hearts')

Card(rank='Q', suit='hearts')

...

>>> for n, card in enumerate(deck, 1):  # doctest: +ELLIPSIS

...   print(n, card)

1 Card(rank='2', suit='spades')

2 Card(rank='3', suit='spades')

3 Card(rank='4', suit='spades')

...

>>> suit_values = dict(spades=3, hearts=2, diamonds=1, clubs=0)

>>> def spades_high(card):

...     rank_value = FrenchDeck.ranks.index(card.rank)

...     return rank_value * len(suit_values) + suit_values[card.suit]

Rank test:

>>> spades_high(Card('2', 'clubs'))

0

>>> spades_high(Card('A', 'spades'))

51

>>> for card in sorted(deck, key=spades_high):  # doctest: +ELLIPSIS

...      print(card)

Card(rank='2', suit='clubs')

Card(rank='2', suit='diamonds')

Card(rank='2', suit='hearts')

...

Card(rank='A', suit='diamonds')

Card(rank='A', suit='hearts')

Card(rank='A', suit='spades')
WSL (Windows Subsystem for Linux) 的 VSLAM (Visual Simultaneous Localization and Mapping) 道路的更多相关文章
- WSL (Windows Subsystem for Linux)
WSL (Windows Subsystem for Linux) :适用于 Linux 的 Windows 子系统. References Install WSL with a single com ...
- WSL(Windows Subsystem for Linux)--Pico Process Overview
[转载] Windows Subsystem for Linux -- Pico Process Overview Overview This post discusses pico processe ...
- WSL(Windows Subsystem for Linux)的安装与使用
有关WSL的介绍这里就不做解释了.另外,本文仅适用于win10 build 16215以及之后的版本,之前的版本可参考官方链接. (可使用“winver”命令查看windows版本号) 安装: 1. ...
- WSL(Windows Subsystem for Linux)的安装与使用及 mongodb安装
有关WSL的介绍这里就不做解释了.另外,本文仅适用于win10 build 16215以及之后的版本,之前的版本可参考官方链接. (可使用“winver”命令查看windows版本号) 安装:1. ...
- WSL(Windows Subsystem for Linux) Ubuntu 下byobu状态栏错误的问题
关于WSL的,Win10 的Linux子系统如何安装,就不赘述了,Win10商店里就有,至于win7和win8.1想装这个估计也不行,所以跳过. 最近处于好奇,也懒得弄VMware的虚拟机(那玩意儿占 ...
- WSL(Windows Subsystem for Linux) 适用于Linux的Windows子系统
打开 Microsoft Store , 搜索 Linux .选择 Ubuntu , 仔细看介绍,尤其是安装前的说明 ========================================= ...
- wsl(Windows Subsystem for Linux)安装简易指南
1. 在“启用或关闭Windows功能”窗口中打开“适用于Linux的Windows子系统”: 2. 让你的Windows更新程序将你的Windows更新到最新版本: 3. 在Microsoft St ...
- WSL Windows Subsystem for Linux安装指南
见官方文档: https://msdn.microsoft.com/en-us/commandline/wsl/install_guide
- Visual simultaneous localization and mapping: a survey 论文解析(全)
当激光或声纳等距离传感器被用来构建小的静态环境的二维地图时,SLAM的问题被认为是解决的.然而,对于动态,复杂和大规模的环境,使用视觉作为唯一的外部传感器,SLAM是一个活跃的研究领域. 第一部分是简 ...
随机推荐
- 安装macosx10.13high serria
本教程所需资源下载链接: 链接:https://pan.baidu.com/s/1wGTezXz6zGvtlwpv6mMoSg 提取码:r6n9 安装VMware workstation 16.0,安 ...
- Java并发包源码学习系列:JDK1.8的ConcurrentHashMap源码解析
目录 为什么要使用ConcurrentHashMap? ConcurrentHashMap的结构特点 Java8之前 Java8之后 基本常量 重要成员变量 构造方法 tableSizeFor put ...
- Python+Selenium+Unittest实现PO模式web自动化框架(5)
1.PageObjects目录下的模块 该目录下是存放各页面功能点. 比如:login_page.py模块下就是存放登录页面上的各个功能点的.(登录功能.获取登录失败的提示信息) # --^_^-- ...
- 关掉IE提示“当前安全设置会使计算机有风险”
我们先来看一下IE浏览器出现的提示窗口,该窗口位于最顶端,不点击设置的话,无法进行下一步的操作. 这时我们点击开始按钮 ,在弹出菜单中选择"运行"菜单项. 在打开的Windows运 ...
- C语言中使用类似awk的功能
awk实在是太强大了, 非常复杂的任务,几行代码就可以解决, awk经常需要用到, 但是在c语言里面, 调用system不太优雅, 能不能直接在c语言中直接调用呢,简单实现了一些功能, 但大多数情况, ...
- jsaper子报表Subreport(父子报表互相传值)
有很多人都说Jasperreports不适合中国式复杂报表,实际上运用好父子报表可以解决大部分问题了.例如下面的表.每个学生的学科数目不固定,且每个学生后有相当于小计的平均分.有点复杂度的报表,可以使 ...
- POJ2029 二维线段树
Get Many Persimmon Trees POJ - 2029 Seiji Hayashi had been a professor of the Nisshinkan Samurai Sch ...
- 十五:SpringBoot-配置Actuator组件,实现系统监控
SpringBoot-配置Actuator组件,实现系统监控 1.Actuator简介 1.1 监控组件作用 1.2 监控分类 2.SpringBoot整合Actuator 2.1 核心依赖Jar包 ...
- 解决java.lang.NoClassDefFoundError: ch/qos/logback/core/joran/spi/Pattern
明明引入了这个,却提示没有 看下面文章: http://www.maocaoying.com/article/109
- vim自动添加C C++ sh文件头
set foldenable set foldmethod=manual set fencs=utf-8,ucs-bom,shift-jis,gb18030,gbk,gb2312,cp936 set ...