
Pytorch从0开始实现YOLO V3指南 part4——置信度阈值和非极大值抑制
前一节我们实现了网络的前向传播。这一节我们对检测输出设置目标置信度阈值和进行非极大值抑制。
必要条件:
1.此系列教程的Part1到Part3。
2.Pytorch的基本知识,包括如何使用nn.Module,nn.Sequential,torch.nn.parameter类构建常规的结构
3.numpy的基础知识
此前我们已经建立了一个模型,给定一张输入图片它能产生B*10674*85维的输出向量。B是批中图片的数目,10674是每张图片预测的边界框数目,85是边界框属性数目。
但就像我们在part1中描述的那样,我们必须对输出进行目标置信度阈值化和非极大值抑制,以获得最终剩余的真正检测。为此,我们将在文件util.py中创建一个名为write_results的函数。
def write_results(prediction, confidence, num_classes, nms_conf = 0.4):
这个函数将prediction、confidence(目标置信度阈值)、num_classes(在我们的示例中是80)和nms_conf (NMS IoU的阈值)作为输入。
目标置信度阈值:
我们的预测张量包含了关于B x 10647个边界框的信息。对于每个目标置信度低于阈值的边界框,我们将它的每个属性(行向量)的值设置为零。
conf_mask = (prediction[:,:,4] > confidence).float().unsqueeze(2)

prediction = prediction*conf_mask
执行极大值抑制:
我们现在拥有的是边界框的中心坐标以及高度和宽度,然而使用边界框的对角点更容易计算IOU。因此,我们将框的(center x, center y, height, width)属性转换为(左上角x,左上角y,右下角x,右下角y)。
box_corner = prediction.new(prediction.shape)

box_corner[:,:,0] = (prediction[:,:,0] - prediction[:,:,2]/2)

box_corner[:,:,1] = (prediction[:,:,1] - prediction[:,:,3]/2)

box_corner[:,:,2] = (prediction[:,:,0] + prediction[:,:,2]/2)

box_corner[:,:,3] = (prediction[:,:,1] + prediction[:,:,3]/2)

prediction[:,:,:4] = box_corner[:,:,:4]
每幅图像中真实检测框的数目可能不同。例如,一批大小为3的图像,其中图像1、2和3分别有5、2、4个真检测值。因此,每次必须对同一个图像进行置信阈值和NMS,而不能对所涉及的操作进行矢量化,必须在预测的第一个维度(包含成批图像的索引)上进行遍历操作。
batch_size = prediction.size(0)

write = False

for ind in range(batch_size):

      image_pred = prediction[ind]          #image Tensor

      #confidence threshholding

      #NMS
write标志位用于指示我们是否对output进行了初始化,将会使用一个向量来收集整个批中真实的预测。
循环的开始我们进行数据清理。因为每个边界框行有85个属性,其中80个是类得分。我们只关心类得分最大值的那个,所以会从每行中删除80个类得分,添加具有最大值的类的索引,以及该类的类得分。
max_conf, max_conf_score = torch.max(image_pred[:,5:5+ num_classes], 1)

max_conf = max_conf.float().unsqueeze(1)

max_conf_score = max_conf_score.float().unsqueeze(1)

seq = (image_pred[:,:5], max_conf, max_conf_score)
image_pred = torch.cat(seq, 1)
我们前面已经将目标置信度得分低于阈值的边界框行属性设置为了0,现在就筛除它们。
non_zero_ind =  (torch.nonzero(image_pred[:,4]))

try:

      image_pred_ = image_pred[non_zero_ind.squeeze(),:].view(-1,7)
except:

      continue

#For PyTorch 0.4 compatibility

#Since the above code with not raise exception for no detection

#as scalars are supported in PyTorch 0.4

if image_pred_.shape[0] == 0:

      continue
try-except块用于处理没有检测到的情况。在这种情况下,我们使用continue跳过此图像的其余循环体。
接下来,让我们在图像中检测目标。
#Get the various classes detected in the image

img_classes = unique(image_pred_[:,-1]) # -1 index holds the class index
因为对于同一个类别可能存在多个正确检测,我们使用一个叫unique的函数来获得给定图片中所有出现的类。
def unique(tensor):

    tensor_np = tensor.cpu().numpy()

    unique_np = np.unique(tensor_np)

    unique_tensor = torch.from_numpy(unique_np)

    tensor_res = tensor.new(unique_tensor.shape)

    tensor_res.copy_(unique_tensor)

    return tensor_res
之后我们对于每个类进行NMS
 for cls in img_classes:

        #perform NMS
一进入这个循环,首先要做的事情就是提取对于某一特定类别的检测(用变量cls表示)
#get the detections with one particular class

cls_mask = image_pred_*(image_pred_[:,-1] == cls).float().unsqueeze(1)

class_mask_ind = torch.nonzero(cls_mask[:,-2]).squeeze()

image_pred_class = image_pred_[class_mask_ind].view(-1,7)

#sort the detections such that the entry with the maximum objectness

#confidence is at the top

conf_sort_index = torch.sort(image_pred_class[:,4], descending = True )[1]

image_pred_class = image_pred_class[conf_sort_index]

idx = image_pred_class.size(0)   #Number of detections
然后我们进行NMS
for i in range(idx):

    #Get the IOUs of all boxes that come after the one we are looking at

    #in the loop

    try:

        ious = bbox_iou(image_pred_class[i].unsqueeze(0), image_pred_class[i+1:])

    except ValueError:

        break

    except IndexError:

        break

    #Zero out all the detections that have IoU > treshhold

    iou_mask = (ious < nms_conf).float().unsqueeze(1)

    image_pred_class[i+1:] *= iou_mask

    #Remove the non-zero entries

    non_zero_ind = torch.nonzero(image_pred_class[:,4]).squeeze()

    image_pred_class = image_pred_class[non_zero_ind].view(-1,7)
这里我们使用到了一个函数bbox_iou。第一个输入参数是循环体变量i索引处的边界框,第二个输入参数是多行边界框的一个tensor。函数bbox_iou的输出是一个tensor它包含了第一个输入的边界框与第二个输入的所有边界框的IOU。如下:
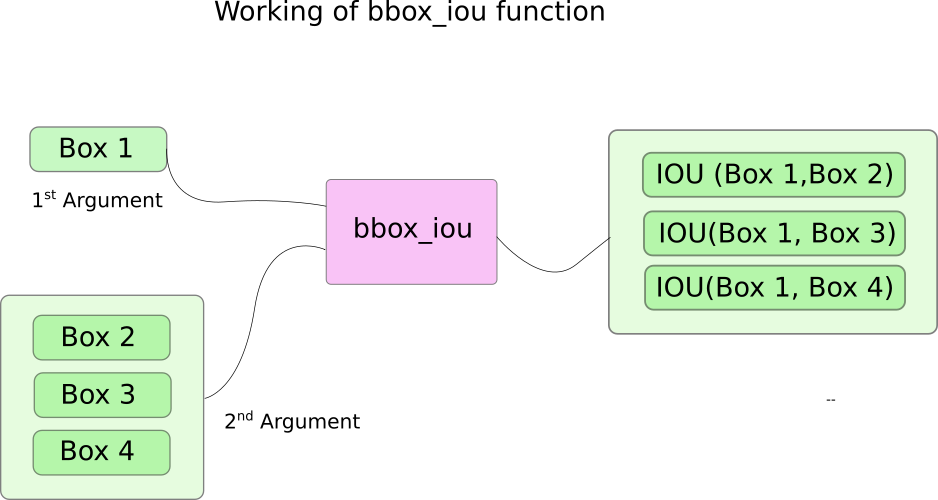
之前我们已经将目标置信度高的边界框放在前面,如果后面的边界框IoU值与前面的相比超过了阈值,那后者就会被删去。
循环体里面下面这行计算IoU。
ious = bbox_iou(image_pred_class[i].unsqueeze(0), image_pred_class[i+1:])
每轮迭代,如果有任何索引大于i的边界框与第i个边界框的IoU大于阈值nms_thresh,那这个边界框就会被删除。
#Zero out all the detections that have IoU > treshhold

iou_mask = (ious < nms_conf).float().unsqueeze(1)

image_pred_class[i+1:] *= iou_mask

#Remove the non-zero entries

non_zero_ind = torch.nonzero(image_pred_class[:,4]).squeeze()

image_pred_class = image_pred_class[non_zero_ind]
还要注意的是,我们将计算IoU的代码行放在try-catch块中。这是因为此循环按照id进行迭代(image_pred_class中的行数)。但因为我们循环过程中可能会从image_pred_class中删除一些边界框。这样一来,迭代可能会出现索引越界触发IndexError或者image_pred_class[i+1:]返回一个空张量触发ValueError。此时我们可以确定NMS已经无法删除多余的边界框了,从而跳出循环。
计算IoU:
def bbox_iou(box1, box2):

    """

    Returns the IoU of two bounding boxes

    """

    #Get the coordinates of bounding boxes

    b1_x1, b1_y1, b1_x2, b1_y2 = box1[:,0], box1[:,1], box1[:,2], box1[:,3]

    b2_x1, b2_y1, b2_x2, b2_y2 = box2[:,0], box2[:,1], box2[:,2], box2[:,3]

    #get the corrdinates of the intersection rectangle

    inter_rect_x1 =  torch.max(b1_x1, b2_x1)

    inter_rect_y1 =  torch.max(b1_y1, b2_y1)

    inter_rect_x2 =  torch.min(b1_x2, b2_x2)

    inter_rect_y2 =  torch.min(b1_y2, b2_y2)

    #Intersection area

    inter_area = torch.clamp(inter_rect_x2 - inter_rect_x1 + 1, min=0) * torch.clamp(inter_rect_y2 - inter_rect_y1 + 1, min=0)

    #Union Area

    b1_area = (b1_x2 - b1_x1 + 1)*(b1_y2 - b1_y1 + 1)

    b2_area = (b2_x2 - b2_x1 + 1)*(b2_y2 - b2_y1 + 1)

    iou = inter_area / (b1_area + b2_area - inter_area)

    return iou
写入预测:
write_results函数输出一个形状为 Dx8 的tensor。这里D是所有图像的真实检测,每个都用一行表示。每个检测有8个属性,即检测所属批次图像的索引、4个角坐标、目标置信度得分、最大置信类得分、该类的索引。
和此前一样,我们等到有一个检测时才初始化输出向量并将后续的检测拼接进来。使用写标志来表示tensor是否已经初始化。在遍历类的循环结束时,我们将检测结果添加到输出tensor中。
 batch_ind = image_pred_class.new(image_pred_class.size(0), 1).fill_(ind)

 #Repeat the batch_id for as many detections of the class cls in the image

 seq = batch_ind, image_pred_class

 if not write:

     output = torch.cat(seq,1)

     write = True
 else:

     out = torch.cat(seq,1)

     output = torch.cat((output,out))
在函数的末尾,我们检查输出是否已经初始化。如果没有,就意味着这批图像中没有一个检测到。在这种情况下,我们返回0。
 try:

    return output

 except:

    return 0
这就是这一部分所要讲解的内容了。现在我们终于有了一个预测,它以tensor的形式列出了每一个边界框。所以只剩下一件事就是创建一个输入管道来从磁盘读取图像,计算预测,在图像上绘制边界框,然后显示/写入这些图像。这是我们下一部分要做的。
Further Reading
Pytorch从0开始实现YOLO V3指南 part4——置信度阈值和非极大值抑制的更多相关文章
- Pytorch从0开始实现YOLO V3指南 part1——理解YOLO的工作
本教程翻译自https://blog.paperspace.com/how-to-implement-a-yolo-object-detector-in-pytorch/ 视频展示:https://w ...
- Pytorch从0开始实现YOLO V3指南 part3——实现网络前向传播
本节翻译自:https://blog.paperspace.com/how-to-implement-a-yolo-v3-object-detector-from-scratch-in-pytorch ...
- Pytorch从0开始实现YOLO V3指南 part5——设计输入和输出的流程
本节翻译自:https://blog.paperspace.com/how-to-implement-a-yolo-v3-object-detector-from-scratch-in-pytorch ...
- Pytorch从0开始实现YOLO V3指南 part2——搭建网络结构层
本节翻译自:https://blog.paperspace.com/how-to-implement-a-yolo-v3-object-detector-from-scratch-in-pytorch ...
- [DeeplearningAI笔记]卷积神经网络3.6-3.9交并比/非极大值抑制/Anchor boxes/YOLO算法
4.3目标检测 觉得有用的话,欢迎一起讨论相互学习~Follow Me 3.6交并比intersection over union 交并比函数(loU)可以用来评价对象检测算法,可以被用来进一步改善对 ...
- pytorch实现yolov3(4) 非极大值抑制nms
在上一篇里我们实现了forward函数.得到了prediction.此时预测出了特别多的box以及各种class probability,现在我们要从中过滤出我们最终的预测box. 理解了yolov3 ...
- YOLO v3
yolo为you only look once. 是一个全卷积神经网络(FCN),它有75层卷积层,包含跳跃式传递和降采样,没有池化层,当stide=2时用做降采样. yolo的输出是一个特征映射(f ...
- 深度学习笔记(十三)YOLO V3 (Tensorflow)
[代码剖析] 推荐阅读! SSD 学习笔记 之前看了一遍 YOLO V3 的论文,写的挺有意思的,尴尬的是,我这鱼的记忆,看完就忘了 于是只能借助于代码,再看一遍细节了. 源码目录总览 tens ...
- 一文看懂YOLO v3
论文地址:https://pjreddie.com/media/files/papers/YOLOv3.pdf论文:YOLOv3: An Incremental Improvement YOLO系列的 ...
随机推荐
- Linux中信号量的实现
如果一个任务获取信号量失败,该任务就必须等待,直到其他任务释放信号量.本文的重点是,在Linux中,当有任务释放信号量之后,如何唤醒正在等待该信号量的任务. 信号量定义如下: struct semap ...
- Linux中,MySQL的常用命令
我的博客 登录 mysql -u用户名 -p -- 然后在下面输入密码,Linux的密码不会显示出,盲打就可以 mysql -u用户名 -p密码 -- 这种方式将直接登录 开关 开启数据库 servi ...
- CRUSE: Convolutional Recurrent U-net for Speech Enhancement
CRUSE: Convolutional Recurrent U-net for Speech Enhancement 本文是关于TOWARDS EFFICIENT MODELS FOR REAL-T ...
- day02 真正的高并发还得看IO多路复用
教程说明 C++高性能网络服务保姆级教程 首发地址 day02 真正的高并发还得看IO多路复用 本节目的 使用epoll实现一个高并发的服务器 从单进程讲起 上节从一个基础的socket服务说起我们实 ...
- Linux 多网卡bonding
bonding 将多块网卡绑定同一IP地址对外提供服务,可以实现高可用或者负载均衡.直接给两块网卡设置同一IP 地址是不可以的.通过 bonding,虚拟一块网卡对外提供连接,物理网卡的被修改为相同的 ...
- 五四青年节,今天要学习。汇总5道难度不高但可能遇到的JS手写编程题
壹 ❀ 引 时间一晃,今天已是五一假期最后一天了,没有出门,没有太多惊喜与意外.今天五四青年节,脑子里突然想起鲁迅先生以及悲欢并不相通的话,我的五一经历了什么呢,忍不住想说那大概是,父母教育孩子大声嚷 ...
- BootstrapBlazor实战 Markdown 编辑器使用
基础工程使用工程: B08. BootstrapBlazor实战 Menu 导航菜单使用 实战BootstrapBlazorMenu Markdown 编辑器使用, 以及整合Freesql orm快速 ...
- Linux的快捷使用(不断更新中)
Linux 命令行提示符 ~代表当前目录,即家目录,#是超级用户提示符,如果是普通用户使用$ 基本快捷键的使用 移动光标命令 Ctrl+A:移动光标到开头 Ctrl+E:移动光标到结尾 Ctrl+F: ...
- kernel 劫持seq_operations && 利用pt_regs
kernel 劫持seq_operations && 利用pt_regs 劫持seq_operations进行栈迁移 seq_operations是一个大小为0x20的结构体,在打开/ ...
- Zookeeper安装学习(二)
学习内容:Zookeeper集群安装(Zookeeper版本:Zookeeper3.5.7:注:master,s1,s2都需要部署) 解压安装: (1)在主机 master 解压 Zookeeper ...