
SpringBoot整合Elasticsearch详细步骤以及代码示例(附源码)
准备工作
环境准备
JAVA版本
java version "1.8.0_121"

Java(TM) SE Runtime Environment (build 1.8.0_121-b13)

Java HotSpot(TM) 64-Bit Server VM (build 25.121-b13, mixed mode)
ES版本
{

  "name": "pYaFJhZ",

  "cluster_name": "my-cluster",

  "cluster_uuid": "oC28y-cNQduGItC7qq5W8w",

  "version": {

    "number": "6.8.2",

    "build_flavor": "oss",

    "build_type": "tar",

    "build_hash": "b506955",

    "build_date": "2019-07-24T15:24:41.545295Z",

    "build_snapshot": false,

    "lucene_version": "7.7.0",

    "minimum_wire_compatibility_version": "5.6.0",

    "minimum_index_compatibility_version": "5.0.0"

  },

  "tagline": "You Know, for Search"

}
SpringBoot版本
2.1.7.RELEASE
开发工具使用的是IDEA
安装ES
Elasticsearch介绍以及安装:ElasticSearch入门-基本概念介绍以及安装
开始
创建SpringBoot项目
打开IDEA,在菜单中点击
File>New>Project...
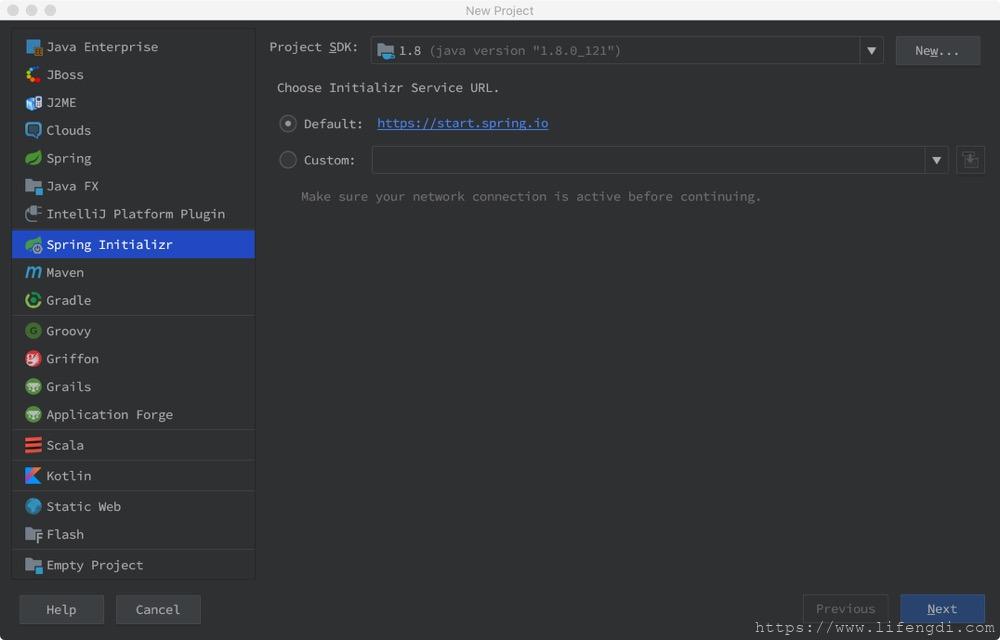
在弹框中选择Spring Initializr
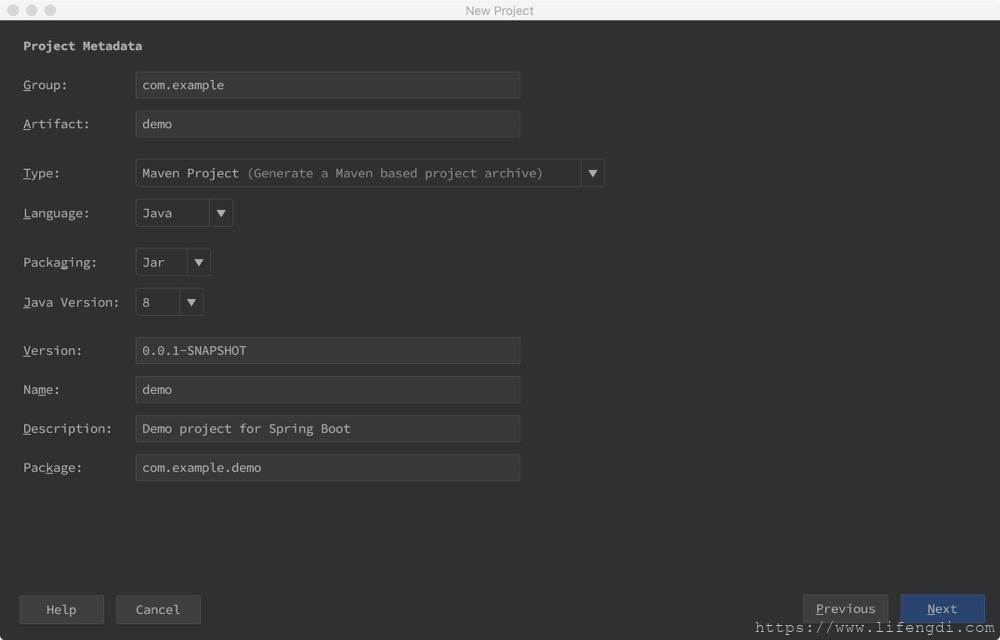
然后Next填写项目名等,然后
Next,
选择依赖的jar包(一般我只选Lombok,其他的自己手动加),然后
Next。
最后选择项目所在路径,点击
Finish。
搞定收工。至此,一个新的SpringBoot项目就新鲜出炉了。
POM文件
当然,具体依赖的jar包肯定不止第2步选择的那些,其中SpringBoot提供的操作ES的jar包spring-boot-starter-data-elasticsearch当然也是必不可少的。
这里贴出最终的pom文件:
<?xml version="1.0" encoding="UTF-8"?>

<project xmlns="http://maven.apache.org/POM/4.0.0" xmlns:xsi="http://www.w3.org/2001/XMLSchema-instance"

         xsi:schemaLocation="http://maven.apache.org/POM/4.0.0 https://maven.apache.org/xsd/maven-4.0.0.xsd">

    <modelVersion>4.0.0</modelVersion>

    <parent>

        <groupId>org.springframework.boot</groupId>

        <artifactId>spring-boot-starter-parent</artifactId>

        <version>2.1.7.RELEASE</version>

        <relativePath/> <!-- lookup parent from repository -->

    </parent>

    <groupId>com.lifengdi</groupId>

    <artifactId>search</artifactId>

    <version>0.0.1-SNAPSHOT</version>

    <name>search</name>

    <description>elasticsearch</description>

    <properties>

        <java.version>1.8</java.version>

        <testng.version>6.14.2</testng.version>

        <spring-cloud-dependencies.version>Greenwich.RELEASE</spring-cloud-dependencies.version>

        <kibana-logging-spring-boot-starter.version>1.2.4</kibana-logging-spring-boot-starter.version>

        <fastjson.version>1.2.47</fastjson.version>

        <alarm-spring-boot-starter.version>1.0.15-SNAPSHOT</alarm-spring-boot-starter.version>

    </properties>

    <dependencyManagement>

        <dependencies>

            <dependency>

                <groupId>org.springframework.cloud</groupId>

                <artifactId>spring-cloud-dependencies</artifactId>

                <version>${spring-cloud-dependencies.version}</version>

                <type>pom</type>

                <scope>import</scope>

            </dependency>

        </dependencies>

    </dependencyManagement>

    <dependencies>

        <dependency>

            <groupId>org.springframework.boot</groupId>

            <artifactId>spring-boot-starter-web</artifactId>

        </dependency>

        <!--elasticsearch-->

        <dependency>

            <groupId>org.springframework.boot</groupId>

            <artifactId>spring-boot-starter-data-elasticsearch</artifactId>

        </dependency>

        <dependency>

            <groupId>org.springframework.boot</groupId>

            <artifactId>spring-boot-configuration-processor</artifactId>

            <optional>true</optional>

        </dependency>

        <!--lombok-->

        <dependency>

            <groupId>org.projectlombok</groupId>

            <artifactId>lombok</artifactId>

            <optional>true</optional>

        </dependency>

        <!--测试-->

        <dependency>

            <groupId>org.springframework.boot</groupId>

            <artifactId>spring-boot-starter-test</artifactId>

            <scope>test</scope>

        </dependency>

        <dependency>

            <groupId>org.testng</groupId>

            <artifactId>testng</artifactId>

            <version>${testng.version}</version>

            <scope>test</scope>

        </dependency>

        <!-- 日期处理 -->

        <dependency>

            <groupId>joda-time</groupId>

            <artifactId>joda-time</artifactId>

        </dependency>

        <!--FastJson-->

        <dependency>

            <groupId>com.alibaba</groupId>

            <artifactId>fastjson</artifactId>

            <version>${fastjson.version}</version>

        </dependency>

        <!--feign-->

        <dependency>

            <groupId>org.springframework.cloud</groupId>

            <artifactId>spring-cloud-starter-openfeign</artifactId>

        </dependency>

        <dependency>

            <groupId>org.apache.commons</groupId>

            <artifactId>commons-lang3</artifactId>

        </dependency>

    </dependencies>

    <build>

        <plugins>

            <plugin>

                <groupId>org.springframework.boot</groupId>

                <artifactId>spring-boot-maven-plugin</artifactId>

            </plugin>

        </plugins>

    </build>

</project>
application.yml文件
application.yml文件配置如下:
server:

  port: 8080

  servlet:

    context-path: /search

spring:

  application:

    name: search

  data:

    elasticsearch:

      cluster-name: my-cluster

      cluster-nodes: localhost:9300

  jackson:

    default-property-inclusion: non_null

logging:

  file: application.log

  path: .

  level:

    root: info

    com.lifengdi.store.client: DEBUG

index-entity:

  configs:

    - docCode: store

      indexName: store

      type: base

      documentPath: com.lifengdi.document.StoreDocument
spring.data.elasticsearch.cluster-name:集群名称
spring.data.elasticsearch.cluster-nodes:集群节点地址列表,多个节点用英文逗号(,)分隔
创建ES文档和映射
首先创建一个JAVA对象,然后通过注解来声明字段的映射属性。
spring提供的注解有@Document、@Id、@Field,其中@Document作用在类,@Id、@Field作用在成员变量,@Id标记一个字段作为id主键。
package com.lifengdi.document;

import com.lifengdi.document.store.*;

import com.lifengdi.search.annotation.DefinitionQuery;

import com.lifengdi.search.enums.QueryTypeEnum;

import lombok.Data;

import org.springframework.data.annotation.Id;

import org.springframework.data.elasticsearch.annotations.Document;

import org.springframework.data.elasticsearch.annotations.Field;

import org.springframework.data.elasticsearch.annotations.FieldType;

import java.util.List;

/**

 * 门店Document

 *

 * @author 李锋镝

 * @date Create at 19:31 2019/8/22

 */

@Document(indexName = "store", type = "base")

@Data

@DefinitionQuery(key = "page", type = QueryTypeEnum.IGNORE)

@DefinitionQuery(key = "size", type = QueryTypeEnum.IGNORE)

@DefinitionQuery(key = "q", type = QueryTypeEnum.FULLTEXT)

public class StoreDocument {

    @Id

    @DefinitionQuery(type = QueryTypeEnum.IN)

    @DefinitionQuery(key = "id", type = QueryTypeEnum.IN)

    @Field(type = FieldType.Keyword)

    private String id;

    /**

     * 基础信息

     */

    @Field(type = FieldType.Object)

    private StoreBaseInfo baseInfo;

    /**

     * 标签

     */

    @Field(type = FieldType.Nested)

    @DefinitionQuery(key = "tagCode", mapped = "tags.key", type = QueryTypeEnum.IN)

    @DefinitionQuery(key = "tagValue", mapped = "tags.value", type = QueryTypeEnum.AND)

    @DefinitionQuery(key = "_tagValue", mapped = "tags.value", type = QueryTypeEnum.IN)

    private List<StoreTags> tags;

}
创建索引
ElasticsearchTemplate提供了四个createIndex()方法来创建索引,可以根据类的信息自动生成,也可以手动指定indexName和Settings
@Override

public <T> boolean createIndex(Class<T> clazz) {

	return createIndexIfNotCreated(clazz);

}

@Override

public boolean createIndex(String indexName) {

	Assert.notNull(indexName, "No index defined for Query");

	return client.admin().indices().create(Requests.createIndexRequest(indexName)).actionGet().isAcknowledged();

}

@Override

public boolean createIndex(String indexName, Object settings) {

	CreateIndexRequestBuilder createIndexRequestBuilder = client.admin().indices().prepareCreate(indexName);

	if (settings instanceof String) {

		createIndexRequestBuilder.setSettings(String.valueOf(settings), Requests.INDEX_CONTENT_TYPE);

	} else if (settings instanceof Map) {

		createIndexRequestBuilder.setSettings((Map) settings);

	} else if (settings instanceof XContentBuilder) {

		createIndexRequestBuilder.setSettings((XContentBuilder) settings);

	}

	return createIndexRequestBuilder.execute().actionGet().isAcknowledged();

}

@Override

public <T> boolean createIndex(Class<T> clazz, Object settings) {

	return createIndex(getPersistentEntityFor(clazz).getIndexName(), settings);

}
创建映射
ElasticsearchTemplate提供了三个putMapping()方法来创建映射
@Override

public <T> boolean putMapping(Class<T> clazz) {

	if (clazz.isAnnotationPresent(Mapping.class)) {

		String mappingPath = clazz.getAnnotation(Mapping.class).mappingPath();

		if (!StringUtils.isEmpty(mappingPath)) {

			String mappings = readFileFromClasspath(mappingPath);

			if (!StringUtils.isEmpty(mappings)) {

				return putMapping(clazz, mappings);

			}

		} else {

			LOGGER.info("mappingPath in @Mapping has to be defined. Building mappings using @Field");

		}

	}

	ElasticsearchPersistentEntity<T> persistentEntity = getPersistentEntityFor(clazz);

	XContentBuilder xContentBuilder = null;

	try {

		ElasticsearchPersistentProperty property = persistentEntity.getRequiredIdProperty();

		xContentBuilder = buildMapping(clazz, persistentEntity.getIndexType(),

				property.getFieldName(), persistentEntity.getParentType());

	} catch (Exception e) {

		throw new ElasticsearchException("Failed to build mapping for " + clazz.getSimpleName(), e);

	}

	return putMapping(clazz, xContentBuilder);

}

@Override

public <T> boolean putMapping(Class<T> clazz, Object mapping) {

	return putMapping(getPersistentEntityFor(clazz).getIndexName(), getPersistentEntityFor(clazz).getIndexType(),

			mapping);

}

@Override

public boolean putMapping(String indexName, String type, Object mapping) {

	Assert.notNull(indexName, "No index defined for putMapping()");

	Assert.notNull(type, "No type defined for putMapping()");

	PutMappingRequestBuilder requestBuilder = client.admin().indices().preparePutMapping(indexName).setType(type);

	if (mapping instanceof String) {

		requestBuilder.setSource(String.valueOf(mapping), XContentType.JSON);

	} else if (mapping instanceof Map) {

		requestBuilder.setSource((Map) mapping);

	} else if (mapping instanceof XContentBuilder) {

		requestBuilder.setSource((XContentBuilder) mapping);

	}

	return requestBuilder.execute().actionGet().isAcknowledged();

}
测试代码如下
@Test

public void testCreate() {

    System.out.println(elasticsearchTemplate.createIndex(StoreDocument.class));

    System.out.println(elasticsearchTemplate.putMapping(StoreDocument.class));

}
删除索引
ElasticsearchTemplate提供了2个deleteIndex()方法来删除索引
@Override

public <T> boolean deleteIndex(Class<T> clazz) {

	return deleteIndex(getPersistentEntityFor(clazz).getIndexName());

}

@Override

public boolean deleteIndex(String indexName) {

	Assert.notNull(indexName, "No index defined for delete operation");

	if (indexExists(indexName)) {

		return client.admin().indices().delete(new DeleteIndexRequest(indexName)).actionGet().isAcknowledged();

	}

	return false;

}
新增&修改文档
在Elasticsearch中文档是不可改变的,不能修改它们。相反,如果想要更新现有的文档,需要重建索引或者进行替换。
所以可以使用和新增同样的接口来对文档进行修改操作。区分的依据就是id。
下面提供新增&修改文档的其中两种方法,一种是通过ElasticsearchTemplate提供的index()方法:
@Override

public String index(IndexQuery query) {

	String documentId = prepareIndex(query).execute().actionGet().getId();

	// We should call this because we are not going through a mapper.

	if (query.getObject() != null) {

		setPersistentEntityId(query.getObject(), documentId);

	}

	return documentId;

}
示例代码如下:
/**

 * 更新索引

 * @param indexName 索引名称

 * @param type 索引类型

 * @param id ID

 * @param jsonDoc JSON格式的文档

 * @param refresh 是否刷新索引

 * @return ID

 */

public String index(String indexName, String type, String id, JsonNode jsonDoc, boolean refresh)

            throws JsonProcessingException {

        log.info("AbstractDocumentIndexService更新索引.indexName:{},type:{},id:{},jsonDoc:{}", indexName, type, id, jsonDoc);

        IndexQuery indexQuery = new IndexQueryBuilder()

                .withIndexName(indexName)

                .withType(type)

                .withId(id)

                .withSource(objectMapper.writeValueAsString(jsonDoc))

                .build();

        try {

            if (elasticsearchTemplate.indexExists(indexName)) {

                String index = elasticsearchTemplate.index(indexQuery);

                if (refresh) {

                    elasticsearchTemplate.refresh(indexName);

                }

                return index;

            }

        } catch (Exception e) {

            log.error("更新索引失败,刷新ES重试", e);

            elasticsearchTemplate.refresh(indexName);

            return elasticsearchTemplate.index(indexQuery);

        }

        throw BaseException.INDEX_NOT_EXISTS_EXCEPTION.build();

    }
另一种则是通过Repository接口。Spring提供的ES的Repository接口为ElasticsearchCrudRepository,所以我们就可以直接定义额新的接口,然后实现ElasticsearchCrudRepository即可:
package com.taoche.docindex.repo;

import com.taoche.document.StoreDocument;

import org.springframework.data.elasticsearch.repository.ElasticsearchRepository;

/**

 * 门店Repository

 * @author 李锋镝

 * @date Create at 09:30 2019/8/23

 */

public interface StoreRepository extends ElasticsearchRepository<StoreDocument, String> { }
示例代码如下:
@Test

public void testSave() {

    StoreDocument storeDocument = new StoreDocument();

    storeDocument.setId("1");

    StoreBaseInfo baseInfo = new StoreBaseInfo();

    baseInfo.setStoreId("1");

    baseInfo.setCreatedTime(DateTime.now());

    storeDocument.setBaseInfo(baseInfo);

    storeRepository.save(storeDocument);

}
查询
ES的主要功能就是查询,ElasticsearchRepository也提供了基本的查询接口,比如findById()、findAll()、findAllById()、search()等方法;当然也可以使用Spring Data提供的另外一个功能:Spring Data JPA——通过方法名创建查询,当然需要遵循一定的规则,比如你的方法名叫做findByTitle(),那么它就知道你是根据title查询,然后自动帮你完成,这里就不仔细说了。
上边说的基本能满足一般的查询,复杂一点的查询就无能为力了,这就需要用到自定义查询,这里可以查看我的另一篇博客SpringBoot使用注解的方式构建Elasticsearch查询语句,实现多条件的复杂查询,这里边有详细的说明。
另外还有一个比较厉害的功能,Elasticsearch的聚合;聚合主要实现的是对数据的统计、分析。这个暂时没有用到的,所以要看聚合功能的小伙伴们可能要失望了~ 哈哈哈~~~
聚合功能以后有时间会再单独说的~都会有的。
至此,SpringBoot整合Elasticsearch基本结束,有什么不明白的地方请留言~
源码
Git项目地址:search
如果觉得有帮助的话,请帮忙点赞、点星小小的支持一下~
谢谢~~
原文链接:https://www.lifengdi.com/archives/article/945
SpringBoot整合Elasticsearch详细步骤以及代码示例(附源码)的更多相关文章
- SpringBoot 整合 spring security oauth2 jwt完整示例 附源码
废话不说直接进入主题(假设您已对spring security.oauth2.jwt技术的了解,不懂的自行搜索了解) 依赖版本 springboot 2.1.5.RELEASE spring-secu ...
- BaiduTemplate模板引擎使用示例附源码
1.新建项目,asp.net 空Web应用程序 添加data,js,styles,templates文件夹,添加baiduTemplate.js,jquery.js,bootstrap.css 2.添 ...
- Bootstrap列表与代码样式(附源码)--Bootstrap
给大家分享下Bootstrap框架中列表与代码样式相关的知识 1.列表 (1)无序列表 <ul> <li>CN217编程</li> </ul> 注意:u ...
- SpringBoot 和Vue前后端分离入门教程(附源码)
作者:梁小生0101 juejin.im/post/5c622fb5e51d457f9f2c2381 推荐阅读(点击即可跳转阅读) 1. SpringBoot内容聚合 2. 面试题内容聚合 3. 设计 ...
- 用Python生成组织机构代码,附源码
#!/usr/bin/python import random def haoma(): ww = [3,7,9,10,5,8,4,2]#suan fa yin zi cc = [] dd=0 for ...
- JavaScript DOM高级程序设计 3.6 实例 将HTML代码转换成DOM代码(附源码)--我要坚持到底!
作为一名Web开发者,最讨厌的事情就是重复性任务,摆脱乏味的日常重复性事物的一种方法,是借助可重用的对象或者说与你现在建立的ADS库类似的库,另外一种让事情变得有意思,且能够加速开发进程的方式是编写能 ...
- 😊SpringBoot 整合 Elasticsearch (超详细).md
SpringBoot 整合 Elasticsearch (超详细) 注意: 1.环境搭建 安装es Elasticsearch 6.4.3 下载链接 为了方便,环境使用Windows 配置 解压后配置 ...
- SpringBoot整合ElasticSearch实现多版本的兼容
前言 在上一篇学习SpringBoot中,整合了Mybatis.Druid和PageHelper并实现了多数据源的操作.本篇主要是介绍和使用目前最火的搜索引擎ElastiSearch,并和Spring ...
- ElasticSearch(2)---SpringBoot整合ElasticSearch
SpringBoot整合ElasticSearch 一.基于spring-boot-starter-data-elasticsearch整合 开发环境:springboot版本:2.0.1,elast ...
随机推荐
- 小白学Python(2)——常用Python编程工具,Python IDE
下载好Python,但是如何开始编程呢? 有几种方法, 1.第一个就是command lind 即为命令行的方式,也就是我们常说的cmd. 输入 win+ cmd 在命令行中再输入 python,即可 ...
- 我是如何学习写一个操作系统(二):操作系统的启动之Bootloader
前言 今天本来的任务看书和把之前写的FragileOS整理一下,但是到现在还在摸鱼,书也只看一点.后来整理了一下写这个系列的思路,原本的目的是对操作系统原理性的学习和对之前写的一个玩具型操作系统的回顾 ...
- day0203
day02 1.for i in range() --->用于设置for循环的迭代设置. ranage 也是一个前闭后开的. 2.random.randrange() --->随机产生给予 ...
- Linux浏览创建文件
pwd:打印当前工作目录(Print Working Directory) ls:列出文件和目录(List) - Ubuntu的清单默认有颜色区分:蓝色(目录).浅蓝色(链接文件).绿色(可执行文件) ...
- SQL优化没思路,智能优化工具来帮你
前言 作为DBA或系统管理员,我们有时会遇到一个慢SQL需要优化,但是通过分析执行计划又没有找到好的优化思路,或者优化之后效果不明显,没有达到自己理想的预期,此时的你是不是很焦虑?此时你一定想如果有一 ...
- 在.net core wep项目中使用Session
第1步:添加包引用 Install-Package Microsoft.AspNetCore.Session 第2步:添加代码启用Session 在项目Startup.cs文件的ConfigureSe ...
- 给手机端页面留一个调试后门吧(vue)
当我们在浏览器开发vue页面时,由于浏览器对于调试有天然的支持,我们开发起来很方便.但是现在已经进入了移动端时代,移动端页面的需求越来越大. 在开发移动端页面的时候我们通常是在浏览器完成开发完成,之后 ...
- Python 基础 (三)
字典排序 dict = {'a':1,'c':3,'b':2} 字典没有sort方法,可使用sorted排序,默认通过key排序 dict = sorted(dict),print(dict)key的 ...
- Mongodb操作1-linux安装数据库
1.下载mongodb 百度云盘连接 :链接:https://pan.baidu.com/s/1b-hTS0XHQKpatecFoumLxw 提取码:z9ax 并送上可视化工具:链接:https:/ ...
- 洛谷 P2051 [AHOI2009]中国象棋 状态压缩思想DP
P2051 [AHOI2009]中国象棋 题意: 给定一个n*m的空棋盘,问合法放置任意多个炮有多少种情况.合法放置的意思是棋子炮不会相互打到. 思路: 这道题我们可以发现因为炮是隔一个棋子可以打出去 ...