
踩坑:VScode 集成 eslint 插件
本文以 Vue 官方脚手架 Vue-cli 为例:
1. 创建 Vue 项目
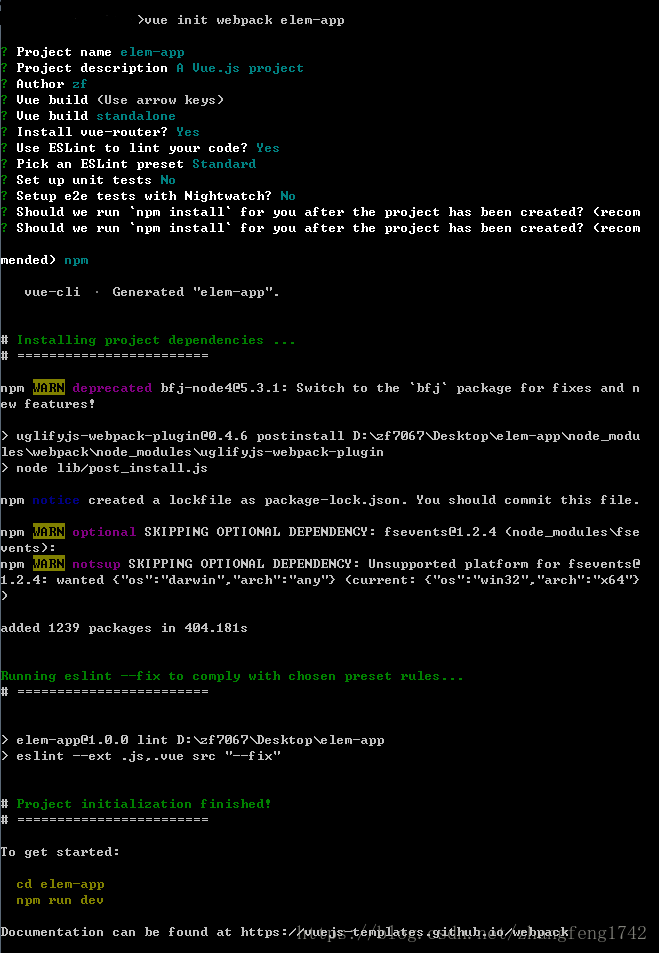
注意:Vue-cli 默认给出了 eslint 配置,一路回车即可。最后在安装模块的时候,选择直接安装!我用淘宝镜像安装时,好像缺少某些东西,一直没有成功!
2. 安装 VScode 的 eslint 插件
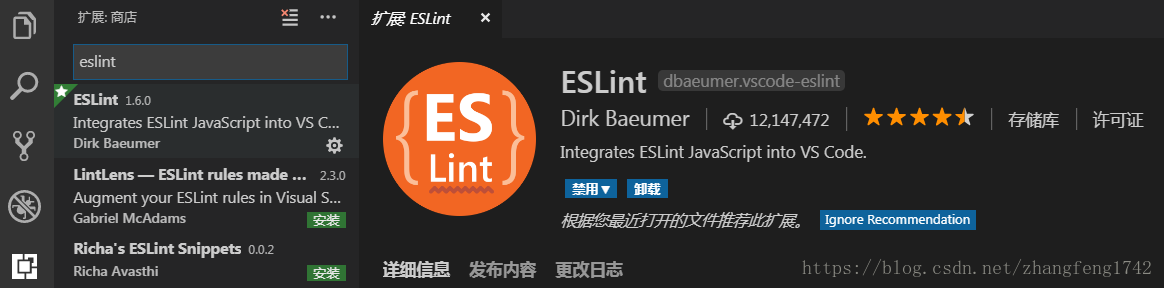
配置: 文件 -> 首选项 -> 设置 -> setting.json

// Turns auto fix on save on or off.
"eslint.autoFixOnSave": true,
// 专门写Vue的eslint配置
"eslint.validate": [
"javascript",
"javascriptreact",
"html",
{ "language": "html", "autoFix": true },
{ "language": "vue", "autoFix": true }
],
"eslint.options": {
"plugins": ["html"]
},
3. 替换 .eslintrc.js 配置文件
// https://eslint.org/docs/user-guide/configuring
module.exports = {
root: true,
parser: 'babel-eslint',
parserOptions: {
sourceType: 'module'
},
env: {
browser: true,
node: true,
es6: true,
},
extends: 'eslint:recommended',
// required to lint *.vue files
plugins: [
'html'
],
// check if imports actually resolve
'settings': {
'import/resolver': {
'webpack': {
'config': 'build/webpack.base.conf.js'
}
}
},
// add your custom rules here
rules: {
'accessor-pairs': 2,
'arrow-spacing': [2, {
'before': true,
'after': true
}],
'block-spacing': [2, 'always'],
'brace-style': [2, '1tbs', {
'allowSingleLine': true
}],
'camelcase': [0, {
'properties': 'always'
}],
'comma-dangle': [2, 'never'],
'comma-spacing': [2, {
'before': false,
'after': true
}],
'comma-style': [2, 'last'],
'constructor-super': 2,
'curly': [2, 'multi-line'],
'dot-location': [2, 'property'],
'eol-last': 2,
'eqeqeq': [2, 'allow-null'],
'generator-star-spacing': [2, {
'before': true,
'after': true
}],
'handle-callback-err': [2, '^(err|error)$'],
'indent': [2, 2, {
'SwitchCase': 1
}],
'jsx-quotes': [2, 'prefer-single'],
'key-spacing': [2, {
'beforeColon': false,
'afterColon': true
}],
'keyword-spacing': [2, {
'before': true,
'after': true
}],
'new-cap': [2, {
'newIsCap': true,
'capIsNew': false
}],
'new-parens': 2,
'no-array-constructor': 2,
'no-caller': 2,
'no-console': 'off',
'no-class-assign': 2,
'no-cond-assign': 2,
'no-const-assign': 2,
'no-control-regex': 2,
'no-delete-var': 2,
'no-dupe-args': 2,
'no-dupe-class-members': 2,
'no-dupe-keys': 2,
'no-duplicate-case': 2,
'no-empty-character-class': 2,
'no-empty-pattern': 2,
'no-eval': 2,
'no-ex-assign': 2,
'no-extend-native': 2,
'no-extra-bind': 2,
'no-extra-boolean-cast': 2,
'no-extra-parens': [2, 'functions'],
'no-fallthrough': 2,
'no-floating-decimal': 2,
'no-func-assign': 2,
'no-implied-eval': 2,
'no-inner-declarations': [2, 'functions'],
'no-invalid-regexp': 2,
'no-irregular-whitespace': 2,
'no-iterator': 2,
'no-label-var': 2,
'no-labels': [2, {
'allowLoop': false,
'allowSwitch': false
}],
'no-lone-blocks': 2,
'no-mixed-spaces-and-tabs': 2,
'no-multi-spaces': 2,
'no-multi-str': 2,
'no-multiple-empty-lines': [2, {
'max': 1
}],
'no-native-reassign': 2,
'no-negated-in-lhs': 2,
'no-new-object': 2,
'no-new-require': 2,
'no-new-symbol': 2,
'no-new-wrappers': 2,
'no-obj-calls': 2,
'no-octal': 2,
'no-octal-escape': 2,
'no-path-concat': 2,
'no-proto': 2,
'no-redeclare': 2,
'no-regex-spaces': 2,
'no-return-assign': [2, 'except-parens'],
'no-self-assign': 2,
'no-self-compare': 2,
'no-sequences': 2,
'no-shadow-restricted-names': 2,
'no-spaced-func': 2,
'no-sparse-arrays': 2,
'no-this-before-super': 2,
'no-throw-literal': 2,
'no-trailing-spaces': 2,
'no-undef': 2,
'no-undef-init': 2,
'no-unexpected-multiline': 2,
'no-unmodified-loop-condition': 2,
'no-unneeded-ternary': [2, {
'defaultAssignment': false
}],
'no-unreachable': 2,
'no-unsafe-finally': 2,
'no-unused-vars': [2, {
'vars': 'all',
'args': 'none'
}],
'no-useless-call': 2,
'no-useless-computed-key': 2,
'no-useless-constructor': 2,
'no-useless-escape': 0,
'no-whitespace-before-property': 2,
'no-with': 2,
'one-var': [2, {
'initialized': 'never'
}],
'operator-linebreak': [2, 'after', {
'overrides': {
'?': 'before',
':': 'before'
}
}],
'padded-blocks': [2, 'never'],
'quotes': [2, 'single', {
'avoidEscape': true,
'allowTemplateLiterals': true
}],
'semi': [2, 'never'],
'semi-spacing': [2, {
'before': false,
'after': true
}],
'space-before-blocks': [2, 'always'],
'space-before-function-paren': [2, 'never'],
'space-in-parens': [2, 'never'],
'space-infix-ops': 2,
'space-unary-ops': [2, {
'words': true,
'nonwords': false
}],
'spaced-comment': [2, 'always', {
'markers': ['global', 'globals', 'eslint', 'eslint-disable', '*package', '!', ',']
}],
'template-curly-spacing': [2, 'never'],
'use-isnan': 2,
'valid-typeof': 2,
'wrap-iife': [2, 'any'],
'yield-star-spacing': [2, 'both'],
'yoda': [2, 'never'],
'prefer-const': 2,
'no-debugger': process.env.NODE_ENV === 'production' ? 2 : 0,
'object-curly-spacing': [2, 'always', {
objectsInObjects: false
}],
'array-bracket-spacing': [2, 'never']
}
}
默认的配置文件缺少 rules 和其他一些配置,所以需要自定义相关内容
4. 安装 eslint-plugin-html 插件
由于 eslint 默认只支持 js 文件的脚本检测,如果我们需要支持类 html 文件(如 Vue)的内联脚本检测,还需要安装 eslint-plugin-html 插件
npm install eslint-plugin-html --save-dev

大功告成!附上 eslint 安装模块
---------------------
作者:番茄啊土豆
来源:CSDN
原文:https://blog.csdn.net/zhangfeng1742/article/details/83070858
版权声明:本文为博主原创文章,转载请附上博文链接!
踩坑:VScode 集成 eslint 插件的更多相关文章
- vscode的eslint插件不起作用
最近在用vue进行开发,但是vsCode中的eslint插件装上之后不起作用 1.vsCode打开“设置”,选择"settings.json" 2.输入一段脚本 "esl ...
- vscode 添加eslint插件
1. 安装vscode中的eslint插件 Ctrl + Shift + P 调出控制台,输入install,再在插件版块查找ESLint,安装 2. 安装node,安装npm 3. 全局安装ESLi ...
- vscode集成eslint
1. 安装 ESLint 扩展 首先,打开 VSCode 扩展面板并搜索 ESLint 扩展,然后点击安装 2. 项目安装eslint yarn add eslint -D 3. 设置eslint配置 ...
- vscode安装eslint插件,代码统一自动修复
ESlint:是用来统一JavaScript代码风格的工具,不包含css.html等. 方法和步骤: 通常情况下vue项目都会添加eslint组件,我们可以查看webpack的配置文件package. ...
- vscode中eslint插件的配置-prettier
用vue-cli构建vue项目,会有个eslint代码检测的安装 可vscode自带代码格式化是prettier格式(右键有格式化文件或alt+shift+f) 这时候要在vscode上装一个esli ...
- electron教程(番外篇一): 开发环境及插件, VSCode调试, ESLint + Google JavaScript Style Guide代码规范
我的electron教程系列 electron教程(一): electron的安装和项目的创建 electron教程(番外篇一): 开发环境及插件, VSCode调试, ESLint + Google ...
- vscode 中 eslint prettier 和 eslint -loader 配置关系
前置 本文将探究 vscode prettier 插件 和 eslint 插件在 vscode 中的配置以及这两者对应的在项目中的配置文件的关系,最后提及 vscode eslint 插件配置与 es ...
- vscode自动修复eslint规范的插件及配置
在开发大型项目中,经常都是需要多人合作的.相信大家一定都非常头疼于修改别人的代码的吧,而合理的使用eslint规范可以让我们在代码review时变得轻松,也可以让我们在修改小伙伴们的代码的时候会更加清 ...
- 基于JQuery可拖动列表格插件DataTables的踩坑记
前言 最近项目中在使用能够拖动列调整列位置顺序的表格插件---DataTables,这也是目前我找到的唯一一种存在有这种功能的插件. 在查找使用方法的过程中发现可用案例并不多,且大多言语不详.本文将全 ...
随机推荐
- React中使用遍历
1.使用for(let item of items){} render(){ var itemList = [] for(let item of items){ itemList.push(<I ...
- vue 超大 table
https://github.com/ColdDay/vue-fast-table https://coldday.github.io/vue-fast-table/dist/index.html h ...
- MySQL8.x msi版安装教程
一.下载MySQL 官网下载地址 https://dev.mysql.com/downloads/windows/installer/8.0.html 下载第二个即可(虽然只有32位的 但是会同时安 ...
- Vue页面缓存和不缓存的方法
第一步 在app中设置需要缓存的div //缓存的页面 <keep-alive> <router-view v-if="$route.meta.keepAlive" ...
- Vivotek 摄像头远程栈溢出漏洞分析及利用
Vivotek 摄像头远程栈溢出漏洞分析及利用 近日,Vivotek 旗下多款摄像头被曝出远程未授权栈溢出漏洞,攻击者发送特定数据可导致摄像头进程崩溃. 漏洞作者@bashis 放出了可造成摄像头 C ...
- python基础:python循环、三元运算、字典、文件操作
目录: python循环 三元运算 字符串 字典 文件操作基础 一.python编程 在面向过程式编程语言的执行流程中包含: 顺序执行 选择执行 循环执行 if是条件判断语句:if的执行流程属于选择执 ...
- 使用 Eclipse 构建的时候会出现 run as 中没有 maven package 选项
注:该方法来自我学习时别人分享的出现问题的解决方法,并没有亲自测试,仅供参考 是因为建的是普通 java 工程,需要把它转换成 maven project. 1.右键工程--maven--Disabl ...
- JNetPcap安装及使用
啥是JNetPcap? JNetPcap是由Sly Technologies开发的开源DPI(Deep Packet Inspection)SDK. Java平台底层不支持底层网络操作,需要通过JNI ...
- 移动端的文本框获取焦点时导致fixed或absolute定位的按钮被手机键盘顶上去的问题
var win_h = $(window).height();//关键代码 window.addEventListener('resize', function () { if($(window).h ...
- C#DataTable导出Excel,并实现合并单元格
asp.net webwofrm后台代码----------建议Framework4.0及以上,3.5试过出现好多莫名错误... 首先导入两个程序集.我的是 office2003,引用的COM里面的 ...