
Yolov_3 网络结构分析
转自:https://blog.csdn.net/KKKSQJ/article/details/83587138
Based on keras-yolov3, understanding of the principle and code details
This article GitHub source code : https://github.com/qqwweee/keras-yolo3
Yolov3 paper address: https://pjreddie.com/media/files/papers/YOLOv3.pdf
Yolov3 official website: https://pjreddie.com/darknet/yolo/
Recently I was very interested in YOLOV3 and read a lot of information. Made some related projects. So I wrote down some experiences to review the query later.

YOLO, the abbreviation of You Only Look Once, is an object detection algorithm based on Convolutional Neural Network (CNN).
Yolo design concept
The yolo algorithm as a whole uses CNN to detect end-to-end targets. The process is shown in Figure 1.
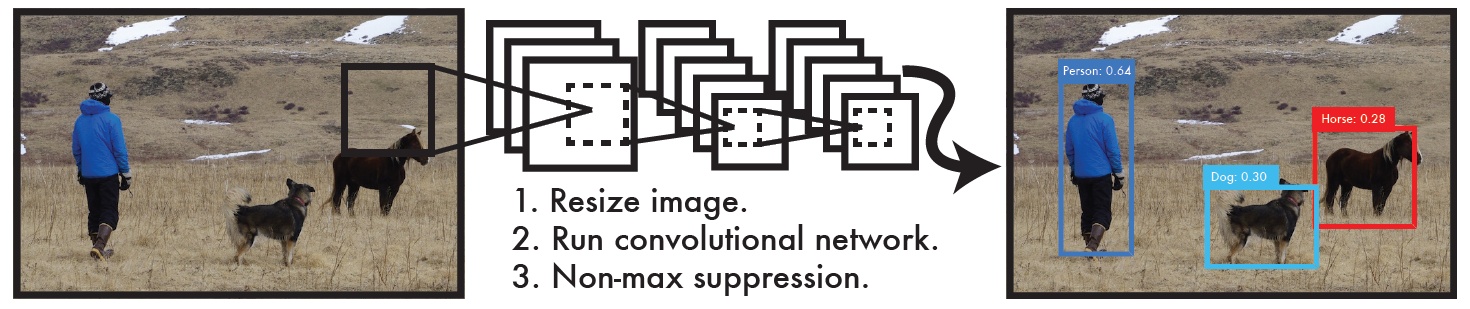
Figure 1
Specifically (based on YOLOV3)
1: Enter an image of any size to keep the aspect ratio unchanged, zoom to w or h to 416, and then overwrite the new image on 416*416 as the input to the network. That is, the input of the network is a 416*416, 3-channel RGB picture.
2: Run the network. YOLO's CNN network divides the picture into S*S grids (yolov3 multi-scale prediction, output 3 layers, each layer S * S grids, respectively 13*13, 26 * 26, 52 * 52), then each The cell is responsible for detecting the targets whose center points fall within the grid, as shown in Figure 2. Each cell needs to predict 3*(4+1+B) values. If the input picture is divided into S*S grids, then the final predicted value of each layer is the tensor of S*S*3*(4+1+B) size. B: number of categories (coco set is 80), that is, B=80. 3 is the number of anchorboxes per layer, and 4 is the bounding box size and position (x, y, w, h)1 is the confidence level.
3: Through NMS, non-maximum value suppression, filter out box boxes , output box class_boxes and confidence class_box_scores, then generate category information classes, generate final detection data frame, and return
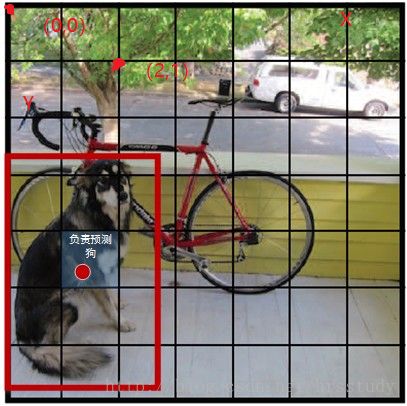
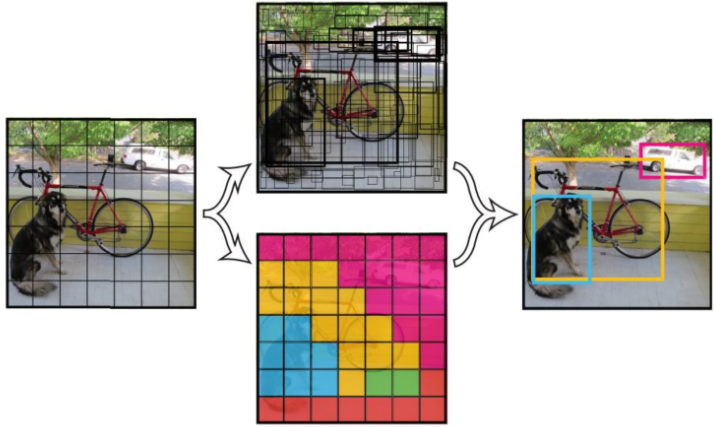
Figure 2 Figure 3
YOLOV3 network structure:

Multiscale:
Yolov3 uses multi-scale prediction. [(13*13)(26*26)(52*52)]
• Small scale: (13*13 feature map)
- The network receives a picture of (416 * 416), downsampling (416 / 2 ˆ 5 = 13) and output (13 * 13) after 5 convolutions of 2 steps.
• Mesoscale: (26*26 feature map)
- The convolutional layer of the penultimate layer in the small scale is upsampled (x2, up sampling) and added to the last 13x13 size feature map, and output (26*26).
• Large scale: (52*52 feature map)
- Operation with mesoscale output (52*52)
Benefit: Let the network learn deep and shallow features at the same time, by superimposing the adjacent features of the shallow feature map to different channels (not spatial locations), similar to identity mapping in Resnet. This method superimposes the feature map of 26x26x512 into the feature map of 13x13x2048, and connects with the original deep feature map, which makes the model have fine-grained features and increases the ability to recognize small targets.
Anchor box:
There are a total of 9 yolov3 anchor boxes, which are obtained by k-means clustering. On the COCO dataset, the nine clusters are: (10*13); (16*30); (33*23); (30*61); (62*45); (59*119); *90); (156*198); (373*326).
Different size feature maps correspond to different sizes of a priori frames.
- 13*13feature map corresponds to [(116*90), (156*198), (373*326)]
- 26*26feature map corresponds to [(30*61), (62*45), (59*119)]
- 52*52feature map corresponds to [(10*13), (16*30), (33*23)]
Reason: The larger the feature map, the smaller the feeling field. The more sensitive it is to small targets, so choose a small anchor box.
The smaller the feature map, the larger the feeling field. The more sensitive the big target is, so choose the big anchor box.
Border prediction:
Prediction tx ty tw th
- Perform sigmoid on tx and ty, and add the corresponding offset (Cx, Cy below)
- Exp on th and tw and multiply by the corresponding anchor value
- Multiply tx, ty, th, tw by the corresponding stride, ie: 416/13, 416 ⁄ 26, 416 ⁄ 52
- Finally, using sigmoid to sigmoid the Objectness and Classes confidence to get a probability of 0~1, the reason is to replace the previous version of softmax with sigmoid, because softmax will expand the maximum category probability value and suppress other category probability values.

(tx, ty): The offset of the target center point relative to the top left corner of the grid at which the point is located, normalized by sigmoid. The value belongs to [0, 1]. As shown in the figure (0.3, 0.4)
(cx, cy): The number of grids in the upper left corner of the grid where the point is different from the top left corner. As shown in Figure (1, 1)
(pw, ph): the side length of the anchor box
(tw,th): predict the width and height of the border
PS: The final frame coordinates are bx, by, bw, bh. The network learning goal is tx, ty, tw, th
Loss function LOSS
- YOLO V3 turns Softmax loss in YOLOV2 into Logistic loss

This picture is for reference only and is slightly different from YOLOV3
Code interpretation: source code detection part
Usage
- Git Clone https://github.com/qqwweee/keras-yolo3
- Download yolov3 weights from the YOLO website
- Convert the darknet version of the yolo model to Keras model
- Run YOLO dection
-
YOLO类的初始化参数:
-
class YOLO(object):
-
_defaults = {
-
"model_path": 'model_data/yolo.h5', #训练好的模型
-
"anchors_path": 'model_data/yolo_anchors.txt', # anchor box 9个, 从小到大排列
-
"classes_path": 'model_data/coco_classes.txt', #类别数
-
"score" : 0.3, #score 阈值
-
"iou" : 0.45, #iou 阈值
-
"model_image_size" : (416, 416), #输入图像尺寸
-
"gpu_num" : 1, #gpu数量
-
}
-
run yolo_video.py
-
-
def detect_img(yolo):
-
while True:
-
img = input('Input image filename:') #输入一张图片
-
try:
-
image = Image.open(img)
-
except:
-
print('Open Error! Try again!')
-
continue
-
else:
-
r_image = yolo.detect_image(image) #进入yolo.detect_image 进行检测
-
r_image.show()
-
yolo.close_session()
-
-
-
detect_image()函数在yolo.py第102行
-
-
def detect_image(self, image):
-
start = timer()
-
-
if self.model_image_size != (None, None): #判断图片是否存在
-
assert self.model_image_size[0]%32 == 0, 'Multiples of 32 required'
-
assert self.model_image_size[1]%32 == 0, 'Multiples of 32 required'
-
#assert断言语句的语法格式 model_image_size[0][1]指图像的w和h,且必须是32的整数倍
-
-
boxed_image = letterbox_image(image, tuple(reversed(self.model_image_size))) #letterbox_image()定义在utils.py的第20行。输入参数(图像 ,(w=416,h=416)),输出一张使用填充来调整图像的纵横比不变的新图。
-
else:
-
new_image_size = (image.width - (image.width % 32),
-
image.height - (image.height % 32))
-
boxed_image = letterbox_image(image, new_image_size)
-
image_data = np.array(boxed_image, dtype='float32')
-
print(image_data.shape) #(416,416,3)
-
image_data /= 255. #归一化
-
image_data = np.expand_dims(image_data, 0)
-
#批量添加一维 -> (1,416,416,3) 为了符合网络的输入格式 -> (bitch, w, h, c)
-
-
out_boxes, out_scores, out_classes = self.sess.run(
-
[self.boxes, self.scores, self.classes],
-
#目的为了求boxes,scores,classes,具体计算方式定义在generate()函数内。在yolo.py第61行
-
feed_dict={ #喂参数
-
self.yolo_model.input: image_data, #图像数据
-
self.input_image_shape: [image.size[1], image.size[0]], #图像尺寸
-
K.learning_phase(): 0 #学习模式 0:测试模型。 1:训练模式
-
})
-
-
print('Found {} boxes for {}'.format(len(out_boxes), 'img'))
-
-
# 绘制边框,自动设置边框宽度,绘制边框和类别文字,使用Pillow绘图库
-
font = ImageFont.truetype(font='font/FiraMono-Medium.otf',
-
size=np.floor(3e-2 * image.size[1] + 0.5).astype('int32')) #字体
-
thickness = (image.size[0] + image.size[1]) // 300 #厚度
-
-
for i, c in reversed(list(enumerate(out_classes))):
-
predicted_class = self.class_names[c] #类别
-
box = out_boxes[i] #框
-
score = out_scores[i] #置信度
-
-
label = '{} {:.2f}'.format(predicted_class, score) #标签
-
draw = ImageDraw.Draw(image) #画图
-
label_size = draw.textsize(label, font) # 标签文字
-
-
top, left, bottom, right = box
-
top = max(0, np.floor(top + 0.5).astype('int32'))
-
left = max(0, np.floor(left + 0.5).astype('int32'))
-
bottom = min(image.size[1], np.floor(bottom + 0.5).astype('int32'))
-
right = min(image.size[0], np.floor(right + 0.5).astype('int32'))
-
print(label, (left, top), (right, bottom)) #边框
-
-
if top - label_size[1] >= 0: #标签文字
-
text_origin = np.array([left, top - label_size[1]])
-
else:
-
text_origin = np.array([left, top + 1])
-
-
# My kingdom for a good redistributable image drawing library.
-
for i in range(thickness): #画框
-
draw.rectangle(
-
[left + i, top + i, right - i, bottom - i],
-
outline=self.colors[c])
-
draw.rectangle( #文字背景
-
[tuple(text_origin), tuple(text_origin + label_size)],
-
fill=self.colors[c])
-
draw.text(text_origin, label, fill=(0, 0, 0), font=font) #文案
-
del draw
-
-
end = timer()
-
print(end - start)
-
return image
generate()在yolo.py第61行
-
def generate(self):
-
model_path = os.path.expanduser(self.model_path) #获取model路径
-
assert model_path.endswith('.h5'), 'Keras model or weights must be a .h5 file.' #判断model是否以h5结尾
-
-
# Load model, or construct model and load weights.
-
num_anchors = len(self.anchors) #num_anchors = 9。yolov3有9个先验框
-
num_classes = len(self.class_names) #num_cliasses = 80。 #coco集一共80类
-
is_tiny_version = num_anchors==6 # default setting is_tiny_version = False
-
try:
-
self.yolo_model = load_model(model_path, compile=False) #下载model
-
except:
-
self.yolo_model = tiny_yolo_body(Input(shape=(None,None,3)), num_anchors//2, num_classes) \
-
if is_tiny_version else yolo_body(Input(shape=(None,None,3)), num_anchors//3, num_classes)
-
self.yolo_model.load_weights(self.model_path) # 确保model和anchor classes 对应
-
else:
-
assert self.yolo_model.layers[-1].output_shape[-1] == \
-
# model.layer[-1]:网络最后一层输出。 output_shape[-1]:输出维度的最后一维。 -> (?,13,13,255)
-
num_anchors/len(self.yolo_model.output) * (num_classes + 5), \
-
#255 = 9/3*(80+5). 9/3:每层特征图对应3个anchor box 80:80个类别 5:4+1,框的4个值+1个置信度
-
'Mismatch between model and given anchor and class sizes'
-
-
print('{} model, anchors, and classes loaded.'.format(model_path))
-
# 生成绘制边框的颜色。
-
hsv_tuples = [(x / len(self.class_names), 1., 1.)
-
#h(色调):x/len(self.class_names) s(饱和度):1.0 v(明亮):1.0
-
for x in range(len(self.class_names))]
-
self.colors = list(map(lambda x: colorsys.hsv_to_rgb(*x), hsv_tuples)) #hsv转换为rgb
-
self.colors = list(
-
map(lambda x: (int(x[0] * 255), int(x[1] * 255), int(x[2] * 255)),
-
self.colors))
-
#hsv取值范围在【0,1】,而RBG取值范围在【0,255】,所以乘上255
-
np.random.seed(10101) # np.random.seed():产生随机种子。固定种子为一致的颜色
-
np.random.shuffle(self.colors) # 调整颜色来装饰相邻的类。
-
np.random.seed(None) #重置种子为默认
# Generate output tensor targets for filtered bounding boxes.
self.input_image_shape = K.placeholder(shape=(2, )) #K.placeholder: placeholder in keras
if self.gpu_num>=2:
self.yolo_model = multi_gpu_model( Self.yolo_model, gpus=self.gpu_num)
boxes, scores, classes = yolo_eval (self.yolo_model.output, self.anchors,
len(self.class_names), self.input_image_shape,
score_threshold=self.score, iou_threshold=self.iou ) #yolo_eval (): evaluation function Yolo
return boxes, scores, classes
-
def yolo_eval(yolo_outputs, #模型输出,格式如下【(?,13,13,255)(?,26,26,255)(?,52,52,255)】 ?:bitch size; 13-26-52:多尺度预测; 255:预测值(3*(80+5))
-
anchors, #[(10,13), (16,30), (33,23), (30,61), (62,45), (59,119), (116,90), (156,198),(373,326)]
-
num_classes, # 类别个数,coco集80类
-
image_shape, #placeholder类型的TF参数,默认(416, 416);
-
max_boxes=20, #每张图每类最多检测到20个框同类别框的IoU阈值,大于阈值的重叠框被删除,重叠物体较多,则调高阈值,重叠物体较少,则调低阈值
-
score_threshold=.6, #框置信度阈值,小于阈值的框被删除,需要的框较多,则调低阈值,需要的框较少,则调高阈值;
-
iou_threshold=.5): #同类别框的IoU阈值,大于阈值的重叠框被删除,重叠物体较多,则调高阈值,重叠物体较少,则调低阈值
-
-
"""Evaluate YOLO model on given input and return filtered boxes."""
-
-
num_layers = len(yolo_outputs) #yolo的输出层数;num_layers = 3 -> 13-26-52
-
-
anchor_mask = [[6,7,8], [3,4,5], [0,1,2]] if num_layers==3 else [[3,4,5], [1,2,3]]
-
# default setting #每层分配3个anchor box.如13*13分配到【6,7,8】即【(116,90)(156,198)(373,326)】
-
-
input_shape = K.shape(yolo_outputs[0])[1:3] * 32
-
#输入shape(?,13,13,255);即第一维和第二维分别*32 ->13*32=416; input_shape:(416,416)
-
-
boxes = []
-
box_scores = []
-
for l in range(num_layers):
-
_boxes, _box_scores = yolo_boxes_and_scores(yolo_outputs[l],
-
anchors[anchor_mask[l]], num_classes, input_shape, image_shape)
-
boxes.append(_boxes)
-
box_scores.append(_box_scores)
-
boxes = K.concatenate(boxes, axis=0) #K.concatenate:将数据展平 ->(?,4)
-
box_scores = K.concatenate(box_scores, axis=0) # ->(?,)
-
-
mask = box_scores >= score_threshold #MASK掩码,过滤小于score阈值的值,只保留大于阈值的值
-
max_boxes_tensor = K.constant(max_boxes, dtype='int32') #最大检测框数20
-
boxes_ = []
-
scores_ = []
-
classes_ = []
-
for c in range(num_classes):
-
# TODO: use keras backend instead of tf.
-
class_boxes = tf.boolean_mask(boxes, mask[:, c]) #通过掩码MASK和类别C筛选框boxes
-
class_box_scores = tf.boolean_mask(box_scores[:, c], mask[:, c]) #通过掩码MASK和类别C筛选scores
-
nms_index = tf.image.non_max_suppression( #运行非极大抑制
-
class_boxes, class_box_scores, max_boxes_tensor, iou_threshold=iou_threshold)
-
class_boxes = K.gather(class_boxes, nms_index) #K.gather:根据索引nms_index选择class_boxes
-
class_box_scores = K.gather(class_box_scores, nms_index) #根据索引nms_index选择class_box_score)
-
classes = K.ones_like(class_box_scores, 'int32') * c #计算类的框得分
-
boxes_.append(class_boxes)
-
scores_.append(class_box_scores)
-
classes_.append(classes)
-
-
boxes_ = K.concatenate(boxes_, axis=0)
-
#K.concatenate().将相同维度的数据连接在一起;把boxes_展平。 -> 变成格式:(?,4); ?:框的个数;4:(x,y,w,h)
-
-
scores_ = K.concatenate(scores_, axis=0) #变成格式(?,)
-
classes_ = K.concatenate(classes_, axis=0) #变成格式(?,)
-
-
return boxes_, scores_, classes_
-
-
-
-
-
yolo_boxes_and_scores()在model.py的第176行
-
def yolo_boxes_and_scores(feats, anchors, num_classes, input_shape, image_shape):
-
# feats:输出的shape,->(?,13,13,255); anchors:每层对应的3个anchor box
-
# num_classes: 类别数(80); input_shape:(416,416); image_shape:图像尺寸
-
-
'''Process Conv layer output'''
-
-
box_xy, box_wh, box_confidence, box_class_probs = yolo_head(feats,
-
anchors, num_classes, input_shape)
-
#yolo_head():box_xy是box的中心坐标,(0~1)相对位置;box_wh是box的宽高,(0~1)相对值;
-
#box_confidence是框中物体置信度;box_class_probs是类别置信度;
-
-
boxes = yolo_correct_boxes(box_xy, box_wh, input_shape, image_shape)
-
#将box_xy和box_wh的(0~1)相对值,转换为真实坐标,输出boxes是(y_min,x_min,y_max,x_max)的值
-
-
boxes = K.reshape(boxes, [-1, 4])
-
#reshape,将不同网格的值转换为框的列表。即(?,13,13,3,4)->(?,4) ?:框的数目
-
-
box_scores = box_confidence * box_class_probs
-
#框的得分=框的置信度*类别置信度
-
-
box_scores = K.reshape(box_scores, [-1, num_classes])
-
#reshape,将框的得分展平,变为(?,80); ?:框的数目
-
return boxes, box_scores
-
-
yolo_head()在model.py的第122行
-
def yolo_head(feats, anchors, num_classes, input_shape, calc_loss=False): #参数同上
-
-
"""Convert final layer features to bounding box parameters."""
-
-
num_anchors = len(anchors) #num_anchors = 3
-
-
# Reshape to batch, height, width, num_anchors, box_params.
-
anchors_tensor = K.reshape(K.constant(anchors), [1, 1, 1, num_anchors, 2]) #reshape ->(1,1,1,3,2)
-
-
grid_shape = K.shape(feats)[1:3] # height, width (?,13,13,255) -> (13,13)
-
-
-
#grid_y和grid_x用于生成网格grid,通过arange、reshape、tile的组合, 创建y轴的0~12的组合grid_y,再创建x轴的0~12的组合grid_x,将两者拼接concatenate,就是grid;
-
grid_y = K.tile(K.reshape(K.arange(0, stop=grid_shape[0]), [-1, 1, 1, 1]),
-
[1, grid_shape[1], 1, 1])
-
grid_x = K.tile(K.reshape(K.arange(0, stop=grid_shape[1]), [1, -1, 1, 1]),
-
[grid_shape[0], 1, 1, 1])
-
grid = K.concatenate([grid_x, grid_y])
-
grid = K.cast(grid, K.dtype(feats)) #K.cast():把grid中值的类型变为和feats中值的类型一样
-
-
feats = K.reshape(
-
feats, [-1, grid_shape[0], grid_shape[1], num_anchors, num_classes + 5])
-
#将feats的最后一维展开,将anchors与其他数据(类别数+4个框值+框置信度)分离
-
-
# Adjust preditions to each spatial grid point and anchor size.
-
#xywh的计算公式,tx、ty、tw和th是feats值,而bx、by、bw和bh是输出值,如下图
-
box_xy = (K.sigmoid(feats[..., :2]) + grid) / K.cast(grid_shape[::-1], K.dtype(feats))
-
box_wh = K.exp(feats[..., 2:4]) * anchors_tensor / K.cast(input_shape[::-1], K.dtype(feats))
-
box_confidence = K.sigmoid(feats[..., 4:5])
-
box_class_probs = K.sigmoid(feats[..., 5:])
-
#sigmoid:σ
-
# ...操作符,在Python中,“...”(ellipsis)操作符,表示其他维度不变,只操作最前或最后1维;

-
if calc_loss == True:
-
return grid, feats, box_xy, box_wh
-
return box_xy, box_wh, box_confidence, box_class_probs
-
-
-
yolo_correct_boxes()在model.py的第150行
-
def yolo_correct_boxes(box_xy, box_wh, input_shape, image_shape): #得到正确的x,y,w,h
-
'''Get corrected boxes'''
-
box_yx = box_xy[..., ::-1] #“::-1”是颠倒数组的值
-
box_hw = box_wh[..., ::-1]
-
input_shape = K.cast(input_shape, K.dtype(box_yx))
-
image_shape = K.cast(image_shape, K.dtype(box_yx))
-
new_shape = K.round(image_shape * K.min(input_shape/image_shape))
-
offset = (input_shape-new_shape)/2./input_shape
-
scale = input_shape/new_shape
-
box_yx = (box_yx - offset) * scale
-
box_hw *= scale
-
-
box_mins = box_yx - (box_hw / 2.)
-
box_maxes = box_yx + (box_hw / 2.)
-
boxes = K.concatenate([
-
box_mins[..., 0:1], #y_min
-
box_mins[..., 1:2], #x_min
-
box_maxes[..., 0:1], #y_max
-
box_maxes[..., 1:2] #x_max
-
])
-
-
# Scale boxes back to original image shape.
-
boxes *= K.concatenate([image_shape, image_shape])
-
return boxes
OK, that's all! Enjoy it!
reference:
Https://blog.csdn.net/qq_14845119/article/details/80335225
https://www.cnblogs.com/makefile/p/YOLOv3.html
Https://www.colabug.com/4125223.html
Yolov_3 网络结构分析的更多相关文章
- macvlan 网络结构分析 - 每天5分钟玩转 Docker 容器技术(56)
上一节我们创建了 macvlan 并部署了容器,本节详细分析 macvlan 底层网络结构. macvlan 网络结构分析 macvlan 不依赖 Linux bridge,brctl show 可以 ...
- 第 8 章 容器网络 - 064 - Weave 网络结构分析
Weave 网络结构分析 在 host1 中运行容器 bbox1: eval $(weave env) docker run --name bbox1 -itd busybox 首先执行 eval $ ...
- 第 8 章 容器网络 - 056 - macvlan 网络结构分析
macvlan 网络结构分析 macvlan 不依赖 Linux bridge,brctl show 可以确认没有创建新的 bridge. 查看一下容器 bbox1 的网络设备: 除了 lo,容器只有 ...
- Weave 网络结构分析 - 每天5分钟玩转 Docker 容器技术(64)
上一节我们安装并创建了 Weave 网络,本节将部署容器并分析网络结构.在 host1 中运行容器 bbox1: eval $(weave env) docker run --name bbox1 - ...
- 064、Weave网络结构分析(2019-04-04 周四)
参考https://www.cnblogs.com/CloudMan6/p/7482035.html Weave网络使用之前需要执行 eval $(weave env) ,其作用是将后续的doc ...
- 056、macvlan网络结构分析(2019-03-25 周一)
参考https://www.cnblogs.com/CloudMan6/p/7383919.html macvlan不依赖linux bridge brctl show 可以确认没有创建新的b ...
- 62-Weave 网络结构分析
上一节我们安装并创建了 Weave 网络,本节将部署容器并分析网络结构. 在 host1 中运行容器 bbox1: eval $(weave env) docker run --name bbox1 ...
- centos7下安装docker(15.3跨主机网络-macvlan)
除了ovrlay,docker还开发了另一个支持跨主机容器的driver:macvlan macvlan本身是linu kernel模块,其功能是允许在同一物理网卡上配置多了MAC地址,即:多个int ...
- 【转】VLAN原理详解
1.为什么需要VLAN 1.1 什么是VLAN? VLAN(Virtual LAN),翻译成中文是“虚拟局域网”.LAN可以是由少数几台家用计算机构成的网络,也可以是数以百计的计算机构成的企业网络.V ...
随机推荐
- Java多线程学习(七)并发编程中一些问题
本节思维导图: 关注微信公众号:"Java面试通关手册" 回复"Java多线程"获取思维导图源文件和思维导图软件. 多线程就一定好吗?快吗?? 并发编程的目的就 ...
- 72.Edit Distance---dp
题目链接:https://leetcode.com/problems/edit-distance/description/ 题目大意:找出两个字符串之间的编辑距离(每次变化都只消耗一步). 法一(借鉴 ...
- 45.Jump Game II---贪心---2018大疆笔试题
题目链接 题目大意:与55题类似,只是这里要求出跳数. 法一(借鉴):贪心.cur表示当前能到达的最远距离,pre表示上一次能到达的最远距离,每到一个位置更新一次最远距离cur,如果当前位置超过了上一 ...
- HTML标签学习之路-001
1.html的注释 <!--这里是注释内容--> <!--代表注释内容的开始 -->代表注释内容结束 注释部分,不会被浏览器输出,只是作为代码的说明,供开发者查阅 2.HTML ...
- 利用Google API生成二维码
什么是二维码:二维码是二维条形码的一种,可以将网址.文字.照片等信息通过相应的编码算法编译成为一个方块形条码图案,手机用户可以通过摄像头和解码软件将相关信息重新解码并查看内容.读取方式:利用30万画素 ...
- Java学习(一)Scanner报错java.util.NoSuchElementException
我在一个方法A中使用了Scanner的 Scanner input=new Scanner(System.in),随后又将其关闭了,因为Eclipse里面你若不关闭,他会有一个warning:Reso ...
- 以太坊go-ethereum客户端docker安装(二)开发(dev)环境搭建
在上一篇博客中,讲述了基于docker怎么搭建一个go-ethereum节点.作为开发人员,如果只是单纯的拥有一个Full node,还无法满足正常的开发.比如说,进行转账交易,你要考虑是否拥有一定的 ...
- js 获取定位信息
1.百度账号 申请一个key http://developer.baidu.com/map/index.php?title=lbscloud 2.开发下面demo代码 <!DOCTYPE htm ...
- day2 字符串常用方法总结
字符串在Python中是常用的功能,我们知道,字符串在Python中存储的形式是以字符数组的形式存在,比如"alex"在内存中的存储形式是:["a"," ...
- vim进阶-自己设置vim编辑器
我这是最基础的一些vim设置,参考文章http://blog.csdn.net/huiguixian/article/details/6394095 看大牛设置的vim,感觉很花里胡哨,以后慢慢接触: ...