
openshift3.10集群部署
简介
要求
准备工作
所有节点创建工作目录:在根目录下创建家目录

mkdir /home && cd /home

# 先关闭防火墙,后续为了安全再重新配置防火墙

# 查看防火墙的状态

systemctl status firewalld

# 关闭防火墙

systemctl stop firewalld

# 关闭防火墙的自启动

systemctl disable firewalld
配置说明
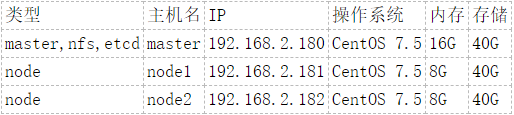
修改主机名
#master:

#192.168.2.180

hostnamectl set-hostname master.example.com

#node1:

#192.168.2.181

hostnamectl set-hostname node1.example.com

#node2:

#192.168.2.182

hostnamectl set-hostname node2.example.com
域名映射
vim /etc/hosts


#添加如下内容

192.168.2.180 master.example.com

192.168.2.181 node1.example.com

192.168.2.182 node2.example.com
SSH相关
sed -i 's/TMOUT=1800/#TMOUT=1800/g' /etc/profile

source /etc/profile
阿里云镜像
mv /etc/yum.repos.d/CentOS-Base.repo /etc/yum.repos.d/CentOS-Base.repo.backup

wget -O /etc/yum.repos.d/CentOS-Base.repo http://mirrors.aliyun.com/repo/Centos-7.repo

yum makecache
设置SELINUX
sed -i 's/SELINUX=disabled/SELINUX=enforcing/g' /etc/selinux/config

reboot
# 查看selinux是否开启

cat /etc/selinux/config

# 编辑

vim /etc/selinux/config

# 将SELINUX和SELINUXTYPE这两个键对应的值修改成如下

SELINUX=enforcing

SELINUXTYPE=targeted
安装工具
yum install -y wget git yum-utils net-tools bind-utils iptables-services bridge-utils bash-completion kexec-tools sos psacct bash-completion.noarch bash-completion-extras.noarch java-1.8.-openjdk-headless python-passlib NetworkManager
集群免密登录
ssh-keygen -f /root/.ssh/id_rsa -N ''
复制公钥到其他节点
for host in master.example.com node1.example.com node2.example.com; do ssh-copy-id -i ~/.ssh/id_rsa.pub $host; done

安装docker
yum install -y docker-1.13. && docker version
镜像加速
vim /etc/docker/daemon.json

# 添加内容如下

{

  "registry-mirrors": [

    "https://registry.docker-cn.com"

  ]

}
启动Docker
# 开机启动

systemctl enable docker

# 启动

systemctl start docker

# 重启

systemctl restart docker

# 停止

systemctl stop docker

# 查看docker运行状况

systemctl status docker
安装ansible
yum -y install epel-release
sed -i -e "s/^enabled=1/enabled=0/" /etc/yum.repos.d/epel.repo
# 安装ansible和pyOpenSSL
yum install -y ansible pyOpenSSL
rpm -Uvh https://releases.ansible.com/ansible/rpm/release/epel-7-x86_64/ansible-2.6.4-1.el7.ans.noarch.rpm
rpm -Uvh ansible-2.6.-.el7.ans.noarch.rpm
yum install -y lrzsz
安装openshift
git clone https://github.com/openshift/openshift-ansible

cd openshift-ansible

git checkout release-3.10
vim /home/openshift-ansible/roles/openshift_repos/templates/CentOS-OpenShift-Origin310.repo.j2

源文件内容如下:

[centos-openshift-origin310]

name=CentOS OpenShift Origin

baseurl=http://mirror.centos.org/centos/7/paas/x86_64/openshift-origin310/

enabled=

gpgcheck=

gpgkey=file:///etc/pki/rpm-gpg/RPM-GPG-KEY-CentOS-SIG-PaaS

[centos-openshift-origin310-testing]

name=CentOS OpenShift Origin Testing

baseurl=http://buildlogs.centos.org/centos/7/paas/x86_64/openshift-origin310/

enabled={{  if openshift_repos_enable_testing else  }}

gpgcheck=

gpgkey=file:///etc/pki/rpm-gpg/RPM-GPG-KEY-CentOS-SIG-PaaS

[centos-openshift-origin310-debuginfo]

name=CentOS OpenShift Origin DebugInfo

baseurl=http://debuginfo.centos.org/centos/7/paas/x86_64/

enabled=

gpgcheck=

gpgkey=file:///etc/pki/rpm-gpg/RPM-GPG-KEY-CentOS-SIG-PaaS

[centos-openshift-origin310-source]

name=CentOS OpenShift Origin Source

baseurl=http://vault.centos.org/centos/7/paas/Source/openshift-origin310/

enabled=

gpgcheck=

gpgkey=file:///etc/pki/rpm-gpg/RPM-GPG-KEY-CentOS-SIG-PaaS

修改为:

[centos-openshift-origin310]

name=CentOS OpenShift Origin

baseurl=http://mirrors.aliyun.com/centos/7/paas/x86_64/openshift-origin310/

enabled=

gpgcheck=

gpgkey=file:///etc/pki/rpm-gpg/RPM-GPG-KEY-CentOS-SIG-PaaS

[centos-openshift-origin310-testing]

name=CentOS OpenShift Origin Testing

baseurl=http://buildlogs.centos.org/centos/7/paas/x86_64/openshift-origin310/

enabled={{  if openshift_repos_enable_testing else  }}

gpgcheck=

gpgkey=file:///etc/pki/rpm-gpg/RPM-GPG-KEY-CentOS-SIG-PaaS

[centos-openshift-origin310-debuginfo]

name=CentOS OpenShift Origin DebugInfo

baseurl=http://debuginfo.centos.org/centos/7/paas/x86_64/

enabled=

gpgcheck=

gpgkey=file:///etc/pki/rpm-gpg/RPM-GPG-KEY-CentOS-SIG-PaaS

[centos-openshift-origin310-source]

name=CentOS OpenShift Origin Source

baseurl=http://vault.centos.org/centos/7/paas/Source/openshift-origin310/

enabled=

gpgcheck=

gpgkey=file:///etc/pki/rpm-gpg/RPM-GPG-KEY-CentOS-SIG-PaaS
mv -f /etc/ansible/hosts /etc/ansible/hosts.org
# 编辑ansible配置:
vim /etc/ansible/hosts
# 内容如下:
[OSEv3:children]

masters

nodes

etcd

nfs

[OSEv3:vars]

ansible_ssh_user=root

openshift_deployment_type=origin

#因采用虚拟机部署学习 配置此选项跳过主机硬件信息检查

openshift_disable_check=disk_availability,docker_storage,memory_availability,docker_image_availability

openshift_master_identity_providers=[{'name':'htpasswd_auth','login':'true','challenge':'true','kind':'HTPasswdPasswordIdentityProvider',}]

openshift_master_default_subdomain=apps.test.example.com

openshift_deployment_type=origin

os_firewall_use_firewalld=true

[masters]

master.example.com

[etcd]

master.example.com

[nodes]

master.example.com openshift_node_group_name='node-config-master'

node1.example.com openshift_node_group_name='node-config-compute'

node2.example.com openshift_node_group_name='node-config-compute'

[nfs]

master.example.com
ansible-playbook /home/openshift-ansible/playbooks/prerequisites.yml
ansible-playbook /home/openshift-ansible/playbooks/deploy_cluster.yml
# master节点下创建用户dev

htpasswd -bc /etc/origin/master/htpasswd dev dev
# 查看所有节点状态:
oc get nodes
访问openshift后台
卸载openshift
如果需要,可以通过这种方式卸载openshift。
ansible-playbook /usr/share/ansible/openshift-ansible/playbooks/adhoc/uninstall.yml
最低硬件要求
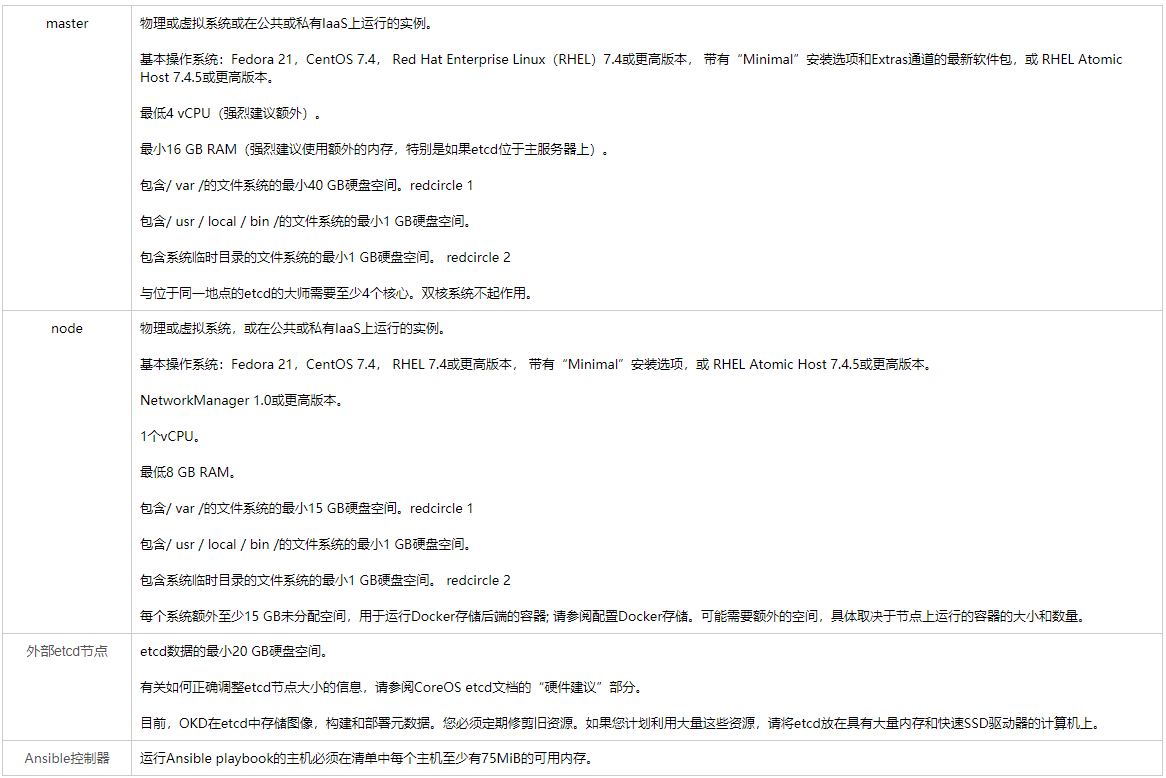
生产级硬件要求
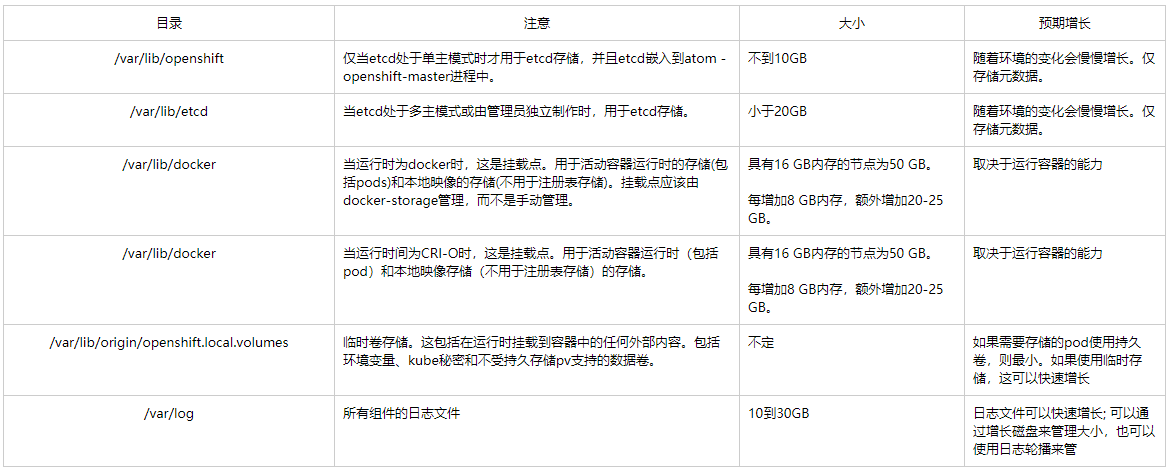
存储管理
DNS域名解析要求
- 禁用,然后将网络接口配置为静态,并将DNS名称服务器添加到NetworkManager。
- 启用后,NetworkManager调度脚本会根据DHCP配置自动配置DNS。
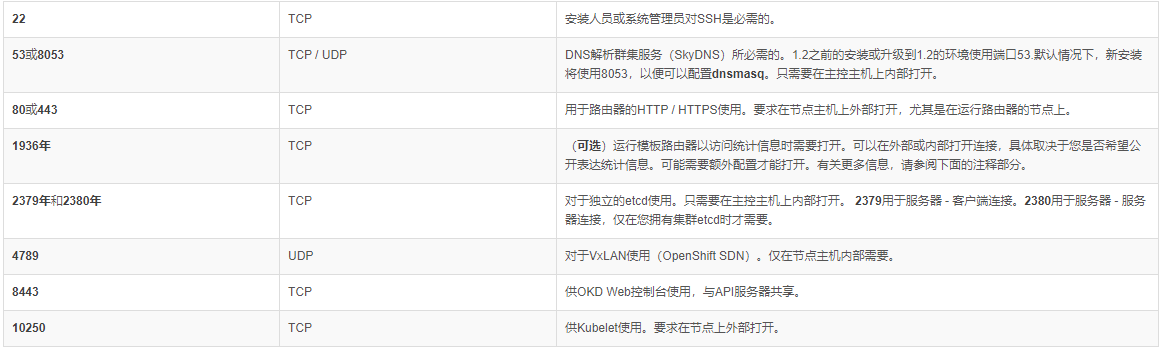
所需端口





openshift3.10集群部署的更多相关文章
- 五、Kubernetes_V1.10集群部署-master-部署组件
一.配置apiserver 1.生成启动文件 cat > /usr/lib/systemd/system/kube-apiserver.service <<EOF [Unit] De ...
- 四、Kubernetes_V1.10集群部署-master-创建kubeconfig
1.生成配置文件 # 创建 TLS Bootstrapping Token # export BOOTSTRAP_TOKEN=$( /dev/urandom | od -An -t x | tr -d ...
- 二、Kubernetes_V1.10集群部署-master-etcd
1.ETCD集群服务器: (1)172.18.6.39 (2)172.18.6.40 (3)172.18.6.41 1.安装etcd # yum -y install etcd 2.发布证书 cp - ...
- 六、Kubernetes_V1.10集群部署-node-部署节点组件
一.配置kubelet 1.配置启动文件 # cat > /usr/lib/systemd/system/kubelet.service <<EOF [Unit] Descripti ...
- 三、Kubernetes_V1.10集群部署-master-部署flanne网络
1. etcdctl --ca-file=/etc/etcd/ssl/ca.pem --cert-file=/etc/etcd/ssl/server.pem --key-file=/etc/etcd/ ...
- 一、Kubernetes_V1.10集群部署-master-生成证书
一.证书生成 1.下载cfssl mkdir -p /etc/kubernetes/sslwget https://pkg.cfssl.org/R1.2/cfssl_linux-amd64 wget ...
- Redis集群部署文档(Ubuntu15.10系统)
Redis集群部署文档(Ubuntu15.10系统)(要让集群正常工作至少需要3个主节点,在这里我们要创建6个redis节点,其中三个为主节点,三个为从节点,对应的redis节点的ip和端口对应关系如 ...
- Openfire 集群部署和负载均衡方案
Openfire 集群部署和负载均衡方案 一. 概述 Openfire是在即时通讯中广泛使用的XMPP协议通讯服务器,本方案采用Openfire的Hazelcast插件进行集群部署,采用Hapro ...
- 基于Tomcat的Solr3.5集群部署
基于Tomcat的Solr3.5集群部署 一.准备工作 1.1 保证SOLR库文件版本相同 保证SOLR的lib文件版本,slf4j-log4j12-1.6.1.jar slf4j-jdk14-1.6 ...
随机推荐
- 学习Python常用的工具
Python编程语言 Python是一门高级计算机程序设计语言! Python是一种解释型(脚本)语言,因为其代码简明,书写效率高,功能强大.易扩展.有丰富的专业库而受大众欢迎! 最常用的专业库有: ...
- go-web 获取get/post请求中的请求头和表单数据
package main import ( "fmt" "net/http" ) func handler(w http.ResponseWriter, r * ...
- WordPress 背后的故事竟然是这样
原文链接:The Story Behind the New WordPress.com 译者:杰微刊-Leo Xu 一年半以前,我们对使用 WordPress 构建网站所需要采用的技术和开发流程进行大 ...
- JFinal Enjoy指令扩展管理常用文本模板
个人博客 地址:http://www.wenhaofan.com/article/20190304102258 平时在项目中使用短信模板 邮件模板以及 站内消息通知等文本模板一般都是通过手动的字符串拼 ...
- 安装python3.7.4时报错:Service Pack 1 is required to continue installation
python3.7.4安装失败:Service Pack 1 is required to continue installation 解决办法: 点击报错页面中的“log file”,日志最后一行显 ...
- HCTF2018-admin[条件竞争]
附上网上师傅的wp 学习链接: https://www.jianshu.com/p/f92311564ad0 按照师傅的wp复现一下: 源代码审计,去看路由里的login函数和change函数都在没 ...
- AE开发常见问题总结
一. Arcgis10.0 组件初始化失败解决方法: ESRI.ArcGIS.RuntimeManager.BindLicense(ESRI.ArcGIS.ProductCode.EngineOrDe ...
- HTML连载63-a标签的伪类选择器
一.a标签的伪类选择器 1.通过观察可以发现a标签存在一定状态 (1)默认状态,从未被访问过 (2)被访问过的状态 (3)鼠标长按的状态 (4)鼠标悬停在a标签上的演示 2.什么是a标签的伪类选择器? ...
- NotePad++中如何改变光标样式(转换横着和竖着)?
在键盘上找 Insert ,按这个Insert就可以把横向闪烁光标( _ )修改成竖向闪烁光标样式( | )
- CQYZOJ P1392 拔河问题
题目\(1\) Description 一个学校举行拔河比赛,所有的人被分成了两组,每个人必须(且只能够)在其中的一组,且两个组内的所有人体重加起来尽可能地接近. Input 第\(1\)行是一个\( ...