Django项目:CMDB(服务器硬件资产自动采集系统)--03--03CMDB信息安全API接口交互认证
#settings.py
"""
Django settings for AutoCmdb project. Generated by 'django-admin startproject' using Django 2.0.6. For more information on this file, see
https://docs.djangoproject.com/en/2.0/topics/settings/ For the full list of settings and their values, see
https://docs.djangoproject.com/en/2.0/ref/settings/
""" import os # Build paths inside the project like this: os.path.join(BASE_DIR, ...)
BASE_DIR = os.path.dirname(os.path.dirname(os.path.abspath(__file__))) # Quick-start development settings - unsuitable for production
# See https://docs.djangoproject.com/en/2.0/howto/deployment/checklist/ # SECURITY WARNING: keep the secret key used in production secret!
SECRET_KEY = '35d18e6vmo0k*xg#h=&kuer*t3a#@hv09@@kvz@=dd@dzw&!7w' # SECURITY WARNING: don't run with debug turned on in production!
DEBUG = True ALLOWED_HOSTS = [] # Application definition INSTALLED_APPS = [
'django.contrib.admin',
'django.contrib.auth',
'django.contrib.contenttypes',
'django.contrib.sessions',
'django.contrib.messages',
'django.contrib.staticfiles',
'api.apps.ApiConfig',
] MIDDLEWARE = [
'django.middleware.security.SecurityMiddleware',
'django.contrib.sessions.middleware.SessionMiddleware',
'django.middleware.common.CommonMiddleware',
'django.middleware.csrf.CsrfViewMiddleware',
'django.contrib.auth.middleware.AuthenticationMiddleware',
'django.contrib.messages.middleware.MessageMiddleware',
'django.middleware.clickjacking.XFrameOptionsMiddleware',
] ROOT_URLCONF = 'AutoCmdb.urls' TEMPLATES = [
{
'BACKEND': 'django.template.backends.django.DjangoTemplates',
'DIRS': [],
'APP_DIRS': True,
'OPTIONS': {
'context_processors': [
'django.template.context_processors.debug',
'django.template.context_processors.request',
'django.contrib.auth.context_processors.auth',
'django.contrib.messages.context_processors.messages',
],
},
},
] WSGI_APPLICATION = 'AutoCmdb.wsgi.application' # Database
# https://docs.djangoproject.com/en/2.0/ref/settings/#databases DATABASES = {
'default': {
'ENGINE': 'django.db.backends.sqlite3',
'NAME': os.path.join(BASE_DIR, 'db.sqlite3'),
}
} # Password validation
# https://docs.djangoproject.com/en/2.0/ref/settings/#auth-password-validators AUTH_PASSWORD_VALIDATORS = [
{
'NAME': 'django.contrib.auth.password_validation.UserAttributeSimilarityValidator',
},
{
'NAME': 'django.contrib.auth.password_validation.MinimumLengthValidator',
},
{
'NAME': 'django.contrib.auth.password_validation.CommonPasswordValidator',
},
{
'NAME': 'django.contrib.auth.password_validation.NumericPasswordValidator',
},
] # Internationalization
# https://docs.djangoproject.com/en/2.0/topics/i18n/ LANGUAGE_CODE = 'en-us' TIME_ZONE = 'UTC' USE_I18N = True USE_L10N = True USE_TZ = True # Static files (CSS, JavaScript, Images)
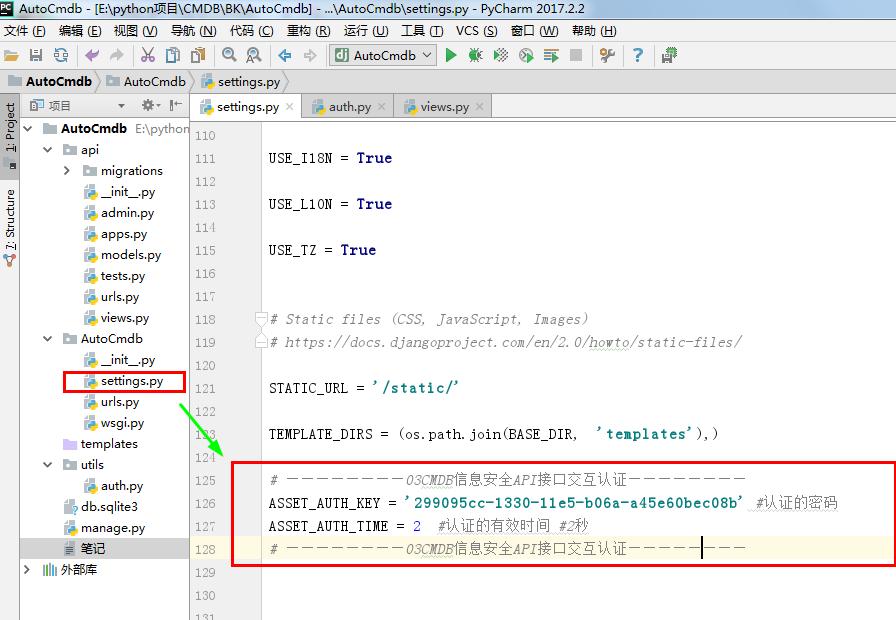
# https://docs.djangoproject.com/en/2.0/howto/static-files/ STATIC_URL = '/static/' TEMPLATE_DIRS = (os.path.join(BASE_DIR, 'templates'),) # ————————03CMDB信息安全API接口交互认证————————
ASSET_AUTH_KEY = '299095cc-1330-11e5-b06a-a45e60bec08b' #认证的密码
ASSET_AUTH_TIME = 2 #认证的有效时间 #2秒
# ————————03CMDB信息安全API接口交互认证————————
#settings.py

# auth.py
# ————————03CMDB信息安全API接口交互认证————————
import time #时间模块
import hashlib #哈希值
from AutoCmdb.settings import ASSET_AUTH_KEY #认证的密码
from AutoCmdb.settings import ASSET_AUTH_TIME #认证的有效时间
from django.http import JsonResponse #这个类是HttpRespon的子类 ENCRYPT_LIST = [
# {'encrypt': encrypt, 'time': timestamp
] #已认证的密码列表 def api_auth_method(request):
auth_key = request.META.get('HTTP_AUTH_KEY')#获取(META)元素 #‘时间密码’和 时间戳
print('‘时间密码’和 时间戳:',auth_key)
if not auth_key: #没有获取到值 就 #返回认证不通过
return False
sp = auth_key.split('|') # split()通过指定分隔符对字符串进行切片
if len(sp) != 2: #如果切片后的字符串 是2个 就 #返回认证不通过
return False
encrypt, timestamp = sp #给切片后的2个字符串 各设置一个变量
timestamp = float(timestamp) #float() 函数用于将整数和字符串转换成浮点数。
limit_timestamp = time.time() - ASSET_AUTH_TIME #设定服务器的时间戳
print('比较时间戳',limit_timestamp, timestamp)
if limit_timestamp > timestamp: #如果服务器的时间戳大于客户端的时间戳 就 #返回认证不通过
return False
#和客户端一样进行哈希加密
ha = hashlib.md5(ASSET_AUTH_KEY.encode('utf-8')) #认证的密码
ha.update(bytes("%s|%f" % (ASSET_AUTH_KEY, timestamp), encoding='utf-8'))#更新认证密码#密码+时间戳
result = ha.hexdigest() # 对‘时间密码’进行哈希
print('对比认证值:',result,encrypt)
if encrypt != result:#比较客户端哈希后的值和服务器哈希后的值是不是一样
return False#不一样就 #返回认证不通过
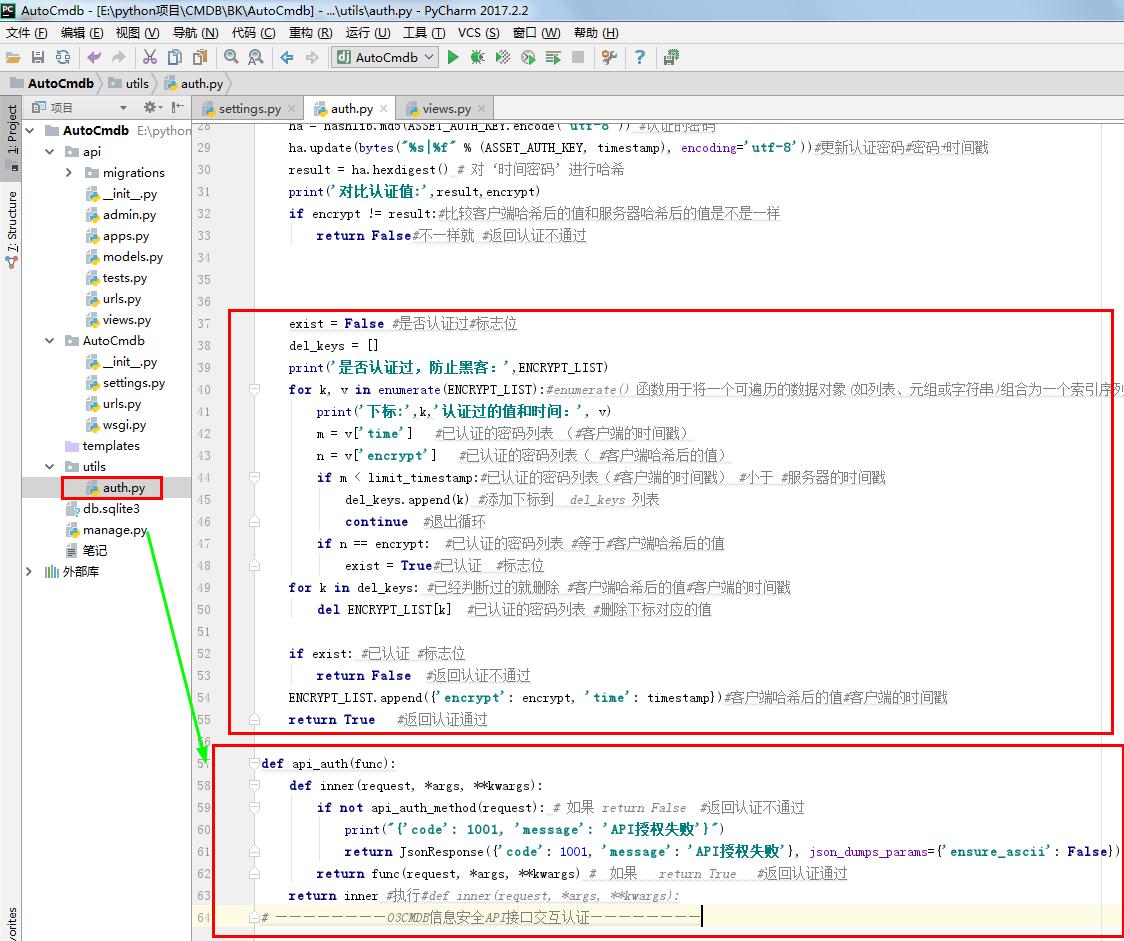
exist = False #是否认证过#标志位
del_keys = []
print('是否认证过,防止黑客:',ENCRYPT_LIST)
for k, v in enumerate(ENCRYPT_LIST):#enumerate() 函数用于将一个可遍历的数据对象(如列表、元组或字符串)组合为一个索引序列,同时列出数据和数据下标,一般用在 for 循环当中。
print('下标:',k,'认证过的值和时间:', v)
m = v['time'] #已认证的密码列表 (#客户端的时间戳)
n = v['encrypt'] #已认证的密码列表( #客户端哈希后的值)
if m < limit_timestamp:#已认证的密码列表(#客户端的时间戳) #小于 #服务器的时间戳
del_keys.append(k) #添加下标到 del_keys 列表
continue #退出循环
if n == encrypt: #已认证的密码列表 #等于#客户端哈希后的值
exist = True#已认证 #标志位
for k in del_keys: #已经判断过的就删除 #客户端哈希后的值#客户端的时间戳
del ENCRYPT_LIST[k] #已认证的密码列表 #删除下标对应的值
if exist: #已认证 #标志位
return False #返回认证不通过
ENCRYPT_LIST.append({'encrypt': encrypt, 'time': timestamp})#客户端哈希后的值#客户端的时间戳
return True #返回认证通过 def api_auth(func):
def inner(request, *args, **kwargs):
if not api_auth_method(request): # 如果 return False #返回认证不通过
print("{'code': 1001, 'message': 'API授权失败'}")
return JsonResponse({'code': 1001, 'message': 'API授权失败'}, json_dumps_params={'ensure_ascii': False})
return func(request, *args, **kwargs) # 如果 return True #返回认证通过
return inner #执行#def inner(request, *args, **kwargs):
# ————————03CMDB信息安全API接口交互认证————————
# auth.py
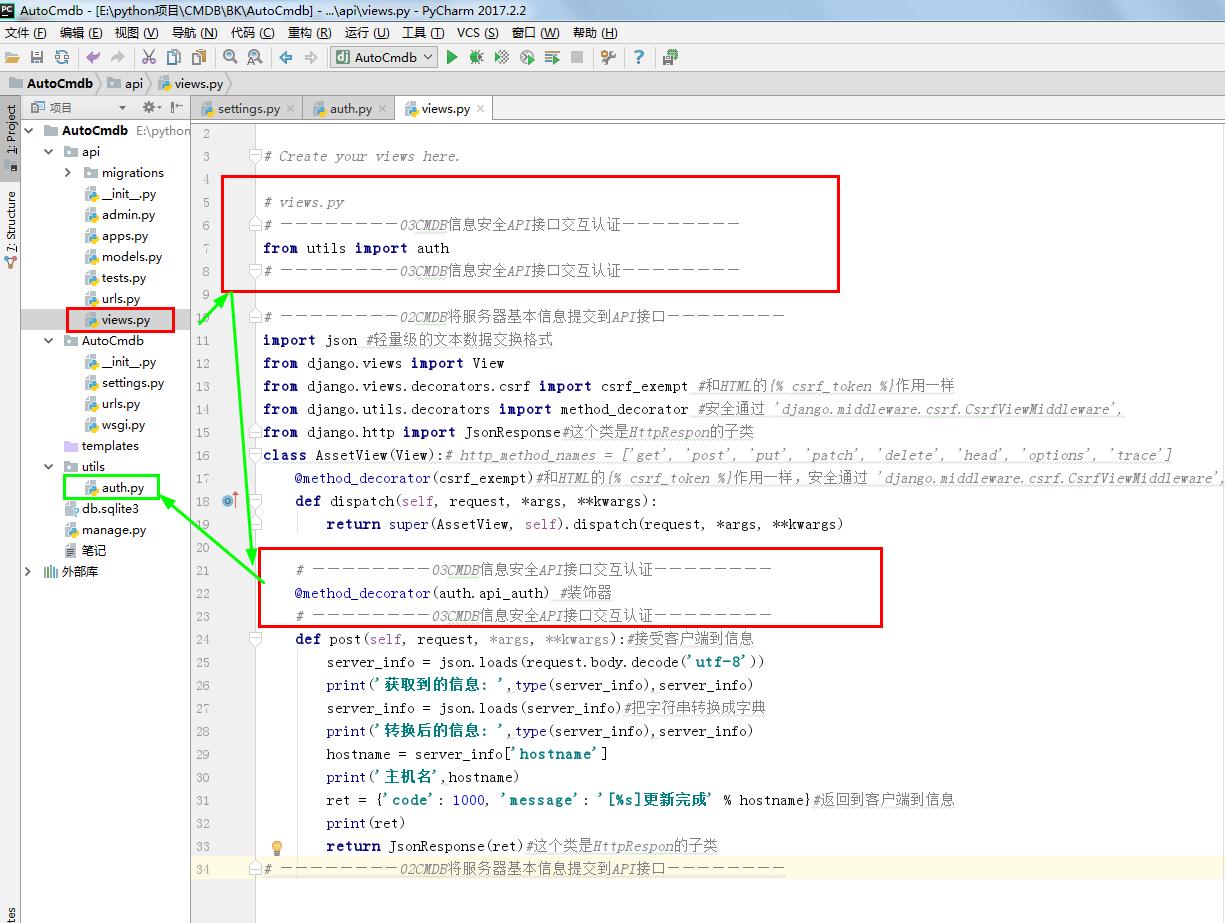
 from django.shortcuts import render

 # Create your views here.

 # views.py

 # ————————03CMDB信息安全API接口交互认证————————

 from utils import auth

 # ————————03CMDB信息安全API接口交互认证————————

 # ————————02CMDB将服务器基本信息提交到API接口————————

 import json #轻量级的文本数据交换格式

 from django.views import View

 from django.views.decorators.csrf import csrf_exempt #和HTML的{% csrf_token %}作用一样

 from django.utils.decorators import method_decorator #安全通过 'django.middleware.csrf.CsrfViewMiddleware',

 from django.http import JsonResponse#这个类是HttpRespon的子类

 class AssetView(View):# http_method_names = ['get', 'post', 'put', 'patch', 'delete', 'head', 'options', 'trace']

     @method_decorator(csrf_exempt)#和HTML的{% csrf_token %}作用一样,安全通过 'django.middleware.csrf.CsrfViewMiddleware',

     def dispatch(self, request, *args, **kwargs):

         return super(AssetView, self).dispatch(request, *args, **kwargs)

     # ————————03CMDB信息安全API接口交互认证————————

     @method_decorator(auth.api_auth) #装饰器

     # ————————03CMDB信息安全API接口交互认证————————

     def post(self, request, *args, **kwargs):#接受客户端到信息

         server_info = json.loads(request.body.decode('utf-8'))

         print('获取到的信息: ',type(server_info),server_info)

         server_info = json.loads(server_info)#把字符串转换成字典

         print('转换后的信息: ',type(server_info),server_info)

         hostname = server_info['hostname']

         print('主机名',hostname)

         ret = {'code': 1000, 'message': '[%s]更新完成' % hostname}#返回到客户端到信息

         print(ret)

         return JsonResponse(ret)#这个类是HttpRespon的子类

 # ————————02CMDB将服务器基本信息提交到API接口————————
# views.py
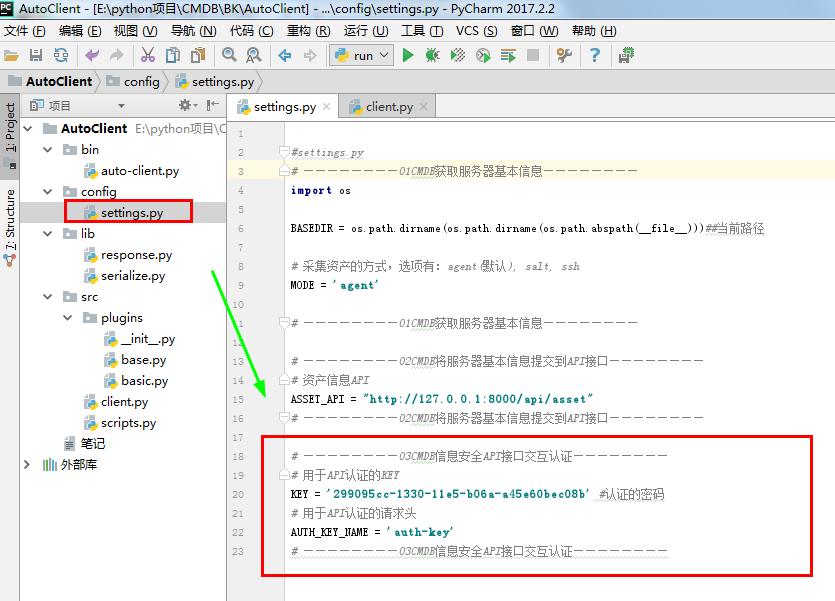
 #settings.py

 # ————————01CMDB获取服务器基本信息————————

 import os

 BASEDIR = os.path.dirname(os.path.dirname(os.path.abspath(__file__)))##当前路径

 # 采集资产的方式,选项有:agent(默认), salt, ssh

 MODE = 'agent'

 # ————————01CMDB获取服务器基本信息————————

 # ————————02CMDB将服务器基本信息提交到API接口————————

 # 资产信息API

 ASSET_API = "http://127.0.0.1:8000/api/asset"

 # ————————02CMDB将服务器基本信息提交到API接口————————

 # ————————03CMDB信息安全API接口交互认证————————

 # 用于API认证的KEY

 KEY = '299095cc-1330-11e5-b06a-a45e60bec08b' #认证的密码

 # 用于API认证的请求头

 AUTH_KEY_NAME = 'auth-key'

 # ————————03CMDB信息安全API接口交互认证————————
#settings.py
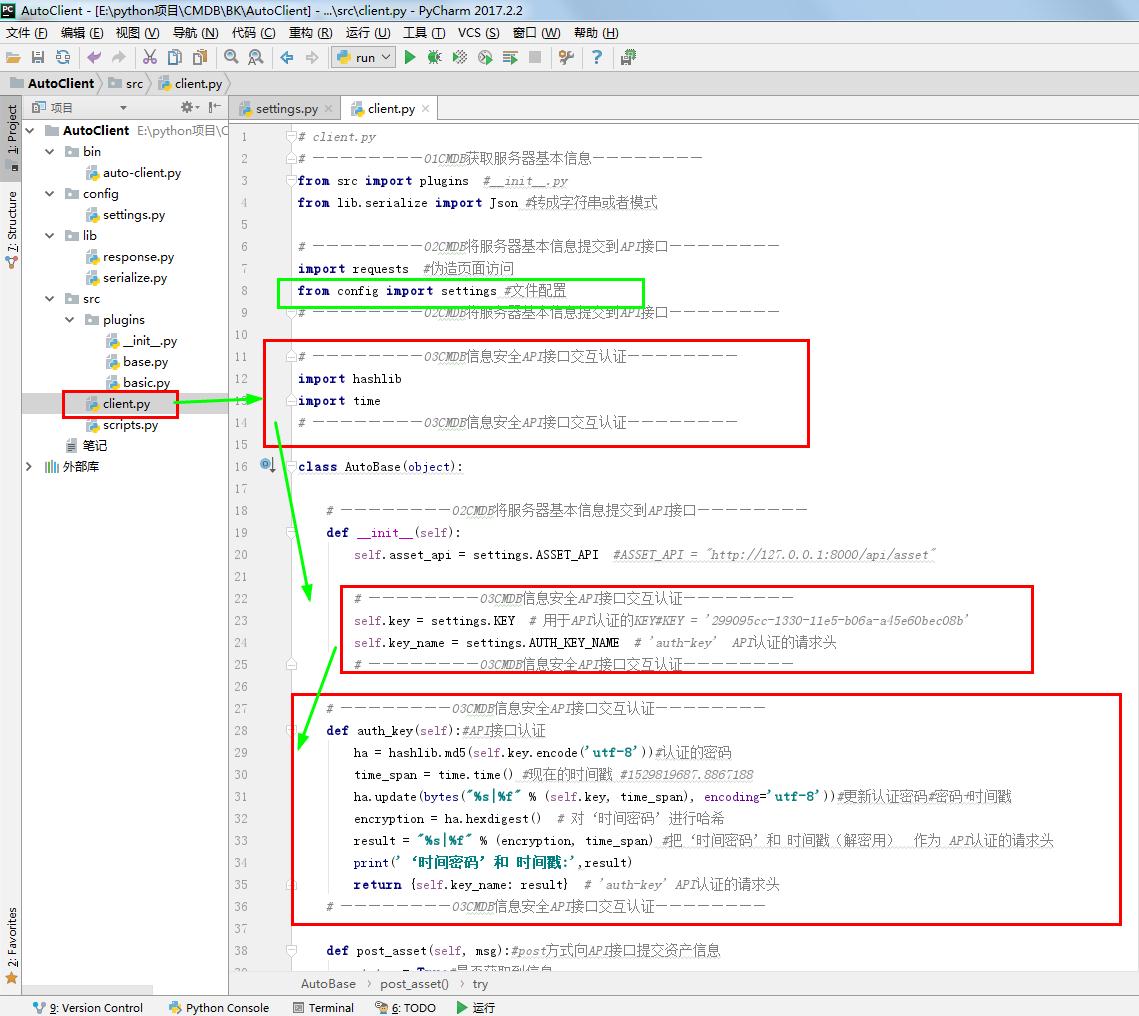
# client.py
# ————————01CMDB获取服务器基本信息————————
from src import plugins #__init__.py
from lib.serialize import Json #转成字符串或者模式 # ————————02CMDB将服务器基本信息提交到API接口————————
import requests #伪造页面访问
from config import settings #文件配置
# ————————02CMDB将服务器基本信息提交到API接口———————— # ————————03CMDB信息安全API接口交互认证————————
import hashlib
import time
# ————————03CMDB信息安全API接口交互认证———————— class AutoBase(object): # ————————02CMDB将服务器基本信息提交到API接口————————
def __init__(self):
self.asset_api = settings.ASSET_API #ASSET_API = "http://127.0.0.1:8000/api/asset" # ————————03CMDB信息安全API接口交互认证————————
self.key = settings.KEY # 用于API认证的KEY#KEY = '299095cc-1330-11e5-b06a-a45e60bec08b'
self.key_name = settings.AUTH_KEY_NAME # 'auth-key' API认证的请求头
# ————————03CMDB信息安全API接口交互认证———————— # ————————03CMDB信息安全API接口交互认证————————
def auth_key(self):#API接口认证
ha = hashlib.md5(self.key.encode('utf-8'))#认证的密码
time_span = time.time() #现在的时间戳 #1529819687.8867188
ha.update(bytes("%s|%f" % (self.key, time_span), encoding='utf-8'))#更新认证密码#密码+时间戳
encryption = ha.hexdigest() # 对‘时间密码’进行哈希
result = "%s|%f" % (encryption, time_span) #把‘时间密码’和 时间戳(解密用) 作为 API认证的请求头
print('‘时间密码’和 时间戳:',result)
return {self.key_name: result} # 'auth-key' API认证的请求头
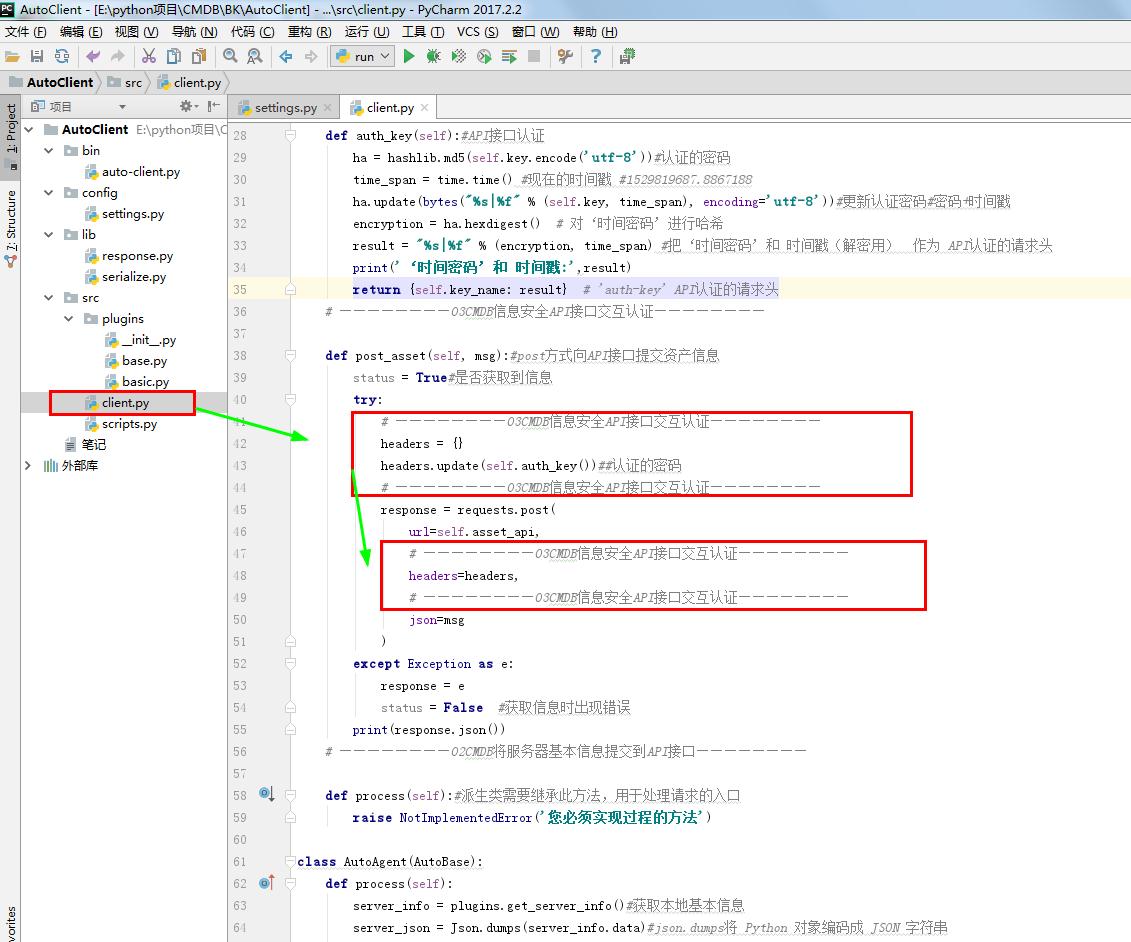
# ————————03CMDB信息安全API接口交互认证———————— def post_asset(self, msg):#post方式向API接口提交资产信息
status = True#是否获取到信息
try:
# ————————03CMDB信息安全API接口交互认证————————
headers = {}
headers.update(self.auth_key())##认证的密码
# ————————03CMDB信息安全API接口交互认证————————
response = requests.post(
url=self.asset_api,
# ————————03CMDB信息安全API接口交互认证————————
headers=headers,
# ————————03CMDB信息安全API接口交互认证————————
json=msg
)
except Exception as e:
response = e
status = False #获取信息时出现错误
print(response.json())
# ————————02CMDB将服务器基本信息提交到API接口———————— def process(self):#派生类需要继承此方法,用于处理请求的入口
raise NotImplementedError('您必须实现过程的方法') class AutoAgent(AutoBase):
def process(self):
server_info = plugins.get_server_info()#获取本地基本信息
server_json = Json.dumps(server_info.data)#json.dumps将 Python 对象编码成 JSON 字符串
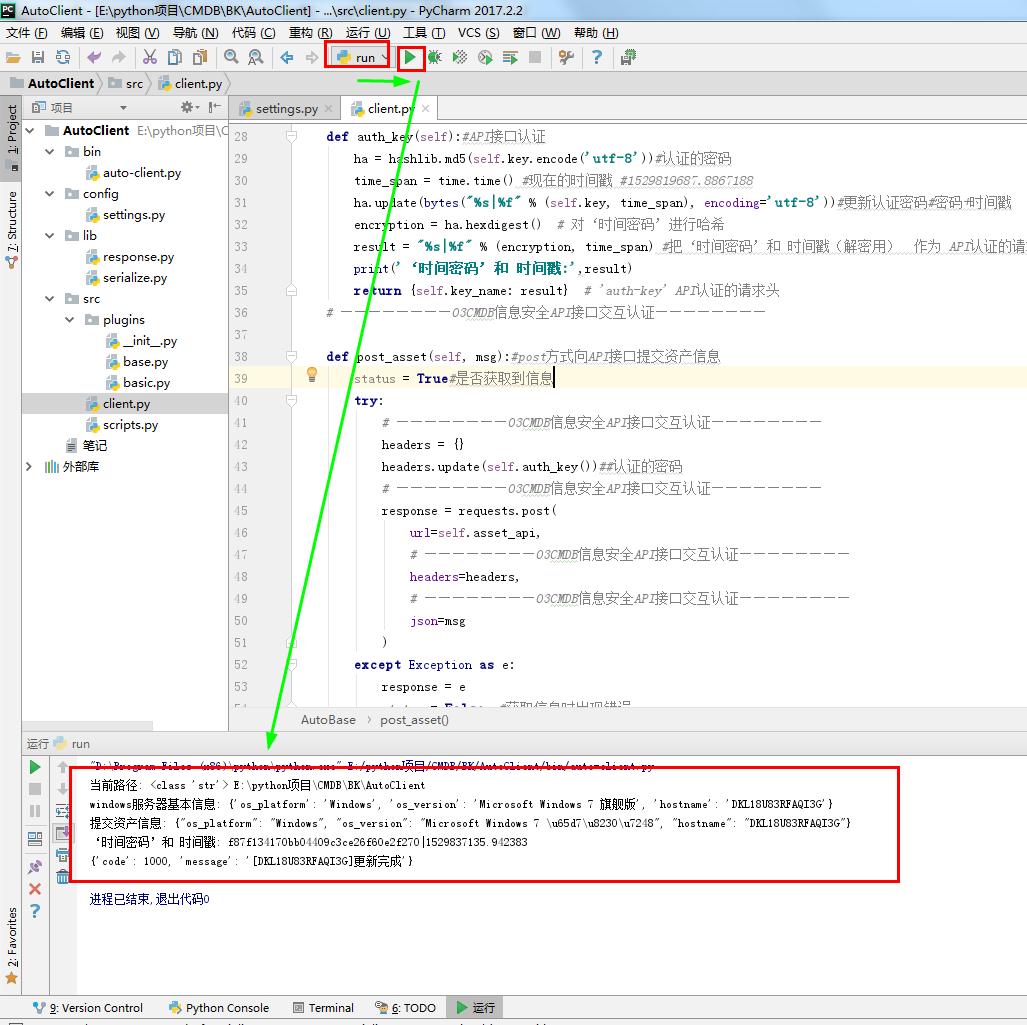
print('提交资产信息:',server_json)
# ————————01CMDB获取服务器基本信息———————— # ————————02CMDB将服务器基本信息提交到API接口————————
self.post_asset(server_json)# post方式向接口提交资产信息
# ————————02CMDB将服务器基本信息提交到API接口————————
# client.py

Django项目:CMDB(服务器硬件资产自动采集系统)--03--03CMDB信息安全API接口交互认证的更多相关文章
- Django项目:CMDB(服务器硬件资产自动采集系统)--11--07CMDB文件模式测试采集硬件数据
#settings.py # ————————01CMDB获取服务器基本信息———————— import os BASEDIR = os.path.dirname(os.path.dirname(o ...
- Django项目:CMDB(服务器硬件资产自动采集系统)--12--08CMDB采集硬件数据日志记录
#settings.py # ————————01CMDB获取服务器基本信息———————— import os BASEDIR = os.path.dirname(os.path.dirname(o ...
- Django项目:CMDB(服务器硬件资产自动采集系统)--07--06CMDB测试Linux系统采集硬件数据的命令02
#settings.py """ Django settings for AutoCmdb project. Generated by 'django-admin sta ...
- Django项目:CMDB(服务器硬件资产自动采集系统)--06--06CMDB测试Linux系统采集硬件数据的命令01
#base.py # ————————01CMDB获取服务器基本信息———————— from config import settings #配置文件 class BasePlugin(object ...
- Django项目:CMDB(服务器硬件资产自动采集系统)--05--05CMDB采集硬件数据的插件
#__init__.py # ————————05CMDB采集硬件数据的插件———————— from config import settings import importlib # —————— ...
- Django项目:CMDB(服务器硬件资产自动采集系统)--04--04CMDB本地(Agent)模式客户端唯一标识(ID)
# client.py # ————————01CMDB获取服务器基本信息———————— from src import plugins #__init__.py from lib.serializ ...
- Django项目:CMDB(服务器硬件资产自动采集系统)--02--02CMDB将服务器基本信息提交到API接口
AutoCmdb # urls.py """AutoCmdb URL Configuration The `urlpatterns` list routes URLs t ...
- Django项目:CMDB(服务器硬件资产自动采集系统)--08--06CMDB测试Linux系统采集硬件数据的命令03
https://www.virtualbox.org/wiki/Downloads https://mirrors.aliyun.com/centos/7/isos/x86_64/ http://ww ...
- Django项目:CMDB(服务器硬件资产自动采集系统)--10--06CMDB测试Linux系统采集硬件数据的命令05
cd /py/AutoClient/bin python3 auto-client.py /usr/local/python3/bin/pip install requests python3 aut ...
随机推荐
- thinkphp cbd模式
ThinkPHP从3.0版本开始引入了全新的CBD(核心Core+行为Behavior+驱动Driver)架构模式,因为从底层开始,框架就采用核心+行为+驱动的架构体系,核心保留了最关键的部分,并在重 ...
- (转)Android中RelativeLayout各个属性的含义
转:http://blog.csdn.net/softkexin/article/details/5933589 android:layout_above="@id/xxx" - ...
- ON_EVENT 报错
错误提示: error C2440: 'initializing' : cannot convert from 'const wchar_t [1]' to 'UINT' error C2440: ' ...
- pinmap 和 pin allocation
串口管脚分配
- <每日一题>题目12:列表解析及zip、dict函数的简单应用
''' 分析: 1.列表解析:迭代机制的一种应用 语法: [expression for iter_val in iterable] [expression for iter_val in itera ...
- Android开发 Tablayout的学习
前言 Tablayout一般做主页底下的导航栏开发或者上面的选择栏开发,就个人感觉Tablayout用于主页导航栏会比BottomNavigationView更好,自定义方面也更容易.缺点是没有动画也 ...
- loj6094 归乡迷途
题意:有一张n个点的无向图,点有标号.求满足下列性质的图有多少个. 1.任意节点到1的最短路唯一.2.i的最短路长度<=i+1的最短路长度.3.所有点的度数给定,为2或3. n<=400. ...
- vue项目中,单页图片过多,使用懒加载
最近做项目,一页图片很多,加载的时候效果很差. 通过学习借鉴其他大神的方法,使用了插件vue-lazyload,使用这个插件,界面更美观了,加载的效果好起来. 安装 npm i vue-lazyloa ...
- [JZOJ4759] 【雅礼联考GDOI2017模拟9.4】石子游戏
题目 描述 题目大意 在一棵树上,每个节点都有些石子. 每次将mmm颗石子往上移,移到根节点就不能移了. 双方轮流操作,问先手声还是后手胜. 有三种操作: 1. 询问以某个节点为根的答案. 2. 改变 ...
- 用C++Builder在Windows开始按钮上绘图制作方法
熟悉Windows操作系统的软件设计人员知道,在Win95/98/NT/2000中有一任务栏(Task Bar)程序,路径为:C:\WINDOWS\SYSTEM\SYSTRAY.EXE(假设你的Win ...