利用cocostudio库函数 实现左右滑动的背包栏UI (cocos2d-x 2.2.0)
.h
#ifndef __COMMON_COMPONENTS__

#define __COMMON_COMPONENTS__

#include "cocos2d.h"

#include "cocos-ext.h"

USING_NS_CC;

USING_NS_CC_EXT;

#define ROOT_BACK_WIDTH        380        //background width

#define ROOT_BACK_HEIGHT    450        //background height

#define LAYOUT_WIDTH        360        //each page width

#define LAYOUT_HEIGHT        360        //each page height

#define PAGE_SUM_NUM        6        //total page num

#define EACH_PAGE_NUM        9        //each page grid num

class CCommonComponents : public cocos2d::extension::UILayer

{

public:

    CCommonComponents(void);

    ~CCommonComponents(void);

    virtual bool init();

    CREATE_FUNC(CCommonComponents);

public:

    UIImageView* createHorizontalGrid( int pageNum = PAGE_SUM_NUM );

    void tagMenuTest( CCObject* pSender );

    void refreshGrid();

    void pageViewEvent(CCObject *pSender, PageViewEventType type);

    void buttonTidyCallback( CCObject* pSender );

public:

    UIImageView*        m_pImgEffect[PAGE_SUM_NUM];                    //effect of selected

    UIButton*            m_pBtnAllGrid[PAGE_SUM_NUM][EACH_PAGE_NUM];    //total num of grid

    UIImageView*        m_pBtnTextureChild[PAGE_SUM_NUM][EACH_PAGE_NUM]; //each icon in gird

    UIImageView*        m_pImgLight[PAGE_SUM_NUM];                    //the current page where the lights

    int                    m_IntCurPage;                                //record the current page number

};

#endif //__COMMON_COMPONENTS__
.cpp
#include "CommonComponents.h"

CCommonComponents::CCommonComponents(void) :

     m_IntCurPage()

{

    memset(m_pImgEffect, , sizeof(m_pImgEffect));

    memset(m_pBtnAllGrid, , sizeof(m_pBtnAllGrid));

    memset(m_pBtnTextureChild, , sizeof(m_pBtnTextureChild));

    memset(m_pImgLight, , sizeof(m_pImgLight));

}

CCommonComponents::~CCommonComponents(void)

{

}

bool CCommonComponents::init()

{

    bool bRet = false;

    do

    {

        CC_BREAK_IF( !UILayer::init() );

        bRet = true;

    } while ();

    return bRet;

}

UIImageView* CCommonComponents::createHorizontalGrid( int pageNum )

{

    CCSize winSize = CCDirector::sharedDirector()->getWinSize();

    UIImageView* imgBack = UIImageView::create();

    imgBack->setTexture("frame.png");

    imgBack->setScale9Enable(true);

    imgBack->setScale9Size(CCSizeMake(ROOT_BACK_WIDTH, ROOT_BACK_HEIGHT));

    UIPageView* pageView = UIPageView::create();

    pageView->setTouchEnable(true);

    pageView->setSize(CCSizeMake(LAYOUT_WIDTH, LAYOUT_HEIGHT));

    pageView->setAnchorPoint(ccp(0.5f, 0.5f));

    for (int i = ; i < pageNum; ++i)

    {

        UIPanel* layout = UIPanel::create();

        layout->setSize(CCSizeMake(LAYOUT_WIDTH, LAYOUT_HEIGHT));

        UIImageView* imageView = UIImageView::create();

        imageView->setTouchEnable(true);

        imageView->setScale9Enable(true);

        imageView->setTexture("pic_frame1.png");

        imageView->setScale9Size(CCSizeMake(LAYOUT_WIDTH, LAYOUT_HEIGHT));

        imageView->setPosition(ccp(layout->getRect().size.width / , layout->getRect().size.height / ));

        layout->addChild(imageView);

        m_pImgEffect[i] = UIImageView::create();

        m_pImgEffect[i]->setVisible(false);

        m_pImgEffect[i]->setTexture("frame_pressed.png");

        layout->addChild(m_pImgEffect[i]);

        m_pImgLight[i] = UIImageView::create();

        if(  == i )

        {

            m_pImgLight[i]->setTexture("green.png");

        }

        else

        {

            m_pImgLight[i]->setTexture("red.png");

        }

        m_pImgLight[i]->setPosition(ccp(- + i*, -));

        for(int j=; j<; ++j)

        {

            m_pBtnAllGrid[i][j] = UIButton::create();

            m_pBtnAllGrid[i][j]->setTouchEnable(true);

            m_pBtnAllGrid[i][j]->setTextures("frame.png", "frame.png", "frame.png");

            m_pBtnAllGrid[i][j]->setPosition(ccp( m_pBtnAllGrid[i][j]->getContentSize().width/+ j%*m_pBtnAllGrid[i][j]->getContentSize().width*1.2 + ,

                layout->getSize().height-m_pBtnAllGrid[i][j]->getContentSize().height/-m_pBtnAllGrid[i][j]->getContentSize().height*(j/)/0.85 - ));

            layout->addChild(m_pBtnAllGrid[i][j]);

            m_pBtnAllGrid[i][j]->setWidgetTag(i*+j);

            m_pBtnAllGrid[i][j]->addReleaseEvent(this, coco_releaseselector(CCommonComponents::tagMenuTest));

            m_pBtnTextureChild[i][j] = UIImageView::create();

            m_pBtnTextureChild[i][j]->setTexture("frame.png");

            m_pBtnAllGrid[i][j]->addChild(m_pBtnTextureChild[i][j]);

        }

        pageView->addPage(layout);

        imgBack->addChild(m_pImgLight[i]);

    }

    pageView->addEventListener(this, pagevieweventselector(CCommonComponents::pageViewEvent));

    imgBack->addChild(pageView);

    pageView->setPosition(ccp(, ));

    UIButton* button = UIButton::create();

    button->setTouchEnable(true);

    button->setTextures("pic_button_1.png","pic_button_2.png","pic_button_3.png");

    button->addReleaseEvent(this, coco_releaseselector(CCommonComponents::buttonTidyCallback));

    imgBack->addChild(button);

    button->setPosition(ccp(, -));

    UILabel* labBtnFont = UILabel::create();

    labBtnFont->setText("TIDY");

    labBtnFont->setFontSize();

    button->addChild(labBtnFont);

    refreshGrid();                //temporary test

    return imgBack;

}

void CCommonComponents::tagMenuTest( CCObject* pSender )

{

    UIButton* curImgClick = dynamic_cast<UIButton*>(pSender);

    int curTag = curImgClick->getWidgetTag();

    CCLOG("curTag = %d ; [%f, %f]", curTag, curImgClick->getPosition().x, curImgClick->getPosition().y);

    m_pImgEffect[m_IntCurPage]->setPosition(curImgClick->getPosition());

    m_pImgEffect[m_IntCurPage]->setVisible(true);

}

void CCommonComponents::refreshGrid()

{

    for(int i= ; i<; ++i)

    {

        for (int j = ; j<EACH_PAGE_NUM; ++j)

        {

            if( i*EACH_PAGE_NUM+j <=  )

            m_pBtnTextureChild[i][j]->setTexture("CloseNormal.png");

        }

    }

}

void CCommonComponents::pageViewEvent(CCObject *pSender, PageViewEventType type)

{

    switch (type)

    {

    case PAGEVIEW_EVENT_TURNING:

        {

            UIPageView* pageView = dynamic_cast<UIPageView*>(pSender);

            CCLog(" m_IntCurPage = %d",pageView->getPage());

            if(m_IntCurPage != pageView->getPage())

            {

                m_IntCurPage = pageView->getPage();

                for(int i=; i<PAGE_SUM_NUM; ++i)

                {

                    m_pImgEffect[i]->setVisible(false);

                    if(i == m_IntCurPage)

                    {

                        m_pImgLight[i]->setTexture("green.png");

                    }

                    else

                    {

                        m_pImgLight[i]->setTexture("red.png");

                    }

                }

            }

        }

        break;

    default:

        break;

    }

}

void CCommonComponents::buttonTidyCallback( CCObject* pSender )

{

    CCLog("running buttonCallback function");

}
使用方式:
CCommonComponents* pageLayer =  CCommonComponents::create();

    this->addChild(pageLayer);
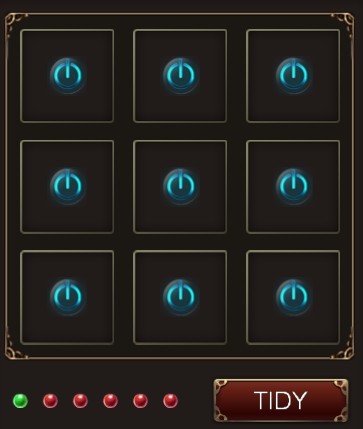
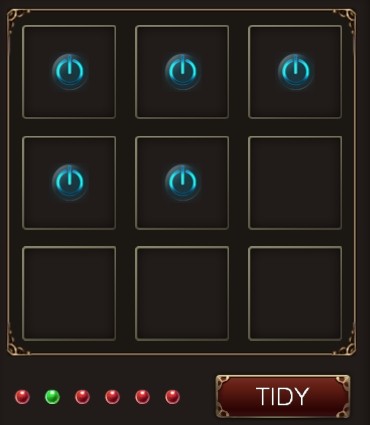
显示效果:
这只是一个小的例子代码,实现方式是依赖 cocostudio 库函数,没有好,只有比较好。
欢迎来访并指教 QQ:316948714, 期待一样热爱技术的你!!!
利用cocostudio库函数 实现左右滑动的背包栏UI (cocos2d-x 2.2.0)的更多相关文章
- CocoStudio教程三:认识并利用CocoStudio的果实 运行2.2.1版本
原文:CocoStudio教程三:认识并利用CocoStudio的果实 原文用的老版,用2.21搞起来好像有些问题,然后自己摸索了下,有的都是乱找的方法,只求能运行... 1,原文的CCJsonRea ...
- Ubuntu/Windows下利用“HIDAPI”库函数实现与Hid类USB设备通信
一.背景: 最近在做的一个项目需要使用USB传递数据,对USB理解不是很深,USB的系统驱动编写则更是天方 夜谭,因此将设备配置成HID类设备成为了首选.其最大的好处在于,LINUX/Windows系 ...
- 利用selenium库自动执行滑动验证码模拟登陆
破解流程 #1.输入账号.密码,然后点击登陆 #2.点击按钮,弹出没有缺口的图 #3.针对没有缺口的图片进行截图 #4.点击滑动按钮,弹出有缺口的图 #5.针对有缺口的图片进行截图 #6.对比两张图片 ...
- 利用C库函数time()打印当前系统动态时间
引入日期和时间头文件 #include<time.h> 用time_t定义一个存储时间的变量获取时间(以秒为单位) time_t t; time (&t); //获取1970年以来 ...
- iOS 滑动隐藏导航栏-三种方式
/** 1隐藏导航栏-简单- */ self.navigationController.hidesBarsOnSwipe = YES; /** 2隐藏导航栏-不随tableView滑动消失效果 ...
- 利用CSS预处理技术实现项目换肤功能(less css + asp.net mvc4.0 bundle)
一.背景 在越来越重视用户体验的今天,换肤功能也慢慢被重视起来.一个web系统用户可以选择一个自己喜欢的系统主题,在用户眼里还是会多少加点分的.我们很开心的是easyui v1.3.4有自带defau ...
- Demon_背包系统(实现装备栏,背包栏,可以切换装备)
using UnityEngine; using System.Collections; public enum BoxType { Normal,//普通格子 Equip//装备栏格子 } publ ...
- React实现顶部固定滑动式导航栏(导航条下拉一定像素时显示原导航栏样式)
摘要 基于react的框架开发一个顶部固定滑动式的酷炫导航栏,当导航栏置顶时,导航栏沉浸在背景图片里:当鼠标滑动滚轮时,导航栏固定滑动并展示下拉样式. JS部分 相关技术栈:react.antd.re ...
- 利用CSS制作背景变色的横向导航栏
1.表单 页面如下: <html> <head> <title>注册表单页面</title> </head> <body> &l ...
随机推荐
- 【BZOJ 1036】【ZJOI 2008】树的统计 树链剖分模板题
sth神犇的模板: //bzoj1036 题目:一个n个点的树每个点有一个权值,支持修改单点权值,求某两点路径上的点权和或最大点权. #include <cstdio> using nam ...
- C 文件读写2
feof() int feof(FILE *stream); 在执行读文件操作时,如果遇到文件尾,则函数返回逻辑真(1):否则,则返回逻辑假(0). feof()函数同时适用于ASCII码文件和二进 ...
- TCP和Http的区别
相信不少初学手机联网开发的朋友都想知道Http与Socket连接究竟有什么区别,希望通过自己的浅显理解能对初学者有所帮助. 1.TCP连接 手机能够使用联网功能是因为手机底层实现了TCP/IP协议,可 ...
- ORACLE RAC集群的体系结构
RAC是一个完整的集群应用环境,它不仅实现了集群的功能,而且提供了运行在集群之上的应用程序,即Oracle数据库.无论与普通的集群相比,还是与普通的Oracle数据库相比,RAC都有一些独特之处. R ...
- android加载大图片到内存
1)演示效果: 1)代码演示: 布局代码: 权限配置:
- C#实现自动升级(附源码)
http://blog.csdn.net/zhuweisky/article/details/50439386 OAUS
- 求任意长度数组的最大值(整数类型)。利用params参数实现任意长度的改变。
using System; using System.Collections.Generic; using System.Linq; using System.Text; using System.T ...
- Strust的基础情况
Struts的优点: 1.实现MVC模式,结构清晰 2.丰富的标签(tag) 3.通过配置文件页面导航,便于后期维护 4.与Servlet API松耦合,便于测试 Structs2=Structs1的 ...
- AppCompat学习(1)-AppCompatSpinner
andriod中的spinner控件一共有两个,一个是本身的Spinner,一个是android.support.v7.widget.AppCompatSpinner. 两者的区别在于v7内的Spin ...
- GDB中应该知道的几个调试方法 来自陈皓
GDB中应该知道的几个调试方法 2011年2月10日陈皓发表评论阅读评论62,325 人阅读 七.八年前写过一篇<用GDB调试程序>,于是,从那以后,很多朋友在MSN上以及给我发邮件询 ...