
o'Reill的SVG精髓(第二版)学习笔记——第十章
10.1 裁剪路径
创建SVG文档时,可以通过制定感兴趣区域的宽度和高度建立视口。这会变成默认的裁剪区域,任何绘制在该范围外部的部分都不会显示。你也可以使用<clipPath>元素来建立自己的裁剪区域。
最简单的情形是建立一个矩形裁剪路径。在<clipPath>元素内是想要裁剪的<rect>。因为我们只想要它的坐标,所以这个矩形本身不显示。可以在<clipPath>元素内随意指定填充和笔画风格。应用时在要裁剪的对象上添加clip-path样式属性,值引用到<clipPath>元素即可。注意这个属性带有连字符且不是大写的,裁剪元素则是有大写字母且不带连字符。
裁剪矩形路径:
http://oreillymedia.github.io/svg-essentials-examples/ch10/clip_path.html
<clipPath>,顾名思义,应该可以让我们指定任意形式的路径用于裁剪。事实上<clipPath>元素也可以包含任意数量的基本形状,<path>元素或者<text>元素,下例展示了一组按照曲线路径裁剪的形状和同一组根据文本裁剪的形状
http://oreillymedia.github.io/svg-essentials-examples/ch10/complex_clip_path.html
  <svg width="500" height="500" viewBox="0 0 500 500" xmlns="http://www.w3.org/2000/svg"

    xmlns:xlink="http://www.w3.org/1999/xlink">

       <defs>

           <clipPath id="curveClip">

               <path id="curve1" d="M5 55 C 25 5,45 -25,75 55,85 85,20 105,40 55 Z" style="stroke: black;fill:none;">

           </clipPath>

           <clipPath id="textClip">

               <text id="text1" x="20" y="20" transform="rotate(60)" style="font-family: 'Liberation Sans';font-size:48pt;stroke:black;fill:none;">

                   CLIP

               </text>

           </clipPath>

           <g id="shapes">

               <rect x="0" y="50" width="90" height="60" style="fill:#999;"/>

               <circle cx="25" cy="25" r="25" style="fill:#666;"/>

            <polygon points="30 0 80 0 80 100" style="fill:#ccc;"/>

           </g>

       </defs>

       <!-- 绘制曲线裁剪路径 -->

       <use xlink:href="#shapes" style="clip-path:url(#curveClip);" />

       <!-- 绘制文本裁剪路径 -->

       <use transform="translate(100,0)" xlink:href="#shapes" style="clip-path:url(#textClip);" />

       <g transform="translate(0,150)">

           <use xlink:href="#shapes" />

           <use xlink:href="#curve1" />

       </g>

    <g transform="translate(100,150)">

        <use xlink:href="#shapes" />

        <use xlink:href="#text1">

    </g>

    </svg>
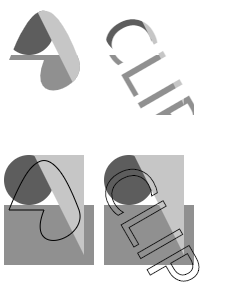
上例的裁剪路径坐标被指定为用户坐标。如果想根据对象的边界框来表示坐标,设置clipPathUnits为objectBoundingBox即可(默认值为userSpaceOnUse)。下例使用路径裁剪在任意对象上生成一个圆形或者椭圆窗口。
<!-- 应用objectBoundingBox的clipPathUnits -->

    <svg width="500" height="500" viewBox="0 0 500 500" xmlns="http://www.w3.org/2000/svg"

        xmlns:xlink="http://www.w3.org/1999/xlink">

        <defs>

            <clipPath id="circularPath" clipPathUnits="objectBoundingBox">

                <circle cx="0.5" cy="0.5" r="0.5" />

            </clipPath>

            <g id="shapes">

                <rect x="0" y="50" width="100" height="50" style="fill:#999;"/>

                <circle cx="25" cy="25" r="25" style="fill:#666;"/>

                <polygon points="30 0 80 0 80 100" style="fill:#ccc;" />

            </g>

            <g id="words">

                <text x="0" y="19" style="font-family: 'Liberation Sans';font-size:14pt;">

                    <tspan x="0" y="19">if you have form'd a circle</tspan>

                    <tspan x="12" y="35">to go into</tspan>

                    <tspan x="0" y="51">Go into if yourself</tspan>

                    <tspan x="12" y="67">and see how you would dou.</tspan>

                    <tspan x="50" y="87">—William Blake</tspan>

                </text>

            </g>

        </defs>

        <use xlink:href="#shapes" style="clip-path:url(#circularPath);"/>

        <use xlink:href="#words" transform="translate(110,0)" style="clip-path:url(#circularPath);">

    </svg>

<marker>、<symbol>和<svg>元素都会定义其自身的视口,也可以使用overflow:hidden样式来裁剪视口内容。然而,如果内容的meet设置为preserveAspectRatio,视口可能比viewBox更大。要裁剪这个viewBox,就要创建一个<clipPath>元素,其中包含一个匹配viewBox最小x、最小y、宽度和高度的矩形。
10.2蒙版
SVG蒙版会变换对象的透明度。如果蒙版是不透明的,被蒙版覆盖的对象的像素就是不透明的;如果蒙版是半透明的,那么对象就是半透明的,蒙版的透明部分会使被覆盖对象的相应部分不可见。
我们用<mask>元素来创建蒙版。使用x、y、width和height属性指定蒙版的尺寸。这些尺寸默认按照objectBoundingBox计算。如果想根据用户控件坐标计算尺寸,设置naskUnits为userSpaceOnUse即可。
起始<mask>和结束</mask>标记之间使我们想要用作蒙版的任意基本形状、文本、图像或者路径。这些元素的坐标默认使用用户坐标控件表达。如果想要为蒙版内容使用对象边界框,设置maskContentUnits为objectBoundingBox即可(默认为userSpaceOnUse)。
SVG如何确认蒙版的透明度?即阿尔法的值。我们知道,每个像素由4个值描述,分别是红、绿、蓝颜色值和不透明度。
SVG使用如下公式:
(0.0125*red value + 0.7154 * green value +0.0721 * blue value)*opacity value
所有的值都是0到1之间的浮点数。
下例中,创建了黑色文本和黑色圆形,圆形由完全不透明的红、绿、蓝和白色正方形遮罩。文本和圆形被组合在一起,并且这个组合使用mask样式属性引用了对应的蒙版。背景中的水平黄色条演示了文本和圆形都是半透明的。
<!-- 不透明的颜色蒙版 -->

    <svg width="500px" height="500px" viewBox="0 0 500 500">

        <defs>

            <mask id="redmask" x="0" y="0" width="1" height="1" maskContentUnits="objectBoundingBox">

                <rect x="0" y="0" width="1" height="1" style="fill:#f00;"/>

            </mask>

            <mask id="greenmask" x="0" y="0" width="1" height="1" maskContentUnits="objectBoundingBox">

                <rect x="0" y="0" width="1" height="1" style="fill:#0f0;"/>

            </mask>

            <mask id="bluemask" x="0" y="0" width="1" height="1" maskContentUnits="objectBoundingBox">

                <rect x="0" y="0" width="1" height="1" style="fill:#00f;"/>

            </mask>

            <mask id="whitemask" x="0" y="0" width="1" height="1" maskContentUnits="objectBoundingBox">

                <rect x="0" y="0" width="1" height="1" style="fill:#fff;"/>

            </mask>

        </defs>

        <!-- 显示颜色以演示相对亮度 -->

        <rect x="10" y="10" width="50" height="50" style="fill:#f00;"/>

        <rect x="70" y="10" width="50" height="50" style="fill:#0f0;"/>

        <rect x="130" y="10" width="50" height="50" style="fill:#00f;"/>

        <rect x="190" y="10" width="50" height="50" style="fill:#fff;stroke:black;"/>

        <!-- 用于演示透明度的背景内容 -->

        <rect x="10" y="72" width="250" height="5" style="fill:yellow;" />

        <rect x="10" y="112" width="250" height="5" style="fill:yellow;" />

        <g style="mask:url(#redmask);font-size: 14pt;text-anchor: middle;">

            <circle cx="35" cy="115" r="25" style="fill:black;"/>

            <text x="25" y="80">Red</text>

        </g>

        <g style="mask:url(#greenmask);font-size: 14pt;text-anchor: middle;">

            <circle cx="95" cy="115" r="25" style="fill:black;"/>

            <text x="95" y="80">Green</text>

        </g>

        <g style="mask:url(#bluemask);font-size: 14pt;text-anchor: middle;">

            <circle cx="155" cy="115" r="25" style="fill:black;"/>

            <text x="155" y="80">Blue</text>

        </g>

        <g style="mask:url(#whitemask);font-size: 14pt;text-anchor: middle;">

            <circle cx="215" cy="115" r="25" style="fill:black;"/>

            <text x="215" y="80">White</text>

        </g>

    </svg>
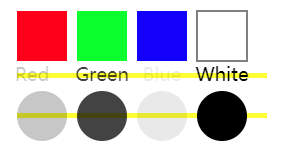
颜色、透明度和最终阿尔法值之间的关系并不直观,如果使用白色填充或者使用白色给遮罩内容描边,则上面公式中前半部分“颜色因子”结果为1,此时不透明度则是控制蒙版阿尔法值的唯一因素。
http://oreillymedia.github.io/svg-essentials-examples/ch10/alpha_opacity_mask.html
<!-- 只使用不透明度的蒙版阿尔法值 -->

    <svg width="500px" height="500px" viewBox="0 0 500 500">

        <defs>

            <mask id="fullmask" x="0" y="0" width="1" height="1" maskContentUnits="objectBoundingBox">

                <rect x="0" y="0" width="1" height="1" style="fill-opacity:1.0;fill:white;" />

            </mask>

            <mask id="three-fourths" x="0" y="0" width="1" height="1" maskContentUnits="objectBoundingBox">

                <rect x="0" y="0" width="1" height="1" style="fill-opacity:0.75;fill:white;" />

            </mask>

            <mask id="one-half" x="0" y="0" width="1" height="1" maskContentUnits="objectBoundingBox">

                <rect x="0" y="0" width="1" height="1" style="fill-opacity:0.5;fill:white;" />

            </mask>

            <mask id="one-fourth" x="0" y="0" width="1" height="1" maskContentUnits="objectBoundingBox">

                <rect x="0" y="0" width="1" height="1" style="fill-opacity:0.25;fill:white;" />

            </mask>

        </defs>

        <g style="font-size: 14pt;text-anchor: middle;fill:black;">

            <g style="mask:url(#fullmask);">

                <circle cx="35" cy="35" r="25" />

                <text x="35" y="80">100%</text>

            </g>

            <g style="mask:url(#three-fourths);">

                <circle cx="95" cy="35" r="25" />

                <text x="95" y="80">75%</text>

            </g>

            <g style="mask:url(#one-half);">

                <circle cx="155" cy="35" r="25" />

                <text x="155" y="80">50%</text>

            </g>

            <g style="mask:url(#one-fourth);">

                <circle cx="215" cy="35" r="25" />

                <text x="215" y="80">25%</text>

            </g>

        </g>

    </svg>

10.3 案例学习:为图形应用蒙版。
<!-- 图形内未应用蒙版的<image> -->

    <svg width="500px" height="500px" viewBox="0 0 500 500">

        <defs>

            <font-face font-family="bakbatn">

                <font-face-url xlink:href="kfont.svg#kfont-defn"/>

            </font-face>

        </defs>

        <!-- 绘制椭圆和文本 -->

        <use xlink:href="kwanghwamun.jpg" x="72" y="92" width="160" height="120" />

    </svg>
解决方案是让照片的边缘淡出,使用径向渐变作为蒙版。下面代码添加到<defs>部分
       <radialGradient id="fade">

                <stop offset="0%" style="stop-color:white;stop-opacity:1.0" />

                <stop offset="85%" style="stop-color:white;stop-opacity:0.5" />

                <stop offset="100%" style="stop-color:white;stop-opacity:0.0" />

            </radialGradient>

            <mask id="fademask" maskContentUnits="objectBoundingBox">

                <rect x="0" y="0" width="1" height="1" style="fill:url(#fade);" / >

            </mask>
然后给<image>标记添加一个蒙版引用:
<image xlink:href="kwanghwamun.jpg" x="72" y="92" width="160" height="120" style="mask:url(#fademask);"/>
o'Reill的SVG精髓(第二版)学习笔记——第十章的更多相关文章
- Docker技术入门与实战 第二版-学习笔记-10-Docker Machine 项目-2-driver
1>使用的driver 1〉generic 使用带有SSH的现有VM/主机创建机器. 如果你使用的是机器不直接支持的provider,或者希望导入现有主机以允许Docker Machine进行管 ...
- Docker技术入门与实战 第二版-学习笔记-8-网络功能network-3-容器访问控制和自定义网桥
1)容器访问控制 容器的访问控制,主要通过 Linux 上的 iptables防火墙来进行管理和实现. iptables是 Linux 上默认的防火墙软件,在大部分发行版中都自带. 容器访问外部网络 ...
- 锋利的jquery第二版学习笔记
jquery系统学习笔记 一.初识:jquery的优势:1.轻量级(压缩后不到30KB)2.强大的选择器(支持css1.css2选择器的全部 css3的大部分 以及一些独创的 加入插件的话还可支持XP ...
- Docker技术入门与实战 第二版-学习笔记-10-Docker Machine 项目-1-cli
Docker Machine 是 Docker 官方编排(Orchestration)项目之一,负责在多种平台上快速安装 Docker 环境 Docker Machine是一种工具,它允许你在虚拟主机 ...
- Docker技术入门与实战 第二版-学习笔记-7-数据管理(volume)
Docker 数据管理 为什么要进行数据管理呢?因为当我们在使用container时,可能会在里面创建一些数据或文件,但是当我们停掉或删除这个容器时,这些数据或文件也会同样被删除,这是我们并不想看见的 ...
- Docker技术入门与实战 第二版-学习笔记-5-容器-命令及限制内存与cpu资源
1.启动容器 启动容器有两种方式: 基于镜像新建一个容器并启动 将在终止状态(stopped)的容器重新启动 1)新建并启动——docker run 比如在启动ubuntu:14.04容器,并输出“H ...
- Docker技术入门与实战 第二版-学习笔记-3-Dockerfile 指令详解
前面已经讲解了FROM.RUN指令,还提及了COPY.ADD,接下来学习其他的指令 5.Dockerfile 指令详解 1> COPY 复制文件 格式: COPY <源路径> .. ...
- Docker技术入门与实战 第二版-学习笔记-6-仓库
仓库(Repository)是集中存放镜像的地方 一个容易混淆的概念是注册服务器(Registry). 实际上注册服务器是管理仓库的具体服务器,每个服务器上可以有多个仓库,而每个仓库下面有多个镜像. ...
- Docker技术入门与实战 第二版-学习笔记-2-镜像构建
3.利用 commit 理解镜像构成 在之前的例子中,我们所使用的都是来自于 Docker Hub 的镜像. 直接使用这些镜像是可以满足一定的需求,而当这些镜像无法直接满足需求时,我们就需要定制这些镜 ...
- Docker技术入门与实战 第二版-学习笔记-10-Docker Machine 项目-3-Command-line completion命令补全
Command-line completion https://docs.docker.com/machine/completion/ Installing Command Completion——实 ...
随机推荐
- (一)安装Python
一.安装python 打开 Python官网,找到“Download”, 在其下拉菜单中选择自己的平台(Windows/Mac),一般的Linux平台已经自带的Python,所以不需要安装,通过打开“ ...
- 深入理解JavaScript系列(30):设计模式之外观模式
介绍 外观模式(Facade)为子系统中的一组接口提供了一个一致的界面,此模块定义了一个高层接口,这个接口值得这一子系统更加容易使用. 正文 外观模式不仅简化类中的接口,而且对接口与调用者也进行了解耦 ...
- 修改K3数据是简介方法
如 及时库存里有个别产品库存没有库位 是*号的 这个时候 我们创建一个其他出库单,把这个没有库位的产品输入进去,库位随便写个 如002 保存,审核不了的 会提示负库存 去后台找到此单据号 修改 ...
- 02.for循环
语法: for(表达式1;表达式2;表达式3) { 循环体; } 练习1: namespace _02.for循环的练习01 { class Program { static void Main(st ...
- 动态网页开发jsp
1.动态网页的优势? ①交互性:即网页会根据用户的要求和选择而动态改变和显示内容. ③自动更新:即无需改变页面代码,便会自动生成新的页面内容. ④随机性:即当不同的时间.不同的人访问 ...
- Spring Chapter4 WebSocket 胡乱翻译 (一) 一个例子
因为没有基础,不知道从哪里入手. 文档里的例子,https://github.com/rstoyanchev/spring-websocket-portfolio,这个除了WebSocket,还整了S ...
- 【学习笔记】使用SQLyog连接MySQL数据库
一.使用SQLyog创建数据库用来管理学生信息 #创建数据库student DROP DATABASE IF EXISTS Myschool; CREATE DATABASE Myschool; #在 ...
- ThreadPoolExecutor(上篇)
Java有两个线程池类:ThreadPoolExecutor和ScheduledThreadPoolExecutor,继承AbstractExecutorService类,AbstractExecut ...
- MCU & 51单片机
- ArcGIS Engine从服务器(ArcSDE geodatabases)读取数据
从远程服务器读取数据进行处理,直接贴代码: public class ConnectDB { private static String SERVER = "xxx.xxx.xxx.xxx& ...