Django3.0 异步通信初体验(小结)
2019年12月2日,Django终于正式发布了3.0版本。怀着无比的期待,我们来尝试一下吧!
(附ASGI官方文档地址:https://asgi.readthedocs.io/en/latest/extensions.html)
一、创建Django3工程

利用Pycharm的方便,直接通过virtualenv创建虚拟环境,并安装Django3.0。
打开控制台,看看都安装了哪些库:
(venv) D:\work\for_test\django3>pip list

Package  Version

------

asgiref  3.2.3

Django   3.0

pip    10.0.1

pytz    2019.3

setuptools 39.1.0

sqlparse  0.3.0
除了pytz和sqlparse,又自动安装了asgiref。
asigref由Django软件基金会开发和维护,是一个Django生态中的库。
先启动一下服务器,看看Django是否正常运行:
没毛病,可以把服务器关了!
二、学习官方文档
毕竟是非常重要和复杂的新特性,先到官网取取经,看看文档怎么写的。
找了一圈,What?就这么点东西?
先康康吧。
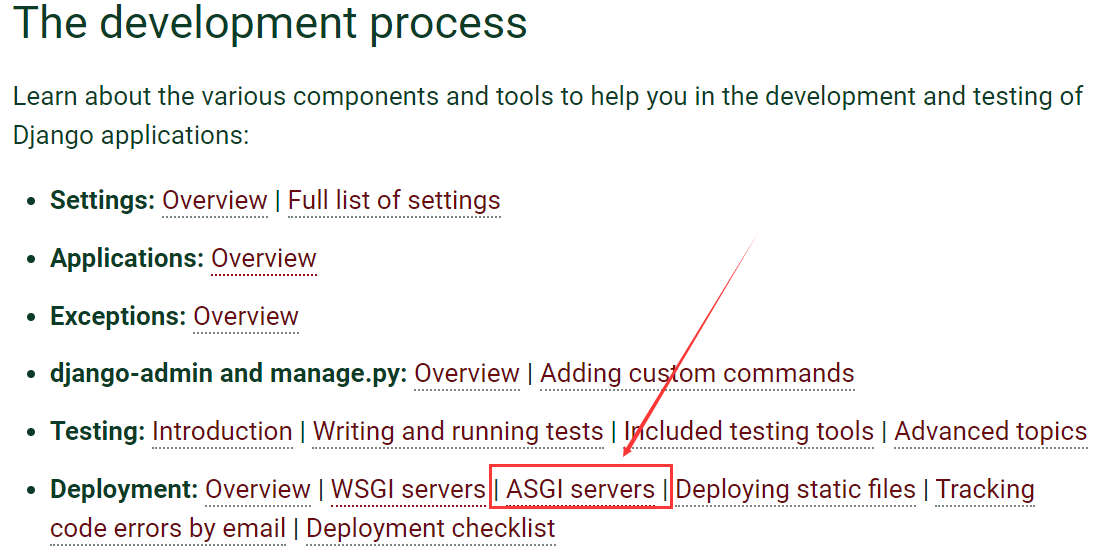
How to deploy with ASGI

As well as WSGI, Django also supports deploying on ASGI, the emerging Python standard for asynchronous web servers and applications.

Django's startproject management command sets up a default ASGI configuration for you, which you can tweak as needed for your project, and direct any ASGI-compliant application server to use.

Django includes getting-started documentation for the following ASGI servers:

How to use Django with Daphne

How to use Django with Uvicorn

The application object

Like WSGI, ASGI has you supply an application callable which the application server uses to communicate with your code. It's commonly provided as an object named application in a Python module accessible to the server.

The startproject command creates a file <project_name>/asgi.py that contains such an application callable.

It's not used by the development server (runserver), but can be used by any ASGI server either in development or in production.

ASGI servers usually take the path to the application callable as a string; for most Django projects, this will look like myproject.asgi:application.

Warning

While Django's default ASGI handler will run all your code in a synchronous thread, if you choose to run your own async handler you must be aware of async-safety.

Do not call blocking synchronous functions or libraries in any async code. Django prevents you from doing this with the parts of Django that are not async-safe, but the same may not be true of third-party apps or Python libraries.

Configuring the settings module

When the ASGI server loads your application, Django needs to import the settings module — that's where your entire application is defined.

Django uses the DJANGO_SETTINGS_MODULE environment variable to locate the appropriate settings module. It must contain the dotted path to the settings module. You can use a different value for development and production; it all depends on how you organize your settings.

If this variable isn't set, the default asgi.py sets it to mysite.settings, where mysite is the name of your project.

Applying ASGI middleware

To apply ASGI middleware, or to embed Django in another ASGI application, you can wrap Django's application object in the asgi.py file. For example:

from some_asgi_library import AmazingMiddleware

application = AmazingMiddleware(application)
文档短小无力,内容稀少!
总结就以下几点:
- 不能用python manage.py runserver的方式启动ASGI服务器,这只会启动传统的、默认的WSGI服务器,也就是老版本的东西
- 要启动ASGI服务器,你需要使用Daphne或者Uvicorn。推荐使用Daphne,这是Django软件基金会开发的一个基于ASGI (HTTP/WebSocket)的服务器。
- 有一个myproject.asgi:application文件,是ASGI通信的接口,Django默认自带
- 你可以配置DJANGO_SETTINGS_MODULE 环境,或者使用默认的your_project.settings
- 可以使用第三方ASGI中间件
再简单粗暴点,全文的意思是,你需要安装Daphne,然后调用Django的application来启动ASGI服务器。
好吧,我们看看Daphne,点击Django给的连接,跳转到相关页面,内容更少:
How to use Django with Daphne

Daphne is a pure-Python ASGI server for UNIX, maintained by members of the Django project. It acts as the reference server for ASGI.

Installing Daphne

You can install Daphne with pip:

python -m pip install daphne

Running Django in Daphne

When Daphne is installed, a daphne command is available which starts the Daphne server process. At its simplest, Daphne needs to be called with the location of a module containing an ASGI application object, followed by what the application is called (separated by a colon).

For a typical Django project, invoking Daphne would look like:

daphne myproject.asgi:application

This will start one process listening on 127.0.0.1:. It requires that your project be on the Python path; to ensure that run this command from the same directory as your manage.py file.
翻译过来就是:
- pip安装daphne
- 执行daphne myproject.asgi:application命令,启动ASGI服务器
- 浏览器访问127.0.0.1:8000
咱们照做!
三、启动ASGI服务器
通过pip install daphne即可安装最新版本的daphne:
Collecting pycparser (from cffi!=1.11.,>=1.8->cryptography>=2.7->autobahn>=0.18->daphne)

Installing collected packages: idna, hyperlink, zope.interface, attrs, six, Automat, constantly, PyHamcrest, incremental, pycparser, cffi, cry

ptography, pyopenssl, pyasn1, pyasn1-modules, service-identity, twisted, txaio, autobahn, daphne

Successfully installed Automat-0.8. PyHamcrest-1.9. attrs-19.3. autobahn-19.11. cffi-1.13. constantly-15.1. cryptography-2.8 daphne-2.4.

 hyperlink-19.0. idna-2.8 incremental-17.5. pyasn1-0.4. pyasn1-modules-0.2. pycparser-2.19 pyopenssl-19.1. service-identity-18.1. six-

.13.0 twisted-19.10. txaio-18.8. zope.interface-4.7.
为了安装daphne,需要额外安装这么多依赖包!我们再pip list看一下:
(venv) D:\work\for_test\django3>pip list

Package     Version

---------------- -------

asgiref     3.2.

attrs      19.3.

autobahn     19.11.

Automat     0.8.

cffi       1.13.

constantly    15.1.

cryptography   2.8

daphne      2.4.

Django      3.0

hyperlink    19.0.

idna       2.8

incremental   17.5.

pip       10.0.

pyasn1      0.4.

pyasn1-modules  0.2.

pycparser    2.19

PyHamcrest    1.9.

pyOpenSSL    19.1.

pytz       2019.3

service-identity 18.1.

setuptools    39.1.

six       1.13.

sqlparse     0.3.

Twisted     19.10.

txaio      18.8.

zope.interface  4.7.
不管了,就当没看见。
安装成功后,我们会获得一个daphne可执行命令,下面我们来启动服务器吧。
执行daphne django3.asgi:application命令。(将其中的django3换成你的工程名字,在manage.py文件所在的路径下执行)
(venv) D:\work\for_test\django3>daphne django3.asgi:application

-- ::, INFO   Starting server at tcp:port=:interface=127.0.0.1

-- ::, INFO   HTTP/ support not enabled (install the http2 and tls Twisted extras)

-- ::, INFO   Configuring endpoint tcp:port=:interface=127.0.0.1

-- ::, INFO   Listening on TCP address 127.0.0.1:
当然,我们也是可以指定ip和port等参数的,详细请学习daphne文档https://pypi.org/project/daphne/
读一下人家的启动信息:
- 默认启动地址是127.0.0.1:8000
- 没有开启HTTP/2的支持(需要安装额外的包)
- 配置了端点,开始监听端口
Nice,通过浏览器来访问一下吧!
依然是熟悉的白底火箭图!图片我就不贴了,看起来没问题。
可是,这是基于HTTP的同步通信,还不是异步请求!让我们尝试一下websocket吧!
四、尝试Websocket
浏览器中按F12进入‘坦克模式',再进入console控制台,尝试发送一个Websocket请求:

忽视前面的css问题,重点在于这个ws请求,居然无法建立连接!返回状态码500,也就是服务器错误!
再看看Pycharm后台的信息:
127.0.0.1: - - [/Dec/:::] "WSCONNECTING /" - -

-- ::, ERROR  Exception inside application: Django can only handle ASGI/HTTP connections, not websocket.

 File "d:\work\for_test\django3\venv\lib\site-packages\daphne\cli.py", line , in asgi

  await self.app(scope, receive, send)

 File "d:\work\for_test\django3\venv\lib\site-packages\django\core\handlers\asgi.py", line , in __call__

  % scope['type']

 Django can only handle ASGI/HTTP connections, not websocket.

127.0.0.1: - - [/Dec/:::] "WSDISCONNECT /" - -
重点在这句Django can only handle ASGI/HTTP connections, not websocket.
什么?Django不支持Websocket?说好的ASGI,说好的全双工异步通信呢?
难道是我哪里搞错了?不行,我得看看源码去!
五、Django3.0源码
一路点点点,翻了个遍,发现Django3.0与之前的2.2关于ASGI的区别就是多了下面两个文件:

django.core.asgi很简单,一看就懂,不多说:
import django

from django.core.handlers.asgi import ASGIHandler

def get_asgi_application():

  django.setup(set_prefix=False)

  return ASGIHandler()
关键是django.core.handlers.asgi这个文件,不到300行,总共就2个类,代码就不贴了:
- ASGIRequest:继承了HttpRequest类,一看就知道是构造请求对象
- ASGIHandler:继承了base.BaseHandler,这个就类似WSGIHandler,用于具体处理ASGI请求
让我们看看它的其中一段代码:
# Serve only HTTP connections.

# FIXME: Allow to override this.

if scope['type'] != 'http':

  raise ValueError(

    'Django can only handle ASGI/HTTP connections, not %s.'

    % scope['type']

  )
这就是我们前面在浏览器中发送ws请求,但是无法建立连接的原因!
如果scope的type属性不是http,那么弹出ValueError异常,并提示不支持该类连接!
再看看人家写的注释,明明白白的写着Serve only HTTP connections. FIXME: Allow to override this.。翻译过来就是只支持HTTP连接,请自己重写这部分内容修复这个缺陷。FIXME!FIXME!
好吧,我承认白高兴了一场。
六、总结
与Django3.0关于异步通信的初体验很不好,有下面几点猜测:
- 可能我水平不行,不会用Django
- 可能不是通过Websocket,而是别的手段与ASGI通信
- Django真的目前只提供了个接口,内部实现还没做
由于相关资料太少,多方查找,据说:
- Django会在后续的版本陆续实现完整的原生的异步通信能力,从同步机制切换到可兼容的异步机制
- 目前3.0阶段,要与websocket通信依然得通过django-channel库,还不是原生支持
#### 此文为转载,原帖地址https://www.cnblogs.com/django-dev/p/11981970.html
Django3.0 异步通信初体验(小结)的更多相关文章
- Django3.0 异步通信初体验
此前博主曾经写过一篇博文,介绍了Django3.0的新特性,其中最主要的就是加入对ASGI的支持,实现全双工的异步通信. 2019年12月2日,Django终于正式发布了3.0版本.怀着无比的期待,我 ...
- Spark2.1.0——Spark初体验
学习一个工具的最好途径,就是使用它.这就好比<极品飞车>玩得好的同学,未必真的会开车,要学习车的驾驶技能,就必须用手触摸方向盘.用脚感受刹车与油门的力道.在IT领域,在深入了解一个系统的原 ...
- selenium 3.0 beta2 初体验
经过漫长的等待,终于迎来了selenium 3.0 从selenium 1.0 至今,差不多有十多年的历史.这个月终于迎来了selenium3.0 那么selenium3.0 为我们带来了什么? 看一 ...
- thinkPHP5.0.22初体验---路由,url访问
“豪情卷起万重浪,吼吼哈哈-”一学thinkPHP才知道这是个国内研究的php web开发框架,瞬间自豪感如电流一般传遍全身 这就不多不说说 一.控制器 所谓MVC编程,无外乎函数(sometimes ...
- vue-cli3.0 gui初体验
为什么80%的码农都做不了架构师?>>> 介绍 新版的vuecli3.0提供了一个vue ui这个命令,这个命令是做什么的呢,这里引用官网的一段介绍 vue ui 你可以通过 v ...
- Axure RP 8.0 中继器初体验
为了解决增删等复杂交互的问题,中继器是个不错的选择. 拖拽出一个默认的中继器 中继器的数据集感觉就像是数据库一样,在右边检视窗口中可以看到中继器的默认数据集,可以理解成一张二维表.默认有1列,现成的3 ...
- thinkPHP5.0.22初体验---request相关用法
如果浏览器要返回美观排列的json数据,可以安装火狐浏览器的插件 返回XML的数据格式 渲染模板的用法 return $this->fetch('index/index2')效果 扒掉stirp ...
- ASP.NET2.0组件控件开发视频 初体验
原文:ASP.NET2.0组件控件开发视频 初体验 ASP.NET2.0组件控件开发视频 初体验 录了视频,质量不是很好,大家体验下.我会重新录制的 如果不清楚,可以看看http://v.youku. ...
- vue.js2.0 自定义组件初体验
理解 组件(Component)是 Vue.js 最强大的功能之一.组件可以扩展 HTML 元素,封装可重用的代码.在较高层面上,组件是自定义元素, Vue.js 的编译器为它添加特殊功能.在有些情况 ...
随机推荐
- solr数据操作
本文介绍solr的基本数据操作,基于solr 8.2.solr支持多种数据格式,包括XML,JSON,CSV等,并提供多种脚本和工具来操作数据.本文讲解curl请求和JSON数据格式的处理方式. 本文 ...
- day20190916notes
记得学完知识,趁热打铁.认真看3遍,写抄写模仿3遍.记不得,就罚抄3遍.奖罚分明.自知之明.最重要的是看懂和理解代码.能自己看懂代码,多花时间和功夫. 只要功夫深,铁杵磨成针.确定一个努力的方向,坚持 ...
- Batch Normalization详解
目录 动机 单层视角 多层视角 什么是Batch Normalization Batch Normalization的反向传播 Batch Normalization的预测阶段 Batch Norma ...
- js前端数据验证JS工具
var regexEnum = { intege : "^-?[1-9]\\d*$", // 整数 intege1 : "^[1-9]\\d*$", // 正整 ...
- zz:NETCONF协议详解
随着SDN的大热,一个诞生了十年之久的协议焕发了第二春,它就是NETCONF协议.如果你在两年前去搜索NETCONF协议,基本得到的信息都是"这个协议是一个网管协议,主要目的是弥补SNMP协 ...
- KETTLE实现复杂的流程
KETTLE是一款将数据从来源端经过抽取(extract).转换(transform).加载(load)至目的端的非常好用的一款ETL工具.学会它,对于跨数据库的表处理或者定时生成文本,excel等常 ...
- oracle开启关闭日志归档
oracle归档日志开启之后,会产生大量的日志,需要定时清理以及不重要的数据库可以不开启归档模式,下面介绍一下oracle归档开启.关闭以及日志的删除:一.oracle归档日志开启及关闭1.登录服务端 ...
- JDBC技术对数据库进行操作
什么是 JDBC: • JDBC(Java DataBase Connectivity)java 数据库连接 • 是 JavaEE 平台下的技术规范 • 定义了在 Java 语言中连接数据,执行 SQ ...
- LightOJ1355 Game Of CS(green 博弈)
Jolly and Emily are two bees studying in Computer Science. Unlike other bees they are fond of playin ...
- hdu2546
Problem Description 电子科大本部食堂的饭卡有一种很诡异的设计,即在购买之前判断余额.如果购买一个商品之前,卡上的剩余金额大于或等于5元,就一定可以购买成功(即使购买后卡上余额为负) ...