
Apache2 在Linux环境下的安装
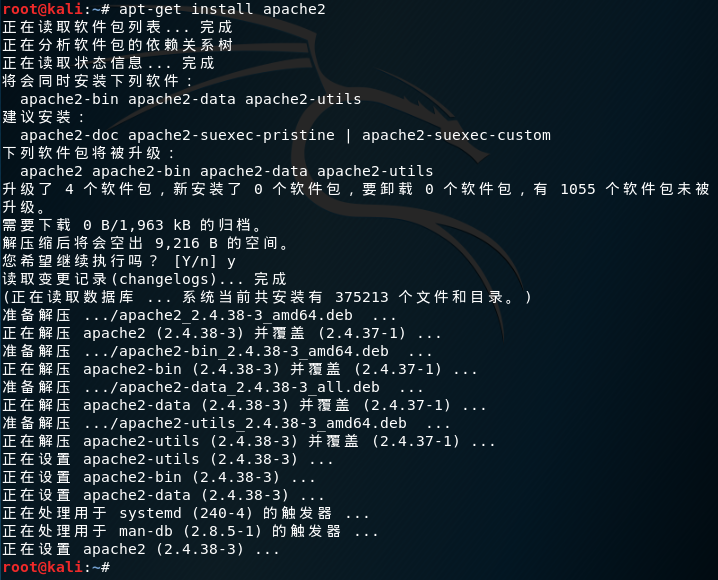
安装Apache2:
apt-get install apache2
启动Apache2服务:
service apache2 start
在终端运行启动后,打开浏览器URL访问 http://localhost/ 或 127.0.0.1
显示的网页就是Apache2 Web Server 默认页[It works],由此可以断定Apache2 Web服务器正在运行

Apache的默认网页位于:/var/www/html/index.html ;可以通过编辑index.html文件提供想要的任何信息,可以通过更改文件代码改变html页面的显示方式和内容
<!DOCTYPE html PUBLIC "-//W3C//DTD XHTML 1.0 Transitional//EN" "http://www.w3.org/TR/xhtml1/DTD/xhtml1-transitional.dtd">

<html xmlns="http://www.w3.org/1999/xhtml">

  <head>

    <meta http-equiv="Content-Type" content="text/html; charset=UTF-8" />

    <title>Apache2 Debian Default Page: It works</title>

    <style type="text/css" media="screen">

  * {

    margin: 0px 0px 0px 0px;

    padding: 0px 0px 0px 0px;

  }

  body, html {

    padding: 3px 3px 3px 3px;

    background-color: #D8DBE2;

    font-family: Verdana, sans-serif;

    font-size: 11pt;

    text-align: center;

  }

  div.main_page {

    position: relative;

    display: table;

    width: 800px;

    margin-bottom: 3px;

    margin-left: auto;

    margin-right: auto;

    padding: 0px 0px 0px 0px;

    border-width: 2px;

    border-color: #212738;

    border-style: solid;

    background-color: #FFFFFF;

    text-align: center;

  }

  div.page_header {

    height: 99px;

    width: 100%;

    background-color: #F5F6F7;

  }

  div.page_header span {

    margin: 15px 0px 0px 50px;

    font-size: 180%;

    font-weight: bold;

  }

  div.page_header img {

    margin: 3px 0px 0px 40px;

    border: 0px 0px 0px;

  }

  div.table_of_contents {

    clear: left;

    min-width: 200px;

    margin: 3px 3px 3px 3px;

    background-color: #FFFFFF;

    text-align: left;

  }

  div.table_of_contents_item {

    clear: left;

    width: 100%;

    margin: 4px 0px 0px 0px;

    background-color: #FFFFFF;

    color: #000000;

    text-align: left;

  }

  div.table_of_contents_item a {

    margin: 6px 0px 0px 6px;

  }

  div.content_section {

    margin: 3px 3px 3px 3px;

    background-color: #FFFFFF;

    text-align: left;

  }

  div.content_section_text {

    padding: 4px 8px 4px 8px;

    color: #000000;

    font-size: 100%;

  }

  div.content_section_text pre {

    margin: 8px 0px 8px 0px;

    padding: 8px 8px 8px 8px;

    border-width: 1px;

    border-style: dotted;

    border-color: #000000;

    background-color: #F5F6F7;

    font-style: italic;

  }

  div.content_section_text p {

    margin-bottom: 6px;

  }

  div.content_section_text ul, div.content_section_text li {

    padding: 4px 8px 4px 16px;

  }

  div.section_header {

    padding: 3px 6px 3px 6px;

    background-color: #8E9CB2;

    color: #FFFFFF;

    font-weight: bold;

    font-size: 112%;

    text-align: center;

  }

  div.section_header_red {

    background-color: #CD214F;

  }

  div.section_header_grey {

    background-color: #9F9386;

  }

  .floating_element {

    position: relative;

    float: left;

  }

  div.table_of_contents_item a,

  div.content_section_text a {

    text-decoration: none;

    font-weight: bold;

  }

  div.table_of_contents_item a:link,

  div.table_of_contents_item a:visited,

  div.table_of_contents_item a:active {

    color: #000000;

  }

  div.table_of_contents_item a:hover {

    background-color: #000000;

    color: #FFFFFF;

  }

  div.content_section_text a:link,

  div.content_section_text a:visited,

   div.content_section_text a:active {

    background-color: #DCDFE6;

    color: #000000;

  }

  div.content_section_text a:hover {

    background-color: #000000;

    color: #DCDFE6;

  }

  div.validator {

  }

    </style>

  </head>

  <body>

    <div class="main_page">

      <div class="page_header floating_element">

        <img src="/icons/openlogo-75.png" alt="Debian Logo" class="floating_element"/>

        <span class="floating_element">

          Apache2 Debian Default Page

        </span>

      </div>

<!--      <div class="table_of_contents floating_element">

        <div class="section_header section_header_grey">

          TABLE OF CONTENTS

        </div>

        <div class="table_of_contents_item floating_element">

          <a href="#about">About</a>

        </div>

        <div class="table_of_contents_item floating_element">

          <a href="#changes">Changes</a>

        </div>

        <div class="table_of_contents_item floating_element">

          <a href="#scope">Scope</a>

        </div>

        <div class="table_of_contents_item floating_element">

          <a href="#files">Config files</a>

        </div>

      </div>

-->

      <div class="content_section floating_element">

        <div class="section_header section_header_red">

          <div id="about"></div>

          It works!

        </div>

        <div class="content_section_text">

          <p>

                This is the default welcome page used to test the correct

                operation of the Apache2 server after installation on Debian systems.

                If you can read this page, it means that the Apache HTTP server installed at

                this site is working properly. You should <b>replace this file</b> (located at

                <tt>/var/www/html/index.html</tt>) before continuing to operate your HTTP server.

          </p>

          <p>

                If you are a normal user of this web site and don't know what this page is

                about, this probably means that the site is currently unavailable due to

                maintenance.

                If the problem persists, please contact the site's administrator.

          </p>

        </div>

        <div class="section_header">

          <div id="changes"></div>

                Configuration Overview

        </div>

        <div class="content_section_text">

          <p>

                Debian's Apache2 default configuration is different from the

                upstream default configuration, and split into several files optimized for

                interaction with Debian tools. The configuration system is

                <b>fully documented in

                /usr/share/doc/apache2/README.Debian.gz</b>. Refer to this for the full

                documentation. Documentation for the web server itself can be

                found by accessing the <a href="/manual">manual</a> if the <tt>apache2-doc</tt>

                package was installed on this server.

          </p>

          <p>

                The configuration layout for an Apache2 web server installation on Debian systems is as follows:

          </p>

          <pre>

/etc/apache2/

|-- apache2.conf

|       `--  ports.conf

|-- mods-enabled

|       |-- *.load

|       `-- *.conf

|-- conf-enabled

|       `-- *.conf

|-- sites-enabled

|       `-- *.conf

          </pre>

          <ul>

                        <li>

                           <tt>apache2.conf</tt> is the main configuration

                           file. It puts the pieces together by including all remaining configuration

                           files when starting up the web server.

                        </li>

                        <li>

                           <tt>ports.conf</tt> is always included from the

                           main configuration file. It is used to determine the listening ports for

                           incoming connections, and this file can be customized anytime.

                        </li>

                        <li>

                           Configuration files in the <tt>mods-enabled/</tt>,

                           <tt>conf-enabled/</tt> and <tt>sites-enabled/</tt> directories contain

                           particular configuration snippets which manage modules, global configuration

                           fragments, or virtual host configurations, respectively.

                        </li>

                        <li>

                           They are activated by symlinking available

                           configuration files from their respective

                           *-available/ counterparts. These should be managed

                           by using our helpers

                           <tt>

                                a2enmod,

                                a2dismod,

                           </tt>

                           <tt>

                                a2ensite,

                                a2dissite,

                            </tt>

                                and

                           <tt>

                                a2enconf,

                                a2disconf

                           </tt>. See their respective man pages for detailed information.

                        </li>

                        <li>

                           The binary is called apache2. Due to the use of

                           environment variables, in the default configuration, apache2 needs to be

                           started/stopped with <tt>/etc/init.d/apache2</tt> or <tt>apache2ctl</tt>.

                           <b>Calling <tt>/usr/bin/apache2</tt> directly will not work</b> with the

                           default configuration.

                        </li>

          </ul>

        </div>

        <div class="section_header">

            <div id="docroot"></div>

                Document Roots

        </div>

        <div class="content_section_text">

            <p>

                By default, Debian does not allow access through the web browser to

                <em>any</em> file apart of those located in <tt>/var/www</tt>,

                <a href="http://httpd.apache.org/docs/2.4/mod/mod_userdir.html" rel="nofollow">public_html</a>

                directories (when enabled) and <tt>/usr/share</tt> (for web

                applications). If your site is using a web document root

                located elsewhere (such as in <tt>/srv</tt>) you may need to whitelist your

                document root directory in <tt>/etc/apache2/apache2.conf</tt>.

            </p>

            <p>

                The default Debian document root is <tt>/var/www/html</tt>. You

                can make your own virtual hosts under /var/www. This is different

                to previous releases which provides better security out of the box.

            </p>

        </div>

        <div class="section_header">

          <div id="bugs"></div>

                Reporting Problems

        </div>

        <div class="content_section_text">

          <p>

                Please use the <tt>reportbug</tt> tool to report bugs in the

                Apache2 package with Debian. However, check <a

                href="http://bugs.debian.org/cgi-bin/pkgreport.cgi?ordering=normal;archive=0;src=apache2;repeatmerged=0"

                rel="nofollow">existing bug reports</a> before reporting a new bug.

          </p>

          <p>

                Please report bugs specific to modules (such as PHP and others)

                to respective packages, not to the web server itself.

          </p>

        </div>

      </div>

    </div>

    <div class="validator">

    </div>

  </body>

</html>
index.html 默认内容
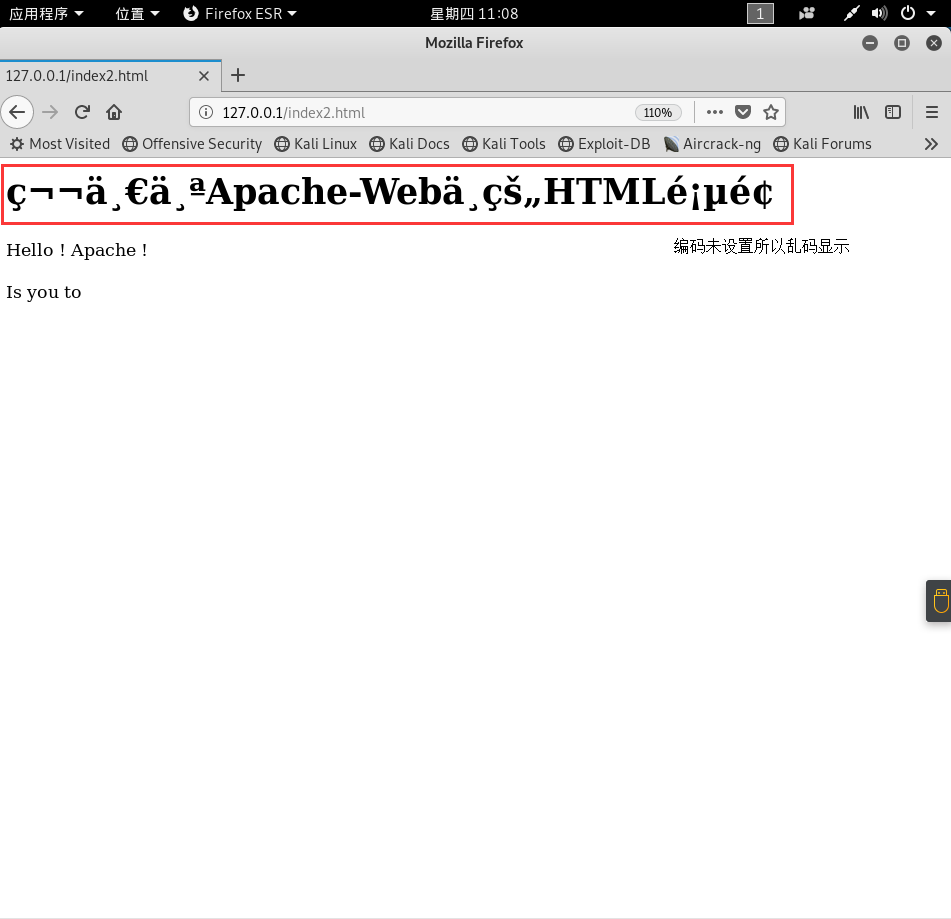
若是想让浏览器浏览我们想要的HTML内容,可以在该目录下添加新的HTML文件【添加新的HTML网页】:
<! index2.html >
<html>

    <body>

        <h1> 第一个Apache-Web中的HTML页面 </h1>

        <p> Hello ! Apache ! </p>

        <p> Is you to </p>

    </body>

</html>
然后打开浏览器,访问 http://localhost/ 或 127.0.0.1 并没有看见自己的网站,依旧是apache默认的网页,这是因为index.html是默认第一加载的页面,此时的真实完整的URL是: http://localhost/index.html ;若想访问自己添加的页面,则需要改变URL:http://localhost/index2.html
`
——————
至此,Apache的简单安装运行介绍完毕!
如果需要关闭服务:service apache2 stop
如果需要重启服务:serivce apache2 restart
Apache2 在Linux环境下的安装的更多相关文章
- 全世界最详细的图形化VMware中linux环境下oracle安装(二)【weber出品必属精品】
<ORACLE 10.2.05版本的升级补丁安装> 首先我们解压 $ unzip p8202632_10205_LINUX.zip 解压后我们会发现多出了个文件夹,他是:Disk1,进入D ...
- 全世界最详细的图形化VMware中linux环境下oracle安装(一)【weber出品必属精品】
安装流程:前期准备工作--->安装ORACLE软件--->安装升级补丁--->安装odbc创建数据库--->安装监听器--->安装EM <前期准备工作> 安装 ...
- Linux 环境下 Lua 安装(转)
系统环境:CentOS-6.2-x86_64. Lua 是嵌入式脚本语言,应用场景很广泛. 引自官网:Lua is used in many products and projects around ...
- 基础--Redis在Linux环境下的安装
1. 安装redis服务 1.1 检查安装依赖程序 yum install gcc-c++yum install -y tclyum install wget 1.1.1 下载redis安装包 (或者 ...
- LINUX环境下SVN安装与配置(利用钩子同步开发环境与测试环境)
安装采用YUM一键安装: 1.环境Centos 6.6 2.安装svnyum -y install subversion 3.配置 建立版本库目录mkdir /www/svndata svnserve ...
- Linux环境下mysql安装并配置远程访问
环境:centOS 1.下载mysql安装文件 [root@localhost ~]# wget http://dev.mysql.com/get/mysql-community-release-el ...
- linux环境下redis安装
本篇文章主要说明的是Linux环境下redis数据库的安装: 首先进入目标目录: 下载安装包,执行命令: wget http://download.redis.io/releases/redis-4. ...
- Linux环境下Oracle安装参数设置
前面讲了虚拟机的设置和OracleLinux的安装,接下来我们来说下Oracle安装前的准备工作.1.系统信息查看系统信息查看首先服务器ip:192.168.8.120服务器系统:Oracle Lin ...
- Redis在linux环境下的安装
下载Redis安装包 wget http://download.redis.io/releases/redis-3.2.9.tar.gz 解压Redis安装包 tar -zxvf redis-3.2. ...
随机推荐
- Linux系统彻底卸载MySQL数据库
一.首先查询系统是否安装了MySQL rpm -qa | grep -i mysql 输出结果表示,我安装的MySQL Server,Client都是5.6.44的,因为我系统支持的版本是要5.7+的 ...
- 分析Jackson的安全漏洞CVE-2019-12086
CVE-2019-12086 Description A Polymorphic Typing issue was discovered in FasterXML jackson-databind 2 ...
- Spring Boot 2 单元测试
开发环境:IntelliJ IDEA 2019.2.2Spring Boot版本:2.1.8 IDEA新建一个Spring Boot项目后,pom.xml默认包含了Web应用和单元测试两个依赖包.如下 ...
- SQL Server 通过游标重新定义单据数据的单据编号
DECLARE @Index INTSET @Index=100DECLARE UpdateCursor CURSOR FOR (SELECT DISTINCT AA.Id FROM dbo.表 ...
- 005 C/C++ 数据类型_void
1.void的字面意思是'无类型'.void * 是无类型指针,void * 可以指向任何类型的数据. 2.数据类型的分装: int InitHardEnv(void ** handle); 典型的内 ...
- WebScraper for Mac(网站数据抓取软件) 4.10.2
WebScraper Mac版是一款Mac平台上通过使用将数据导出为JSON或CSV的简约应用程序,WebScraper Mac版可以快速提取与某个网页(包括文本内容)相关的信息.WebScraper ...
- AcWing 46. 二叉搜索树的后序遍历序列
地址 https://www.acwing.com/solution/acwing/content/3959/ 题目描述输入一个整数数组,判断该数组是不是某二叉搜索树的后序遍历的结果. 如果是则返回t ...
- 算法问题实战策略 BOARDCOVER
地址 https://algospot.com/judge/problem/read/BOARDCOVER 解法 DFS 最近似乎在简单DFS上花费太多时间了 首先扫描地图 统计可覆盖的元素个数 如果 ...
- eclipse拉取git项目 Read timed out after 30,000 ms
点击 eclipse -> Window -> Preferences -> Team ->git 在git选项里有Remote connection timeout ,默 ...
- 【2019.8.20 NOIP模拟赛 T3】小X的图(history)(可持久化并查集)
可持久化并查集 显然是可持久化并查集裸题吧... 就是题面长得有点恶心,被闪指导狂喷. 对于\(K\)操作,直接\(O(1)\)赋值修改. 对于\(R\)操作,并查集上直接连边. 对于\(T\)操作, ...