spring boot:spring security+oauth2+sso+jwt实现单点登录(spring boot 2.3.3)
一,sso的用途 ?
1,如果有多个应用系统,用户只需要登录一次就可以访问所有相互信任的应用系统。
不需要每次输入用户名称和用户密码,
也不需要创建并记忆多套用户名称和用户密码。
2,系统管理员只需维护一套统一的用户账号,方便、简单。
而不必管理很多套的用户账号。
3, 如果需要开发新的应用系统,可以直接使用单点登录平台的用户认证服务,简化开发流程。
4,oauth和sso的区别:
oauth2解决的是服务提供方(微信等)给第三方应用授权的问题,
sso解决的是大型系统中各个子系统如何共享登陆状态的问题
说明:刘宏缔的架构森林是一个专注架构的博客,地址:https://www.cnblogs.com/architectforest
对应的源码可以访问这里获取: https://github.com/liuhongdi/
说明:作者:刘宏缔 邮箱: 371125307@qq.com
二,演示项目的相关信息
1,项目地址:
https://github.com/liuhongdi/securityssojwt
2,功能说明:
演示了基于oauth2实现sso
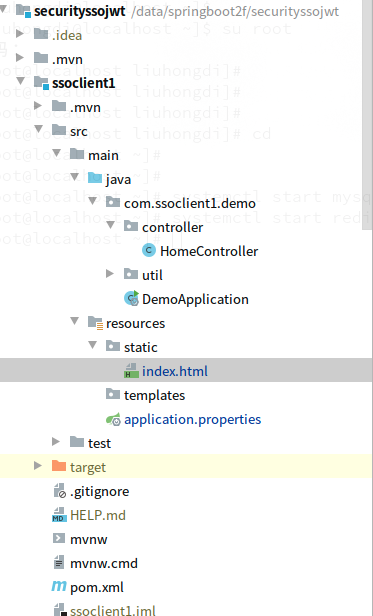
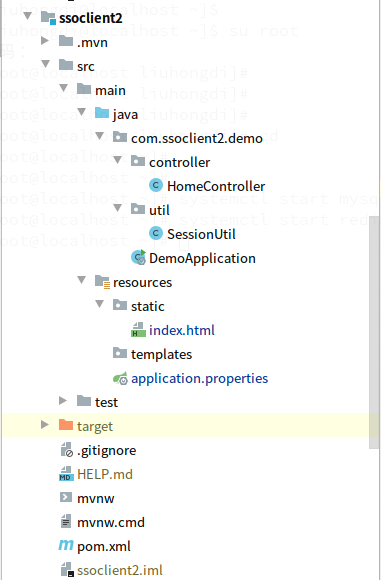
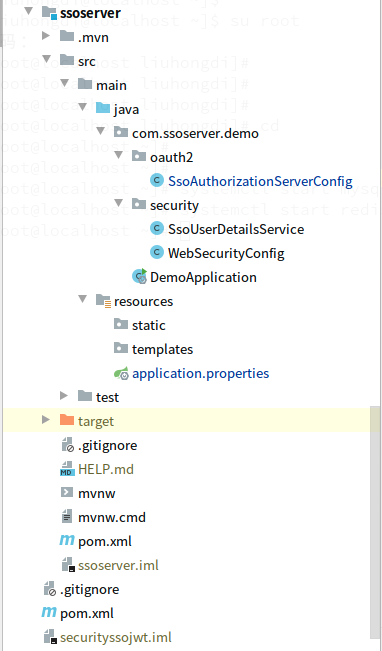
3,项目结构:如图:
三,配置文件说明
1,ssoserver的 pom.xml
        <dependency>

            <groupId>org.springframework.boot</groupId>

            <artifactId>spring-boot-starter-web</artifactId>

        </dependency>

       <!--security-->

        <dependency>

            <groupId>org.springframework.boot</groupId>

            <artifactId>spring-boot-starter-security</artifactId>

        </dependency>

        <!--oauth2-->

        <dependency>

<groupId>org.springframework.security.oauth</groupId>

            <artifactId>spring-security-oauth2</artifactId>

            <version>2.5.0.RELEASE</version>

        </dependency>

        <!--jwt-->

        <dependency>

            <groupId>org.springframework.security</groupId>

            <artifactId>spring-security-jwt</artifactId>

            <version>1.1.1.RELEASE</version>

        </dependency>

        <!--jaxb-->

        <dependency>

            <groupId>javax.xml.bind</groupId>

            <artifactId>jaxb-api</artifactId>

            <version>2.3.0</version>

        </dependency>

        <dependency>

            <groupId>com.sun.xml.bind</groupId>

            <artifactId>jaxb-impl</artifactId>

            <version>2.3.0</version>

        </dependency>

        <dependency>

            <groupId>com.sun.xml.bind</groupId>

            <artifactId>jaxb-core</artifactId>

            <version>2.3.0</version>

        </dependency>

        <dependency>

            <groupId>javax.activation</groupId>

            <artifactId>activation</artifactId>

            <version>1.1.1</version>

        </dependency>
2,ssoclient1的 pom.xml
        <dependency>

            <groupId>org.springframework.boot</groupId>

            <artifactId>spring-boot-starter-web</artifactId>

        </dependency>

        <!--security-->

        <dependency>

            <groupId>org.springframework.boot</groupId>

            <artifactId>spring-boot-starter-security</artifactId>

        </dependency>

        <!--oauth2-->

        <dependency><groupId>org.springframework.security.oauth</groupId>

            <artifactId>spring-security-oauth2</artifactId>

            <version>2.5.0.RELEASE</version>

        </dependency>

        <!--jwt-->

        <dependency>

            <groupId>org.springframework.security</groupId>

            <artifactId>spring-security-jwt</artifactId>

            <version>1.1.1.RELEASE</version>

        </dependency>

        <!--oauth2 autoconfigure-->

        <dependency>

<groupId>org.springframework.security.oauth.boot</groupId>

            <artifactId>spring-security-oauth2-autoconfigure</artifactId>

            <version>2.3.3.RELEASE</version>

        </dependency>
3,ssoclient2的 pom.xml
        <dependency>

            <groupId>org.springframework.boot</groupId>

            <artifactId>spring-boot-starter-web</artifactId>

        </dependency>

        <!--security-->

        <dependency>

            <groupId>org.springframework.boot</groupId>

            <artifactId>spring-boot-starter-security</artifactId>

        </dependency>

        <!--oauth2-->

        <dependency><groupId>org.springframework.security.oauth</groupId>

            <artifactId>spring-security-oauth2</artifactId>

            <version>2.5.0.RELEASE</version>

        </dependency>

        <!--jwt-->

        <dependency>

            <groupId>org.springframework.security</groupId>

            <artifactId>spring-security-jwt</artifactId>

            <version>1.1.1.RELEASE</version>

        </dependency>

        <!--oauth2 autoconfigure-->

        <dependency>

<groupId>org.springframework.security.oauth.boot</groupId>

            <artifactId>spring-security-oauth2-autoconfigure</artifactId>

            <version>2.3.3.RELEASE</version>

        </dependency>
4,ssoserver的application.properties
server.port = 8080

server.servlet.context-path = /server

spring.security.user.password=123456

#error

server.error.include-stacktrace=always

#log

logging.level.org.springframework.web=trace

logging.level.org.springframework.security=debug
5,ssoclient1的application.properties
security.oauth2.client.client-id=client1

security.oauth2.client.client-secret=client1secrect

#需要认证时候跳转的地址

security.oauth2.client.user-authorization-uri=http://127.0.0.1:8080/server/oauth/authorize

#请求令牌地址

security.oauth2.client.access-token-uri=http://127.0.0.1:8080/server/oauth/token

#解析

security.oauth2.resource.jwt.key-uri=http://127.0.0.1:8080/server/oauth/token_key

#security.oauth2.resource.jwt.key-value=imooc

#sso

server.port=8081

server.servlet.context-path=/client1
6,ssoclient2的application.properties
security.oauth2.client.client-id=client2

security.oauth2.client.client-secret=client2secrect

#需要认证时候跳转的地址

security.oauth2.client.user-authorization-uri=http://127.0.0.1:8080/server/oauth/authorize

#请求令牌地址

security.oauth2.client.access-token-uri=http://127.0.0.1:8080/server/oauth/token

#解析

security.oauth2.resource.jwt.key-uri=http://127.0.0.1:8080/server/oauth/token_key

#sso

server.port=8082

server.servlet.context-path=/client2
四,java代码说明:
1,ssoserver的WebSecurityConfig.java
@Configuration

public class WebSecurityConfig extends WebSecurityConfigurerAdapter {

    @Resource

    private SsoUserDetailsService ssoUserDetailsService;

    @Bean

    public PasswordEncoder passwordEncoder()    {

        return new BCryptPasswordEncoder();

    }

    @Override

    protected void configure(AuthenticationManagerBuilder auth) throws Exception {

        auth.userDetailsService(ssoUserDetailsService).passwordEncoder(passwordEncoder());

    }

    @Override

    protected void configure(HttpSecurity http) throws Exception {

        http.formLogin().and().authorizeRequests().anyRequest().authenticated();

    }

}
2,ssoserver的SsoUserDetailsService.java:
@Component

public class SsoUserDetailsService implements UserDetailsService {

    @Autowired

    private PasswordEncoder passwordEncoder;

    //本来应该从数据库加载数据,此处供仅演示

    @Override

    public UserDetails loadUserByUsername(String username) throws UsernameNotFoundException {

        System.out.println("----------------------loadUserByUsername");

        if (username.equals("laoliu") == false) {

           throw new UsernameNotFoundException("用户名不存在");

        }

        return new User(username, passwordEncoder.encode("123456"),

                AuthorityUtils.commaSeparatedStringToAuthorityList("ROLE_USER"));

    }

}
3,ssoserver的SsoAuthorizationServerConfig.java:
@Configuration

@EnableAuthorizationServer

public class SsoAuthorizationServerConfig extends AuthorizationServerConfigurerAdapter {

    //配置供访问的客户端的账户

    @Override

    public void configure(ClientDetailsServiceConfigurer clients) throws Exception {

        clients.inMemory()

                // 注册一个客户端,设置名称

                .withClient("client1")

                // 设置客户端阴匙

                .secret(new BCryptPasswordEncoder().encode("client1secrect"))

                // 对应客户端登录请求URI

                .redirectUris("http://127.0.0.1:8081/client1/login")

                // 授权方式

                .authorizedGrantTypes("authorization_code", "password", "refresh_token")

                // 授权范围

                .scopes("all")

                // 是否自动同意,如果采用非自动同意,则需要用户手动授权

                .autoApprove(true)

                .and().

                withClient("client2")

                .redirectUris("http://127.0.0.1:8082/client2/login")

                .secret(new BCryptPasswordEncoder().encode("client2secrect"))

                .authorizedGrantTypes("authorization_code", "password", "refresh_token")

                .scopes("all")

                .autoApprove(true);

    }

    @Override

    public void configure(AuthorizationServerEndpointsConfigurer endpoints) throws Exception {

        endpoints.tokenStore(jwtTokenStore()).accessTokenConverter(jwtAccessTokenConverter());

    }

    @Override

    public void configure(AuthorizationServerSecurityConfigurer security) throws Exception {

        security.tokenKeyAccess("isAuthenticated()");

    }

    @Bean

    public TokenStore jwtTokenStore() {

        return new JwtTokenStore(jwtAccessTokenConverter());

    }

    @Bean

    public JwtAccessTokenConverter jwtAccessTokenConverter(){

        JwtAccessTokenConverter converter = new JwtAccessTokenConverter();

        //指定signkey

        converter.setSigningKey("liuhongdi");

        return converter;

    }

}
4,ssoclient1的HomeController.java
@Controller

@RequestMapping("/home")

public class HomeController {

    //查看登录后的用户信息

    @RequestMapping("/session")

    @ResponseBody

    public String getsession(){

        //session

        String userone = SessionUtil.getCurrentUserName();

        System.out.println("user:"+userone);

        if (userone == null) {

            return "not login";

        } else {

            return userone;

        }

    }

}
5,ssoclient1的SessionUtil.java
public class SessionUtil {

    //得到security所保存的用户

    public static String getCurrentUserName(){

        Authentication authentication = SecurityContextHolder.getContext().getAuthentication();

        if (authentication.isAuthenticated() && !(authentication instanceof AnonymousAuthenticationToken)) {

            Object principal = authentication.getPrincipal();

            //System.out.println(principal);

            if (principal instanceof String) {

                return (String)principal;

            } else if (principal instanceof UserDetails) {

                String currentuser = ((UserDetails) principal).getUsername();

                return currentuser;

            } else {

                //System.out.println("not instanceof UserDetails");

            }

            return null;

        }

        return null;

    }

}
6,其他非关键代码可访问github查看
五,测试效果
1,按以下顺序启动三个模块:
ssoserver
ssoclient1
ssoclient2
2,先访问client1,
http://127.0.0.1:8081/client1/home/session
会跳转到:
http://127.0.0.1:8080/server/login
如图:

我们输入用户名 laoliu,密码 123456
这个是写死在代码中的演示账号
登录后会跳转到:

这个url会打印当前登录用户的用户名
我们新打开一个标签页:
http://127.0.0.1:8082/client2/home/session
我们之前并未从client2登录,查看效果:

可以看到也已经登录
3,通过html页面跳转访问:
http://127.0.0.1:8081/client1/index.html
返回:
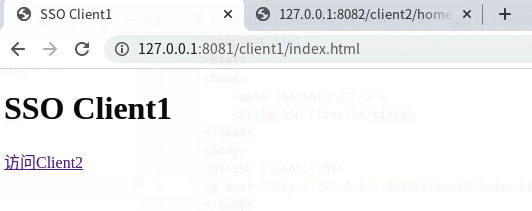
点击 访问client2 的链接
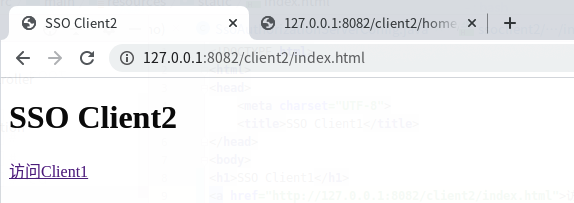
可正常访问
六,查看spring boot版本
  .   ____          _            __ _ _

 /\\ / ___'_ __ _ _(_)_ __  __ _ \ \ \ \

( ( )\___ | '_ | '_| | '_ \/ _` | \ \ \ \

 \\/  ___)| |_)| | | | | || (_| |  ) ) ) )

  '  |____| .__|_| |_|_| |_\__, | / / / /

 =========|_|==============|___/=/_/_/_/

 :: Spring Boot ::        (v2.3.3.RELEASE)
spring boot:spring security+oauth2+sso+jwt实现单点登录(spring boot 2.3.3)的更多相关文章
- 使用Spring Security OAuth2进行简单的单点登录
1.概述 在本教程中,我们将讨论如何使用Spring Security OAuth和Spring Boot实现SSO - 单点登录. 我们将使用三个单独的应用程序: 授权服务器 - 这是中央身份验证机 ...
- Spring Security OAuth2 SSO
通常公司肯定不止一个系统,每个系统都需要进行认证和权限控制,不可能每个每个系统都自己去写,这个时候需要把登录单独提出来 登录和授权是统一的 业务系统该怎么写还怎么写 最近学习了一下Spring Sec ...
- Spring Security OAuth2 SSO 单点登录
基于 Spring Security OAuth2 SSO 单点登录系统 SSO简介 单点登录(英语:Single sign-on,缩写为 SSO),又译为单一签入,一种对于许多相互关连,但是又是各自 ...
- 基于spring boot2.0+spring security +oauth2.0+ jwt微服务架构
github地址:https://github.com/hankuikuide/microservice-spring-security-oauth2 项目介绍 该项目是一个演示项目,主要演示了,基于 ...
- 【SpringSecurityOAuth2】源码分析@EnableOAuth2Sso在Spring Security OAuth2 SSO单点登录场景下的作用
目录 一.从Spring Security OAuth2官方文档了解@EnableOAuth2Sso作用 二.源码分析@EnableOAuth2Sso作用 @EnableOAuth2Client OA ...
- Spring Security构建Rest服务-1300-Spring Security OAuth开发APP认证框架之JWT实现单点登录
基于JWT实现SSO 在淘宝( https://www.taobao.com )上点击登录,已经跳到了 https://login.taobao.com,这是又一个服务器.只要在淘宝登录了,就能直接访 ...
- springBoot整合spring security+JWT实现单点登录与权限管理--筑基中期
写在前面 在前一篇文章当中,我们介绍了springBoot整合spring security单体应用版,在这篇文章当中,我将介绍springBoot整合spring secury+JWT实现单点登录与 ...
- SSO之CAS单点登录详细搭建教程
本教程是我个人编写,花费几个小时的时间,给需要学习的人员学习使用,希望能帮助到你们. [环境说明]:本文演示过程在同一个机器上的(也可以在三台实体机器或者三个的虚拟机上),环境如下: windows7 ...
- Spring Cloud:Security OAuth2 自定义异常响应
对于客户端开发或者网站开发而言,调用接口返回有统一的响应体,可以针对性的设计界面,代码结构更加清晰,层次也更加分明. 默认异常响应 在使用 Spring Security Oauth2 登录和鉴权失败 ...
随机推荐
- 开始使用 TypeScript 和 React
原文地址:Getting started with TypeScript and React 原文作者:Jack_Franklin 译者:luxj 校对者:veizz Tom Dale 和其他人有一些 ...
- Dos拒绝服务Sockstress/TearDrop 泪滴攻击(二)
Sockstress放大攻击原理:攻击者向目标发送一个很小的流量,但是会造成产生的攻击流量是一个巨大的.成百上千倍上万倍流量被放大的一个效果,才适合作为一个拒绝服务攻击效果.(实现攻击者很小的流量打垮 ...
- Docker Swarm 集群管理利器核心概念扫盲
Swarm 简介 Docker Swarm 是 Docker 官方推出的容器集群管理工具,基于 Go 语言实现.代码开源在:https://github.com/docker/swarm 使用它可以将 ...
- SSM获取SqlSessionFactory
1.实现类获取session //根据id 修改阈值 public int altThers(threshold threshold) { SqlSessionFactoryBuilder build ...
- 知识全聚集 .Net Core 技术突破 | 如何实现一个模块化方案一
简介 模块化的介绍一共2篇 这一篇我们实现一个功能非常简单的StartupModules模块化. 第二篇我们来实现一个ABP的模块化效果. 思考 其实来简单想一下模块化的实验思路,写个接口=>模 ...
- mariadb 2
mariadb第二章-增删改 MariaDB 数据类型 MariaDB数据类型可以分为数字,日期和时间以及字符串值. 使用数据类型的原则:够用就行, 尽量使用范围小的,而不用大的 常用的数据类型 ...
- JS节流与防抖
节流 节流,走字面上理解就是节约流量.比作水就话就是让水流的少一点,节约一点.对应到JS当中,就是在scroll事件和mousemove事件的时候,浏览器会很频繁的被触发,会导致对应的事件也会被很频繁 ...
- if else与switch for与foreach
if...else...适用于变量判断 switch适用于常量判断(switch只判断一次,if else 判断多次) foreach只适用于集合和数组查询(foreach不支持增加删除操作) for ...
- Neo4j---性能优化
不会项目管理的研发不是好loder(^_^ ^_^),开个玩笑,目的是想说项目管理很重要,研发同胞们需要重视.重视.重视(重要的事情说三遍).随着项目业务扩展,不再是停留在基本某一业务范围,海量数据接 ...
- Centos-搜索文件或目录-find
find 在指定的目录下查找指定的文件 相关选项 -type 指定文件类型 -name 指定文件名字,支持通配符 -gid 指定用户组ID -uid 指定用户ID -empty 查找长度为 ...